nginx反向代理;Keepalvied 高可用技术实践笔记·
*在upstream中加入hash语句,nginx语句中不能写入weight等其他的参数,**hash_method使用的是。**该调度算法可以解决动态网页的 session 共享问题,但有时会导致请求分配不均,**即无法保证1:1的负载。Nginx本身是不支持url_hash的,如果需要使用这种调度算法,必须安装Nginx的hash模块软件包。反向代理(reverse proxy),指的是代理外
反向代理
反向代理介绍
正向代理:替客户端办事,隐藏客户端
反向代理:替服务器办事,隐藏服务器
生活案例:代买奶茶
你:客户端
奶茶店:服务器
室友:正向代理
你懒得下楼 / 小区不让出去,让室友帮你去买奶茶。
奶茶店只知道是你室友来买的,不知道背后真正买的人是你。
�� 这就是正向代理:代理代表客户端。
生活案例:餐厅前台点餐
你:客户端
前台小姐姐:反向代理
后厨厨师们:真实服务器
你进店只跟前台点餐,不用管是哪个厨师做的。
前台把单子传给后厨,做好了再端给你。
你全程只面对前台,不知道、也不用关心背后是哪个厨师在干活。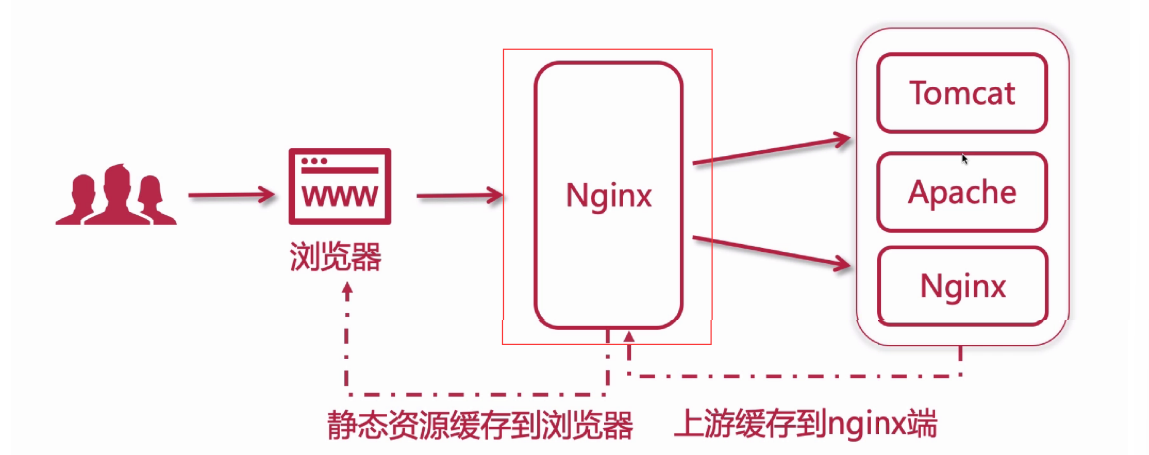
反向代理(reverse proxy),指的是代理外网用户的请求到内部的指定的服务器,并将数据返回给用
户。客户端不直接与后端服务器进行通信,而是与反向代理服务器进行通信,隐藏了后端服务器的 IP 地
址。
反向代理的主要作用是提供负载均衡和高可用性:
负载均衡:Nginx可以将传入的请求分发给多个后端服务器,以平衡服务器的负载,提高系统性能
和可靠性。
缓存功能:Nginx可以缓存静态文件或动态页面,减轻服务器的负载,提高响应速度。
动静分离:将动态生成的内容(如 PHP、Python、Node.js 等)和静态资源(如 HTML、CSS、
JavaScript、图片、视频等)分别存放在不同的服务器或路径上。
多站点代理:Nginx可以代理多个域名或虚拟主机,将不同的请求转发到不同的后端服务器上,实
现多个站点的共享端口。
Location 配置
Location 配置语法
Nginx 使用 location 匹配规则 + proxy_pass 反向代理指令实现反向代理功能,匹配本质是 “URL 路
径匹配 → 命中对应规则 → 转发至指定后端地址”。
location 定义匹配路径
proxy_pass 指定后端服务地址
http {
   # 后端服务可配置 upstream 集群(推荐,支持负载均衡)
   upstream backend_nginx {
       nginx 192.168.1.100:8080;  # 后端服务1
       nginx 192.168.1.101:8080;  # 后端服务2(多节点自动轮询负载均衡)
  }
   server {
       listen 80;  # Nginx 监听端口
       server_name localhost;  # 访问域名/IP
       # 1. 匹配所有请求(兜底规则)
       location / {
           proxy_pass http://backend_nginx;  # 转发至 upstream 集群
           # 必加的反向代理核心参数(传递客户端真实信息、适配后端服务)
           proxy_set_header Host $host;                # 传递客户端访问的域名
           proxy_set_header X-Real-IP $remote_addr;    # 传递客户端真实IP
           proxy_set_header X-Forwarded-For $proxy_add_x_forwarded_for; #传递IP链
路
           proxy_set_header X-Forwarded-Proto $scheme; # 传递请求协议(http/https)
      }
       # 2. 匹配特定路径(如 /api 开头的请求,单独转发)
       location /api/ {
           proxy_pass http://192.168.1.102:9090/;  # 后端地址末尾带 /,会剔除匹配的
/api/
           proxy_set_header Host $host;
           proxy_set_header X-Real-IP $remote_addr;
      }
  }
}
Location 匹配规则
- 后端匹配逻辑:URL 路径 → 按 location 优先级命中规则 → 由规则内的 proxy_pass 转发至对应
后端; - 优先级:精确匹配(=)> 前缀匹配(^~)> 正则匹配(/*)> 普通前缀 > 兜底(/);
- URL 重构关键: proxy_pass 末尾是否带 /,决定是否剔除 location 匹配的路径前缀。
- 精确匹配(=)
语法: location = /path { … }
逻辑:仅当请求 URL 与 /path 完全一致时命中,优先级最高。
示例:
# 仅匹配 http://localhost/login,不匹配 /login?a=1、/login/
location = /login {
    proxy_pass http://backend_login:8080;
}
前缀匹配(^~)
语法: location ^~ /path { … }
逻辑:URL 以 /path 开头即命中,优先级仅次于精确匹配,会跳过正则匹配。
用途:优先匹配静态资源(如 /static、/img)或特定业务路径,避免被正则规则拦截。
示例:
# 匹配所有 /static 开头的请求(如 /static/css/main.css、/static/img/1.jpg)
location ^~ /static/ {
    proxy_pass http://backend_static:80;
}
正则匹配(~ / ~)
语法:
区分大小写: location ~ /regex { … } (如 /API 不匹配 /api 规则)
不区分大小写: location ~ /regex { … } (如 /API、/api 均匹配)
逻辑:URL 符合正则表达式即命中,优先级低于前缀匹配(^~),多个正则规则按定义顺序匹配,
先命中先生效。
示例:
# 匹配所有 .jpg、.png、.gif 结尾的图片请求(不区分大小写)
location ~* \.(jpg|png|gif)$ {
    proxy_pass http://backend_img:80;
}
普通前缀匹配(无符号)
语法: location /path { … }
逻辑:URL 以 /path 开头即命中,优先级低于正则匹配,多个普通前缀规则按 “路径最长” 优先命
中。
示例:
# 规则1:匹配 /api/xxx(路径长度3)
location /api/ {
    proxy_pass http://backend_api:9090;
}
# 规则2:匹配 /api/user/xxx(路径长度7,比规则1长,优先命中)
location /api/user/ {
    proxy_pass http://backend_user:9090;
}
通用匹配(/)
语法: location / { … }
逻辑:所有未被上述规则命中的请求,都会匹配此规则(兜底),优先级最低。
用途:通常作为全局反向代理,转发所有默认请求到主后端服务。
proxy_pass 后端地址细节
proxy_pass 末尾是否带 / ,会直接改变转发到后端的 URL 路径,这是后端匹配后 “URL 重构” 的核
心,分 2 种场景:
场景 1:proxy_pass 末尾带 /
逻辑:转发时,会剔除 location 匹配的路径前缀,将剩余路径拼接在后端地址后。
示例:
# location 匹配 /api/,proxy_pass 末尾带 /
location /api/ {
    proxy_pass http://192.168.1.102:9090/;
}
# 实际转发逻辑:
# 客户端请求 http://localhost/api/user/list → 后端接收
http://192.168.1.102:9090/user/list
场景 2:proxy_pass 末尾不带 /
逻辑:转发时,会保留 location 匹配的路径前缀,直接拼接在后端地址后。
示例
# location 匹配 /api/,proxy_pass 末尾不带 /
location /api/ {
    proxy_pass http://192.168.1.102:9090;
}
# 实际转发逻辑:
# 客户端请求 http://localhost/api/user/list → 后端接收
http://192.168.1.102:9090/api/user/list
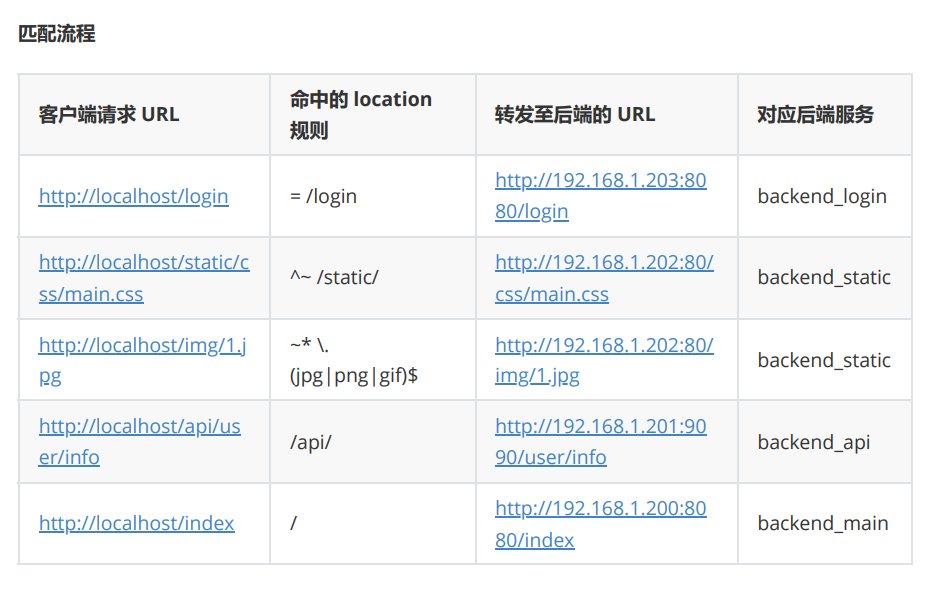
综合示例
配置文件
http {
    upstream backend_main { nginx 192.168.1.200:8080; }
    upstream backend_api { nginx 192.168.1.201:9090; }
    upstream backend_static { nginx 192.168.1.202:80; }
    upstream backend_login { nginx 192.168.1.203:8080; }
    server {
        listen 80;
        server_name localhost;
        # 1. 精确匹配:仅 /login → 后端 login 服务
        location = /login {
            proxy_pass http://backend_login;
            proxy_set_header Host $host;
       }
        # 2. 前缀匹配:/static/ 开头 → 后端静态服务(跳过正则)
        location ^~ /static/ {
            proxy_pass http://backend_static/;
            proxy_set_header Host $host;
       }
        # 3. 正则匹配:图片后缀 → 后端静态服务
        location ~* \.(jpg|png|gif)$ {
            proxy_pass http://backend_static;
            proxy_set_header Host $host;
       }
        # 4. 普通前缀:/api/ 开头 → 后端 api 服务
        location /api/ {
            proxy_pass http://backend_api/;
            proxy_set_header Host $host;
            proxy_set_header X-Real-IP $remote_addr;
       }
        # 5. 兜底匹配:所有未命中的请求 → 主后端服务
        location / {
            proxy_pass http://backend_main;
            proxy_set_header Host $host;
            proxy_set_header X-Real-IP $remote_addr;
       }
   }
}
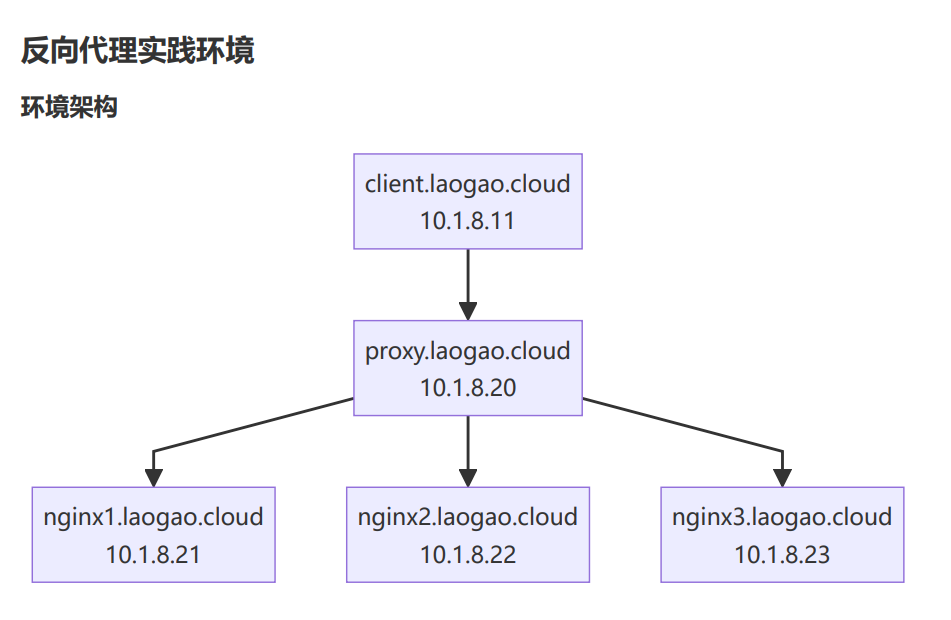
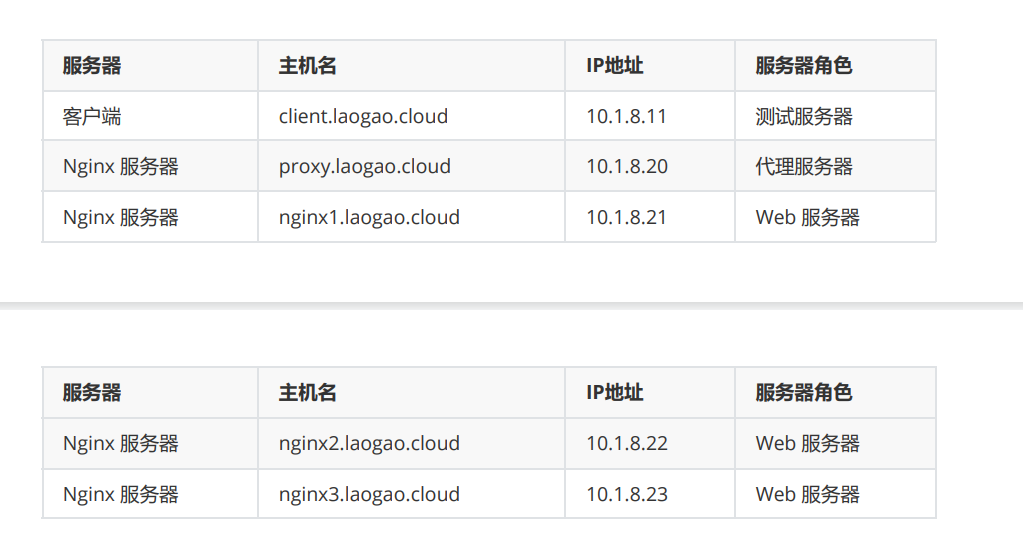
/etc/hosts
# 所有节点
[root@client,proxy,nginx1,nginx2,nginx3 ~]# vim /etc/hosts
127.0.0.1   localhost localhost.localdomain localhost4 localhost4.localdomain4
::1         localhost localhost.localdomain localhost6 localhost6.localdomain6
############ proxy ##################
10.1.8.11 client.laogao.cloud client
10.1.8.20 www.laogao.cloud www
10.1.8.20 proxy.laogao.cloud proxy
10.1.8.21 nginx1.laogao.cloud nginx1
10.1.8.22 nginx2.laogao.cloud nginx2
10.1.8.23 nginx3.laogao.cloud nginx3
后端 nginx 服务器配置
# 除了客户端,所有节点安装nginx并启动nginx服务。
[root@proxy,nginx1,nginx2,nginx3 ~]# yum -y install nginx
# 启动并启用服务
[root@proxy,nginx1,nginx2,nginx3 ~]# systemctl enable nginx --now
# 防火墙设置
[root@proxy,nginx1,nginx2,nginx3 ~]# firewall-cmd --add-service=http --permanent
[root@proxy,nginx1,nginx2,nginx3 ~]# firewall-cmd --add-service=http
# 准备主页-其他节点
[root@nginx1 ~]# echo Welcome to $(hostname) > /usr/share/nginx/html/index.html
[root@nginx2 ~]# echo Welcome to $(hostname) > /usr/share/nginx/html/index.html
[root@nginx3 ~]# echo Welcome to $(hostname) > /usr/share/nginx/html/index.html
# 客户端测试
[root@client ~]# curl http://nginx1.laogao.cloud/
Welcome to nginx1.laogao.cloud
[root@client ~]# curl http://nginx2.laogao.cloud/
Welcome to nginx2.laogao.cloud
[root@client ~]# curl http://nginx3.laogao.cloud/
Welcome to nginx3.laogao.cloud
前端 proxy 服务器配置
# 准备主页-代理节点
[root@proxy ~]# echo Welcome to www.laogao.cloud >
/usr/share/nginx/html/index.html
[root@proxy ~]# mkdir /var/nginx
[root@proxy ~]# echo "Hello, Nginx" > /var/nginx/index.html
[root@proxy ~]# echo "Hello, laogao" > /var/nginx/test.txt
[root@proxy ~]# cp /usr/share/nginx/html/nginx-logo.png /var/nginx/
[root@proxy ~]# ls /var/nginx/
index.html nginx-logo.png test.txt
[root@proxy ~]# vim /etc/nginx/conf.d/proxy.conf
server {
 listen 80;
 server_name www.laogao.cloud;
    # 匹配根位置
    location / {
      root /var/nginx;
      index index.html;
   }
}
# 重新加载nginx配置
[root@proxy ~]# nginx -s reload
测试
[root@client ~]# curl http://www.laogao.cloud/
Hello, Nginx
[root@client ~]# curl http://www.laogao.cloud/test.txt
Hello, laogao
访问 www.laogao.cloud/nginx-logo.png,系统会返回以下页面
思考:如果在Nginx目录中创建一个test.nn的文件,通过www.laogao.cloud/test.nn访问该文件时,系
统是否会返回对应文件内容?为什么?
答:不可以,因为“nn”类型的文件不在mime.type中,因此nginx无法对该文件进行解析,此时将下载文
件到本地。
反向代理基础实践-代理本地
环境准备
[root@proxy ~]# mkdir /var/nginx/nginx{1,2}
[root@proxy ~]# echo "Hello, I'm here /var/nginx/nginx1" >
/var/nginx/nginx1/index.html
[root@proxy ~]# echo "Hello, I'm here /var/nginx/nginx2" >
/var/nginx/nginx2/index.html
[root@proxy ~]# mkdir /var/nginx{1,2}
[root@proxy ~]# echo "Hello, Nginx1" > /var/nginx1/index.html
[root@proxy ~]# echo "Hello, Nginx2" > /var/nginx2/index.html
[root@proxy ~]# tree /var/nginx*
/var/nginx
├── index.html
├── nginx1
│   └── index.html
├── nginx2
│   └── index.html
├── nginx-logo.png
└── test.txt
/var/nginx1
└── index.html
/var/nginx2
└── index.html
2 directories, 7 files


[root@proxy ~]# \
for path1 in www{1..2}
do
  for path2 in nginx{1..2}
  do
    mkdir -p /var/$path1/$path2
 echo "Hello, I'm here /var/$path1/$path2" > /var/$path1/$path2/index.html
  done
done


[root@proxy ~]# tree /var/www*
/var/www1
├── nginx1
│   └── index.html
└── nginx2
   └── index.html
/var/www2
├── nginx1
│   └── index.html
└── nginx2
   └── index.html
4 directories, 4 files
基本测试
[root@client ~]# curl http://www.laogao.cloud/
Hello, Nginx
# 显示结果是目录/var/nginx/nginx1中内容
[root@client ~]# curl http://www.laogao.cloud/nginx1/
Hello, I'm here /var/nginx/nginx1
# 显示结果是目录/var/nginx/nginx2中内容
[root@client ~]# curl http://www.laogao.cloud/nginx2/
Hello, I'm here /var/nginx/nginx2
实践1:无符号匹配
[root@proxy ~]# vim /etc/nginx/conf.d/proxy.conf
server {
 listen 80;
 server_name www.laogao.cloud;
    # 匹配根位置
    location / {
        root /var/nginx;
        index index.html;
   }
    # 匹配/nginx1时,/var目录下找nginx1,完整路径是/var/nginx1
    location /nginx1 {
        root /var;
        # 等效于下面的 alias 语句,必须使用绝对路径
        # alias /var/nginx1;
        index index.html;
   }
}
# 重新加载nginx配置
[root@proxy ~]# nginx -s reload
访问测试
# nginx1 后面必须添加 / 符号
[root@client ~]# curl http://www.laogao.cloud/nginx1/
Hello, Nginx1
# 显示结果是目录/var/nginx1中内容
# nginx2 后面必须添加 / 符号
[root@client ~]# curl http://www.laogao.cloud/nginx2/
Hello, I'm here /var/nginx/nginx2
# 显示结果是目录/var/nginx/nginx2中内容
实验结果:无符号匹配优先级高于默认的/
实践2:正则表达式匹配
[root@proxy ~]# vim /etc/nginx/conf.d/proxy.conf
server {
 listen 80;
 server_name www.laogao.cloud;
    # 匹配根位置
    location / {
        root /var/nginx;
        index index.html;
   }
    # 匹配/nginx1时,/var目录下找nginx1,完整路径是/var/nginx1
    location /nginx1 {
        root /var;
        # 等效于下面的 alias 语句,必须使用绝对路径
        # alias /var/nginx1;
        index index.html;
   }
    # 正则表达式匹配 /nginx.*
    location ~ /nginx.* {
        root /var/www1;
        index index.html;访问测试
实验结果:正则表达式匹配优先级高于无符号。

实践3:精确匹配
   }
}
# 重新加载nginx配置
[root@proxy ~]# nginx -s reload
访问测试
# nginx1 后面必须添加 / 符号
[root@client ~]# curl http://www.laogao.cloud/nginx1/
Hello, I'm here /var/www1/nginx1
# 显示结果是目录/var/www1/nginx1中内容
# nginx2 后面必须添加 / 符号
[root@client ~]# curl http://www.laogao.cloud/nginx2/
Hello, I'm here /var/www1/nginx2
# 显示结果是目录/var/www1/nginx2中内容
实验结果:正则表达式匹配优先级高于无符号。
实践3:精确匹配
root@proxy ~]# vim /etc/nginx/conf.d/proxy.conf
server {
 listen 80;
 server_name www.laogao.cloud;
    # 匹配根位置
    location / {
        root /var/nginx;
        index index.html;
   }
    # 匹配/nginx1时,/var目录下找nginx1,完整路径是/var/nginx1
    location /nginx1 {
        root /var;
        # 等效于下面的 alias 语句,必须使用绝对路径
        # alias /var/nginx1;
        index index.html;
   }
    # 正则表达式匹配 /nginx.*
    location ~ /nginx.* {
        root /var/www1;
        index index.html;
   }
    # 精确匹配
    location = /nginx2/index.html {
        root /var/www2;
        index index.html;
   }
}
# 重新加载nginx配置
[root@proxy ~]# nginx -s reload
访问测试
# nginx1 后面必须添加 / 符号
[root@client ~]# curl http://www.laogao.cloud/nginx1/
Hello, I'm here /var/www1/nginx1
# 显示结果是目录/var/www1/nginx1中内容
# nginx2 后面必须添加 / 符号
[root@client ~]# curl http://www.laogao.cloud/nginx2/
Hello, I'm here /var/www2/nginx2
# 显示结果是目录/var/www2/nginx2中内容
实验结果:精确匹配优先级高于正则表达式。
反向代理基础实践-代理远端
实践1:无符号匹配
[root@proxy ~]# vim /etc/nginx/conf.d/proxy.conf

server {
    listen 80;
    server_name www.laogao.cloud;

    # 匹配根位置
    location / {
        root /var/nginx;
        index index.html;
   }
    # 匹配 /nginx1/ 开头,代理到nginx1.laogao.cloud,/nginx1/不组合到后端服务器
    # 访问 /nginx1/ 开头,相当于直接访问http://nginx1.laogao.cloud/
    location /nginx1/ {
        # 后端服务
        proxy_pass http://nginx1.laogao.cloud/; # 注意:代理后端后面有 /。
        index index.html;
   }
}
# 重新加载nginx配置
[root@proxy ~]# nginx -s reload
访问测试
# nginx1 后面必须添加 / 符号
[root@client ~]# curl http://www.laogao.cloud/nginx1/
Welcome to nginx1.laogao.cloud
# 显示结果是服务器 nginx1.laogao.cloud 内容
# nginx2 后面必须添加 / 符号
[root@client ~]# curl http://www.laogao.cloud/nginx2/
Hello, I'm here /var/nginx/nginx2
# 显示结果是目录/var/nginx/nginx2中内容
实验结果:无符号匹配优先级高于默认的/.
实践2:正则表达式匹配
[root@proxy ~]# vim /etc/nginx/conf.d/proxy.conf

server {
    listen 80;
    server_name www.laogao.cloud;

    # 匹配根位置
    location / {
        root /var/nginx;
        index index.html;
   }
    # 匹配 /nginx1/ 开头,代理到nginx1.laogao.cloud,/nginx1/不组合到后端服务器
    # 访问 /nginx1/ 开头,相当于直接访问http://nginx1.laogao.cloud/
    location /nginx1/ {
        # 后端服务
        proxy_pass http://nginx1.laogao.cloud/; # 注意:代理后端后面有 /。
        index index.html;
   }

    # 正则表达式匹配 /nginx.*
    location ~ /nginx[12].* {
        # 手动重写路径:去掉 /nginx 前缀,转发到目标服务器
        # ^/nginx[12](.*)$ 匹配 /nginx[12] 开头的完整路径,$1表示 /nginx[12] 后的所有内
容
        # break 表示重写后不再匹配其他 rewrite 规则
        rewrite ^/nginx[12](.*)$ $1 break;

        # proxy_pass 不带 URI(无末尾的 /),配合 rewrite 实现路径替换
        proxy_pass http://nginx2.laogao.cloud;
        index index.html;
   }
}
# 重新加载nginx配置
[root@proxy ~]# nginx -s reload
访问测试
# nginx 后面必须添加 / 符号
[root@client ~]# curl http://www.laogao.cloud/nginx1/
Welcome to nginx2.laogao.cloud
# 显示结果是服务器 nginx2.laogao.cloud 内容
# nginx 后面必须添加 / 符号
[root@client ~]# curl http://www.laogao.cloud/nginx2/
Welcome to nginx2.laogao.cloud
# 显示结果是服务器 nginx2.laogao.cloud 内容
实验结果:正则表达式匹配优先级高于无符号。
实践3:精确匹配
[root@proxy ~]# vim /etc/nginx/conf.d/proxy.conf
server {
    listen 80;
    server_name www.laogao.cloud;

    # 匹配根位置
    location / {
        root /var/nginx;
        index index.html;
   }
    # 匹配 /nginx1/ 开头,代理到nginx1.laogao.cloud,/nginx1/不组合到后端服务器
    # 访问 /nginx1/ 开头,相当于直接访问http://nginx1.laogao.cloud/
    location /nginx1/ {
        # 后端服务
        proxy_pass http://nginx1.laogao.cloud/; # 注意:代理后端后面有 /。
        index index.html;
   }

    # 正则表达式匹配 /nginx.*
    location ~ /nginx[12].* {
        # 手动重写路径:去掉 /nginx 前缀,转发到目标服务器
        # ^/nginx[12](.*)$ 匹配 /nginx[12] 开头的完整路径,$1表示 /nginx[12] 后的所有内
容
        # break 表示重写后不再匹配其他 rewrite 规则
        rewrite ^/nginx[12](.*)$ $1 break;

        # proxy_pass 不带 URI(无末尾的 /),配合 rewrite 实现路径替换
        proxy_pass http://nginx2.laogao.cloud;
        index index.html;
   }
    # 精确匹配
    location = /nginx1/ {
        proxy_pass http://nginx1.laogao.cloud/;  访问测试
实验结果:精确匹配优先级高于正则表达式。

负载均衡-七层
Nginx 反向代理支持七层 http/https 代理和四层 TCP/UDP 代理。
通过Nginx反向代理实现Nginx服务器负载均衡。
代理服务器配置
测试
        index index.html;
   }
}

# 重新加载nginx配置
[root@proxy ~]# nginx -s reload
访问测试
# nginx1 后面必须添加 / 符号
[root@client ~]# curl http://www.laogao.cloud/nginx1/
Welcome to nginx1.laogao.cloud
# 显示结果是服务器 nginx1.laogao.cloud 内容
# nginx2 后面必须添加 / 符号
[root@client ~]# curl http://www.laogao.cloud/nginx2/
Welcome to nginx2.laogao.cloud
# 显示结果是服务器 nginx2.laogao.cloud 内容
实验结果:精确匹配优先级高于正则表达式。
负载均衡-七层
Nginx 反向代理支持七层 http/https 代理和四层 TCP/UDP 代理。
通过Nginx反向代理实现Nginx服务器负载均衡。
代理服务器配置
# 配置nginx
[root@proxy ~]# vim /etc/nginx/conf.d/proxy.conf
server {
   listen  80;
   server_name www.laogao.cloud;
   location / {
       proxy_pass http://backends/;
   }
}
upstream backends {
   server nginx1.laogao.cloud:80;
   server nginx2.laogao.cloud:80;
   server nginx3.laogao.cloud:80;
}
# 重新加载服务配置
[root@proxy ~]# nginx -s reload
测试
[root@client ~]# for n in {1..90}; do curl http://www.laogao.cloud -s; done |
sort |uniq -c
     30 Welcome to nginx1.laogao.cloud
     30 Welcome to nginx2.laogao.cloud
     30 Welcome to nginx3.laogao.cloud
负载均衡-upstream
Nginx 的 upstream 模块声明一组可以被 proxy_pass 和 fastcgi_pass 引用的服务器。这些服务器既可以
使用不同的端口,也可以使用Unix Socket。这些服务器可被赋予了不同的权重、不同的类型甚至可以基
于维护等原因被标记为 down。
upstream 语法:
upstream name {
   ....
}
例如:
upstream backend {
    server backend1.example.com weight=5 down backup;
    server 127.0.0.1:8080 max_fails=3 fail_timeout=30s;
    server unix:/tmp/backend2;
}
upstream 模块常用的指令有:
keepalive,每个 worker 进程为发送到 upstream 服务器的连接所缓存的个数。
nginx,定义一个upstream服务器的地址,还可包括一系列可选参数。
weight:权重,默认值为1;
max_fails:最大失败连接次数,失败连接的超时时长由fail_timeout指定;
fail_timeout:等待请求的目标服务器发送响应的时长;
backup:用于 fallback 的目的,所有服务均故障时才启动此服务器;
down:手动标记其不再处理任何请求;
示例:
upstream backends {
    keepalive 32;
    nginx nginx1.laogao.cloud:80 max_fails=3 fail_timeout=30s;
    nginx nginx2.laogao.cloud:80 max_fails=3 fail_timeout=30s weight=2;
    nginx nginx3.laogao.cloud:80 max_fails=3 fail_timeout=30s backup;
    nginx nginx4.laogao.cloud:80 max_fails=3 fail_timeout=30s down;
}
upstream 模块调度算法一般分为两类:
静态调度算法,
即负载均衡器根据自身设定的规则进行分配,不需要考虑后端节点服务器的情况。
例如:rr、ip_hash 等都属于静态调度算法。
动态调度算法,即负载均衡器会根据后端节点的当前状态来决定是否分发请求, 例如:连接数少
(least_conn)的服务器优先获得请求,响应时间短(least_time)的服务器优先获得请求。
轮询(round-robin)
nginx 默认的调度算法,按客户端请求顺序把客户端的请求逐一分配到不同的后端节点服务器。如果后
端节点服务器宕机(默认情况下Nginx只检测80端口),宕机的服务器会被自动从节点服务器池中剔除,
以使客户端的用户访问不受影响。新的请求会分配给正常的服务器。
示例:
[root@proxy ~]# vim /etc/nginx/conf.d/proxy.conf
upstream backends {
    server nginx1.laogao.cloud:80;
    server nginx2.laogao.cloud:80;
    server nginx3.laogao.cloud:80;
}
测试结果
[root@client ~]# for n in {1..600}; do curl http://www.laogao.cloud -s; done |
sort |uniq -c
    100 Welcome to nginx1.laogao.cloud
    200 Welcome to nginx2.laogao.cloud
    300 Welcome to nginx3.laogao.cloud
IP哈希(ip_hash)
**每个请求按客户端IP的 hash 结果分配。**当新的请求到达时,先将其客户端IP通过哈希算法哈希出一个
值,在随后的客户端请求中,客户IP的哈希值只要相同,就会被分配至同一台服务器。
**该调度算法可以解决动态网页的 session 共享问题,但有时会导致请求分配不均,**即无法保证1:1的负载
均衡,因为在国内大多数公司都是NAT上网模式,多个客户端会对应一个外部IP,所以这些客户端都会被
分配到同一节点服务器,从而导致请求分配不均。
LVS负载均衡的-p参数、Keepalived配置里的per-sistence_timeout 50参数都类似这个Nginx里的
ip_hash参数,其功能都可以解决动态网页的session共享问题。
示例:
[root@proxy ~]# vim /etc/nginx/conf.d/proxy.conf
upstream backends {
    ip_hash;
    server nginx1.laogao.cloud:80;
    server nginx2.laogao.cloud:80;
    server nginx3.laogao.cloud:80;
}
[root@proxy ~]# nginx -s reload
测试结果
[root@client ~]# for n in {1..100}; do curl http://www.laogao.cloud -s; done |
sort |uniq -c
    100 Welcome to nginx2.laogao.cloud
通用哈希(generic Hash)
请求发送到的服务器由用户定义的键确定,该键可以是文本字符串、变量或组合。例如,密钥可以是配
对的源 IP 地址和端口,或者是 URI。
**在upstream中加入hash语句,nginx语句中不能写入weight等其他的参数,**hash_method使用的是
hash算法。url_hash按访问URL的hash结果来分配请求,使每个URL定向到同一个后端服务器,可以进
一步提高后端缓存服务器的效率命中率。
Nginx本身是不支持url_hash的,如果需要使用这种调度算法,必须安装Nginx的hash模块软件包。
示例:
upstream backends {
    hash $request_uri;
    server nginx1.laogao.cloud:80;
    server nginx2.laogao.cloud:80;
    server nginx3.laogao.cloud:80;
}
[root@proxy ~]# nginx -s reload
测试
[root@client ~]# for n in {1..100}; do curl http://www.laogao.cloud -s; done |
sort |uniq -c
    100 Welcome to nginx3.laogao.cloud
最少连接数(least_conn)
最少连接数,将请求分发给后端节点服务器连接数最少的那个机器。
示例:
[root@proxy ~]# vim /etc/nginx/conf.d/proxy.conf
upstream backends {
   least_conn;
    server nginx1.laogao.cloud:80;
    server nginx2.laogao.cloud:80;
    server nginx3.laogao.cloud:80;
}
[root@proxy ~]# nginx -s reload
测试结果
[root@client ~]# for n in {1..60}; do curl http://www.laogao.cloud -s; done |
sort |uniq -c
     20 Welcome to nginx1.laogao.cloud
     19 Welcome to nginx2.laogao.cloud
     21 Welcome to nginx3.laogao.cloud
最少连接数也支持权重。
最少时间(Least Time)
Least Time (仅限 NGINX Plus),对于每个请求,NGINX Plus 选择具有最低平均延迟和最少活动连接
数的服务器,其中最低平均延迟是根据 least_time 指令中包含的以下参数来计算的:
header – 从服务器接收第一个字节的时间。
last_byte – 从服务器接收完整响应的时间。
last_byte inflight – 从服务器接收完整响应的时间,考虑到不完整的请求。
示例:
[root@proxy ~]# vim /etc/nginx/conf.d/proxy.conf
upstream backends {
    least_time header;
    server nginx1.laogao.cloud:80;
    server nginx2.laogao.cloud:80;
    server nginx3.laogao.cloud:80;
}
[root@proxy ~]# nginx -s reload
高可用-Keepalived 全解析
Keepalived 介绍
Keepalived 是一个用 C 语言编写的路由软件。这个项目的主要目标是为 Linux 系统和基于 Linux 的基础
设施的负载平衡和高可用性提供简单而健壮的设施。
Keepalived 起初是为LVS设计的,专门用来监控集群系统中各个服务节点的状态,它根据TCP/IP参考模
型的第三、第四层、第五层机制检测每个服务节点的状态,如果某个服务器节点出现异常,或者工作出
现故障,Keepalived将检测到,并将出现的故障的服务器节点从集群系统中剔除,这些工作全部是自动
完成的,不需要人工干涉,需要人工完成的只是修复出现故障的服务节点。
后来 Keepalived 又加入了VRRP的功能,VRRP(Vritrual Router Redundancy Protocol,虚拟路由冗余
协议)出现的目的是解决静态路由出现的单点故障问题,通过VRRP可以实现网络不间断稳定运行,因此
Keepalvied 一方面具有服务器状态检测和故障隔离功能,另外一方面也有HA cluster功能。
VRRP 原理
单网关面临的问题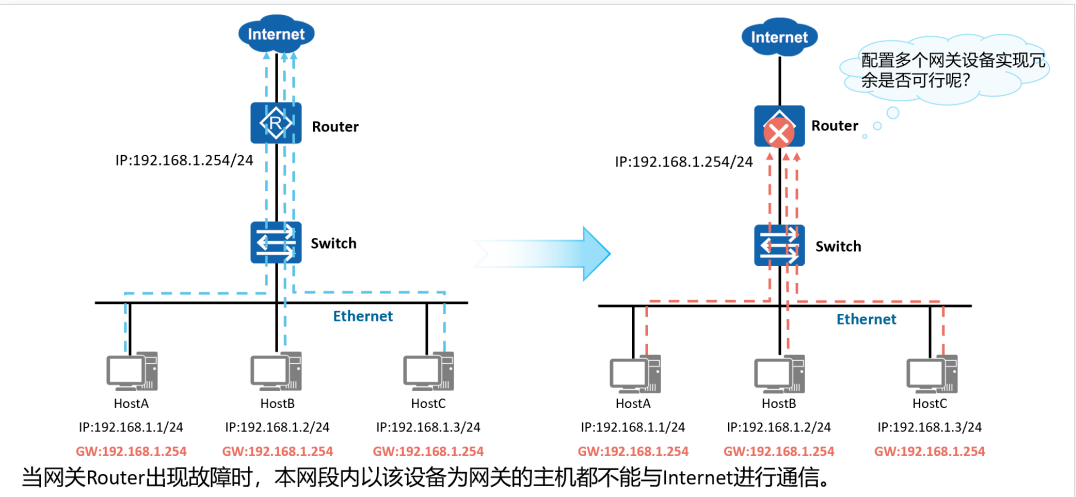
设计了VRRP,将2个物理设备形成一个逻辑设备,监听VIP地址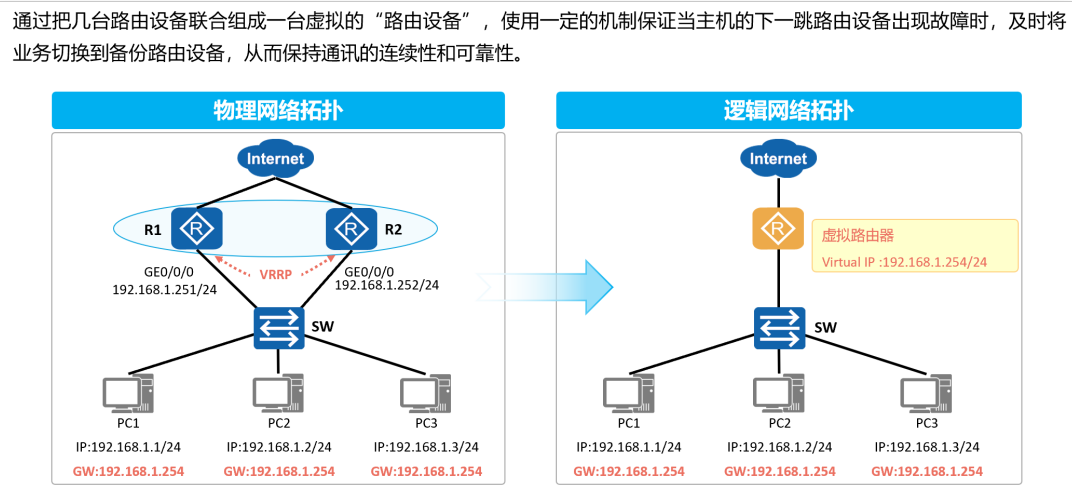
两台设备VRID要一致为VRRP组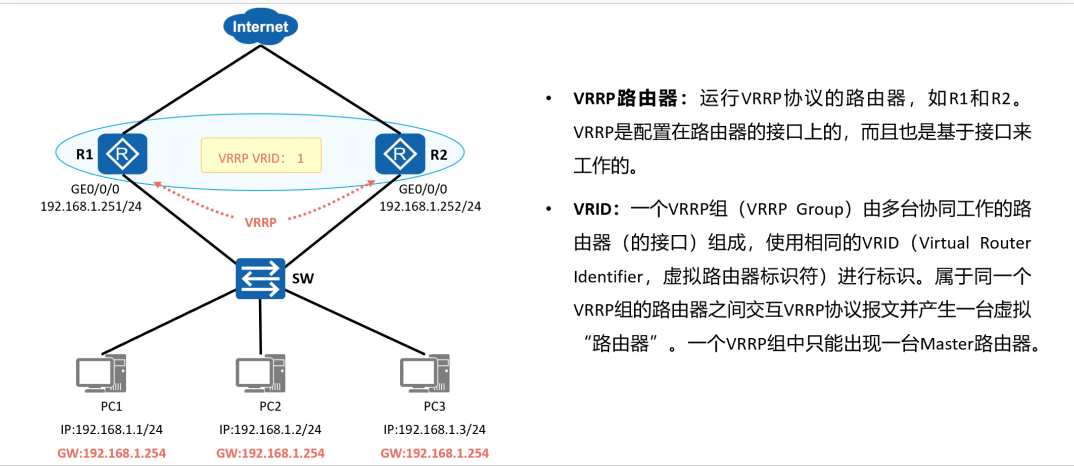

实践准备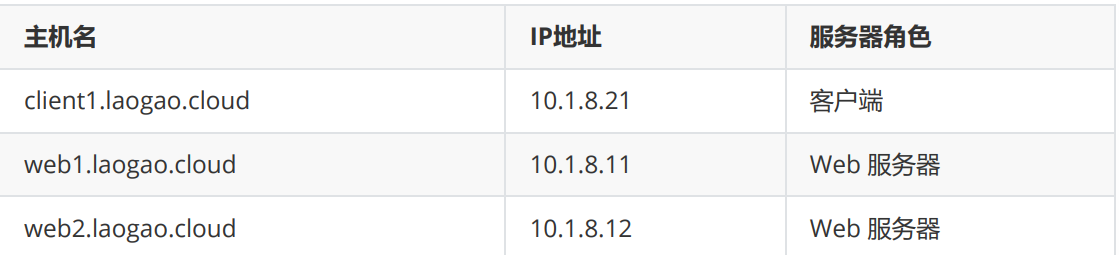
配置 web
root@web1-2 ~]#
# 部署 web
yum install -y nginx
echo Welcome to $(hostname) > /usr/share/nginx/html/index.html
systemctl enable nginx.service --now
# 访问后端 nginx
[root@client1 ~]# curl 10.1.8.11
Welcome to web1.laogao.cloud
[root@client1 ~]# curl 10.1.8.12
Welcome to web2.laogao.cloud
配置 keepalived
配置 web2
web2 作为备节点。
[root@web2 ~]#
yum install -y keepalived
cp /etc/keepalived/keepalived.conf{,.ori}

vim /etc/keepalived/keepalived.conf
 ! Configuration File for keepalived
global_defs {
   router_id web2
}
vrrp_instance nginx {
   state BACKUP
   interface ens33
   virtual_router_id 51
   priority 100
   advert_int 1
   authentication {
       auth_type PASS
       auth_pass laogao@123
   }
   virtual_ipaddress {
        10.1.8.100/24
   }
}
说明:
- router_id web2 ,定义路由器名称,每个节点使用不同的名称。
- state BACKUP ,定义节点角色为备节点,MASTER则代表主节点。
- interface ens33 ,定义VIP配置到该接口。
- virtual_router_id 51 ,定义虚拟路由器ID,范围1-255,每个节点使用相同名称。
- priority 100 ,定义节点优先级,值越大优先级越高。
- authentication ,定义心跳认证。
- virtual_ipaddress ,定义虚拟VIP。
# 启动 keepalived 服务
[root@web2 ~]# systemctl enable keepalived.service --now
# 查看 IP
[root@web2 ~]# ip -br a show ens33
ens33           UP             10.1.8.12/24 10.1.8.100/24
fe80::20c:29ff:fe83:619c/64
配置 web1
web1 作为主节点。
[root@web1 ~]#
yum install -y keepalived
cp /etc/keepalived/keepalived.conf{,.ori}


vim /etc/keepalived/keepalived.conf
! Configuration File for keepalived
global_defs {
   router_id web1
}
vrrp_instance nginx {
   state MASTER
   interface ens33
   virtual_router_id 51
    # master节点优先级要高于BACKUP节点
   priority 110
   advert_int 1
   authentication {
       auth_type PASS
       auth_pass laogao@123     # 密码长度 不能超过 8 位(超过则 只取前8位)
   }
   virtual_ipaddress {
        10.1.8.100/24
   }
}
# 启动服务
systemctl enable keepalived.service --now
# 查看 IP,VIP 切换到 web1
[root@web1 ~]# ip -br a show ens33
ens33           UP             10.1.8.11/24 10.1.8.100/24
fe80::20c:29ff:fe16:ad99/64
[root@web2 ~]# ip -br a show ens33
ens33           UP             10.1.8.12/24 fe80::20c:29ff:fe83:619c/64
高可用验证
# 访问 web
[root@client1 ~]# curl 10.1.8.100
Welcome to web1.laogao.cloud
[root@client2 ~]# curl 10.1.8.100
Welcome to web1.laogao.cloud
# 关闭 web1 的 keepalive服务,再次访问
[root@web1 ~]# systemctl stop keepalived.service
[root@client1 ~]# curl 10.1.8.100
Welcome to web2.laogao.cloud
# 再次启动 web1 的keepalive服务,再次访问
[root@web1 ~]# systemctl start keepalived.service
[root@client1 ~]# curl 10.1.8.100
Welcome to web1.laogao.cloud

openEuler 是由开放原子开源基金会孵化的全场景开源操作系统项目,面向数字基础设施四大核心场景(服务器、云计算、边缘计算、嵌入式),全面支持 ARM、x86、RISC-V、loongArch、PowerPC、SW-64 等多样性计算架构
更多推荐


 6
6 0
0- 0


 已为社区贡献1条内容

所有评论(0)