repo镜像站点部署
本文详细介绍了在内网环境部署openEuler本地镜像站点的完整流程。主要内容包括:1)通过rsync工具同步获取官方镜像源,重点说明了镜像目录结构和必要组件;2)部署rsync服务器实现镜像更新维护;3)配置nginx服务搭建本地镜像站点,包括SELinux权限设置和防火墙配置;4)客户端yum源的配置方法及参数说明。文章提供了完整的命令行操作步骤和配置文件示例,特别强调了内网环境下的特殊配置注
工欲善其事,必先利其器。部署本地镜像站点,是内网环境使用openEuler操作系统的基础。
1 获取镜像
查阅文档,了解操作步骤和磁盘空间需求:
https://www.openeuler.openatom.cn/zh/mirror/list/
同时需要了解镜像仓库的目录结构:
https://mirrors.huaweicloud.com/openeuler/openEuler-24.03-LTS-SP3/
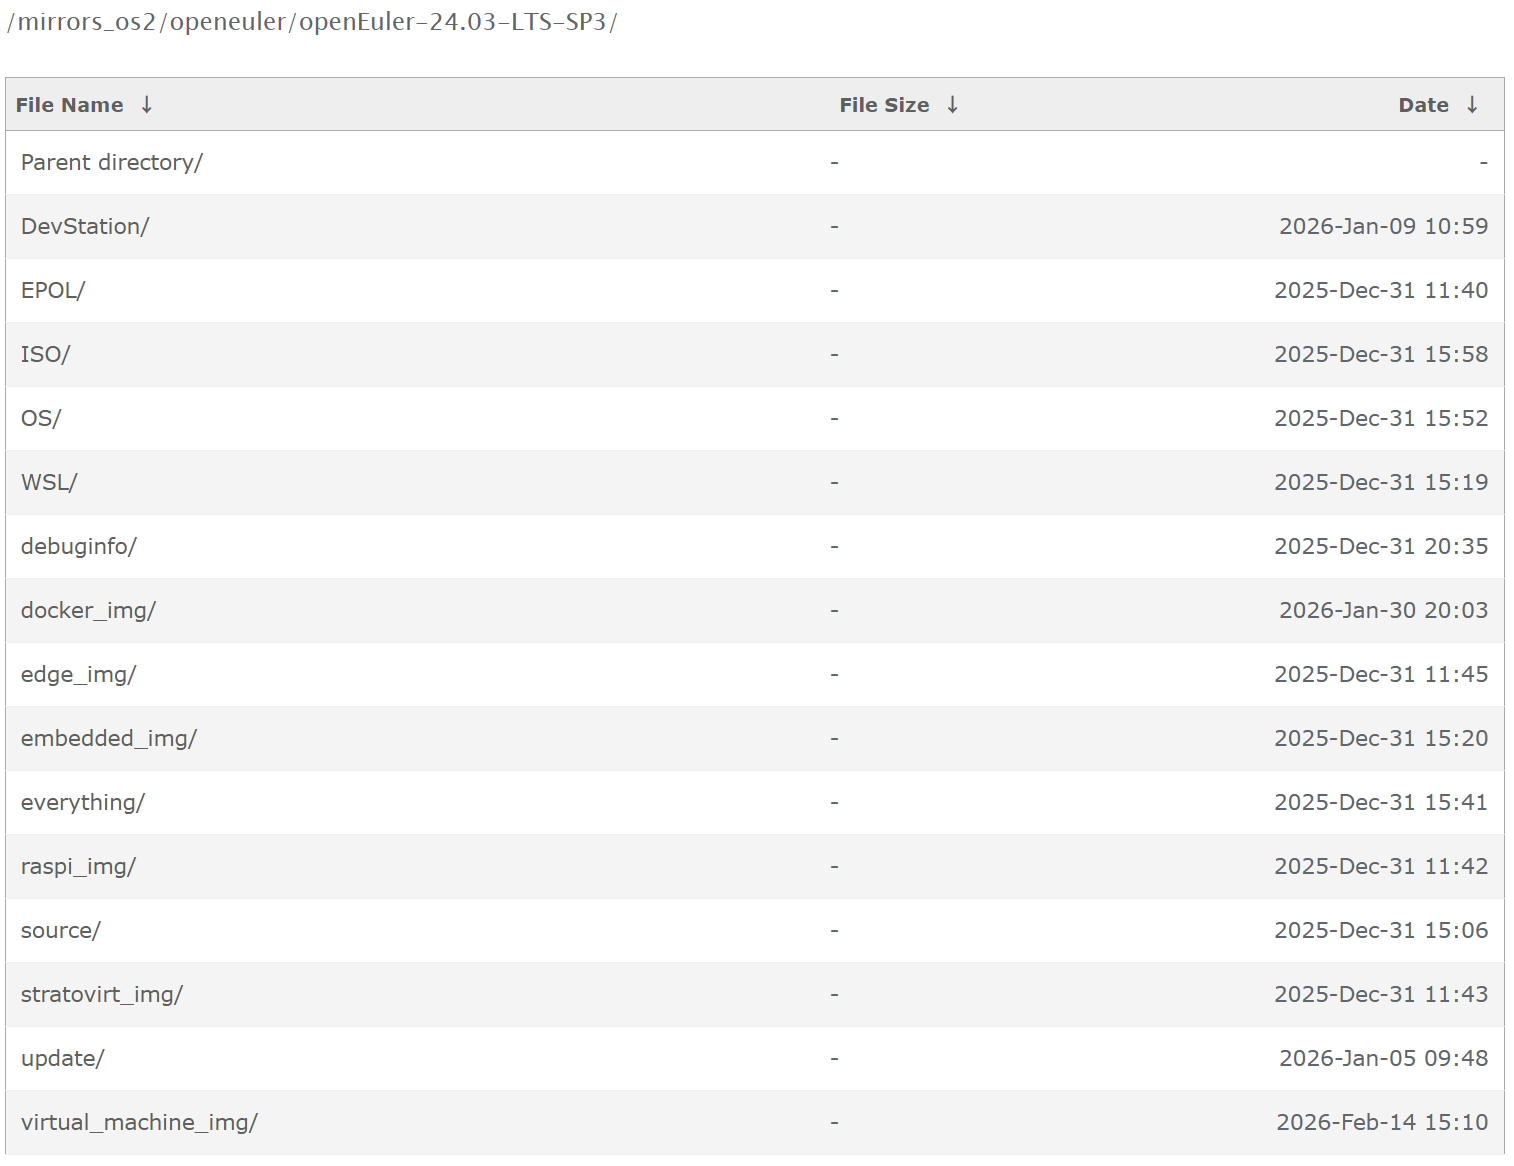
其中:
【必选】OS为基础软件源,提供系统运行必须的核心软件包。
【必选】everything为全量软件源。
【必选】EPOL为官方扩展源,提供商业级、生态增强软件包。
【必选】update为补丁包,系统更新保、bug修复包和软件升级包等
【建议】DevStation为桌面开发版,含桌面环境和较为丰富的开发工具、驱动程序等。
ISO为系统安装镜像,用于离线安装系统。
source为源码包,用于编译安装各类软件。
WSL为Wingdows软件包,支持Windows环境下运行openEuler操作系统。
debuginfo为调试软件包。
docker(容器)、edge(边缘计算)、embedded(嵌入式)、raspi(树莓派)、stratovirt(轻量化虚拟机)、virtual_machine(虚拟机)分别对应不同应用场景下的系统镜像。
1.1 获取互联网镜像
准备1台中转机接入互联网(以银河麒麟桌面操作系统V10为例)。
安装rsync并创建镜像存储目录。
apt update
apt install rsync
mkdir -p /data/openEuler/openEuler-24.03-LTS-SP3
chmod -R 0777 /data/openEuler
使用文档提供的命令,同步镜像到本地磁盘。
rsync -avP --delete \
--exclude=/debuginfo/ \
rsync://root@repo.openeuler.openatom.cn/openeuler/openEuler-24.03-LTS-SP3/ \
/data/openEuler/openEuler-24.03-LTS-SP3/
-a 归档模式,保持文件权限、目录结构、软链接等,使同步后的镜像源和官方完全一致
-v 显示同步进度详情
--partial 断点续传
--progress 显示单个文件的同步进度
-P 等效于"--partial --progress"
--dry-run 模拟同步,仅输出同步结果,不传输文件,可用于了解所需磁盘容量、校验include和exclude规则是否正确、排查目录循环等
--delete 删除本地多余文件,使本地镜像源和官方完全一致
--delete-exclude 删除本地存在,但是本次同步排除的文件
--exclude=/debuginfo/ 排除根目录下的debuginfo文件夹
复杂规则可以使用"--exclude-from=文件名",新建文本文件,每行写1条规则。强烈建议详细了解include和exclude规则,可有
# 排除任何目录下source目录或文件
**/source
# 排除WSL目录或文件
WSL
# +表示保留该目录或文件
+ everything/amd64
# 排除everything目录下除amd64之外的其他目录和文件
everything/*
1.2 部署rsync服务器
如果是一锤子买卖,可以直接将文件夹带属性拷贝到本地镜像站点。如果长期使用,考虑更新问题,建议将中转机部署为rsync服务器。
虽然也可以使用rsync命令将镜像推送到内网服务器,但实际操作中往往会遇到用户权限问题,这里强烈建议部署rsync服务器。
vi /etc/rsyncd.conf编辑以下内容:
uid = root
gid = root
use chroot = no
max connections = 10
timeout = 600
log file = /var/log/rsyncd.log
pid file = /var/run/rsyncd.pid
lock file = /var/run/rsync.lock
ignore nonreadable = yes
dont compress = *.gz *.bz2 *.zip *.rar *.7z
[openEuler]
path = /data/openEuler
read only = no
list = yes
auth users = admin
secrets file = /etc/rsyncd.secrets
创建用户文件:
vi /etc/rsyncd.secrets
chmod 0600 /etc/rsyncd.secrets
编辑用户名和密码:
admin:123456
启动rsync服务(无须设置开机自启,每次更新时临时启动rsync服务即可):
systemctl stop rsync
rsync --daemon
systemctl status rsync
如果报错,可以重启计算机或者结束rsync进程后重试。
pkill rsync
rsync --daemon
查看rsync运行状态:
ps -ef | grep rsync
netstat -tlpn | grep 873
如果运行正常,则关闭系统防火墙,将中转机接入内网环境。
1.3 内网同步镜像
挂载iso文件为本地软件源。
mount -o loop /home/openEuler.iso /mnt
cp /etc/yum.repo.d/openEuler.conf /etc/yum.repo.d/openEuler.conf~
vi /etc/yum.repo.d/openEuler.conf
编辑以下内容:
[openEuler-iso]
name = openEuler
baseurl = file:///mnt
gpgcheck=0enabled=1
在本地镜像站点服务器安装rsync软件,并获取镜像。
dnf clean all && dnf makecache
dnf install rsync
mkdir /data/openEuler
chmod 0777 /data/openEuler
rsync -avP --delete rsync://admin@IP/openeuler/ /data/openEuler/
2 部署nginx服务
本地镜像站点为静态网页,优选nginx软件。
2.1 安装nginx软件
安装nginx软件:
dnf clean all && sudo dnf makecache
dnf install nginx
配置文件位置:/etc/nginx/nginx.conf
网站目录位置:/usr/share/nginx/html
2.2 修改配置文件
cp /etc/nginx/nginx.conf /etc/nginx/nginx.conf~
vi /etc/nginx/nginx.conf
查找配置文件中server模块,编辑以下内容:
server {
listen 80;
# 使用nobody用户时,端口号必须大于1000
server_name euler.dong.net;# 使用域名时,需要dns服务器支持
root /data/openEuler;
include /etc/nginx/default.d/*.conf;
location / {
# 默认索引文件
autoindex on;
autoindex_exact_size on;
autoindex_localtime on;
#以上三项必须配置,否则无法读取文件目录、大小和时间
}error_page 404 /404.html;
location = /404.html {
}
error_page 500 502 503 504 /50x.html;
location = /50x.html {
}}
如果不配置DNS服务器,可以使用“IP:端口号”的方式访问,对应配置如下:
server {
listen 50000
server_name euler;root /data/openEuler;
include /etc/nginx/default.d/*.conf;
location / {
# 默认索引文件
autoindex on;
autoindex_exact_size on;
autoindex_localtime on;
#以上三项必须配置,否则无法读取文件目录、大小和时间
}error_page 404 /404.html;
location = /404.html {
}
error_page 500 502 503 504 /50x.html;
location = /50x.html {
}}
2.3 修改SELinux配置
自定义网站文件夹,必须修改SELinux配置,否则会拒绝访问。
setsebool -P httpd_read_user_content 1
setsebool -P httpd_enable_homedirs 1
setsebool -P httpd_can_network_connect 1
chcon -R -t httpd_sys_content_t /data/openEuler
2.4 重启nginx服务
systemctl restart nginx
systemctl enable nginx
3 防火墙配置
防火墙放行http服务,重新加载防火墙策略并查看服务状态。
firewall-cmd --permanent --add-service=http
firewall-cmd --reload
firewall-cme --list-all
4 客户端配置
4.1 配置文件位置
仓库配置目录:/etc/yum.repos.d,配置文件以“.repo”结尾,所有配置文件均生效。
全局配置目录:/etc/dnf/dnf.con,缓存位置、全局参数等。
缓存目录:/var/cache/dnf,下载的软件会临时保存到这里。
4.2 编辑配置文件
备份原有配置文件:
cp -a /etc/yum.repo.d/xxx.conf /etc/yum.repo.d/xxx.conf~
vi /etc/yum.repo.d/xxx.conf
编辑以下内容:
[OS]
name=OS
baseurl=http://euler.dong.net/openEuler-24.03-LTS-SP3/OS/$basearch/metadata_expire=30d
enabled=1
gpgcheck=1gpgkey=http://euler.dong.net/openEuler-24.03-LTS-SP3/$basearch/RPM-GPG-KEY-openEuler
#其他项目参考以上配置,只需替换网址即可。
[OS]定义软件源名称
baseurl定义软件源网址
metalink定义优选镜像源,一般用于外网环境,内网环境应删除此配置。
metadata_expire=30d定义缓存数据过期时间,内网环境可设置为-1,避免不必要的网络请求(-1永不过期,s秒,m分,h时)。
enabled定义此软件源是否可用
gpgcheck定义是否检查gpg公钥
gpgkey定义gpg公钥位置
4.3 验证软件源
dnf clean all
dnf makecache
如有报错,可根据提示作进一步排查。
水平有限,敬请批评指正。

openEuler 是由开放原子开源基金会孵化的全场景开源操作系统项目,面向数字基础设施四大核心场景(服务器、云计算、边缘计算、嵌入式),全面支持 ARM、x86、RISC-V、loongArch、PowerPC、SW-64 等多样性计算架构
更多推荐


 5
5 0
0- 0


 已为社区贡献3条内容

所有评论(0)