第15章 MCP高级功能与编码实现(1)——项目十二:构建代码形式的MCP客户端——生成图像
本章本片讲述MCP的高级功能,并编码实现MCP的服务器和客户端。首先讲述MCP服务器的高级功能身份凭证、进度更新与定制化工具;然后练习如何创建MCP资源、提示模板与纯MCP工具;接着使用代码实现多应用的FastMCP服务器并排查MCP服务器开发中的Bug;第四构建代码形式的使用stdio_client连接的MCP客户端;最后,使用Gradio与Apps SDK构建ChatGPT应用。
第15章 MCP高级功能与编码实现(1)——项目十二:构建代码形式的MCP服务器与客户端——生成图像
第15章 MCP高级功能与编码实现
本章本片讲述MCP的高级功能,并编码实现MCP的服务器和客户端。首先讲述MCP服务器的高级功能身份凭证、进度更新与定制化工具;然后练习如何创建MCP资源、提示模板与纯MCP工具;接着使用代码实现多应用的FastMCP服务器并排查MCP服务器开发中的Bug;第四构建代码形式的使用stdio_client连接的MCP客户端;最后,使用Gradio与Apps SDK构建ChatGPT应用。
15.1 MCP高级功能:身份凭证、进度更新与定制化工具
旧版方法虽然提供了一种将线上任意Gradio应用转化为线上MCP服务器的简便途径,但仍存在以下限制:
(1)用户身份识别限制。MCP工具调用无法识别特定用户身份,这将导致:①无法在Gradio应用内跨会话保存用户状态;②应用中使用的gr.State组件始终会以初始默认值传入;③无法通过gr.Request获取用户特定信息。
(2)端点选择与描述修改限制:①端点选择:所有设置footer_links=[“api”]的端点都会被自动视为工具,此时就无法选择Gradio特定端点并将其暴露为工具;②描述修改限制:工具描述仅能通过修改函数文档字符串实现变更。
好在随着新版MCP规范的发布,由Gradio构建的MCP服务器的功能也实现了上述限制的突破,还新增了进度更新,下面讲解其具体实现。
15.1.1 身份识别与凭证管理
开发者可能需要更精确地进行用户身份识别,或允许用户提供其他类型的凭证或令牌,以便为不同用户提供定制化体验。本小节通过gr.Request对象实现身份识别,通过gr.Header类实现token的凭证管理,下面分别讲述。
使用gr.Request对象进行身份识别。Gradio支持访问底层starlette.Request对象(负责发起工具调用),这意味着可以获取网络请求头部、源IP地址或包含的任何其他信息。只需在函数中添加gr.Request类型的参数,Gradio将自动注入该请求对象作为入参。如代码15-1所示:
import gradio as gr
def echo_headers(x, request: gr.Request):
    return str(dict(request.headers))
gr.Interface(echo_headers, "textbox", "textbox").launch(mcp_server=True)
此MCP服务器将忽略用户输入内容,直接回传用户请求中的所有头部信息。可见gr.Request头部包含丰富的信息,此外还有其他属性,比如client、query_params、session_hash、username等,基于此可构建更复杂的应用程序。
使用gr.Header类进行凭证管理。在MCP服务器开发中,常见的模式是利用认证标头来代表用户调用服务。因此开发者无需像前例那样使用gr.Request对象,而可以改用gr.Header参数,Gradio会自动从传入请求中提取该标头(如果存在)并传递给预测函数。使用gr.Header的优势在于:当连接至服务器时,MCP连接文档会自动向服务器显示需要提供的标头!
在以下示例中,标头X-API-Token从传入请求中提取,并作为参数x_api_token传递给函数make_api_request_on_behalf_of_user,如代码15-2所示:
import gradio as gr
def make_api_request_on_behalf_of_user(prompt: str, x_api_token: gr.Header):
    """Make a request to everyone's favorite API.
    Args:
        prompt: The prompt to send to the API.
    Returns:
        The response from the API.
    Raises:
        AssertionError: If the API token is not valid.
    """
    return "Hello from the API" if not x_api_token else "Hello from the API with token!"

demo = gr.Interface(
    make_api_request_on_behalf_of_user,
    [gr.Textbox(label="Prompt")],
    gr.Textbox(label="Response"),
)
demo.launch(mcp_server=True)
在客户端配置中添加标头X-API-Token,就可将其传到服务器的API函数进行认证。客户端配置方法请参阅图15-1所示: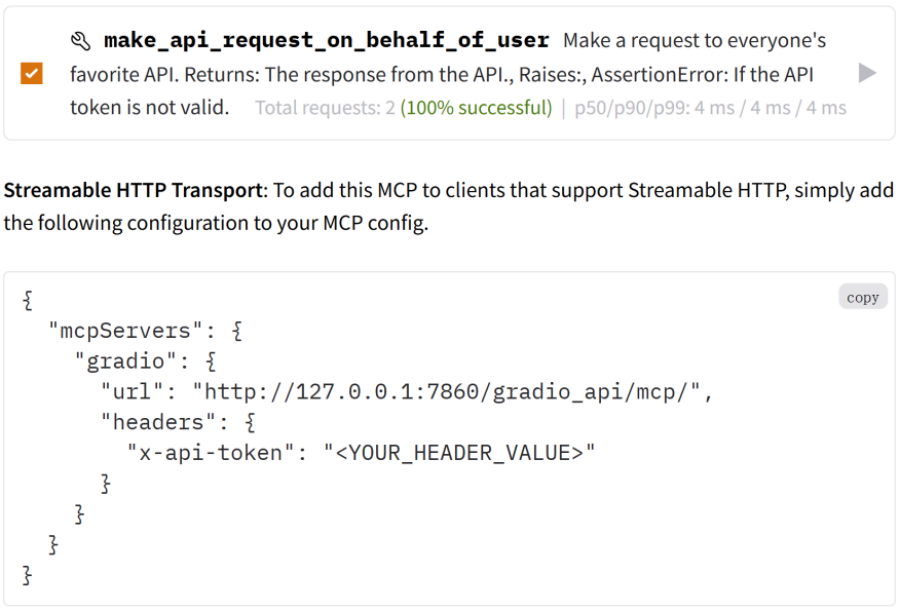
15.1.2 发送进度更新
根据Gradio应用中的队列顺序,Gradio的MCP服务器会自动向MCP客户端发送进度更新。如需发送自定义进度更新,可采用与Gradio应用界面中显示进度更新相同的机制:gr.Progress类!具体实现如代码15-3所示:
import gradio as gr
import time
def slow_text_reverser(text: str, progress=gr.Progress()):
    for i in range(len(text)):
        progress(i / len(text), desc="Reversing text")
        time.sleep(0.3)
    return text[::-1]

demo = gr.Interface(slow_text_reverser, gr.Textbox("Hello, world!"), gr.Textbox())
if __name__ == "__main__":
    demo.launch(mcp_server=True)
单击Submit,其进度显示如图15-2所示:
15.1.3 修改工具描述和选择工具
Gradio会根据函数名称自动设置工具名称,并通过函数文档字符串生成工具描述。但开发者可能需要调整其在LLM中呈现的描述内容,这可以通过构建布局组件的api_description参数来实现,该参数接受三种类型的取值:
- None(默认值):工具描述自动从函数的文档字符串生成。若函数本身无文档字符串但继承自含有文档字符串的方法,则使用父级文档字符串。
- False:不向LLM显示工具描述。
- str:任意字符串,将作为工具描述使用。
除修改工具描述外,还可以控制向LLM展示哪些工具。从API文档和MCP服务器中隐藏该端点,可设置界面的参数footer_links=[]或footer_links=[“gradio”, “settings”]。如果开发者暴露多个工具,用户还可以在页脚的“通过API或MCP使用”面板中,通过勾选框来选择该函数是否要添加到其MCP服务器。展示api_description和footer_links参数的实际应用,如代码15-4所示:
import numpy as np
import gradio as gr
from pathlib import Path
import os
from PIL import Image

def prime_factors(n: str):
    """Compute the prime factorization of a positive integer.
    Args:
        n (str): The integer to factorize. Must be greater than 1."""
    n_int = int(n)
    if n_int <= 1:
        raise ValueError("Input must be an integer greater than 1.")
    factors = []
    while n_int % 2 == 0:
        factors.append(2)
        n_int //= 2
    divisor = 3
    while divisor * divisor <= n_int:
        while n_int % divisor == 0:
            factors.append(divisor)
            n_int //= divisor
        divisor += 2
    if n_int > 1:
        factors.append(n_int)
    return factors

def image_orientation(image: Image.Image) -> str:
    """Returns whether image is portrait or landscape.
    Args:
        image (Image.Image): The image to check.
    Returns:
        str: "Portrait" if image is portrait, "Landscape" if image is landscape."""
    return "Portrait" if image.height > image.width else "Landscape"

demo = gr.TabbedInterface(
    [gr.Interface(prime_factors, gr.Textbox("1001"), gr.Textbox(), api_description="Input an integer to factorize!"),
        gr.Interface(image_orientation, gr.Image(type="pil"), gr.Textbox(),  api_description=False)],
    ["Prime Factors", "Image Orientation Checker"])
if __name__ == "__main__":
    demo.launch(mcp_server=True)
    # demo.launch(footer_links=[], mcp_server=True)
在页面底部的“通过API或MCP使用”,去掉勾选函数image_orientation,各个函数工具的描述及选择工具后生成的MCP服务器URL如图15-3所示: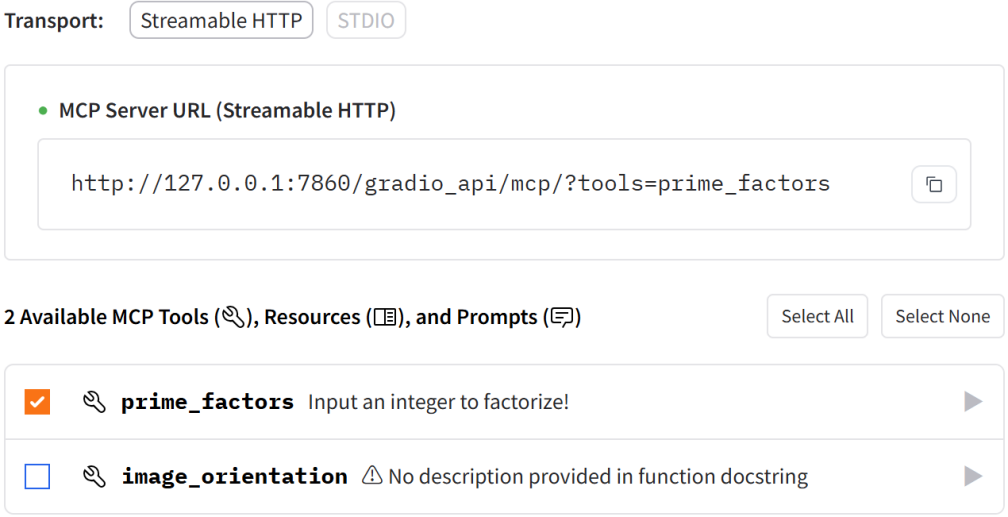
15.2 练习14:创建MCP资源、提示模板与纯MCP工具
工具不仅执行一般函数,还是通过Gradio MCP集成暴露任意函数的默认选择。但除了工具外,MCP还支持另外三种重要原语:resource资源(暴露数据)和prompt模板(定义可复用模板)以及纯MCP工具,详解如下:
- MCP资源。在任意函数使用@gr.mcp.resource装饰器,即可通过Gradio应用暴露数据。资源可以是静态的(通过固定URI访问)或模板化的(URI中包含参数)。
- 提示模板。提示模板有助于标准化用户与工具的交互方式,对于需要特定格式或多步骤的复杂工作流尤为实用。
- 添加纯MCP功能函数。截至目前,所有的MCP工具、资源或提示模板均与UI中的事件监听器相关。这种方式适用于直接更新UI的函数,但若暴露仅返回原始数据而不直接引发UI更新的"纯逻辑"函数,则可能不再适用。此时可使用gr.api创建纯Gradio API端点。三者示例如代码15-5所示:
import gradio as gr
@gr.mcp.tool()  # Not needed as functions that are registered as tools by default
def add(a: int, b: int) -> int:
    """Add two numbers"""
    return a + b

@gr.mcp.resource("greeting://{name}")
def get_greeting(name: str) -> str:
    """Get a personalized greeting"""
    return f"Hello, {name}!"

@gr.mcp.prompt()
def greet_style(name: str, style: str = "friendly") -> str:
    """Generate a greeting prompt"""
    styles = {"friendly": "Please write a warm, friendly greeting",
        "formal": "Please write a formal, professional greeting",
        "casual": "Please write a casual, relaxed greeting"}
    return f"{styles.get(style, styles['friendly'])} for someone named {name}."

def slice_list(lst: list, start: int, end: int) -> list:
    """A tool that slices a list given a start and end index.
    Args:
        lst: The list to slice.
        start: The start index.
        end: The end index.
    Returns:
        The sliced list."""
    return lst[start:end]

with gr.Blocks() as demo:
    with gr.Group():
        with gr.Tab("Add"):
            input_num1 = gr.Number(value=1)
            input_num2 = gr.Number(value=1)
            output_num = gr.Number()
            add_button = gr.Button("Add")
        with gr.Tab("Get Greeting"):
            input_name = gr.Textbox("Abubakar")
            style = gr.Dropdown(choices=["friendly", "formal", "casual"])
            output_greet = gr.Textbox()
            get_button = gr.Button("Greet Style")
        with gr.Tab("Greet Style"):
            name = gr.Textbox("Abubakar")
            style = gr.Dropdown(choices=["friendly", "formal", "casual"])
            output_text = gr.Textbox()
            greet_button = gr.Button("Greet Style")
        with gr.Tab("MCP-only Tool"):
            gr.Markdown("""This is a demo of a MCP-only tool.
                This tool slices a list.
                This tool is MCP-only, so it does not have a UI.""")
            gr.api(slice_list)

    add_button.click(add, inputs=[input_num1, input_num2], outputs=output_num)
    get_button.click(get_greeting, inputs=input_name, outputs=output_greet)
    greet_button.click(greet_style, inputs=[name, style], outputs=output_text)
_, url, _ = demo.launch(mcp_server=True)
示例中get_greeting函数通过@gr.mcp.resource()装饰器实现以下功能:
- add函数即使不加装饰器,也会自动转化为工具。
- get_greeting函数作为资源被暴露,其URI模板为greeting://{name}。 当MCP客户端请求为greeting://Alice时,将收到"Hello, Alice!"响应。资源同样可返回图像、其他类型文件或二进制数据。若要返回非文本数据,应在@gr.mcp.resource()中指定mime_type参数,并返回Base64编码的字符串。
- greet_style函数通过@gr.mcp.prompt()装饰器实现以下功能:①作为提示模板供MCP客户端使用;②接收参数以定制输出内容,返回结构化提示。
- slice_list函数是用于划分列表的MCP工具,它的签名必须包含完整类型标注(包括参数及返回值类型),用于明确MCP工具的类型信息。运行示例后,虽没有显示UI,但单击页脚的查看页面,仍可看到被列为工具的Gradio API端点。
在查看页面中,工具、资源和提示模板使用不同的图形区分。另外,MCP端点中仍用tools统一标识工具、资源和提示模板。运行界面如图15-4所示: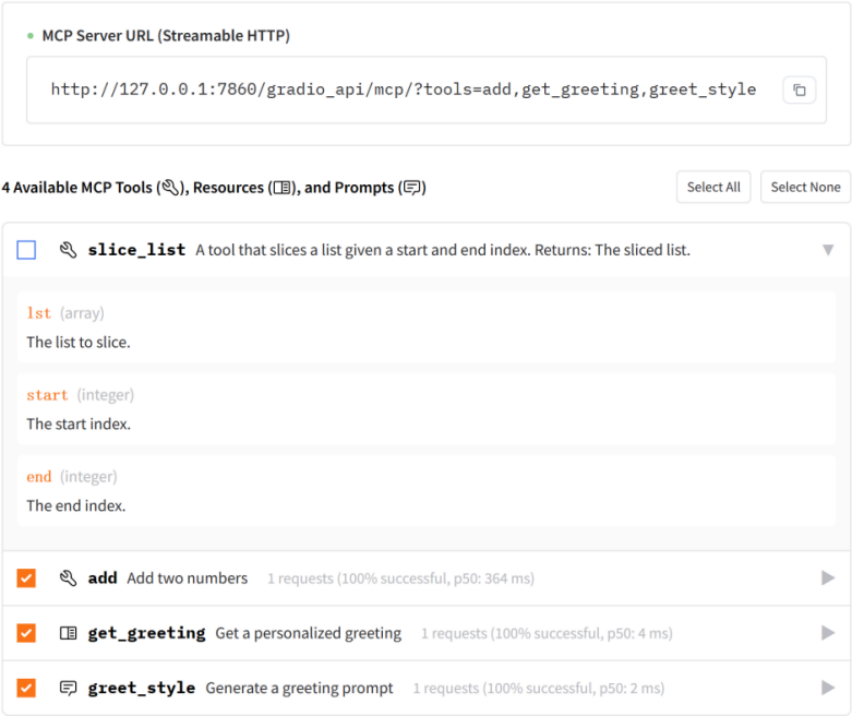
15.3 练习15:代码实现多应用FastMCP服务器
前面内容讲述的MCP服务器和MCP客户端都是通过配置形式来实现的,接下来将讲解如何通过代码实现MCP服务器和MCP客户端。
在某些场景下,开发者可选择不使用Gradio内置集成方案,转而手动创建可调用Gradio应用的FastMCP服务器。这种方案特别适用于以下场景:
- 在多次调用间维持状态/识别用户身份,而非将每次工具调用视为完全独立操作。
- 若本地运行多个Gradio应用且需节省内存/GPU资源,可在工具被调用时再启动Gradio应用的MCP服务器。
借助Gradio Python Client与MCP Python SDK的FastMCP类,这一方案完全可行。下面通过实例进行演示。
创建FastMCP服务器的代码文件。本示例演示如何创建自定义MCP服务器,并通过Stdio传输连接Spaces上托管的多个Gradio应用,如代码15-6所示:
# custome_mcp_server.py
from mcp.server.fastmcp import FastMCP
from gradio_client import Client
import sys
import io
import json

mcp = FastMCP("gradio-spaces")
clients = {}
def get_client(space_id: str) -> Client:
    """Get or create a Gradio client for the specified space."""
    if space_id not in clients:
        clients[space_id] = Client(space_id)
    return clients[space_id]

@mcp.tool()
async def generate_image(prompt: str, space_id: str = "ysharma/SanaSprint") -> str:
    """Generate an image using Flux.
    Args:
        prompt: Text prompt describing the image to generate
        space_id: Hugging Face Space ID to use"""
    client = get_client(space_id)
    result = client.predict(prompt=prompt, model_size="0.6B", seed=0,
        randomize_seed=True, width=1024, height=1024,
        guidance_scale=4.5, num_inference_steps=2, api_name="/infer")
    return result

@mcp.tool()
async def run_dia_tts(prompt: str, space_id: str = "nari-labs/Dia-1.6B") -> str:
    """Text-to-Speech Synthesis.
    Args:
        prompt: Text prompt describing the conversation between speakers S1, S2
        space_id: Hugging Face Space ID to use"""
    client = get_client(space_id)
    result = client.predict(text_input=f"""{prompt}""", audio_prompt_input=None,
            max_new_tokens=3072, cfg_scale=3, temperature=1.3,
            top_p=0.95, cfg_filter_top_k=30, speed_factor=0.94,
            api_name="/generate_audio")
    return result

if __name__ == "__main__":
    sys.stdout = io.TextIOWrapper(sys.stdout.buffer, encoding='utf-8')
    mcp.run(transport='stdio')
该服务器对外提供两大工具接口:
- generate_image:使用Spaces项目:ysharma/SanaSprint🖇️链接15-1,通过高效文生图模型生成图像。
- run_dia_tts:使用Spaces项目:nari-labs/Dia-1.6B🖇️链接15-2,将指定文本转录稿转换为对话格式,输出样式示例:[S1]第一句话;[S2]第二句话;[S1]…。
配置Claude for Desktop客户端。以Claude for Desktop为宿主,其使用MCP服务器的配置步骤如下所述:
(1)保存之前创建的服务器代码,比如保存为custome_mcp_server.py。
(2)因为在启动Claude for Desktop的环境中要运行MCP服务器的Python脚本,所以需安装Python脚本所需依赖项,否则会报错。或者先激活安装Gradio的环境,然后使用命令启动Claude for Desktop。安装依赖项命令如下所示:uv pip install --upgrade mcp gradio-client
(3)修改客户端配置。通过在以下位置编辑Claude for Desktop配置文件,①macOS路径:~/Library/Application Support/Claude/claude_desktop_config.json;②Windows路径:%APPDATA%\Claude\claude_desktop_config.json。以Windows环境为例,添加的服务器配置信息如下:
{
    "mcpServers": {
        "gradio-spaces": {
            "command": "python",
            "args": [
                "D:\\mcp\\server\\custome_mcp_server.py"
            ]
        }
    }
}
最后重启Claude Desktop客户端。完成配置后,当用户向Claude提出图像生成或音频转录要求时,系统将自动调用Generate image完成任务;让Claude生成音频时,Claude会调用工具Run dia tts,运行界面如图15-5所示:
15.4 如何排查MCP服务器Bug
MCP协议仍处于起步阶段,所以在连接自建MCP服务器时可能会遇到问题,通常建议使用MCP Inspector Tool尝试连接并调试MCP服务器代码。除此之外,可尝试下面四种方法排查MCP服务器问题。
为工具函数添加说明文档和类型提示。确保已为函数添加有效的说明文档字符串和输入输出类型提示。如前所述,Gradio会读取函数的文档字符串及输入参数的类型提示来生成工具和参数的描述,有效的函数及文档字符串示例参考代码15-2。
注意:通过地址http://your-server:port/gradio_api/mcp/schema,可以预览为MCP服务器创建的描述模式。以字母计数程序代码14-5为例,其模式输出为:
[{"name":"letter_counter","description":"Count the number of occurrences of a letter in a word or text. Returns: str: A message indicating how many times the letter appears","inputSchema":{"type":"object","properties":{"word":{"type":"string","description":"The input text to search through"},"letter":{"type":"string","description":"The letter to search for"}}},"meta":{"file_data_present":false,"mcp_type":"tool","endpoint_name":"predict"}}]
尝试将输入参数设为字符串。部分MCP客户端无法识别数值或其他复杂类型的参数,但官方测试过的所有MCP客户端都支持字符串输入参数。所以若不确定,尝试将输入参数改为字符串类型,然后在函数内部进行类型转换。
确保MCP客户端支持Streamable HTTP。部分MCP客户端尚不支持基于Streamable HTTP的MCP服务器,此时可以使用诸如mcp-remote(🖇️链接15-3)之类的工具。通过mcp-remote,使仅支持本地Stdio传输的MCP客户端可以连接到远端MCP服务器,并且支持身份认证。使用方法:首先安装Node.js,然后将以下内容添加到MCP客户端配置中:
{
  "mcpServers": {
    "gradio": {
      "command": "npx",
      "args": [
        "mcp-remote",
        "http://your-server:port/gradio_api/mcp/"
      ]
    }
  }
}
重启MCP客户端和MCP服务器。某些MCP客户端要求每次更新MCP配置后必须重启客户端。此外,当MCP客户端与服务器之间的连接中断时,需要重启MCP服务器。当其他方法都无效时,可以尝试同时重启MCP客户端和服务器!
15.5 项目十二:构建代码形式的MCP服务器与客户端——生成图像
本节将基于Gradio实现代码形式的MCP服务器与MCP客户端。先创建一个FastMCP服务器,将其启动后等待MCP客户端连接;然后使用Anthropic的Claude API构建一个Gradio聊天机器人,将其作为MCP客户端来连接FastMCP服务器。
15.5.1 准备图像生成的FastMCP服务器
在本示例中,将通过FastMCP创建一个绑定图像生成工具的MCP服务器,为Claude提供可调用的工具集。图像生成工具中,仍通过Gradio客户端连接托管在Spaces上的SanaSprint,但对其返回消息进行详细处理。
开始之前,首先安装anthropic和mcp库;然后配置ANTHROPIC_API_KEY以使用Claude,也可替换成其它模态模型,如Deepseek。
MCP服务器代码解读与运行。首先,创建服务器文件并录入代码15-7:
# gradio_mcp_server.py
from mcp.server.fastmcp import FastMCP
import json
import sys
import io
from gradio_client import Client
sys.stdout = io.TextIOWrapper(sys.stdout.buffer, encoding='utf-8', errors='replace')
sys.stderr = io.TextIOWrapper(sys.stderr.buffer, encoding='utf-8', errors='replace')
mcp = FastMCP("huggingface_spaces_image_display")

@mcp.tool()
async def generate_image(prompt: str, width: int = 512, height: int = 512) -> str:
    """Generate an image using SanaSprint model.
    Args:
        prompt: Text prompt describing the image to generate
        width: Image width (default: 512)
        height: Image height (default: 512)"""
    client = Client("ysharma/SanaSprint")
    try:
        result = client.predict(prompt, model_size="1.6B", seed=0,
            randomize_seed=True, width=1024, height=1024, guidance_scale=4.5,
            num_inference_steps=2, api_name="/infer")
        if isinstance(result, list) and len(result) >= 1:
            image_data = result[0]
            if isinstance(image_data, dict) and "url" in image_data:
                return json.dumps({"type": "image", "url": image_data["url"],
                    "message": f"Generated image for prompt: {prompt}"})
        return json.dumps({"type": "error",
            "message": "Failed to generate image"})
    except Exception as e:
        return json.dumps({"type": "error",
            "message": f"Error generating image: {str(e)}"})
if __name__ == "__main__":
    mcp.run(transport='stdio')
代码实现MCP服务器,用于调用Spaces上的图像生成模型。说明如下:
- io.TextIOWrapper(…)重新包装标准输出和标准错误流,强制使用UTF-8编码,并设置错误处理策略为’replace’,将原本的sys.stdout / sys.stderr替换为一个新的 TextIOWrapper对象。创建一个FastMCP类型的服务器,并绑定图像生成工具。
- 定义generate_image函数。首先Gradio客户端连接托管在Spaces的SanaSprint模型。然后向Gradio客户端传入提示来生成图像(模型大小除了0.6B,还可选1.6B)。最后通过轮询来异步接受图像。
- 当图像生成完成后,以结构化JSON格式返回图片URL或错误结果。
- 最后启动MCP服务器,由于服务器和客户端在同一局域网,所以设为Stdio传输。
15.5.2 使用stdio_client构建MCP客户端
现在创建一个MCP客户端的包装类和一个Gradio界面函数。MCP客户端的包装类用Stdio客户端连接MCP服务器并处理消息,它既可以直接回复用户消息,也可根据绘画提示从MCP服务器获取图像。Gradio界面函数呈现与MCP服务器的连接状态,并显示聊天内容和生成图像。
MCP客户端包装类。首先,创建一个客户端文件gradio_mcp_client.py,并录入MCP客户端包装器MCPClientWrapper的代码,如代码15-8所示:
# gradio_mcp_client.py
loop = asyncio.new_event_loop()
asyncio.set_event_loop(loop)
class MCPClientWrapper:
    def __init__(self):...
    def connect(self, server_path: str) -> str:
        return loop.run_until_complete(self._connect(server_path))
    async def _connect(self, server_path: str) -> str: # 连接服务器
        if self.exit_stack:
            await self.exit_stack.aclose()
        self.exit_stack = AsyncExitStack()
        is_python = server_path.endswith('.py')
        command = "python" if is_python else "node"
        server_params = StdioServerParameters(command=command,
            args=[server_path],
            env={"PYTHONIOENCODING": "utf-8", "PYTHONUNBUFFERED": "1"})

        stdio_transport = await self.exit_stack.enter_async_context(stdio_client(server_params))
        self.stdio, self.write = stdio_transport
        self.session = await self.exit_stack.enter_async_context(ClientSession(self.stdio, self.write))
        await self.session.initialize()

        response = await self.session.list_tools()
        self.tools = [{"name": tool.name,
            "description": tool.description,
            "input_schema": tool.inputSchema
        } for tool in response.tools]
        tool_names = [tool["name"] for tool in self.tools]
        return f"Connected to MCP server. Available tools: {', '.join(tool_names)}"

    def process_message(self, message: str, history: List[Union[Dict[str, Any], ChatMessage]]) -> tuple:
        if not self.session:
            return history + [{"role": "user", "content": message},
                {"role": "assistant", "content": "Please connect to an MCP server first."}
            ], gr.Textbox(value="")
        new_messages = loop.run_until_complete(self._process_query(message, history))
        return history + [{"role": "user", "content": message}] + new_messages, gr.Textbox(value="")

    async def _process_query(self, message: str, history: List[Union[Dict[str, Any], ChatMessage]]):
        claude_messages = []
        for msg in history:
            if isinstance(msg, ChatMessage):
                role, content = msg.role, msg.content
            else:
                role, content = msg.get("role"), msg.get("content")
            if role in ["user", "assistant", "system"]:
                claude_messages.append({"role": role, "content": content})
        claude_messages.append({"role": "user", "content": message})
        response = self.anthropic.messages.create(model="claude-sonnet-4-6",
            max_tokens=1000, messages=claude_messages, tools=self.tools)

        # 根据响应的内容类型决定是否调用工具
        result_messages = []
        for content in response.content:
            if content.type == 'text':
                result_messages.append({"role": "assistant", "content": content.text})
            elif content.type == 'tool_use':  # use tool
                tool_name = content.name
                tool_args = content.input
                result_messages.append({"role": "assistant",
                    "content": f"I'll use the {tool_name} tool to help answer your question.",
                    "metadata": {"title": f"Using tool: {tool_name}",
                        "log": f"Parameters: {json.dumps(tool_args, ensure_ascii=True)}",
                        "status": "pending",
                        "id": f"tool_call_{tool_name}"}})
                result_messages.append({"role": "assistant",
                    "content": "```json\n" + json.dumps(tool_args, indent=2, ensure_ascii=True) + "\n```",
                    "metadata": {"parent_id": f"tool_call_{tool_name}",
                        "id": f"params_{tool_name}",
                        "title": "Tool Parameters"}})

                # 调用服务器会话的工具并解析结果
                result = await self.session.call_tool(tool_name, tool_args)
                if result_messages and "metadata" in result_messages[-2]:
                    result_messages[-2]["metadata"]["status"] = "done"
                result_messages.append({"role": "assistant",
                    "content": "Here are the results from the tool:",
                    "metadata": {"title": f"Tool Result for {tool_name}",
                        "status": "done",
                        "id": f"result_{tool_name}"}})
                result_content = result.content
                if isinstance(result_content, list):
                   ...
        return result_messages
client = MCPClientWrapper()
代码是MCP客户端实现,将Claude AI与MCP服务器(如天气查询、图像生成等)集成到Gradio聊天界面中。该MCP客户端包装类的功能说明如下:
(1)根据MCP服务器参数server_params创建MCP客户端stdio_client,并根据该客户端获取传输机制stdio_transport。注意,在创建stdio_client过程中,会根据server_params的服务器路径server_path启动之前创建的FastMCP服务器,所以不需要单独启动FastMCP服务器。
(2)根据stdio_transport创建连接至指定MCP服务器的ClientSession类会话session,并对会话进行初始化。
(3)管理历史对话记录与并对消息进行格式化,加入新录入消息。根据自定义的工具Anthropic调用Claude API并记录回复response。
(4)根据response的内容类型content.type判断是否需要调用工具,如果不需要,直接添加回复内容到result_messages并返回,否则调用工具tool_name。通过session向MCP服务器发送工具调用请求,提示prompt通过tool_args发送。
(5)解析工具执行结果result_content,将包含结果的消息claude_messages再次发送到Claude进行解读,并将回复结果添加到结果消息result_messages并返回。限于篇幅,省略此处代码,请参考线上资源。
(6)最后,创建MCPClientWrapper对象,供Gradio界面调用。
Gradio界面函数。实现与用户友好交互,如代码15-9所示:
def gradio_interface():
    with gr.Blocks(title="MCP Weather Client") as demo:
        gr.Markdown("# MCP Weather Assistant")
        gr.Markdown("Connect to your MCP weather server and chat with the assistant")
        with gr.Row(equal_height=True):
            with gr.Column(scale=4):
                server_path = gr.Textbox(label="Server Script Path",
                    placeholder="Enter path to server script (e.g., weather.py)",
                    value="gradio_mcp_server.py")
            with gr.Column(scale=1):
                connect_btn = gr.Button("Connect")

        status_txt = gr.Textbox(label="Connection Status", interactive=False)
        chatbot = gr.Chatbot(value=[], height=500,
            avatar_images=(
                "https://www.gstatic.com/images/branding/searchlogo/ico/favicon.ico",
                "https://em-content.zobj.net/source/twitter/376/hugging-face_1f917.png"))
        with gr.Row(equal_height=True):
            msg = gr.Textbox(label="Your Question", scale=4,
                placeholder="Ask about weather or alerts.")
            clear_btn = gr.Button("Clear Chat", scale=1)
        connect_btn.click(client.connect, inputs=server_path, outputs=status_txt)
        msg.submit(client.process_message, [msg, chatbot], [chatbot, msg])
        clear_btn.click(lambda: [], None, chatbot)
    return demo
if __name__ == "__main__":
    if not os.getenv("ANTHROPIC_API_KEY"):
        print("Warning: ANTHROPIC_API_KEY not found. Please set it in .env file.")
    interface = gradio_interface()
    interface.launch(debug=True)
在Gradio聊天界面展示MCP服务器脚本路径、连接状态、聊天记录、输入提示及清空按钮等,最后返回Demo。以下是Gradio界面函数的处理逻辑:
(1)客户端连接服务器,并显示连接状态和可用工具。
(2)用户消息prompt和历史记录chatbot通过Gradio界面传入MCP客户端包装类的对象client,并调用其成员函数process_message进行消息处理。注意,此处client并不是MCP客户端,MCP客户端是stdio_client。
(3)在函数process_message中,将prompt和chatbot转发至Claude,并同步显示Claude回复与生成的图像。清理按钮可清空历史记录chatbot。
(4)在主程序main中创建gradio_interface对象,并以调试方式启动Demo。
运行应用。运行客户端应用步骤如下:
(1)首先设置秘钥:echo “ANTHROPIC_API_KEY=your_key” > .env。然后打开一个命令窗口,运行MCP客户端:python gradio_mcp_client.py。
(2)在浏览器中打开Gradio界面,可见MCP服务端文件路径。点击"Connect"建立与MCP服务端的连接,成功连接后将显示服务端连接成功并列出可用工具。
(3)现在可与Claude对话,它将根据聊天内容进行文本回复,或调用MCP服务器工具以生成图像,例如尝试输入以下指令:
- “Can you generate an image of a mountain landscape at sunset?”
- “Please draw a tabby cat wearing Hanfu.”
- “Generate a picture of a panda wearing sunglasses.”
MCPClientWrapper将根据Claude的回复自动识别这些请求,并调用MCP服务器的工具来生成图像。运行界面如图15-6所示: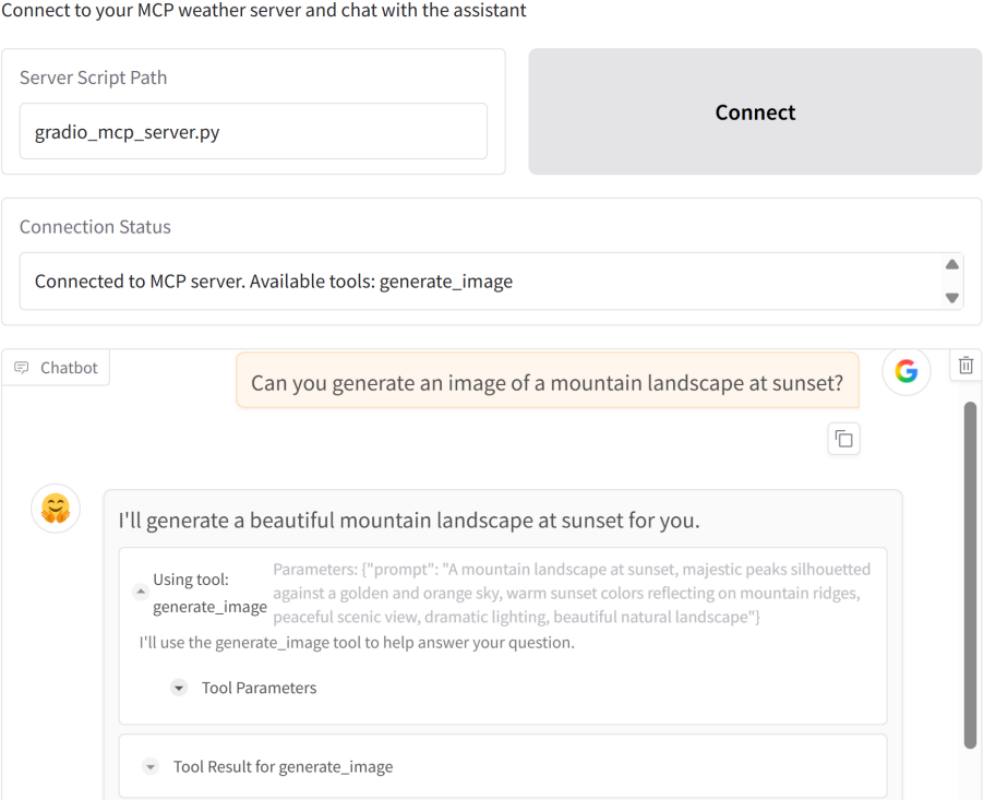
输入绘画请求后,可能会遇到超时问题,此时可将SanaSprint部署到本地或尝试其他绘画工具。首先,将Spaces项目ysharma/SanaSprint的代码复制到本地;然后,安装库spaces、torch、diffusers、transformers、accelerate及hf_xet;最后启动SanaSprint代码,期间还需下载相关模型,之后便可在本地运行。
扩展建议。现已搭建可运行的MCP系统,后续该如何扩展呢?建议如下:①为服务器添加更多工具模块;②完善错误处理机制;③将服务器及客户端部署在带认证的私有Spaces,实现工具安全访问;④开发定制化的服务器工具,可以连接自有API或服务;⑤采用流式响应提升用户体验。

openEuler 是由开放原子开源基金会孵化的全场景开源操作系统项目,面向数字基础设施四大核心场景(服务器、云计算、边缘计算、嵌入式),全面支持 ARM、x86、RISC-V、loongArch、PowerPC、SW-64 等多样性计算架构
更多推荐


 10
10 0
0- 0


 已为社区贡献9条内容

所有评论(0)