第16章 Gradio应用拓展为Discord Bot、Slack Bot和Website Widget(1)——项目十四:Gradio应用拓展为Discord Bot
为了拓展Gradio应用的使用范围,可以将Gradio应用部署到其他平台或嵌入到网站中。本章详细描述了三种拓展方式:Discord Bot、Slack Bot和Website Widget,分别讲述了各自的工作原理与前置条件、如何创建平台应用、编写机器人代码、将机器人安装到服务器并进行对话操作。这三个平台各有特色,Discord适合娱乐放松,Slack适合工作管理,而Website Widget适
第16章 Gradio应用拓展为Discord Bot、Slack Bot和Website Widget(1)——项目十四:Gradio应用拓展为Discord Bot
第16章 Gradio应用拓展为Discord Bot、Slack Bot和Website Widget
为了拓展Gradio应用的使用范围,可以将Gradio应用部署到其他平台或嵌入到网站中。本章详细描述了三种拓展方式:Discord Bot、Slack Bot和Website Widget,分别讲述了各自的工作原理与前置条件、如何创建平台应用、编写机器人代码、将机器人安装到服务器并进行对话操作。这三个平台各有特色,Discord适合娱乐放松,Slack适合工作管理,而Website Widget适合网站开发,读者可根据实际情况选择。
16.1 项目十四:Gradio应用拓展为Discord Bot
Discord是专为游戏和娱乐打造的群聊,它甚至是打造全球社区的理想平台,用户可以自由定制一方天地,在其中聊天、游戏,与朋友共度美好时光。Gradio应用可以拓展到Discord,创建Discord Bot,让Discord服务器中的用户直接与之互动。
Gradio应用创建Discord Bot的工作原理可以概括为:该Discord Bot会监听频道中使用符号@提及它的消息,当收到消息时(消息可包含文本或文件),它会通过Gradio内置的API将消息发送至Gradio应用,并将API返回的响应作为回复发送给Discord用户。由于Gradio内置的API非常灵活,因此可以轻易创建支持文本、图片、音频、实时流、聊天记录等多样化功能的Discord聊天机器人。开始之前:
(1)安装最新版gradio和discord.py库,安装命令如下所示:
pip install --upgrade gradio discord.py~=2.0
(2)准备Gradio应用。需确保已有一个正在运行的Gradio应用,该应用可以运行在本地或Spaces上。下面详细讲述本文使用的Gradio应用示例。
16.1.1 编码机器人:Gradio Playground Bot
在本章示例中,使用应用Gradio Playground Bot,其Spaces地址为:shao918516/GradioClaudeBot🖇️链接16-1。注意:需在页面输入正确的ANTHROPIC_API_KEY并创建Anthropic客户端之后,才可有效使用其其API,否则无法得到有效结果。为避免ANTHROPIC_API_KEY泄漏,读者可根据本项目代码创建自己Spaces应用,并在Bot代码中创建Gradio客户端时,替换为Spaces应用地址。
源代码及解读。Gradio Playground Bot根据上传图像或用户描述,编写Python代码来生成Gradio应用,要求重新创建Gradio UI,在返回Markdown中响应,用三重回溯符将代码括起来。源代码如代码16-1所示:
import anthropic
import base64
import gradio as gr
import mimetypes

def generate_playground_link(code):
    """Generate a Gradio app link from the code."""
    base64_code = base64.b64encode(code.encode()).decode()
    return base64_code

def extract_code(message):
    return message.split('```python')[1].split('```')[0]

def get_response(message, history):
    client = anthropic.Anthropic()
    response = []
    if message["files"]:
        response.append("Generating Gradio app based on the image...")
        yield response
        image = message["files"][0]  # str filepath
        image_data = base64.standard_b64encode(open(image, "rb").read()).decode("utf-8")
        image_media_type = mimetypes.guess_type(image)[0]

        resp_text = client.messages.create(
            model="claude-sonnet-4-6",
            max_tokens=1024,
            messages=[{"role": "user",
                    "content": [{"type": "image",
                            "source": {"type": "base64",
                                "media_type": image_media_type,
                                "data": image_data,},},
                        {"type": "text", "text": data["text"]},
                        {"type": "text", "text": "Based on the screenshot, write the Python code to generate this Gradio app. Try to recreate the Gradio UI, not necessarily the underlying data or machine learning model. Respond in Markdown enclosing the code in triple backticks."}],}],)
    else:
        response.append("Generating Gradio app based on the description...")
        ...
    code = extract_code(resp_text.content[0].text)
    formatted_code = f"```python\n{code}\n```"
    response.append(formatted_code)
    yield response
    response.append("[Try it out!](" + generate_playground_link(code) + ")")
    yield response

with gr.Blocks() as demo:
    api_tb = gr.Textbox(placeholder="Please input your Anthropic api keys.", type='password')
    gen_but = gr.Button("Create Anthropic Client")
    client_status = gr.Textbox(label="Client status", interactive=False, render=False)
    def on_create(api_key):
        success, message = create_anthropic_client(api_key)
        if success:
            return gr.update(value=message)
        else:
            return gr.update(value=message)
    gen_but.click(on_create, inputs=api_tb, outputs=client_status)
    client_status.render()
    gr.ChatInterface(
        get_response,
        multimodal=True,
        title="Gradio Claude Bot",
        api_name="chat"
    )
    demo.load(clean_client, None, None)
if __name__ == "__main__":
    demo.launch()
示例使用gr.Blocks与gr.ChatInterface结合创建聊天界面,代码解读如下:
- 函数generate_playground_link将生成的代码返回,方便复制后运行。
- 函数extract_code抽取代码,去掉代码标识符,只保留被包裹的代码。
- 函数get_response获取响应。首先创建Anthropic Client客户端;然后根据数据是否包含文件分别处理,当包含文件时,文件和文本一起传入client产生回复消息,否则只传入文本并产生回复消息;最后抽取代码并格式化后添加到回复中。
注意:此处选择Anthropic公司新发布的模型claude-sonnet-4-6,它以代码能力著称,但需要设置ANTHROPIC_API_KEY。此处可以换成其他大模型。运行正确时,界面如图16-1所示: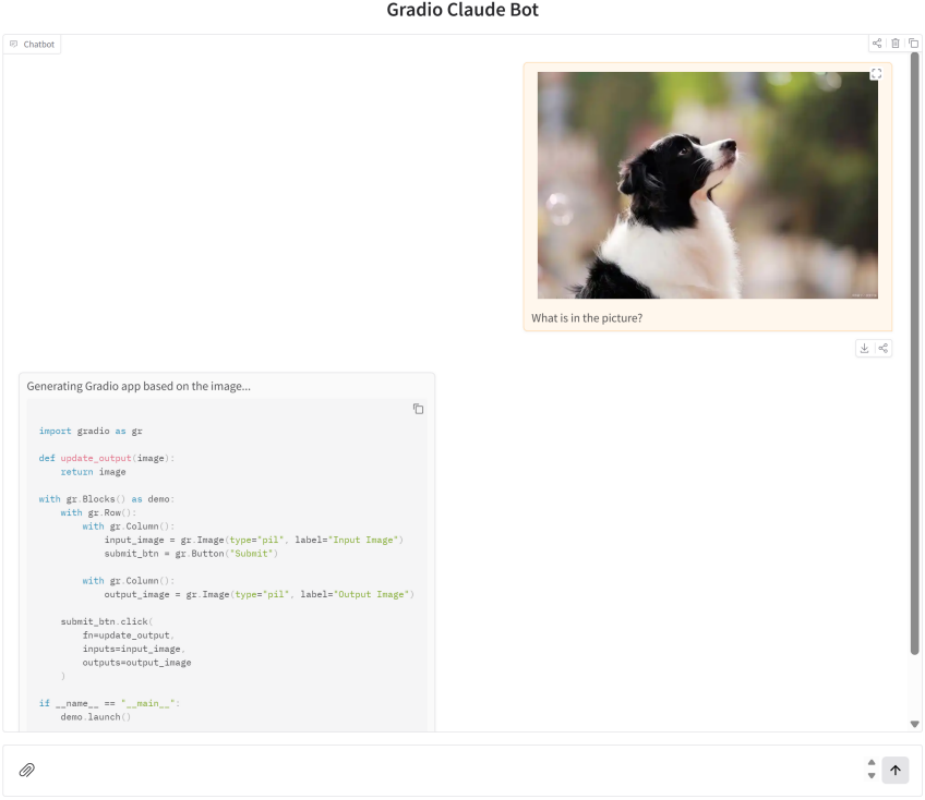
可以单击复制按钮复制代码后在本地运行。
16.1.2 创建Discord Bot并配置
创建Discord应用包括新建Discord App、生成Token及启用权限。
新建Discord Bot应用。访问Discord开发者面板:Discord Developers🖇️链接16-2,注册并登录。然后找到"New Application"按钮并单击,在弹出框为应用命名:GradioPlaygroundBot,最后单击"Create",创建界面如图16-2所示: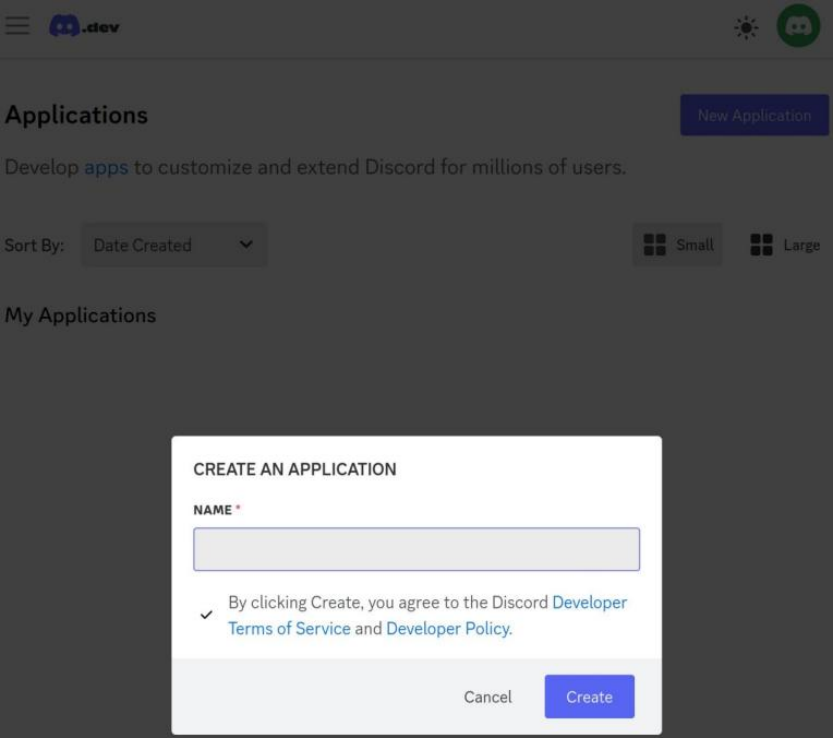
在接下来的页面中,可以看到新建应用程序的基本信息。
生成Token。在"Settings"栏下,点击"Bot"选项,可以在此修改机器人的用户名Username(可选操作)。接着点击"Reset Token"(重置令牌)按钮,出现提示“Multi-Factor Authentication”,直接点击“Submit”即可。系统将生成一个新令牌DISCORD_TOKEN,请立即复制保存该令牌,我们后续步骤会用到它,最后别忘了点击“Save Changes”。如图16-3所示: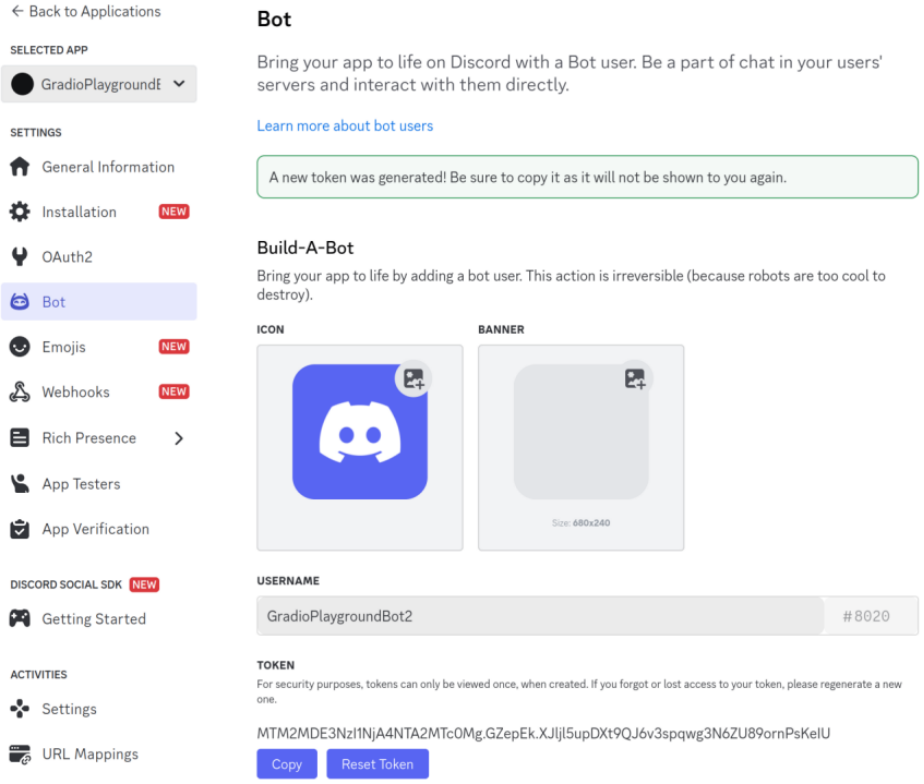
启用权限:Message Content Intent。向下滚动至"Privileged Gateway Intents"(特权网关意向)部分,因为机器人需要特定权限才能工作,所以需要启用"Message Content Intent"(消息内容意向),切换开关启用该权限并保存。如图16-4所示: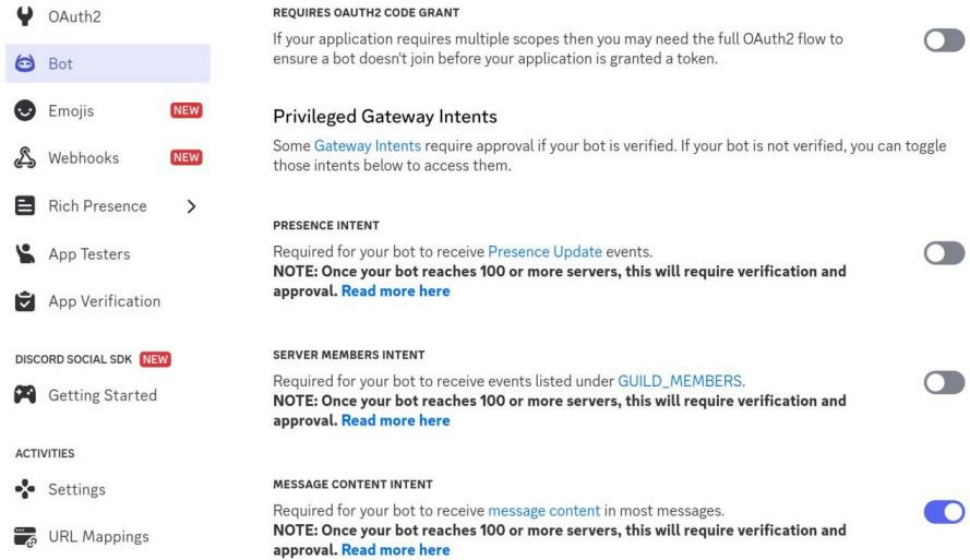
16.1.3 编写Discord Bot客户端代码
本节编写Discord Bot基础及详细版代码并对其代码进行详细解读。
首先编写一个简单的Discord机器人来确保基础功能正常。将以下Python代码保存为discord_bot.py,并设置令牌DISCORD_TOKEN,如代码16-2所示:
# discord_bot.py
import discord
from google.colab import userdata
import nest_asyncio

intents = discord.Intents.default()  # Include all default intents
client = discord.Client(intents=intents)
@client.event
async def on_ready():
    print(f'{client.user} has connected to Discord!')
nest_asyncio.apply()  # Apply nest_asyncio patch
client.run(userdata.get('DISCORD_TOKEN'))
首先,配置机器人,启用默认的网关并创建客户端实例。然后,进行事件处理,当机器人成功登录Discord服务器时触发 on_ready(),打印机器人用户名和“已连接”提示。最后,启动机器人,允许在已有运行中循环里再次。其中nest_asyncio库是用来解决Colab中事件循环冲突的补丁,允许嵌套事件循环。Colab运行输出信息如下:
INFO:discord.client:logging in using static token
GradioPlaygroundBot#4217 has connected to Discord!
确认基础功能正常后,就可以使用Gradio的Python客户端来调用前面提到的Gradio Playground Bot,更新discord_bot.py内容,如代码16-3所示:
import discord
from gradio_client import Client, handle_file
import httpx
import os

TOKEN = "DISCORD_TOKEN"
intents = discord.Intents.default()
intents.message_content = True
discord_client = discord.Client(intents=intents)
gradio_client = Client("abidlabs/gradio-playground-bot")

def download_image(attachment):
    response = httpx.get(attachment.url)
    image_path = f"./images/{attachment.filename}"
    os.makedirs("./images", exist_ok=True)
    with open(image_path, "wb") as f:
        f.write(response.content)
    return image_path
...
@discord_client.event
async def on_message(message):
    if message.author == discord_client.user:
        return
    if discord_client.user in message.mentions:
        clean_message = message.content.replace(f"<@{discord_client.user.id}>", "").strip()
        files = []
        if message.attachments:
            for attachment in message.attachments:
                if any(attachment.filename.lower().endswith(ext) for ext in ['png', 'jpg', 'jpeg', 'gif', 'webp']):
                    image_path = download_image(attachment)
                    files.append(handle_file(image_path))
                    break
        for response in gradio_client.submit(
            message={"text": clean_message, "files": files},
        ):
            await message.channel.send(response[-1])
discord_client.run(TOKEN)
代码定义客户端收到消息后的处理,详细解读如下:
- 首先分别根据Discord默认Intents配置创建Discord客户端discord_client、根据Space ID创建Gradio的客户端gradio_client。
- 定义下载函数download_image,根据附件的url下载图片,并写入目录/images。
- 定义同样的on_message,在收到消息时调用。先排除来自机器人的消息,然后判断是否提到Discord的Bot,当被提到时就开始清理消息并下载附件,最后将消息和附件同时提交给gradio_client,并将gradio_client产生的回复返回给消息的channel,由channel显示在聊天界面,交互完成!运行后输出如下:
Loaded as API: https://abidlabs-gradio-playground-bot.hf.space ✔
INFO:discord.client:logging in using static token

INFO:discord.gateway:Shard ID None has connected to Gateway (Session ID: 32b6c043dfdc898a9671e4d1856a6654).
We have logged in as GradioPlaygroundBot#4217

INFO:discord.gateway:Shard ID None has successfully RESUMED session 32b6c043dfdc898a9671e4d1856a6654.
通过代码解读,可以看到客户端对象discord_client,通过DISCORD_TOKEN与Discord Bot类型的应用GradioPlaygroundBot连接。客户端代码中,首先启动客户端discord_client并触发登录事件on_ready以登录GradioPlaygroundBot;然后Discord服务器的@GradioPlaygroundBot提示消息通过message.channel发送到discord_client,从而触发discord_client事件并调用函数on_message;随后在该函数对消息处理加工后发送给gradio_client;最后将gradio_client返回的消息通过message.channel发送到Discord服务器回显。
16.1.4 将Discord Bot安装到Discord服务器
本节将聊天机器人GradioPlaygroundBot安装到Discord服务器,以便Discord服务器中使用@GradioPlaygroundBot提及它时,可以将提示消息发送到与之关联的discord_client。首先生成GradioPlaygroundBot的授权URL,然后创建Discord服务器,最后在URL中将聊天机器人配置到Discord服务器中。
生成授权URL。请返回Discord应用GradioPlaygroundBot的控制面板,在"设置(Settings)"栏目下点击"OAuth2"选项,向下滚动至"OAuth2 URL Generator"区域并勾选"bot"复选框,如图16-5所示: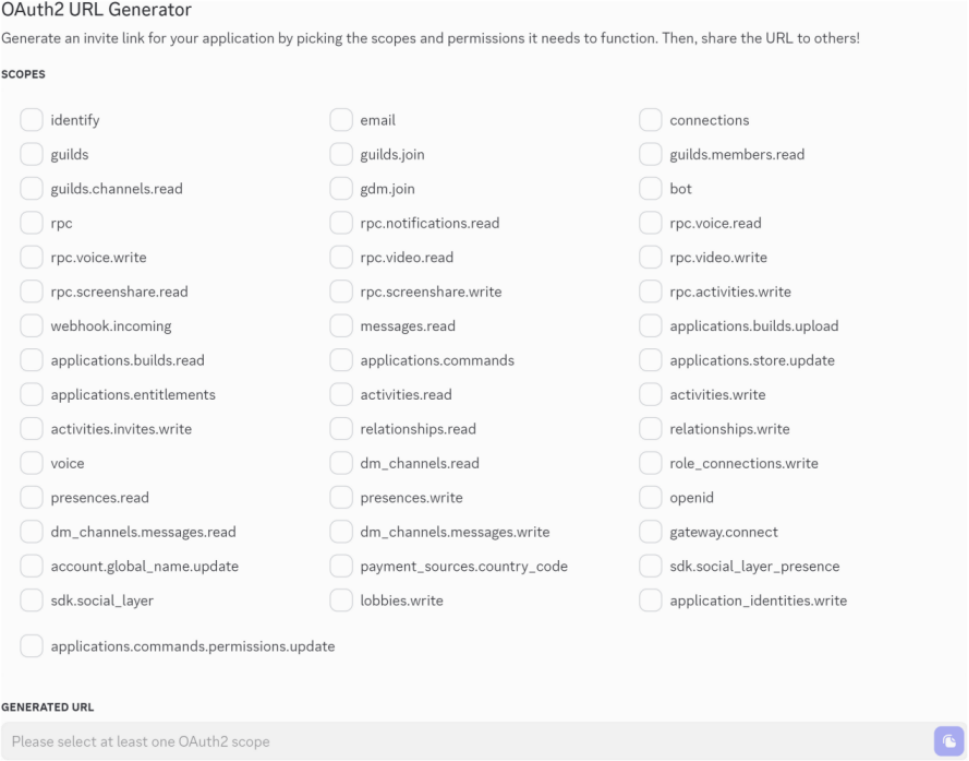
此时会弹出"机器人权限(Bot Permissions)"设置面板,请启用图16-6中的权限: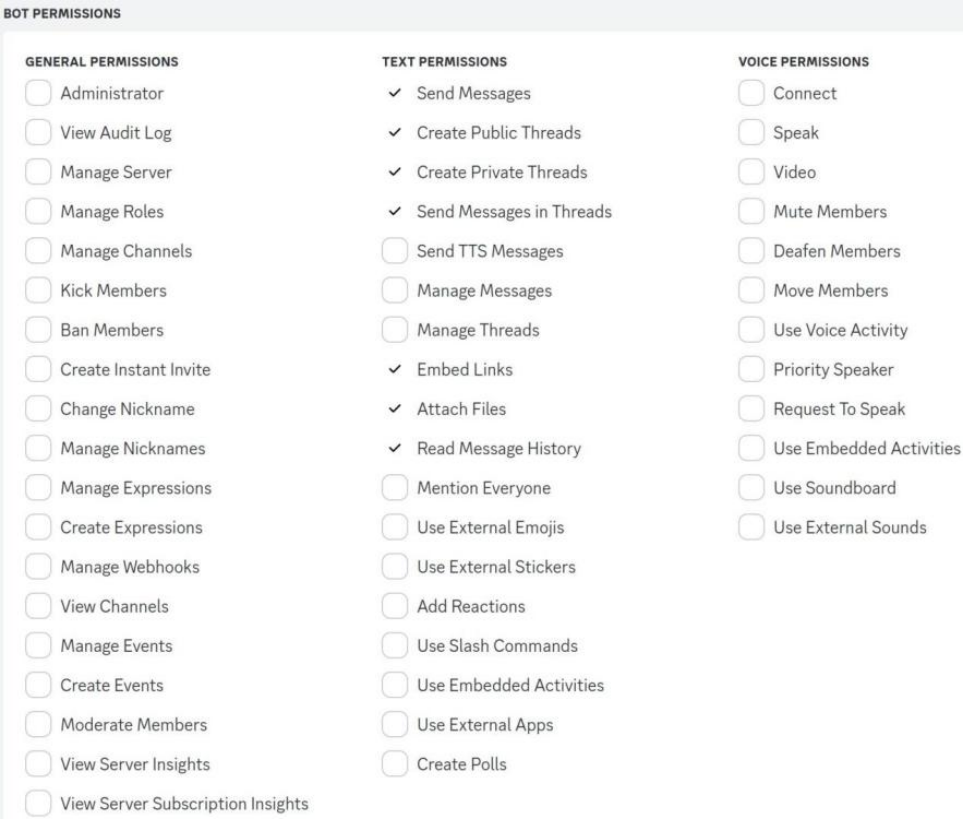
此时,系统会自动生成一个授权链接Generated URL,格式大致如下:
https://discord.com/oauth2/authorize?client_id=1356247375693484116&permissions=377957238784&integration_type=0&scope=bot
将该链接复制到浏览器中打开,就可以把GradioPlaygroundBot添加到用户管理的任意服务器上了,如图16-7所示: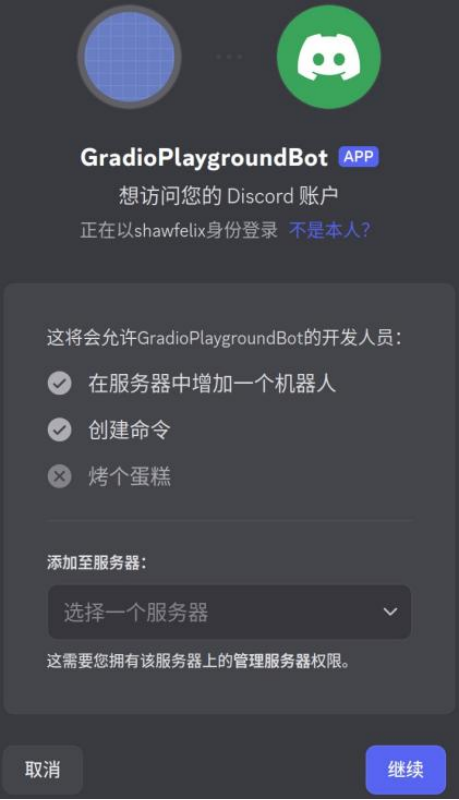
在此之前,需要有自己的Discord服务器才能添加,对于刚接触Discord的新人来说,显然还没有自己的服务器,因此这里教读者简单创立自己的Discord服务器。
创建Discord服务器。首先在电脑端打开Discord官网,注册并登录后,在主页选择:“在您的浏览器中打开Discord”,出现界面如图16-8所示: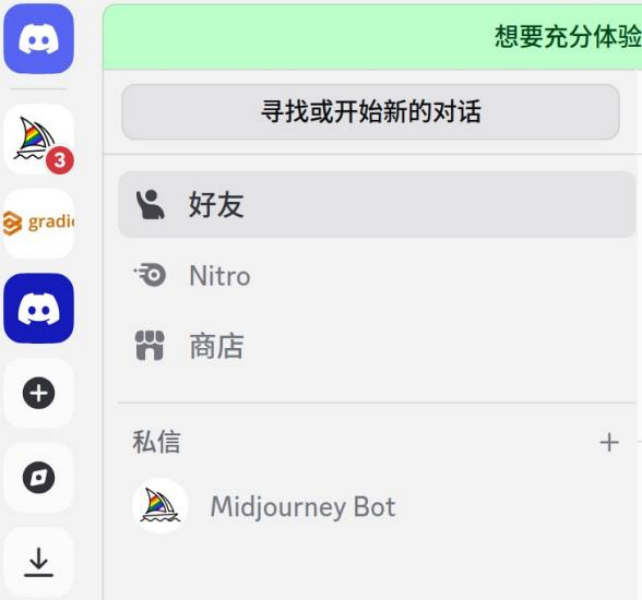
点击左侧导航栏中的+(加号),开始创建自己的服务器,在弹出框单击“亲自创建”,从列表中选择一个模板:“对我来说和我的朋友”或“为俱乐部或社区”,也可以通过点击“跳过此问题”来跳过此选项。以“对我来说和我的朋友”为例,之后就是设置服务器图标和名称,如图16-9所示: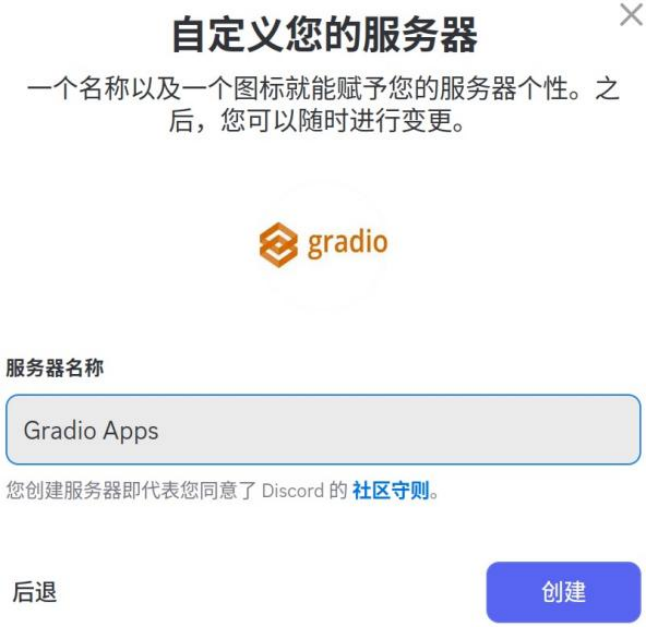
设置后点击“创建”,就可得到名为“Gradio Apps”的服务器,顾名思义,以后创建的Gradio应用都可以安装到此服务器。
将机器人安装到Discord服务器。重新刷新之前生成的授权链接Generated URL,选项栏就会出现新创建服务器,选择它后点击“继续”出现授权界面如图16-10所示: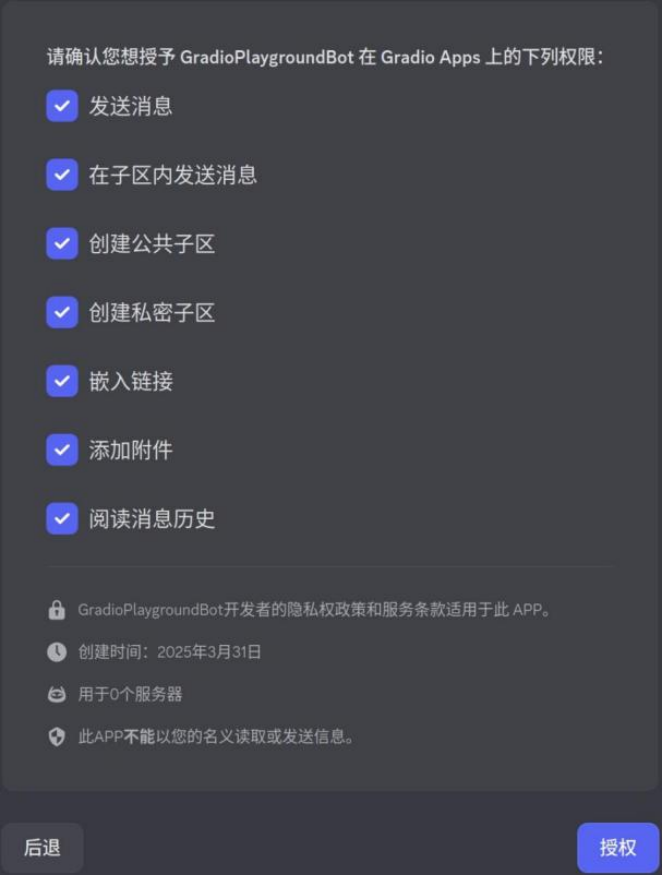
点击授权后就会出现提示:GradioPlaygroundBot已获得授权并添加至Gradio Apps,此时就可以关闭该标签页,使用Gradio创建Discord Bot完成!
16.1.5 操作机器人及功能扩展
现在已将Gradio应用部署为Discord Bot,经由Space ID和DISCORD_TOKEN,经过客户端的消息转化后与Didscord服务器相连。那么,现在如何使用及扩展它呢?
使用Discord Bot。现在,可以在Discord服务器的任意频道中用符号@GradioPlaygroundBot,并选择性地附加图片,发送消息后得到Gradio应用的回复。访问Discord个人服务器🖇️链接16-3,点击左侧的服务器Gradio Apps,比如上传一张图片并配文:@GradioPlaygroundBot Please generate Gradio app based on the image.,发送消息界面如图16-11所示: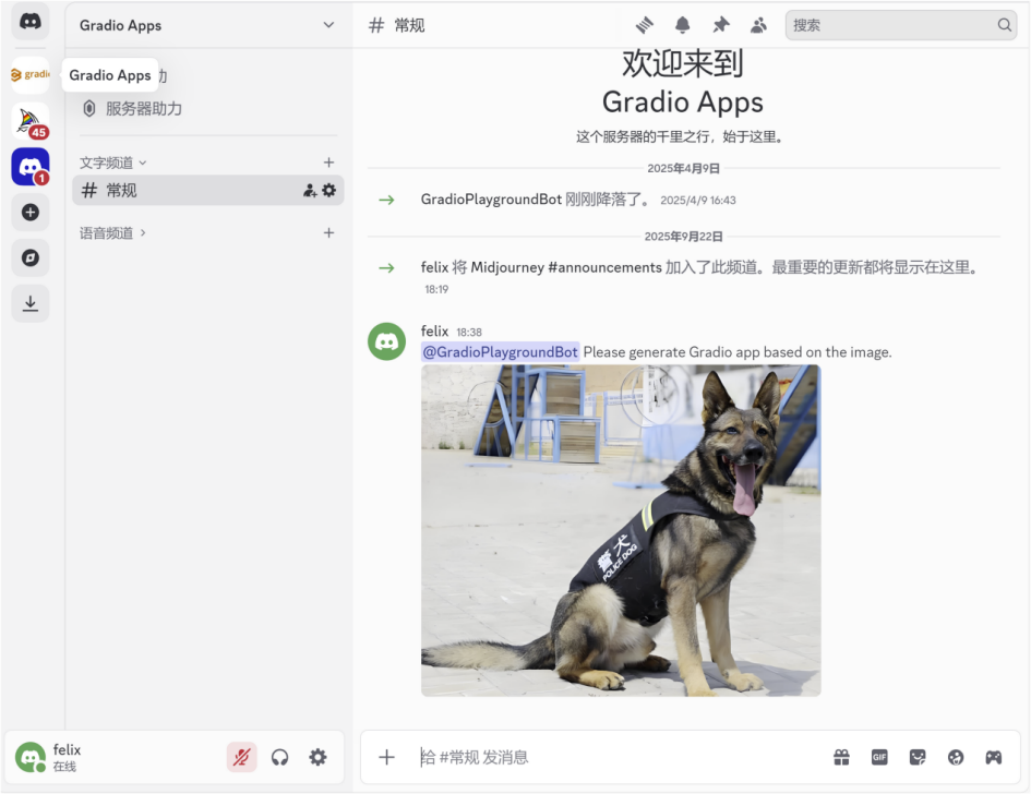
当Gradio应用没有报错且正常回复后,Discord端收到的回复类似图16-12: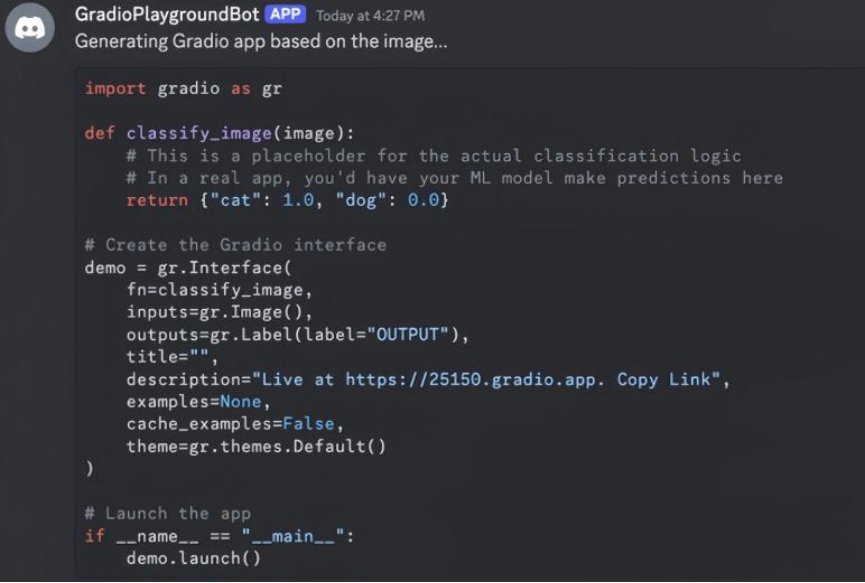
功能及扩展。该机器人GradioPlaygroundBot应具备的功能有:①监听被提及的消息;②处理附加的图片;③将文本和图片发送至Gradio应用;④将响应内容实时流式传输回Discord服务器的频道。
这只是一个基础示例——可以进一步扩展Gradio,比如:①支持更多文件类型;②添加错误处理机制;③集成不同的Gradio应用。
如果我们基于Gradio应用开发了Discord Bot,可以在X(Twitter)上分享并@Gradio官方账号🖇️链接16-4,官方将很乐意帮助开发者推广应用!

openEuler 是由开放原子开源基金会孵化的全场景开源操作系统项目,面向数字基础设施四大核心场景(服务器、云计算、边缘计算、嵌入式),全面支持 ARM、x86、RISC-V、loongArch、PowerPC、SW-64 等多样性计算架构
更多推荐
 3
3 0
0- 0


 已为社区贡献9条内容

所有评论(0)