「保姆级教程」ModelScope免费服务器+文件上传服务+ngrok内网穿透全流程
ModelScope Notebook是阿里云提供的云端机器学习开发环境,支持Python编程,实名用户可获得免费算力额度,完美解决本地算力不足的问题。ngrok是一个内网穿透工具,可以将你的本地服务器暴露到公网,让外网用户也能访问。它的核心功能:🚀 将本地端口映射到公网URL🔒 支持HTTPS加密连接📊 提供请求日志和流量统计🔄 支持多种协议(HTTP/HTTPS/TCP)今天我们完成了
引言
大家好!今天给大家带来一个超实用的技术教程组合拳——如何在阿里云ModelScope免费服务器上搭建文件上传服务,并通过ngrok实现内网穿透,让外网也能访问你的服务。全程保姆级教学,跟着操作就能成功!
一、领取ModelScope免费服务器
1. 什么是ModelScope Notebook?
ModelScope Notebook是阿里云提供的云端机器学习开发环境,支持Python编程,实名用户可获得免费算力额度,完美解决本地算力不足的问题。
2. 领取步骤
第一步:登录注册
-
访问 魔塔社区
-
注册账号并完成实名认证
第二步:进入Notebook
-
点击右上角「控制台」
-
选择「Notebook」进入管理页面
第三步:创建实例
-
点击「新建Notebook」
-
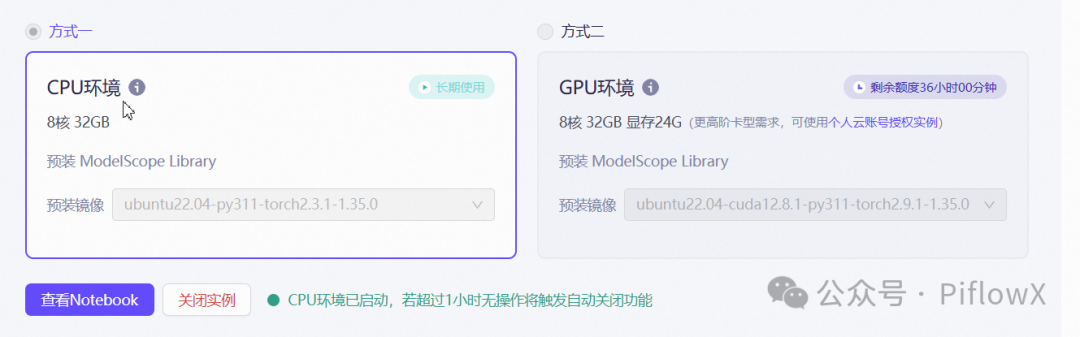
选择GPU环境(36小时免费额度)或CPU环境(长期免费使用)
-
等待实例启动(约1-2分钟)
二、搭建文件上传服务
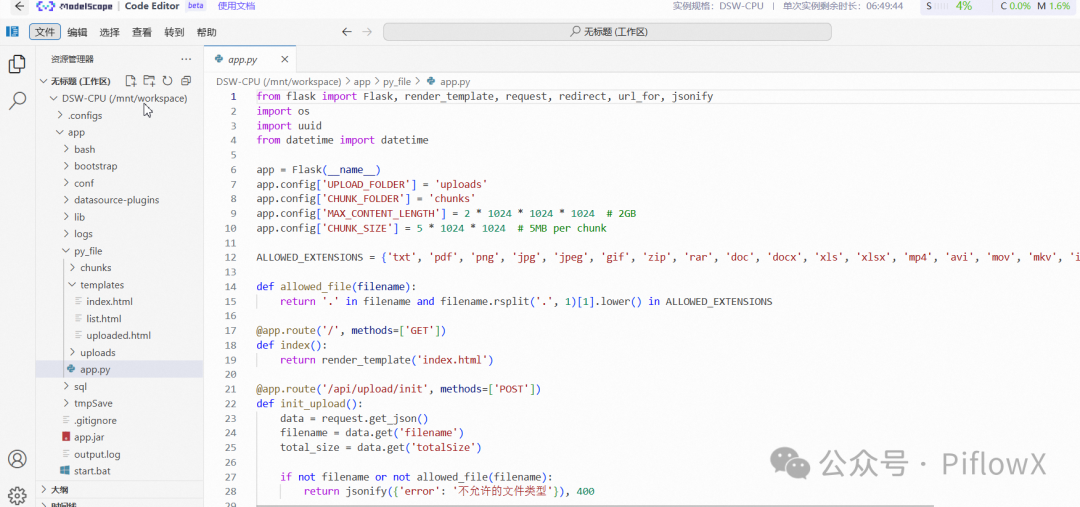
1. 项目结构
如果选择CPU环境,若超过1小时无操作将触发自动关闭功能,重启后会清空/mnt/workspace之外的数据,所有为了持久化,将数据放在/mnt/workspace下。
首先创建项目目录结构:
mkdir
 -p /mnt/workspace/py_file/{templates,uploads,chunks}

cd
 py_file
2. 创建Flask服务端代码
创建 app.py 文件:
from
 flask
import
 Flask, render_template, request, redirect, url_for, jsonify

import
 os

import
 uuid

from
 datetime
import
 datetime


app = Flask(__name__)

app.config[
'UPLOAD_FOLDER'
] =
'uploads'

app.config[
'CHUNK_FOLDER'
] =
'chunks'

app.config[
'MAX_CONTENT_LENGTH'
] =
2
 *
1024
 *
1024
 *
1024
# 2GB

app.config[
'CHUNK_SIZE'
] =
5
 *
1024
 *
1024
# 5MB per chunk


ALLOWED_EXTENSIONS = {
'txt'
,
'pdf'
,
'png'
,
'jpg'
,
'jpeg'
,
'gif'
,
'zip'
,
'rar'
,


'doc'
,
'docx'
,
'xls'
,
'xlsx'
,
'mp4'
,
'avi'
,
'mov'
,
'mkv'
}


def
allowed_file
(
filename
):


return
'.'
in
 filename
and
 filename.rsplit(
'.'
,
1
)[
1
].lower()
in
 ALLOWED_EXTENSIONS


@app.route('/', methods=['GET'])

def
index
():


return
 render_template(
'index.html'
)


@app.route('/api/upload/init', methods=['POST'])

def
init_upload
():

    data = request.get_json()

    filename = data.get(
'filename'
)

    total_size = data.get(
'totalSize'
)


if
not
 filename
or
not
 allowed_file(filename):


return
 jsonify({
'error'
:
'不允许的文件类型'
}),
400


    upload_id =
str
(uuid.uuid4())

    chunk_dir = os.path.join(app.config[
'CHUNK_FOLDER'
], upload_id)

    os.makedirs(chunk_dir, exist_ok=
True
)


return
 jsonify({


'uploadId'
: upload_id,


'chunkSize'
: app.config[
'CHUNK_SIZE'
],


'resumed'
:
False

    })


@app.route('/api/upload/chunk', methods=['POST'])

def
upload_chunk
():

    upload_id = request.form.get(
'uploadId'
)

    chunk_index =
int
(request.form.get(
'chunkIndex'
))

    file = request.files.get(
'file'
)


if
not
 upload_id
or
not
 file:


return
 jsonify({
'error'
:
'缺少参数'
}),
400


    chunk_dir = os.path.join(app.config[
'CHUNK_FOLDER'
], upload_id)

    chunk_path = os.path.join(chunk_dir,
f'chunk_{chunk_index}'
)

    file.save(chunk_path)


return
 jsonify({
'chunkIndex'
: chunk_index,
'status'
:
'success'
})


@app.route('/api/upload/complete', methods=['POST'])

def
complete_upload
():

    data = request.get_json()

    upload_id = data.get(
'uploadId'
)

    filename = data.get(
'filename'
)


    chunk_dir = os.path.join(app.config[
'CHUNK_FOLDER'
], upload_id)

    timestamp = datetime.now().strftime(
'%Y%m%d_%H%M%S_'
)

    final_filename = timestamp + filename

    final_path = os.path.join(app.config[
'UPLOAD_FOLDER'
], final_filename)


with
open
(final_path,
'wb'
)
as
 final_file:

        chunk_files =
sorted
([f
for
 f
in
 os.listdir(chunk_dir)
if
 f.startswith(
'chunk_'
)],

                           key=
lambda
 x:
int
(x.split(
'_'
)[
1
]))


for
 chunk_file
in
 chunk_files:

            chunk_path = os.path.join(chunk_dir, chunk_file)


with
open
(chunk_path,
'rb'
)
as
 cf:

                final_file.write(cf.read())


import
 shutil

    shutil.rmtree(chunk_dir)


return
 jsonify({


'filename'
: filename,


'savedName'
: final_filename,


'size'
: os.path.getsize(final_path),


'uploadTime'
: datetime.now().strftime(
'%Y-%m-%d %H:%M:%S'
)

    })


@app.route('/list')

def
list_files
():

    files = []


if
 os.path.exists(app.config[
'UPLOAD_FOLDER'
]):


for
 filename
in
 os.listdir(app.config[
'UPLOAD_FOLDER'
]):

            file_path = os.path.join(app.config[
'UPLOAD_FOLDER'
], filename)


if
 os.path.isfile(file_path):

                files.append({


'name'
: filename,


'size'
: os.path.getsize(file_path),


'mtime'
: datetime.fromtimestamp(os.path.getmtime(file_path)).strftime(
'%Y-%m-%d %H:%M:%S'
)

                })

    files.sort(key=
lambda
 x: x[
'mtime'
], reverse=
True
)


return
 render_template(
'list.html'
, files=files)


if
 __name__ ==
'__main__'
:

    os.makedirs(app.config[
'UPLOAD_FOLDER'
], exist_ok=
True
)

    os.makedirs(app.config[
'CHUNK_FOLDER'
], exist_ok=
True
)

    app.run(debug=
True
, host=
'0.0.0.0'
, port=
5000
)
3. 创建前端页面
创建 templates/index.html:
<!DOCTYPE html>

<
html

lang
=
"zh-CN"
>

<
head
>


<
meta

charset
=
"UTF-8"
>


<
title
>
文件上传
</
title
>


<
style
>


body
 {
font-family
: -apple-system, BlinkMacSystemFont,
'Segoe UI'
, Roboto, sans-serif;
padding
:
20px
;
max-width
:
600px
;
margin
:
0
 auto; }


.upload-area
 {
border
:
2px
 dashed
#ccc
;
border-radius
:
10px
;
padding
:
40px
;
text-align
: center;
cursor
: pointer; }


.upload-area
:hover
 {
border-color
:
#007bff
; }


#fileInput
 {
display
: none; }


.progress-bar
 {
width
:
100%
;
height
:
20px
;
background
:
#eee
;
border-radius
:
10px
;
margin-top
:
20px
; }


.progress
 {
height
:
100%
;
background
:
#007bff
;
border-radius
:
10px
;
transition
: width
0.3s
; }


</
style
>

</
head
>

<
body
>


<
h1
>
📤 文件上传
</
h1
>


<
div

class
=
"upload-area"

id
=
"uploadArea"
>


<
p
>
点击或拖拽文件到此处上传
</
p
>


<
p

style
=
"color: #666; font-size: 14px;"
>
支持大文件分片上传(最大2GB)
</
p
>


</
div
>


<
input

type
=
"file"

id
=
"fileInput"
>


<
div

class
=
"progress-bar"

id
=
"progressBar"

style
=
"display: none;"
>


<
div

class
=
"progress"

id
=
"progress"
>
</
div
>


</
div
>


<
p

id
=
"status"
>
</
p
>


<
script
>


const
 uploadArea =
document
.
getElementById
(
'uploadArea'
);


const
 fileInput =
document
.
getElementById
(
'fileInput'
);


const
 progressBar =
document
.
getElementById
(
'progressBar'
);


const
 progress =
document
.
getElementById
(
'progress'
);


const
 status =
document
.
getElementById
(
'status'
);


        uploadArea.
addEventListener
(
'click'
,
() =>
 fileInput.
click
());

        uploadArea.
addEventListener
(
'dragover'
,
(
e
) =>
 e.
preventDefault
());

        uploadArea.
addEventListener
(
'drop'
,
(
e
) =>
 {

            e.
preventDefault
();


const
 files = e.
dataTransfer
.
files
;


if
 (files.
length
 >
0
)
uploadFile
(files[
0
]);

        });

        fileInput.
addEventListener
(
'change'
,
(
e
) =>
uploadFile
(e.
target
.
files
[
0
]));


async
function
uploadFile
(
file
) {


if
 (!file)
return
;


const
CHUNK_SIZE
 =
5
 *
1024
 *
1024
;
// 5MB


const
 totalChunks =
Math
.
ceil
(file.
size
 /
CHUNK_SIZE
);


let
 uploadedChunks =
0
;


            progressBar.
style
.
display
 =
'block'
;

            status.
textContent
 =
`初始化上传...`
;


const
 initResponse =
await
fetch
(
'/api/upload/init'
, {


method
:
'POST'
,


headers
: {
'Content-Type'
:
'application/json'
 },


body
:
JSON
.
stringify
({
filename
: file.
name
,
totalSize
: file.
size
 })

            });


const
 { uploadId, chunkSize } =
await
 initResponse.
json
();


for
 (
let
 i =
0
; i < totalChunks; i++) {


const
 start = i * chunkSize;


const
 end =
Math
.
min
(start + chunkSize, file.
size
);


const
 chunk = file.
slice
(start, end);


const
 formData =
new
FormData
();

                formData.
append
(
'uploadId'
, uploadId);

                formData.
append
(
'chunkIndex'
, i);

                formData.
append
(
'totalChunks'
, totalChunks);

                formData.
append
(
'file'
, chunk);


await
fetch
(
'/api/upload/chunk'
, {
method
:
'POST'
,
body
: formData });


                uploadedChunks++;

                progress.
style
.
width
 =
`${(uploadedChunks / totalChunks) * 100}%`
;

                status.
textContent
 =
`上传中: ${Math.round((uploadedChunks / totalChunks) * 100)}%`
;

            }


const
 completeResponse =
await
fetch
(
'/api/upload/complete'
, {


method
:
'POST'
,


headers
: {
'Content-Type'
:
'application/json'
 },


body
:
JSON
.
stringify
({ uploadId,
filename
: file.
name
 })

            });


const
 result =
await
 completeResponse.
json
();


            status.
textContent
 =
`✅ 上传成功!文件名: ${result.filename}, 大小: ${formatSize(result.size)}`
;

        }


function
formatSize
(
bytes
) {


if
 (bytes <
1024
)
return
 bytes +
' B'
;


if
 (bytes <
1024
 *
1024
)
return
 (bytes /
1024
).
toFixed
(
2
) +
' KB'
;


if
 (bytes <
1024
 *
1024
 *
1024
)
return
 (bytes / (
1024
 *
1024
)).
toFixed
(
2
) +
' MB'
;


return
 (bytes / (
1024
 *
1024
 *
1024
)).
toFixed
(
2
) +
' GB'
;

        }


</
script
>

</
body
>

</
html
>
4. 创建文件列表页面
创建 templates/list.html:
<!DOCTYPE html>

<
html

lang
=
"zh-CN"
>

<
head
>


<
meta

charset
=
"UTF-8"
>


<
meta

name
=
"viewport"

content
=
"width=device-width, initial-scale=1.0"
>


<
title
>
已上传文件列表
</
title
>


<
style
>

        * {


margin
:
0
;


padding
:
0
;


box-sizing
: border-box;

        }


body
 {


font-family
:
'Segoe UI'
, Tahoma, Geneva, Verdana, sans-serif;


background
:
linear-gradient
(
135deg
,
#667eea
0%
,
#764ba2
100%
);


min-height
:
100vh
;


padding
:
40px
20px
;

        }


.container
 {


background
: white;


border-radius
:
20px
;


padding
:
30px
;


box-shadow
:
0
20px
60px
rgba
(
0
,
0
,
0
,
0.15
);


max-width
:
800px
;


margin
:
0
 auto;

        }


.header
 {


display
: flex;


justify-content
: space-between;


align-items
: center;


margin-bottom
:
30px
;

        }


h1
 {


color
:
#333
;


font-size
:
28px
;


display
: flex;


align-items
: center;


gap
:
10px
;

        }


.btn
 {


padding
:
10px
25px
;


border
: none;


border-radius
:
8px
;


font-size
:
15px
;


font-weight
:
600
;


cursor
: pointer;


transition
: all
0.3s
 ease;


text-decoration
: none;


display
: inline-flex;


align-items
: center;


gap
:
8px
;

        }


.btn-primary
 {


background
:
linear-gradient
(
135deg
,
#667eea
0%
,
#764ba2
100%
);


color
: white;

        }


.btn-primary
:hover
 {


transform
:
translateY
(-
2px
);


box-shadow
:
0
5px
20px
rgba
(
102
,
126
,
234
,
0.4
);

        }


.btn-danger
 {


background
:
#ff4757
;


color
: white;


padding
:
10px
20px
;


font-size
:
15px
;

        }


.btn-danger
:hover
 {


background
:
#ff3838
;

        }


.file-list
 {


list-style
: none;

        }


.file-item
 {


display
: flex;


align-items
: center;


padding
:
15px
20px
;


border
:
1px
 solid
#eee
;


border-radius
:
10px
;


margin-bottom
:
12px
;


transition
: all
0.3s
 ease;

        }


.file-item
:hover
 {


border-color
:
#667eea
;


background
:
#f8f9ff
;

        }


.file-icon
 {


font-size
:
36px
;


margin-right
:
15px
;

        }


.file-details
 {


flex
:
1
;

        }


.file-name
 {


font-weight
:
600
;


color
:
#333
;


margin-bottom
:
5px
;

        }


.file-meta
 {


font-size
:
13px
;


color
:
#999
;

        }


.file-actions
 {


display
: flex;


gap
:
10px
;

        }


.no-files
 {


text-align
: center;


padding
:
60px
20px
;


color
:
#999
;

        }


.no-files-icon
 {


font-size
:
60px
;


margin-bottom
:
20px
;

        }


.no-files
p
 {


font-size
:
16px
;

        }


</
style
>

</
head
>

<
body
>


<
div

class
=
"container"
>


<
div

class
=
"header"
>


<
h1
>
📁 已上传文件列表
</
h1
>


<
a

href
=
"/"

class
=
"btn btn-primary"
>
📤 上传新文件
</
a
>


</
div
>


        {% if files %}


<
ul

class
=
"file-list"
>

                {% for file in files %}


<
li

class
=
"file-item"
>


<
div

class
=
"file-icon"
>
{{ file.icon }}
</
div
>


<
div

class
=
"file-details"
>


<
div

class
=
"file-name"
>
{{ file.name }}
</
div
>


<
div

class
=
"file-meta"
>
{{ file.size }} | {{ file.modified }}
</
div
>


</
div
>


<
div

class
=
"file-actions"
>


<
a

href
=
"/download/{{ file.name }}"

class
=
"btn btn-primary"
>
下载
</
a
>


<
form

action
=
"/delete/{{ file.name }}"

method
=
"post"

style
=
"display: inline;"
>


<
button

type
=
"submit"

class
=
"btn btn-danger"

onclick
=
"return confirm('确定要删除此文件吗?')"
>
删除
</
button
>


</
form
>


</
div
>


</
li
>

                {% endfor %}


</
ul
>

        {% else %}


<
div

class
=
"no-files"
>


<
div

class
=
"no-files-icon"
>
📂
</
div
>


<
p
>
暂无上传的文件
</
p
>


</
div
>

        {% endif %}


</
div
>

</
body
>

</
html
>
5. 创建上传成功页面
创建 templates/uploaded.html:
<!DOCTYPE html>

<
html

lang
=
"zh-CN"
>

<
head
>


<
meta

charset
=
"UTF-8"
>


<
meta

name
=
"viewport"

content
=
"width=device-width, initial-scale=1.0"
>


<
title
>
上传成功
</
title
>


<
style
>

        * {


margin
:
0
;


padding
:
0
;


box-sizing
: border-box;

        }


body
 {


font-family
:
'Segoe UI'
, Tahoma, Geneva, Verdana, sans-serif;


background
:
linear-gradient
(
135deg
,
#667eea
0%
,
#764ba2
100%
);


min-height
:
100vh
;


display
: flex;


justify-content
: center;


align-items
: center;


padding
:
20px
;

        }


.container
 {


background
: white;


border-radius
:
20px
;


padding
:
40px
;


text-align
: center;


box-shadow
:
0
20px
60px
rgba
(
0
,
0
,
0
,
0.15
);


max-width
:
450px
;


width
:
100%
;

        }


.success-icon
 {


font-size
:
80px
;


margin-bottom
:
20px
;


animation
: bounce
0.6s
 ease;

        }


@keyframes
 bounce {


0%
,
100%
 {
transform
:
scale
(
1
); }


50%
 {
transform
:
scale
(
1.1
); }

        }


h1
 {


color
:
#333
;


margin-bottom
:
15px
;


font-size
:
28px
;

        }


p
 {


color
:
#666
;


margin-bottom
:
30px
;


font-size
:
16px
;

        }


.file-info
 {


background
:
#f8f9fa
;


padding
:
20px
;


border-radius
:
12px
;


margin-bottom
:
30px
;


text-align
: left;

        }


.file-info
div
 {


margin-bottom
:
10px
;

        }


.file-info
div
:last-child
 {


margin-bottom
:
0
;

        }


.file-info
strong
 {


color
:
#333
;


min-width
:
100px
;


display
: inline-block;

        }


.btn
 {


padding
:
12px
30px
;


border
: none;


border-radius
:
8px
;


font-size
:
16px
;


font-weight
:
600
;


cursor
: pointer;


transition
: all
0.3s
 ease;


text-decoration
: none;


display
: inline-block;

        }


.btn-primary
 {


background
:
linear-gradient
(
135deg
,
#667eea
0%
,
#764ba2
100%
);


color
: white;

        }


.btn-primary
:hover
 {


transform
:
translateY
(-
2px
);


box-shadow
:
0
5px
20px
rgba
(
102
,
126
,
234
,
0.4
);

        }


.btn-secondary
 {


background
:
#f0f0f0
;


color
:
#666
;


margin-left
:
10px
;

        }


.btn-secondary
:hover
 {


background
:
#e0e0e0
;

        }


</
style
>

</
head
>

<
body
>


<
div

class
=
"container"
>


<
div

class
=
"success-icon"
>
✅
</
div
>


<
h1
>
上传成功!
</
h1
>


<
p
>
您的文件已成功上传到服务器
</
p
>


<
div

class
=
"file-info"
>


<
div
>
<
strong
>
文件名:
</
strong
>
{{ file_info.filename }}
</
div
>


<
div
>
<
strong
>
文件大小:
</
strong
>
{{ file_info.size|format_size }}
</
div
>


<
div
>
<
strong
>
上传时间:
</
strong
>
{{ file_info.upload_time }}
</
div
>


</
div
>


<
a

href
=
"/"

class
=
"btn btn-primary"
>
继续上传
</
a
>


<
a

href
=
"/list"

class
=
"btn btn-secondary"
>
查看文件列表
</
a
>


</
div
>

</
body
>

</
html
>
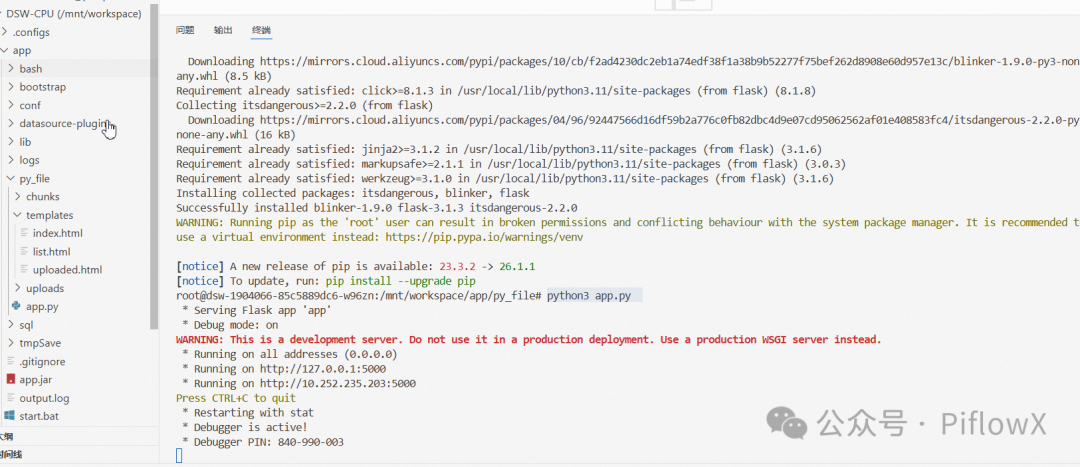
6. 安装依赖并启动服务
# 安装Flask

pip install flask


# 启动服务

python3 app.py
三、什么是ngrok?
ngrok简介
ngrok是一个内网穿透工具,可以将你的本地服务器暴露到公网,让外网用户也能访问。它的核心功能:
-
🚀 将本地端口映射到公网URL
-
🔒 支持HTTPS加密连接
-
📊 提供请求日志和流量统计
-
🔄 支持多种协议(HTTP/HTTPS/TCP)
为什么需要ngrok?
-
开发测试:让远程同事测试你的本地服务
-
演示展示:向客户展示本地开发的应用
-
调试Webhook:接收第三方服务的回调
四、使用ngrok开启代理
1. 安装ngrok
方法一:下载安装(推荐)
# 下载ngrok

wget https://bin.ngrok.com/c/bNyj1mQVY4c/ngrok-v3-stable-linux-amd64.tgz


# 解压

tar -xzf ngrok-v3-stable-linux-amd64.tgz


# 移动到系统目录

sudo

mv
 ngrok /usr/local/bin/
方法二:使用npm安装
npm install -g ngrok
2. 注册并获取Auth Token
-
访问 ngrok官网 注册账号
-
登录后在「Your Authtoken」页面复制你的token
3. 配置Auth Token
ngrok config add-authtoken YOUR_AUTH_TOKEN
4. 启动ngrok代理
# 将本地5000端口映射到公网

ngrok http 5000
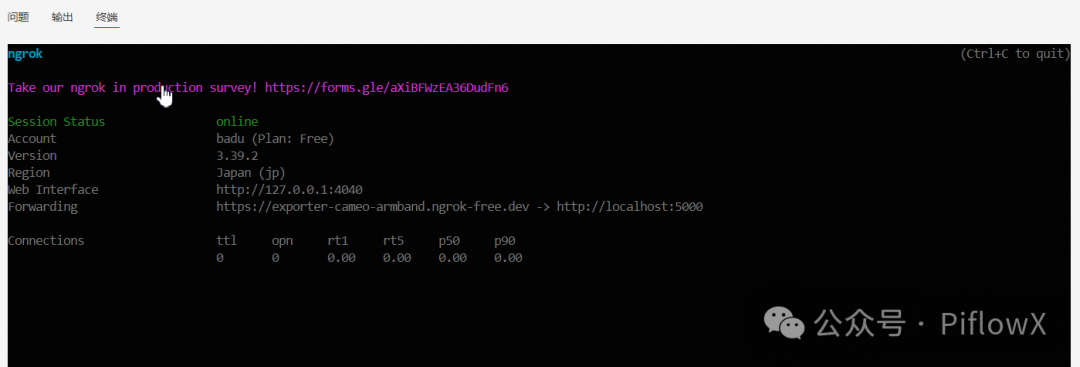
执行后会看到类似如下输出:
Session Status                online

Account                       YourName (Plan: Free)

Version                       3.1.0

Region                        Asia Pacific (ap)

Latency                       12ms

Web Interface                 http://127.0.0.1:4040

Forwarding                    https://abc123.ngrok.io -> http://localhost:5000

Forwarding                    http://abc123.ngrok.io -> http://localhost:5000
✨ 重点:
https://abc123.ngrok.io就是你的公网访问地址!
五、上传文件测试
1. 访问上传页面
打开浏览器,访问ngrok提供的公网URL(如 https://abc123.ngrok.io)
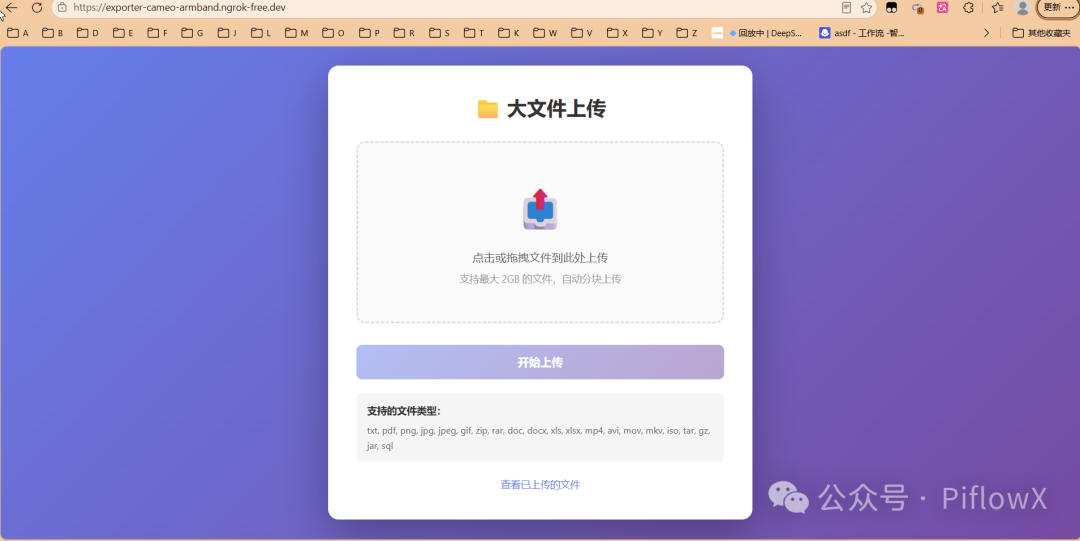
2. 上传文件
-
点击上传区域或拖拽文件到页面
-
等待上传完成(大文件会自动分片上传,支持断点续传)
-
查看上传结果
3. 查看已上传文件
访问 https://abc123.ngrok.io/list 查看所有已上传的文件列表
六、常见问题排查
Q1: ngrok启动失败?
解决方案:
-
检查网络连接是否正常
-
确保Auth Token配置正确
-
尝试更换端口:
ngrok http 8080
Q2: 文件上传失败?
解决方案:
-
检查文件大小是否超过2GB限制
-
确保uploads和chunks目录有写入权限
-
查看Flask控制台错误日志
Q3: ngrok URL失效?
解决方案:
-
免费版ngrok每次启动会生成新URL
-
升级到付费版可获得固定域名
-
保持ngrok终端窗口打开
总结
今天我们完成了一个完整的技术链路:
-
🎁 领取免费服务器:ModelScope Notebook提供免费GPU算力
-
🚀 搭建上传服务:使用Flask实现大文件分片上传
-
🌐 内网穿透:通过ngrok将本地服务暴露到公网
-
📤 测试上传:成功上传文件到服务器
这套组合拳可以应用在很多场景:
-
临时文件分享服务
-
开发测试环境
-
个人项目展示

openEuler 是由开放原子开源基金会孵化的全场景开源操作系统项目,面向数字基础设施四大核心场景(服务器、云计算、边缘计算、嵌入式),全面支持 ARM、x86、RISC-V、loongArch、PowerPC、SW-64 等多样性计算架构
更多推荐
 5
5 0
0- 0


 已为社区贡献1条内容

所有评论(0)