Web——安装httpd服务(Apache)
本文介绍了三大主流Web服务器(Apache、Nginx、Tomcat)的特点及适用场景,重点讲解了Apache HTTP Server在CentOS 7系统下的两种安装方式:源码编译安装和yum安装。源码编译安装详细说明了从依赖包安装、源码下载到APR、APR-Util和Apache的编译安装全过程,并提供了自动化安装脚本;yum安装则展示了更简便的安装流程。文章还包含了环境准备、防火墙配置、服
Apache、Nginx、Tomcat 三大主流 Web 服务
Apache
- 编程语言:C/C++
- 特点:模块化设计,支持动态加载模块,兼容性强
- 适用场景:传统网站服务,需要高度定制化的环境
Nginx
- 编程语言:C/C++
- 特点:事件驱动架构,高并发处理能力强
- 适用场景:高并发网站,反向代理,负载均衡
Tomcat
- 编程语言:Java
- 特点:轻量级,Servlet容器,适合Java Web应用
- 适用场景:Java Web应用部署,JSP/Servlet运行环境
源码编译安装三部曲
预编译
检查系统环境,配置编译选项,生成Makefile(编译蓝图)
./configure --prefix=/usr/local/httpd2467
编译
将源代码转换为机器可执行的二进制文件(0和1)
make
安装
拷贝,将编译生成的二进制程序/配置文件等拷贝到—perfix指定的主目录以及子目录下
make install
Apache 配置文件路径说明
编译安装路径
主配置文件位于:
/usr/local/httpd2467/conf/httpd.conf
yum安装路径
主配置文件位于:
/etc/httpd/conf/httpd.conf
关键注意事项
编译安装前需确保系统已安装必要的开发工具和依赖库 gcc、make、apr、apr-util等是常见依赖项 修改配置文件后需要重启服务使更改生效
编译安装httpd服务
实验环境
以Centos 7为例
NAME="CentOS Linux"
VERSION="7 (Core)"
ID="centos"
ID_LIKE="rhel fedora"
VERSION_ID="7"
PRETTY_NAME="CentOS Linux 7 (Core)"
ANSI_COLOR="0;31"
CPE_NAME="cpe:/o:centos:centos:7"
HOME_URL="https://www.centos.org/"
BUG_REPORT_URL="https://bugs.centos.org/"

CENTOS_MANTISBT_PROJECT="CentOS-7"
CENTOS_MANTISBT_PROJECT_VERSION="7"
REDHAT_SUPPORT_PRODUCT="centos"
REDHAT_SUPPORT_PRODUCT_VERSION="7"
yum源
yum repolist已加载插件:fastestmirror, priorities
Loading mirror speeds from cached hostfile
* base: mirrors.aliyun.com
* extras: mirrors.aliyun.com
* updates: mirrors.aliyun.com
10072 packages excluded due to repository priority protections
源标识 源名称 状态
!base/7/x86_64 CentOS-7 - Base - mirrors.aliyun.com 10,072
!extras/7/x86_64 CentOS-7 - Extras - mirrors.aliyun.com 526
!updates/7/x86_64 CentOS-7 - Updates - mirrors.aliyun.com 6,169+4
repolist: 16,767关闭防火墙
systemctl stop firewalld
systemctl status firewalld


● firewalld.service - firewalld - dynamic firewall daemon
   Loaded: loaded (/usr/lib/systemd/system/firewalld.service; disabled; vendor preset: enabled)
   Active: inactive (dead)
     Docs: man:firewalld(1)
关闭SElinux
直接在/root目录输入以下命令
setenforce 0
在/etc/selinux/config中设置selinux为disabled
# This file controls the state of SELinux on the system.
# SELINUX= can take one of these three values:
#     enforcing - SELinux security policy is enforced.
#     permissive - SELinux prints warnings instead of enforcing.
#     disabled - No SELinux policy is loaded.
SELINUX=disabled  #改为disabled
# SELINUXTYPE= can take one of three values:
#     targeted - Targeted processes are protected,
#     minimum - Modification of targeted policy. Only selected processes are protected.
#     mls - Multi Level Security protection.
SELINUXTYPE=targeted
1.安装依赖包
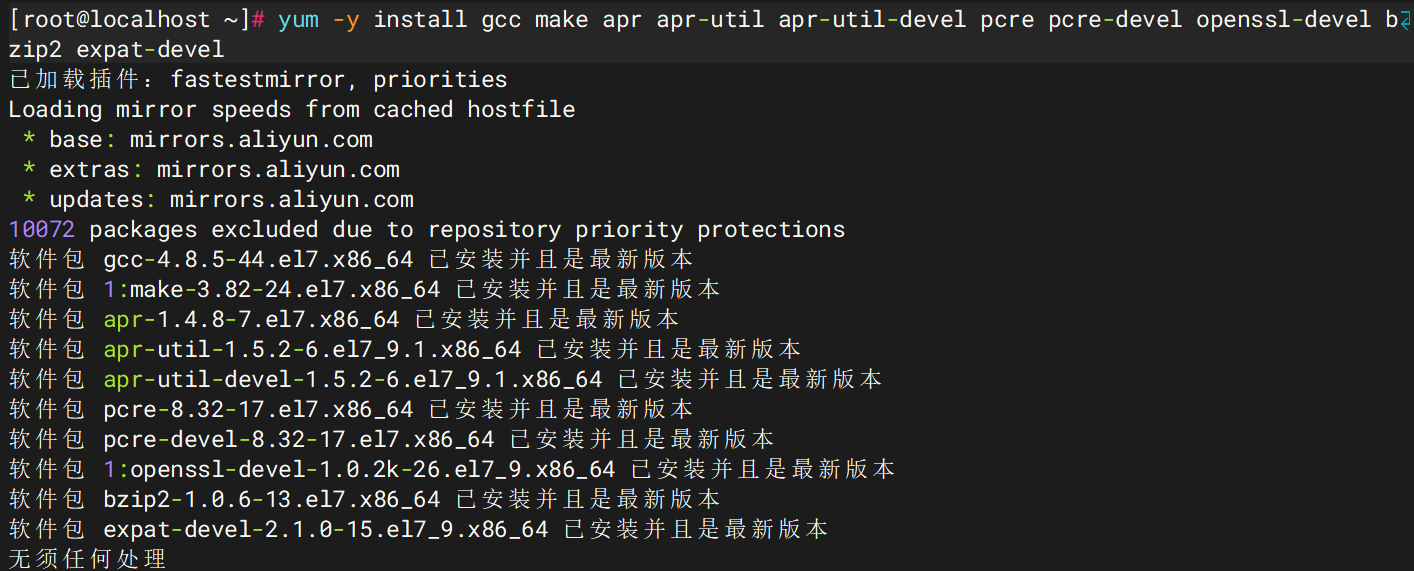
执行以下命令安装编译Apache HTTP Server所需的依赖包:
yum -y install gcc make apr apr-util apr-util-devel pcre pcre-devel openssl-devel bzip2 expat-devel
2.下载源码包
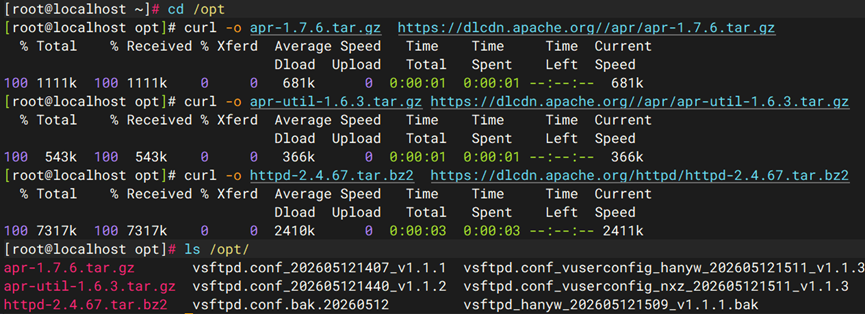
进入/opt目录并下载所需的源码包:
cd /opt
curl -o apr-1.7.6.tar.gz https://dlcdn.apache.org//apr/apr-1.7.6.tar.gz
curl -o apr-util-1.6.3.tar.gz https://dlcdn.apache.org//apr/apr-util-1.6.3.tar.gz
curl -o httpd-2.4.67.tar.bz2 https://dlcdn.apache.org/httpd/httpd-2.4.67.tar.bz2
3.编译安装APR
解压并编译安装APR:
tar xf apr-1.7.6.tar.gz
cd apr-1.7.6
./configure --prefix=/usr/local/apr
make -j `nproc` && make install

4.编译安装APR-Util
解压并编译安装APR-Util:
cd ../
tar xf apr-util-1.6.3.tar.gz
cd apr-util-1.6.3
./configure --with-apr=/usr/local/apr/
make -j `nproc` && make install

5.编译安装Apache HTTP Server
解压并编译安装Apache HTTP Server:
cd ../
tar xf httpd-2.4.67.tar.bz2
cd httpd-2.4.67
./configure --prefix=/usr/local/httpd2467 --with-apr=/usr/local/apr --with-apr-util=/usr/local/apr
make -j `nproc` && make install

6.验证安装
检查Apache配置文件语法并启动服务:
# 检查 Apache HTTP 服务器的配置文件是否存在语法错误
/usr/local/httpd2467/bin/apachectl -t
# 式启动你安装在 /usr/local/httpd2467 目录下的 Apache HTTP 服务器
/usr/local/httpd2467/bin/apachectl -k start


7.检查运行状态
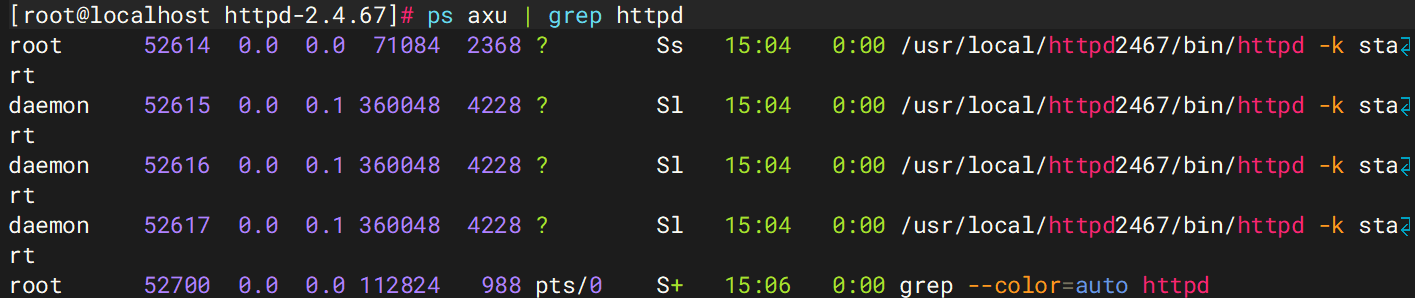
查看HTTP服务进程是否正常运行:
ps axu | grep httpd
8.网页测试
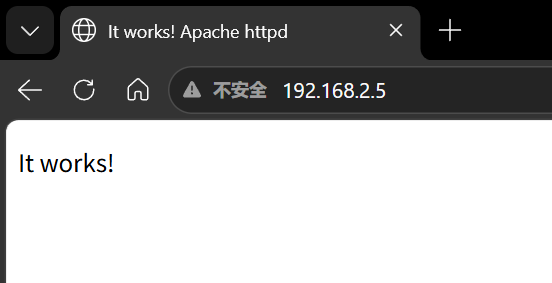
强制刷新浏览器缓存
在浏览器中按下Ctrl + F5可以强制刷新缓存,确保加载最新的页面内容。
9.httpd一键编译安装脚本
#!/bin/bash

# HTTP  2.4.67 编译安装脚本
# 作者  lengmx
# 版本: 1.0
# 功能: 自动化安装  HTTP  及其依赖 (APR, APR-Util)

set -e  # 遇到任何命令执行失败立即退出

# 1. 安装系统依赖包
echo "正在安装系统依赖包..."
yum -y install gcc make apr apr-util apr-util-devel pcre pcre-devel openssl-devel bzip2 expat-devel

# 2. 下载源码包
echo "正在下载源码包..."
cd /opt

curl -o apr-1.7.6.tar.gz https://dlcdn.apache.org//apr/apr-1.7.6.tar.gz
curl -o apr-util-1.6.3.tar.gz https://dlcdn.apache.org//apr/apr-util-1.6.3.tar.gz
curl -o httpd-2.4.67.tar.bz2 https://dlcdn.apache.org/httpd/httpd-2.4.67.tar.bz2

# 3. 编译安装 APR (Apache Portable Runtime)
echo "正在编译安装 APR..."
tar xf apr-1.7.6.tar.gz
cd apr-1.7.6
./configure --prefix=/usr/local/apr
make -j $(nproc) && make install
cd ..

# 4. 编译安装 APR-Util
echo "正在编译安装 APR-Util..."
tar xf apr-util-1.6.3.tar.gz
cd apr-util-1.6.3
./configure --with-apr=/usr/local/apr/
make -j $(nproc) && make install
cd ..

# 5. 编译安装  HTTP
echo "正在编译安装  HTTP ..."
tar xf httpd-2.4.67.tar.bz2
cd httpd-2.4.67
./configure \
    --prefix=/usr/local/httpd2467 \
    --with-apr=/usr/local/apr \
    --with-apr-util=/usr/local/apr
make -j $(nproc) && make install

# 6. 启动服务并验证
echo "正在启动 HTTP 服务..."
/usr/local/httpd2467/bin/apachectl -t
/usr/local/httpd2467/bin/apachectl -k start

# 7. 检查进程
echo "安装完成,正在检查服务状态..."
ps axu | grep httpd

echo " HTTP  已成功启动!"
说明
编译安装的 Apache HTTPD 服务默认首页文件位于:
/usr/local/httpd2467/htdocs/index.html
yum安装
实验环境
以Centos 7为例
NAME="CentOS Linux"
VERSION="7 (Core)"
ID="centos"
ID_LIKE="rhel fedora"
VERSION_ID="7"
PRETTY_NAME="CentOS Linux 7 (Core)"
ANSI_COLOR="0;31"
CPE_NAME="cpe:/o:centos:centos:7"
HOME_URL="https://www.centos.org/"
BUG_REPORT_URL="https://bugs.centos.org/"

CENTOS_MANTISBT_PROJECT="CentOS-7"
CENTOS_MANTISBT_PROJECT_VERSION="7"
REDHAT_SUPPORT_PRODUCT="centos"
REDHAT_SUPPORT_PRODUCT_VERSION="7"
yum源
yum repolist已加载插件:fastestmirror, priorities
Loading mirror speeds from cached hostfile
* base: mirrors.aliyun.com
* extras: mirrors.aliyun.com
* updates: mirrors.aliyun.com
10072 packages excluded due to repository priority protections
源标识 源名称 状态
!base/7/x86_64 CentOS-7 - Base - mirrors.aliyun.com 10,072
!extras/7/x86_64 CentOS-7 - Extras - mirrors.aliyun.com 526
!updates/7/x86_64 CentOS-7 - Updates - mirrors.aliyun.com 6,169+4
repolist: 16,767关闭防火墙
systemctl stop firewalld
systemctl status firewalld


● firewalld.service - firewalld - dynamic firewall daemon
   Loaded: loaded (/usr/lib/systemd/system/firewalld.service; disabled; vendor preset: enabled)
   Active: inactive (dead)
     Docs: man:firewalld(1)
关闭SElinux
直接在/root目录输入以下命令
setenforce 0
在/etc/selinux/config中设置selinux为disabled
# This file controls the state of SELinux on the system.
# SELINUX= can take one of these three values:
#     enforcing - SELinux security policy is enforced.
#     permissive - SELinux prints warnings instead of enforcing.
#     disabled - No SELinux policy is loaded.
SELINUX=disabled  #改为disabled
# SELINUXTYPE= can take one of three values:
#     targeted - Targeted processes are protected,
#     minimum - Modification of targeted policy. Only selected processes are protected.
#     mls - Multi Level Security protection.
SELINUXTYPE=targeted
1.安装 依赖包
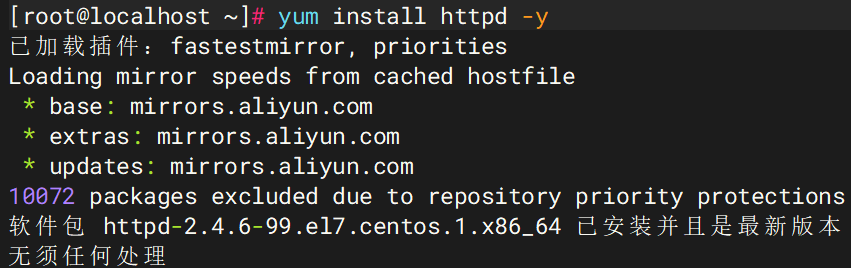
在终端中执行以下命令,系统会自动下载并安装 Apache 及其所需的所有依赖:
yum install httpd -y
2.启动服务并设置开机自启
安装完成后,手动启动 httpd 服务,并将其设置为系统开机自动运行:
sudo systemctl start httpd
sudo systemctl enable httpd

3.配置防火墙(允许外部访问)
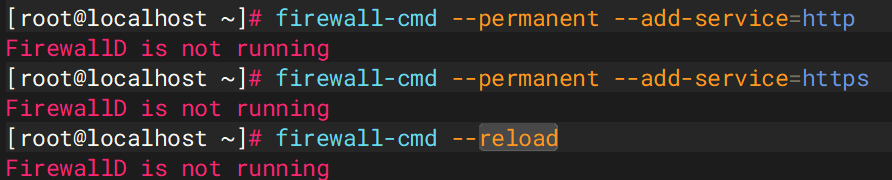
如果系统开启了防火墙(firewalld),需要放行 HTTP(80端口)和 HTTPS(443端口)的流量:
sudo firewall-cmd --permanent --add-service=http
sudo firewall-cmd --permanent --add-service=https
sudo firewall-cmd --reload
4.验证安装是否成功
通过以下两种方式检查 Apache 是否正常运行:
查看服务状态
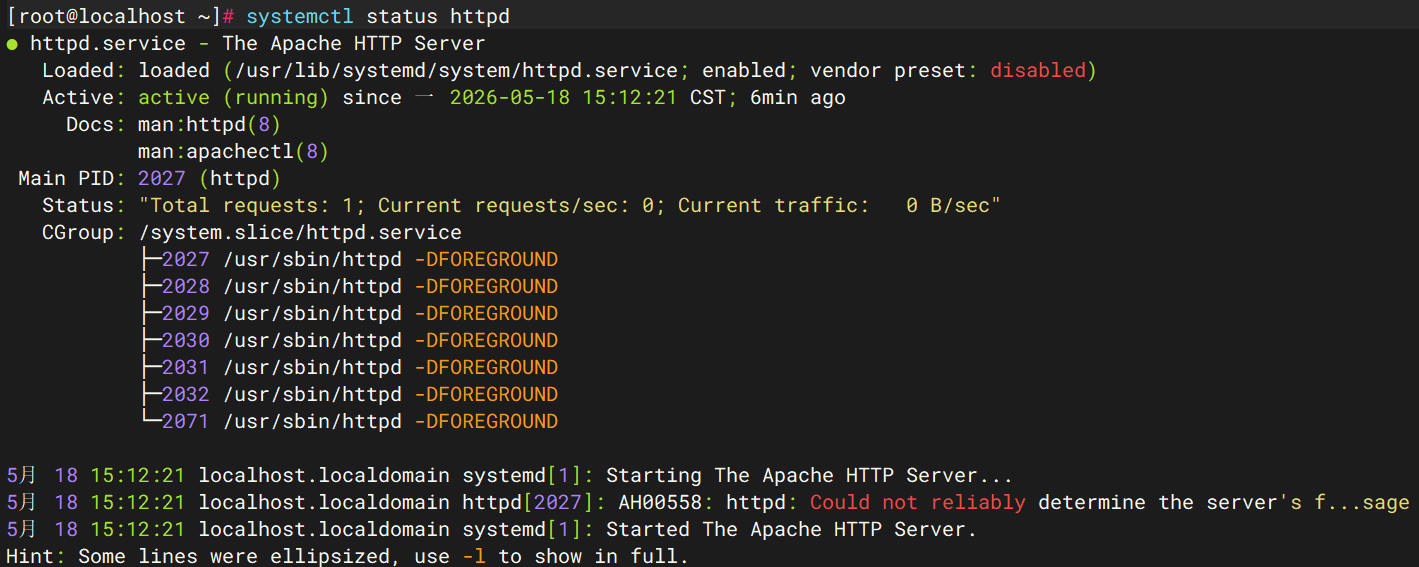
执行以下命令,如果输出中包含 Active: active (running),说明服务已正常启动:
systemctl status httpd
浏览器访问
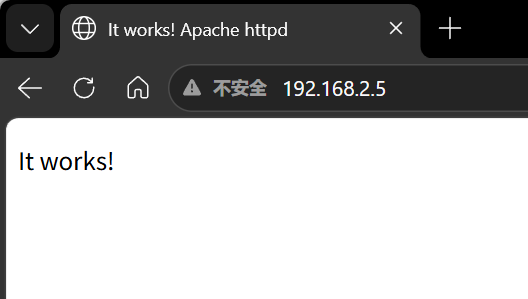
在浏览器中输入服务器的 IP 地址或域名(例如 http://你的服务器IP),如果能看到 Apache 的默认欢迎页面,即代表安装成功。
说明
yum安装的 Apache HTTPD 服务默认首页文件位于:
/var/www/html/index.htm

openEuler 是由开放原子开源基金会孵化的全场景开源操作系统项目,面向数字基础设施四大核心场景(服务器、云计算、边缘计算、嵌入式),全面支持 ARM、x86、RISC-V、loongArch、PowerPC、SW-64 等多样性计算架构
 20
20 0
0- 0


 已为社区贡献4条内容

所有评论(0)