一文吃透 Linux 基础运维:使用nginx服务器部署YUM 仓库、定时任务、进程调度与磁盘管理
本文介绍了使用Nginx服务器部署Yum仓库的完整过程。在服务端,通过源码安装Nginx并配置为系统服务,设置autoindex允许查看文件列表,创建Packages目录存放软件包,使用yum下载软件包及其依赖。在客户端,配置新的yum源指向Nginx服务器,验证仓库可用性。此外还介绍了Linux计划任务管理,包括atd服务的启用和at命令的使用方法,演示了如何创建一次性计划任务来执行命令。整个过
使用 nginx 服务器部署yum仓库
1、源码安装nginx
server端
#安装依赖软件包
[root@server ~ 09:51:29]# yum -y install gcc make pcre-devel zlib-devel
#下载wget软件包
[root@server ~ 09:52:12]# yum install -y wget
#下载nginx软件包(压缩包)
[root@server ~ 09:52:24]# wget https://nginx.org/download/nginx-1.24.0.tar.gz
#解压缩
[root@server ~ 09:53:20]# tar -xf nginx-1.24.0.tar.gz
#配置,生成编译文件
[root@server ~ 09:53:46]# cd nginx-1.24.0/
[root@server nginx-1.24.0 09:53:49]# ./configure --prefix=/usr/local/nginx
#编译
[root@server nginx-1.24.0 09:54:23]# make && make install
[root@server nginx-1.24.0 09:54:44]# ls /usr/local/nginx
conf  html  logs  sbin
#配置环境变量
[root@server nginx-1.24.0 09:54:55]# export PATH=$PATH:/usr/local/nginx/sbin/
[root@server nginx-1.24.0 09:55:05]#  echo 'export PATH=$PATH:/usr/local/nginx/sbin/' >> ~/.bashrc
#配置nginx服务
[root@server nginx-1.24.0 09:55:09]# cd ~
[root@server ~ 09:55:17]# cp /usr/lib/systemd/system/sshd.service /etc/systemd/system/nginx.service
[root@server ~ 09:55:19]# vim /etc/systemd/system/nginx.service
[Unit]
Description=Nginx server daemon

[Service]
Type=forking
ExecStart=/usr/local/nginx/sbin/nginx -c /usr/local/nginx/conf/nginx.conf
ExecReload=/usr/local/nginx/sbin/nginx -s reload
ExecStop=/usr/local/nginx/sbin/nginx -s quit

[Install]
WantedBy=multi-user.target

[root@server ~]# systemctl restart nginx
[root@server ~ 09:57:59]# systemctl daemon-reload
[root@server ~ 10:02:43]# systemctl daemon-reload
[root@server ~ 10:03:30]# systemctl enable nginx.service --now

#配置nginx允许查看文件清单
[root@server ~ 09:58:19]# vim /usr/local/nginx/conf/nginx.conf
......
http {
    # 添加如下记录,其他保持不变
    autoindex on;
......
[root@server ~ 10:03:43]# systemctl restart nginx
#发布软件仓库
[root@server ~ 10:03:59]# cd /usr/local/
bin/     etc/     games/   include/ lib/     lib64/   libexec/ nginx/   sbin/    share/   src/
[root@server ~ 10:03:59]# cd /usr/local/nginx/
client_body_temp/ fastcgi_temp/     logs/             sbin/             uwsgi_temp/
conf/             html/             proxy_temp/       scgi_temp/
[root@server ~ 10:03:59]# cd /usr/local/nginx/html/
#创建Packages目录
[root@server html 10:04:26]# mkdir -p centos7/Packages
[root@server html 10:05:00]# cd centos7/Packages
#将软件包下载到Packages目录下,--downloadonly只下载,--downloaddir指定下载路径,这里不能用yumdownloader,因为yumdownloader不能下载依赖软件包
[root@server Packages 10:05:13]# yum install -y httpd nginx --downloadonly --downloaddir=.
[root@server Packages 10:05:54]# cd ..
[root@server centos7 10:06:02]# yum install -y createrepo
client端
[susan@client ~ 09:52:39]$ su - root
密码:
上一次登录:三 5月 13 16:09:02 CST 2026pts/0 上
[root@client ~ 09:52:44]# clear
[root@client ~ 09:52:46]# cd /etc/yum.repos.d/
[root@client yum.repos.d 10:06:59]# mkdir bakcup
[root@client yum.repos.d 10:07:20]# mv *repo bakcup
[root@client yum.repos.d 10:07:30]# ls
bakcup
[root@client yum.repos.d 10:07:33]# vim centos7.repo
[centos7]
name=centos7 test
baseurl=http://10.1.8.10/centos7
enabled=1
gpgcheck=0

[root@client yum.repos.d 10:09:58]# vim centos7.repo
[root@client yum.repos.d 10:10:40]# yum install -y httpd
[root@client yum.repos.d 10:10:47]# systemctl enable httpd --now
Created symlink from /etc/systemd/system/multi-user.target.wants/httpd.service to /usr/lib/systemd/system/httpd.service.
[root@client yum.repos.d 10:11:01]# yum repolist
已加载插件:fastestmirror
Loading mirror speeds from cached hostfile
源标识                                                                    源名称                                                                         状态
centos7                                                                   centos7 test                                                                   10
repolist: 10
Linux计划任务管理
1、一次性计划任务
atd服务:Linux 系统中at提供一次性计划任务功能。
#下载at软件包
[susan@client ~ 10:28:38]$ yum install -y at
#确认atd服务状态
[root@server ~ 16:20:24]# systemctl status atd
● atd.service - Job spooling tools
   Loaded: loaded (/usr/lib/systemd/system/atd.service; enabled; vendor preset: enabled)
   Active: inactive (dead)
#开启atd服务
[root@server ~ 16:20:56]# systemctl start atd
[root@server ~ 16:21:20]# systemctl status atd
● atd.service - Job spooling tools
   Loaded: loaded (/usr/lib/systemd/system/atd.service; enabled; vendor preset: enabled)
   Active: active (running) since 二 2026-05-19 16:21:20 CST; 4s ago
 Main PID: 1338 (atd)
   CGroup: /system.slice/atd.service
           └─1338 /usr/sbin/atd -f

5月 19 16:21:20 server.susan.cloud systemd[1]: Started Job spooling tools.
Hint: Some lines were ellipsized, use -l to show in full.

#at命令从标准输入中读取要执行的命令。手动输入命令时,按ctrl+D完成输入。
#输入错误时按ctrl+backspace删除。
#五分钟后向hello.log文件中写入hello world
[root@server ~ 16:21:48]# at now +5 minutes
at> echo hello world > /tmp/hello.log
at> <EOT>
job 1 at Tue May 19 16:27:00 2026
[root@server ~ 16:27:22]# at now +5 minutes
at> echo hello world >> myscript.sh
at> <EOT>
job 2 at Tue May 19 16:32:00 2026

#at -l 或 atq:查看任务队列。
[root@server ~ 16:23:30]# at -l
1	Tue May 19 16:27:00 2026 a root
2	Tue May 19 16:32:00 2026 a root
[root@server ~ 16:26:02]# atq
1	Tue May 19 16:27:00 2026 a root
2	Tue May 19 16:32:00 2026 a root

#atd提供26个队列,a到z,排的越后优先级越低。使用at命令使用-q选项指定队列。
[root@server ~ 16:30:33]#  at -q b now +5 minutes < myscript.sh
job 3 at Tue May 19 16:40:00 2026
[root@server ~ 16:35:05]# atq
3	Tue May 19 16:40:00 2026 b root
[root@server ~ 16:35:25]# at -l -q b
3	Tue May 19 16:40:00 2026 b root
#时间到了之后验证
[root@server ~ 16:36:29]# cat /tmp/hello.log
hello world
[root@server ~ 16:41:43]# cat myscript.sh
hello world

#at -c:查看任务详细信息
[root@server ~ 16:37:08]# at -c 3
......

#at -d/r或atrm:删除任务
[root@server ~ 16:42:21]# atrm 5
[root@server ~ 16:42:28]# atq
用户周期性计划任务
1、crond服务
crond是 Linux 系统内置的定时任务服务,默认开机自启,用于周期性自动执行脚本、备份、日志清理等运维任务,是服务器自动化运维的核心工具。
2、crontab命令
#查看周期性计划任务
[root@server ~ 16:42:34]# crontab -l
no crontab for root
crontab -e
该命令默认使用vi编辑周期性计划任务:
可以申明环境变量,格式为name=value,将影响声明之后的所有行。crontab使用的常规环境变量有SHELL和MAILTO。发送邮件需要额外的配置:mail服务器和smtp。
空行是允许的。
以#开头的行是注释行。
每一行是一个job。
默认编辑器可以通过EDITOR环境变量设定。每一个jobs包涵6个部分:五个时间和一个要执行的命令,按以下顺序显示:
分钟
小时
几号
月份
星期几
命令
前五个字段全部使用相同的语法规则:*,表示“无关紧要”,始终。
数字可用于指定分钟数或小时数、日期或者工作日。对于工作日,0表示星期日,1表示星期一,2表示星期二,依此类推。7也表示星期曰。
x-y:表示范围:x到y(含)。
x,y:表示列表。列表也可以包含范围,例如,5,10-13,17表示作业应当在每小时过去5分钟、10分钟、11分钟、12分钟、13分钟和17分钟后运行。
/x,表示x的时间间隔,例如列中的/7表示每七分钟运行一次作业。
最后一个区域是要执行的命令,命令通过/bin/sh执行,除非指定SHELL变量。如果命令中包涵未转义字符%,则表示开启新行,并且%后面所有字符作为标准输入。
月和周区域可以使用三字母简写单词,Jan,Feb,Mar和Mon,Tue。
#把系统默认文本编辑器强制设置为 vim
[root@server ~ 16:44:47]# export EDITOR=vim
#2点和2-23点每两分钟写一次
[root@server ~ 16:53:14]# crontab -e
*/2 2,3-23 * * * date >> /tmp/date.log
[root@server ~ 16:53:26]# crontab -l
*/2 2,3-23 * * * date >> /tmp/date.log
#后台看日志
[root@server ~ 16:57:17]# tail -f /tmp/date.log &
[1] 1719
[root@server ~ 16:57:46]# 2026年 05月 19日 星期二 16:54:01 CST
2026年 05月 19日 星期二 16:56:01 CST
[root@server ~ 16:57:48]#
[root@server ~ 16:57:48]# 2026年 05月 19日 星期二 16:58:01 CST
#crontab -r:删除所有周期性计划任务
[root@server ~ 16:59:09]# crontab -r
[root@server ~ 16:59:20]# crontab -l
no crontab for root
#停止tail进程
[root@server ~ 16:59:25]# pkill tail
[1]+  已终止               tail -f /tmp/date.log
#crontab -u:root用户可以使用参数 -u 管理其他用户周期性作业。
[root@server ~ 16:59:40]# crontab -u susan -e
0 9 2 2 * /usr/local/bin/yearly_backup
0 9 * * 1-5 mutt -s  "Checking in" boss@example.com % Hi boss, just checking in.
#删除susan用户的周期性计划任务
[root@server ~ 17:03:12]#  crontab -u susan -r
[root@server ~ 17:03:30]#  crontab -u susan -l
no crontab for susan
#crontab filename:从文件 filename 中读取的作业并替换当前所有作业。
[root@server ~ 17:07:44]# vim mycron
0 9 2 2 * /usr/local/bin/yearly_backup
0 9 * * 1-5 mutt -s "Checking in" boss@example.com % Hi boss, just checking in.
[root@server ~ 17:08:00]# crontab mycron
[root@server ~ 17:08:54]# crontab -l
0 9 2 2 * /usr/local/bin/yearly_backup
0 9 * * 1-5 mutt -s "Checking in" boss@example.com % Hi boss, just checking in.
系统周期性计划任务
系统管理员使用配置文件定义系统周期性作业。crond守护进程会从多个配置文件中读取系统周期性计划作业:
- /etc/crontab
- /etc/cron.d/ 目录
- /etc/anacrontab
1、/etc/crontab
[root@server ~ 17:09:25]# cat /etc/crontab
SHELL=/bin/bash
PATH=/sbin:/bin:/usr/sbin:/usr/bin
MAILTO=root

# For details see man 4 crontabs

# Example of job definition:
# .---------------- minute (0 - 59)
# |  .------------- hour (0 - 23)
# |  |  .---------- day of month (1 - 31)
# |  |  |  .------- month (1 - 12) OR jan,feb,mar,apr ...
# |  |  |  |  .---- day of week (0 - 6) (Sunday=0 or 7) OR sun,mon,tue,wed,thu,fri,sat
# |  |  |  |  |
# *  *  *  *  * user-name  command to be executed
2、/etc/cron.d
系统周期性作业应始终在 /etc/cron.d/ 目录中创建自定义crontab文件,防止cronie更新后覆盖/etc/crontab文件。其他应用也会将系统周期性作业存放在该目录。
/etc/cron.d/0hourly定义了每小时要执行的任务: run-parts /etc/cron.hourly。
作用:每小时将 /etc/cron.hourly目录下所有脚本按顺序执行一次。
[root@server ~ 17:16:51]# ls /etc/cron.d
0hourly
[root@server ~ 17:18:36]# cat /etc/cron.d/0hourly
# Run the hourly jobs
SHELL=/bin/bash
PATH=/sbin:/bin:/usr/sbin:/usr/bin
MAILTO=root
01 * * * * root run-parts /etc/cron.hourly
3、/etc/anacrontab
在过去,/etc/anacrontab 由单独的一个进程anacron处理,在CentOS 7 及后续版本中,这个文件也由 crond 进程处理,目的是确保重要的工作总是被执行,即使系统关机或者其他重大事故。
/etc/anacrontab 定义了每天、每周、每个月要运行的任务。
周期性执行任务目录:
- 每天要执行的任务目录:/etc/cron.daily
- 每周要执行的任务目录:/etc/cron.weekly
- 每月要执行的任务目录:/etc/cron.monthly
[root@server ~ 17:18:56]# cat /etc/anacrontab
# /etc/anacrontab: configuration file for anacron

# See anacron(8) and anacrontab(5) for details.

SHELL=/bin/sh
PATH=/sbin:/bin:/usr/sbin:/usr/bin
MAILTO=root
# the maximal random delay added to the base delay of the jobs
RANDOM_DELAY=45
# the jobs will be started during the following hours only
START_HOURS_RANGE=3-22

#period in days   delay in minutes   job-identifier   command
1	5	cron.daily		nice run-parts /etc/cron.daily
7	25	cron.weekly		nice run-parts /etc/cron.weekly
@monthly 45	cron.monthly		nice run-parts /etc/cron.monthly
/etc/anacrontab 使用语法 NAME=value 配置 anacrontab。
例如,START_HOURS_RANGE=3-22,作业只能在此时间段运行。
/etc/anacrontab 每行包涵4个区域:
- period in days,按重复计划运行的作业的间隔天数。该字段接受整数或宏作为值。例如,宏@daily相当于整数1,它表示每天执行该作业。同样,宏@weekly相当于整数7,它表示每周执行该作业。
- delay in minutes,在启动该作业前,crond守护进程应等待的时间。
- job-identifier,此为/var/spool/anacron中的文件名称,用于检查该作业是否已运行。
- command,要执行的命令。
Linux 进程调度管理
1、进程调度器
Linux 进程调度器是内核核心模块,负责分配 CPU 资源、决定进程执行顺序,实现多任务并发运行。
- 普通进程:用
nice/renice调整谦让优先级(范围-20~19),数值越大越谦让,适合备份、文件同步等后台任务,避免抢占业务服务 CPU。 - 实时进程:用
chrt调整实时优先级(1~99),优先级极高,可优先抢占 CPU。 - 进程前后台调度:
jobs查看后台任务、fg调至前台、bg后台继续运行,&直接后台启动。 - 进程管理:
kill按 PID 结束进程,pkill按进程名批量终止。
2、非实时调度器(普通进程,TS 调度)
日常业务、脚本、备份等普通进程都属于这类,使用 nice/renice 调整优先级,优先级范围 -20 ~ 19,数值越大越谦让 CPU,公平竞争 CPU 资源。
3、实时调度器(实时进程,RR/FIFO 调度)
对响应速度要求极高的进程,用 chrt 命令管理,实时优先级 1~99,优先级越高越优先抢占 CPU,不受 nice 值控制,优先于普通进程执行。
配套运维命令:jobs/fg/bg 控制前后台任务,kill/pkill 管理进程启停。
4、nice命令
#nice值默认为10
[root@server ~ 17:20:09]# nice md5sum /dev/zero &
[1] 1785
[root@server ~ 17:26:35]# ps -o pid,nice,command
   PID  NI COMMAND
  1282   0 su - root
  1283   0 -bash
  1393   0 bash
  1785  10 md5sum /dev/zero
  1787   0 ps -o pid,nice,command
普通用户仅允许使用正数的nice值运行程序。
#设置一个负数优先级
[root@server ~ 17:26:51]# nice -n -2 md5sum /dev/zero &
[2] 1789
[root@server ~ 17:28:36]# ps -o pid,nice,command 1789
   PID  NI COMMAND
  1789  -2 md5sum /dev/zero
#设置一个正数优先级
[root@server ~ 17:29:01]# nice -n 2 md5sum /dev/zero &
[3] 1792
[root@server ~ 17:30:02]# ps -o pid,nice,command 1792
   PID  NI COMMAND
  1792   2 md5sum /dev/zero
5、renice命令
修改之前例子中产生的进程优先级,普通用户只能升高进程nice值,不能降低
[root@server ~ 17:31:49]# renice -n 2 1789
1789 (进程 ID) 旧优先级为 -2,新优先级为 2
[root@server ~ 17:32:16]# ps -o pid,nice,command 1789
   PID  NI COMMAND
  1789   2 md5sum /dev/zero
#用top命令查看cpu使用率
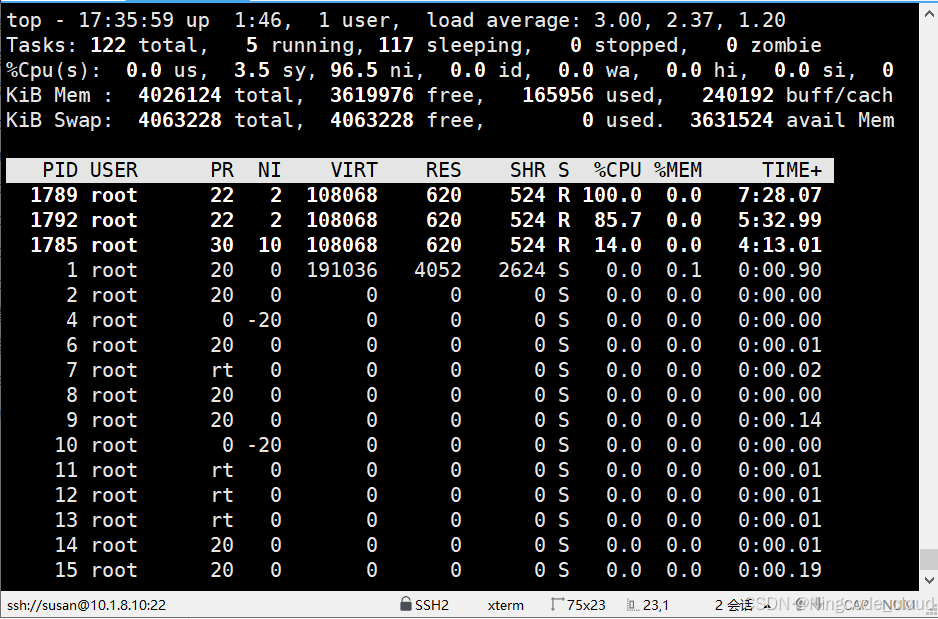
在该界面中使用 r 指令设置进程nice值。
终止之前创建的3个md5sum进程。
[root@server ~ 17:36:47]# pkill md5sum
[1]   已终止               nice md5sum /dev/zero
[2]-  已终止               nice -n -2 md5sum /dev/zero
[3]+  已终止               nice -n 2 md5sum /dev/zero
6、实时调度策略
chrt 命令用于获取和设置实时调度器进程优先级,以及更改进程调度器。
#查看进程优先级范围,chrt不能用于调整非实时进程nice值优先级。
[root@server ~ 17:36:53]# chrt -m
SCHED_OTHER min/max priority	: 0/0
SCHED_FIFO min/max priority	: 1/99
SCHED_RR min/max priority	: 1/99
SCHED_BATCH min/max priority	: 0/0
SCHED_IDLE min/max priority	: 0/0
SCHED_DEADLINE min/max priority	: 0/0
# 以SCHED_RR调度器和优先级为5运行md5sum进程
[root@server ~ 17:38:07]# chrt -r 5 md5sum /dev/zero &
[1] 1803
[root@server ~ 17:38:45]# ps -o pid,cls,rtprio,command 1803
   PID CLS RTPRIO COMMAND
  1803  RR      5 md5sum /dev/zero
#修改进程调度器和优先级
[root@server ~ 17:39:31]# chrt -f --pid 10 1803
[root@server ~ 17:40:39]# ps -o pid,cls,rtprio,command 1803
   PID CLS RTPRIO COMMAND
  1803  FF     10 md5sum /dev/zero
# 修改进程调度器为非实时
[root@server ~ 17:41:22]# chrt -o --pid 0 1803
[root@server ~ 17:42:13]# ps -o pid,cls,rtprio,command 1803
   PID CLS RTPRIO COMMAND
  1803  TS      - md5sum /dev/zero
Linux 文件系统基本管理
1、查看设备和文件系统
#lsblk命令:查看块设备使用情况
[root@server ~ 17:42:33]# lsblk
NAME            MAJ:MIN RM   SIZE RO TYPE MOUNTPOINT
sda               8:0    0   200G  0 disk
├─sda1            8:1    0     1G  0 part /boot
└─sda2            8:2    0   199G  0 part
  ├─centos-root 253:0    0    50G  0 lvm  /
  ├─centos-swap 253:1    0   3.9G  0 lvm  [SWAP]
  └─centos-home 253:2    0 145.1G  0 lvm  /home
sdb               8:16   0   100G  0 disk
sr0              11:0    1   4.4G  0 rom
结果说明:
- NAME :块设备名。
- MAJ:MIN :主要(MAJ)和次要(MIN)设备号。
- RM :指明设备是否是可移动设备。注意,在本例中设备sdb和sr0的RM值等于1,这说明他们是可移动设备。
- SIZE :本栏列出设备的容量大小信息。例如298.1G表明该设备大小为298.1GB,而1K表明该设备大小为1KB。
- RO :该项表明设备是否为只读。在本案例中,所有设备的RO值为0,表明他们不是只读的。
- TYPE :本栏显示块设备是否是磁盘或磁盘上的一个分区。在本例中,sda和sdb是磁盘,而sr0是只读存储(rom)。
- MOUNTPOINT :本栏指出设备挂载的挂载点。
2、df命令
#查看文件系统使用情况。
[root@server ~ 17:45:04]# df
文件系统                    1K-块    已用      可用 已用% 挂载点
devtmpfs                  2000948       0   2000948    0% /dev
tmpfs                     2013060       0   2013060    0% /dev/shm
tmpfs                     2013060   11740   2001320    1% /run
tmpfs                     2013060       0   2013060    0% /sys/fs/cgroup
/dev/mapper/centos-root  52403200 1644160  50759040    4% /
/dev/sda1                 1038336  142352    895984   14% /boot
/dev/mapper/centos-home 152092100   33008 152059092    1% /home
tmpfs                      402616       0    402616    0% /run/user/1
# -h选项,友好显示单位,单位进制是1024。
# -T选项,显示文件系统类型。
[root@server ~ 17:45:51]# df -hT
文件系统                类型      容量  已用  可用 已用% 挂载点
devtmpfs                devtmpfs  2.0G     0  2.0G    0% /dev
tmpfs                   tmpfs     2.0G     0  2.0G    0% /dev/shm
tmpfs                   tmpfs     2.0G   12M  2.0G    1% /run
tmpfs                   tmpfs     2.0G     0  2.0G    0% /sys/fs/cgroup
/dev/mapper/centos-root xfs        50G  1.6G   49G    4% /
/dev/sda1               xfs      1014M  140M  875M   14% /boot
/dev/mapper/centos-home xfs       146G   33M  146G    1% /home
tmpfs                   tmpfs     394M     0  394M    0% /run/user/10
# -H选项,单位进制是1000。
[root@server ~ 17:46:19]# df -H
文件系统                 容量  已用  可用 已用% 挂载点
devtmpfs                 2.1G     0  2.1G    0% /dev
tmpfs                    2.1G     0  2.1G    0% /dev/shm
tmpfs                    2.1G   13M  2.1G    1% /run
tmpfs                    2.1G     0  2.1G    0% /sys/fs/cgroup
/dev/mapper/centos-root   54G  1.7G   52G    4% /
/dev/sda1                1.1G  146M  918M   14% /boot
/dev/mapper/centos-home  156G   34M  156G    1% /home
tmpfs                    413M     0  413M    0% /run/user/1000
# 查看单个文件系统
[root@server ~ 17:46:41]# df -hT /boot
文件系统       类型  容量  已用  可用 已用% 挂载点
/dev/sda1      xfs  1014M  140M  875M   14% /boot
# 查看文件或目录存储在哪个设备
[root@server ~ 17:47:38]# df /tmp
文件系统                   1K-块    已用     可用 已用% 挂载点
/dev/mapper/centos-root 52403200 1644160 50759040    4% /
3、du命令
查看目录和文件占用磁盘空间大小。
# 查看/boot目录及其子目录占用空间
[root@server ~ 17:49:16]# du /boot
0	/boot/efi/EFI/centos
0	/boot/efi/EFI
0	/boot/efi
2400	/boot/grub2/i386-pc
3176	/boot/grub2/locale
2504	/boot/grub2/fonts
8096	/boot/grub2
4	/boot/grub
109136	/boot
# 只查看/boot目录占用空间
[root@server ~ 17:50:55]# du -s /boot
109136	/boot
# -h 选项友好方式显示文件大小
[root@server ~ 17:52:22]# du -sh /boot
107M	/boot
挂载和卸载文件系统
#实验准备:为虚拟机添加一块硬盘/dev/sdb
[root@server ~ 17:54:50]# lsblk /dev/sdb
NAME MAJ:MIN RM  SIZE RO TYPE MOUNTPOINT
sdb    8:16   0  100G  0 disk

#格式化文件系统,.xfs是文件格式相同的还有sata等等...
[root@server ~ 17:55:02]# mkfs.xfs /dev/sdb
meta-data=/dev/sdb               isize=512    agcount=4, agsize=6553600 blks
         =                       sectsz=512   attr=2, projid32bit=1
         =                       crc=1        finobt=0, sparse=0
data     =                       bsize=4096   blocks=26214400, imaxpct=25
         =                       sunit=0      swidth=0 blks
naming   =version 2              bsize=4096   ascii-ci=0 ftype=1
log      =internal log           bsize=4096   blocks=12800, version=2
         =                       sectsz=512   sunit=0 blks, lazy-count=1
realtime =none                   extsz=4096   blocks=0, rtextents=0
1、挂载文件系统
当需要适用文件系统的时候,通过mount命令挂载。
mount 命令语法:
mount [-fnrsvw] [-t vfstype] [-o options] device mountpoint
选项说明:
- -t vfstype,指明文件系统类型。
- -o options,指明挂载选项。
- device,指明要挂载的具有文件系统的设备,可以通过UUID=\、\、LABEL=\、PARTLABEL=\、PARTUUID=\等方式指明。例如,/dev/sdb,UUID=“f20547b2-df53-46e5-b526-a8744be26231” 。
- mountpoint,指明挂载点位置。
#创建挂载点
[root@server ~ 17:55:53]# mkdir /data
# 显示系统中所有文件系统
[root@server ~ 18:01:35]# blkid
# 显示系统中特定文件系统
[root@server ~ 18:01:53]# blkid /dev/sdb
/dev/sdb: UUID="8193d50d-c269-4a3c-ad03-519db1b2407c" TYPE="xfs"
# 挂载设备并验证
[root@server ~ 18:02:48]# mount /dev/sdb /data
#验证
[root@server ~ 18:03:19]# df -h /data
文件系统        容量  已用  可用 已用% 挂载点
/dev/sdb        100G   33M  100G    1% /data
#创建文件测试
[root@server ~ 18:03:35]# touch /data/file-{00..09}
[root@server ~ 18:04:23]# ls /data
file-00  file-02  file-04  file-06  file-08
file-01  file-03  file-05  file-07  file-09
#查看系统中所有挂载在过滤dev
[root@server ~ 18:17:41]# mount |grep ^/dev
/dev/mapper/centos-root on / type xfs (rw,relatime,attr2,inode64,noquota)
/dev/sda1 on /boot type xfs (rw,relatime,attr2,inode64,noquota)
/dev/mapper/centos-home on /home type xfs (rw,relatime,attr2,inode64,noquota)
/dev/sdb on /data type xfs (rw,relatime,attr2,inode64,noquota)
2、卸载文件系统
[root@server ~ 18:19:31]# umount /dev/sdb
#或者
[root@server ~ 18:19:39]# umount /date
[root@server ~ 18:20:16]# df -h /data
文件系统                 容量  已用  可用 已用% 挂载点
/dev/mapper/centos-root   50G  1.6G   49G    4% /
3、卸载失败处理
[root@server ~ 18:20:23]# mount /dev/sdb /data
[root@server ~ 18:23:42]# cd /data
[root@server data 18:23:45]# ls
file-00  file-02  file-04  file-06  file-08
file-01  file-03  file-05  file-07  file-09
[root@server data 18:25:10]# umount /dev/sdb
umount: /data:目标忙。
        (有些情况下通过 lsof(8) 或 fuser(1) 可以
         找到有关使用该设备的进程的有用信息)
4、lsof命令
lsof,list open files,用于查看系统打开的文件。
#下载软件包,查看哪个进程在使用挂载点
[root@server data 18:33:36]# yum install -y lsof
[root@server data 18:33:51]# lsof /data
COMMAND  PID USER   FD   TYPE DEVICE SIZE/OFF NODE NAME
bash    1393 root  cwd    DIR   8,16      156   64 /data
lsof    1899 root  cwd    DIR   8,16      156   64 /data
lsof    1900 root  cwd    DIR   8,16      156   64 /data
5、终止进程再次卸载
[root@server data 18:40:37]# cd
[root@server ~ 18:41:09]# umount /data

openEuler 是由开放原子开源基金会孵化的全场景开源操作系统项目,面向数字基础设施四大核心场景(服务器、云计算、边缘计算、嵌入式),全面支持 ARM、x86、RISC-V、loongArch、PowerPC、SW-64 等多样性计算架构
更多推荐
 2
2 0
0- 0


 已为社区贡献1条内容

所有评论(0)