hghac集群ipv6设置参考
9、修改各节点vip-manger配置文件信息,将涉及到的ipv4地址替换为ipv6地址,将新版本的vip-manger命令上传到当前环境,替换旧版本vip-manager命令。9、修改各节点vip-manger配置文件信息,将涉及到的ipv4地址替换为ipv6地址,上传新版本vip-manger服务器替换旧版本vip-manager。5、修改各节点etcd的配置文件,将文件中的ipv4地址更换为
环境
系统平台:Linux x86-64 Red Hat Enterprise Linux 7
版本:4.5.10
文档用途
本文主要用于指导hghac集群如何使用ipv6。
支持版本说明:
hghac4.2.3开始etcd及etcd支持使用ipv6,但自带的vip-manager版本不支持ipv6,需要升级到更高版本的vip-manager才可支持ipv6。
hghac4.2.5及更新版本中的所有组件均支持ipv6。
详细信息
一、整体步骤
1、按照数据库集群先备后主的顺序关闭hghac集群服务及数据库服务
2、关闭集群的vip-manager服务
3、关闭集群的etcd服务
4、删除各节点的etcd data目录
5、修改各节点etcd的配置文件,将文件中的ipv4地址更换为ipv6,三个节点均需修改,修改完成后启动etcd服务,三个节点启动时间不要超过10s。
6、确认etcd集群状态,状态正常后修改对应的环境变量信息
7、修改各节点的hghac配置文件,将文件中的ipv4地址修改为ipv6
8、启动主节点hac,状态无误后再启动备节点hac服务
9、修改各节点vip-manger配置文件信息,将涉及到的ipv4地址替换为ipv6地址,上传新版本vip-manger服务器替换旧版本vip-manager。
10、启动各节点vip-manger服务,确认vip是否挂载,挂载完成则替换成功。
11、验证能否正常备份,确认是否修改pgpass文件。
二、环境说明
| 序号 | 集群架构 | ipv4 | ipv6 | vip |
|---|---|---|---|---|
| 1 | hghac | 192.168.11.51 | fd15:4ba5:5a2b:1008:a516:cbff:be1c:2148/64 | fd15:4ba5:5a2b:1008:a516:cbff:be1c:204c |
| 2 | hghac | 192.168.11.52 | fd15:4ba5:5a2b:1008:200c:29ff:fe0a:aeb0/64 | fd15:4ba5:5a2b:1008:a516:cbff:be1c:204c |
| 3 | hghac | 192.168.11.53 | fd15:4ba5:5a2b:1008:fd42:d7ab:ea6e:5aef/64 | fd15:4ba5:5a2b:1008:a516:cbff:be1c:204c |
三、步骤明细
1、按照数据库集群先备后主的顺序关闭hghac集群服务及数据库服务
#检查数据库集群主备节点,role角色列中leader节点为主节点,其他节点为备节点
①任意节点执行hghactl list确认主备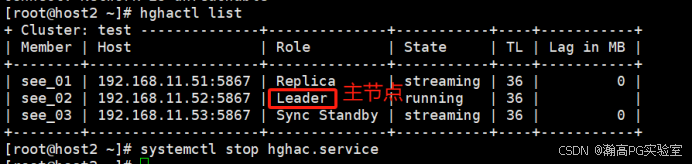
②按照先备后主的顺序去各数据库节点停止hghac服务
systemctl stop hghac.service
2、关闭集群的vip-manager服务 在所有节点执行关闭命令
systemctl stop vip-manager.service
3、关闭集群的etcd服务
在所有节点执行关闭命令
systemctl stop etcd.service
4、备份各节点的etcd data目录
①确定etcd data目录的路径,三个节点可能不一致,请详细检查
cat /usr/local/hghac/etcd/etcd.yml|grep data-dir
②备份各节点的etcd data目录,请根据各节点的路径去执行命令
mv /usr/local/hghac/etcd/etcd01 /usr/local/hghac/etcd/etcd01.bak
5、修改之前etcd各节点的配置文件,将涉及到的ipv4地址更换为ipv6,三个节点均修改完成后同时启动etcd服务(三个节点启动时间不要超过10s)
①修改各节点的etcd配置信息
单个的修改为本地的ipv6地址,initial-cluster需要配置三个节点的ipv6地址

vi /usr/local/hghac/etcd/etcd.yml
# List of comma separated URLs to listen on for peer traffic.
listen-peer-urls: http://[fd15:4ba5:5a2b:1008:200c:29ff:fe0a:aeb0]:2380

# List of comma separated URLs to listen on for client traffic.
listen-client-urls: http://[fd15:4ba5:5a2b:1008:200c:29ff:fe0a:aeb0]:2379,http://[::1]:2379

# List of this member's peer URLs to advertise to the rest of the cluster.
# The URLs needed to be a comma-separated list.
initial-advertise-peer-urls: http://[fd15:4ba5:5a2b:1008:200c:29ff:fe0a:aeb0]:2380

# List of this member's client URLs to advertise to the public.
# The URLs needed to be a comma-separated list.
advertise-client-urls: http://[fd15:4ba5:5a2b:1008:200c:29ff:fe0a:aeb0]:2379

# Initial cluster configuration for bootstrapping.
initial-cluster: etcd_01=http://[fd15:4ba5:5a2b:1008:a516:cbff:be1c:2148]:2380,etcd_02=http://[fd15:4ba5:5a2b:1008:200c:29ff:fe0a:aeb0]:2380,etcd_03=http://[fd15:4ba5:5a2b:1008:fd42:d7ab:ea6e:5aef]:2380

②各节点etcd配置信息修改完成后,启动各节点etcd服务,各节点启动时间差不超过10s
systemctl start etcd.service
6、确认etcd集群状态,状态正常后修改对应的环境变量信息
①检查etcd集群服务状态
systemctl status etcd -l
所有节点状态均为active,无报错,如下图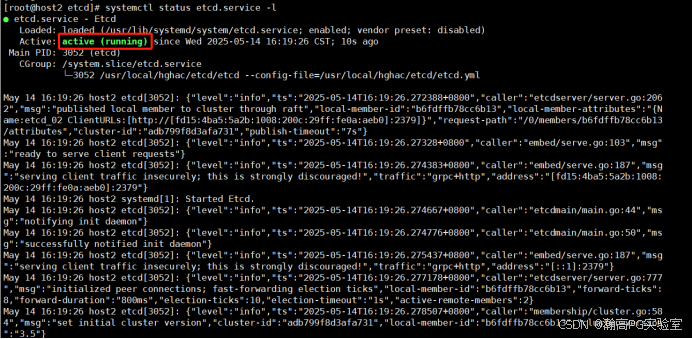
②修改各节点的etcd环境变量
vi ~/.bash_profile
#export ETCDCTL_ENDPOINTS=http://192.168.11.51:2379,http://192.168.11.52:2379,http://192.168.11.53:2379 --把原来ipv4的环境变量信息注释掉,前面加#号
export ETCDCTL_ENDPOINTS=http://[fd15:4ba5:5a2b:1008:a516:cbff:be1c:2148]:2380,http://[fd15:4ba5:5a2b:1008:200c:29ff:fe0a:aeb0]:2380,http://[fd15:4ba5:5a2b:1008:fd42:d7ab:ea6e:5aef]:2380
③使之生效
source ~/.bash_profile
④执行etcd集群状态检查
etcdctl endpoint status -w table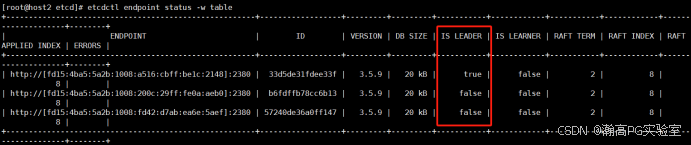
⑤开启etcd集群的密码登陆验证
etcdctl user add root --新建用户–输入两次密码,假如密码为highgo
etcdctl --user root:highgo auth enable --开启密码验证
etcdctl --user root role get root --验证密码登陆,命令执行完成后需输入密码才能登陆。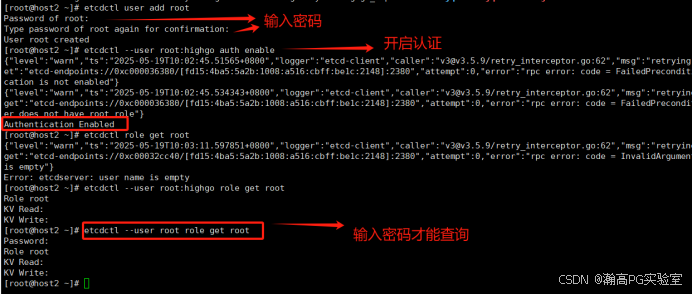
7、修改各节点的hghac配置文件,将涉及到的ipv4地址修改为ipv6
对于配置文件中的特殊说明
①etcd3部分需配置刚才添加的etcd用户及密码
②listen部分*:5867改为[::]:5867 端口号根据实际情况来
③pg_hba部分的说明:
0.0.0.0/0改为::/0

127.0.0.1/32改为::1/128

vi /usr/local/hghac/hac/hghac.yml

scope: test
namespace: /service/
name: see_02

restapi:
  listen: "[fd15:4ba5:5a2b:1008:200c:29ff:fe0a:aeb0]:8008"
  connect_address: "[fd15:4ba5:5a2b:1008:200c:29ff:fe0a:aeb0]:8008"
etcd3:
hosts: "[fd15:4ba5:5a2b:1008:a516:cbff:be1c:2148]:2379,[fd15:4ba5:5a2b:1008:200c:29ff:fe0a:aeb0]:2379,[fd15:4ba5:5a2b:1008:fd42:d7ab:ea6e:5aef]:2379"
username: root
password: highgo


bootstrap:
  dcs:
    ttl: 30
    loop_wait: 10
    retry_timeout: 10
    maximum_lag_on_failover: 1048576
    master_start_timeout: 300
    synchronous_mode: false
    postgresql:
      use_pg_rewind: true
      parameters:
        wal_level: replica
        hot_standby: "on"
        wal_keep_size: 100
        max_wal_senders: 10
        max_replication_slots: 10
        wal_log_hints: "on"
        archive_mode: "off"
        archive_timeout: 1800s
        logging_collector: "on"

  method: initdb_keygen
  initdb_keygen:
    command: /usr/local/hghac/hac/initdb_keygen.sh
    keep_existing_recovery_conf: True
    no_params: True

postgresql:
  database: highgo
  listen: "[::]:5867"  --监听所有ipv6地址
  connect_address: "[fd15:4ba5:5a2b:1008:200c:29ff:fe0a:aeb0]:5867"
  bin_dir: /opt/highgo/hgdb-see-4.5.8/bin
  data_dir: /opt/highgo/hgdb-see-4.5.8/data
  config_dir: /opt/highgo/hgdb-see-4.5.8/data
  pgpass: /tmp/.pgpass

  authentication:
    replication:
      username: sysdba
      password: Hello@1234
    rewind:
      username: sysdba
      password: Hello@1234
    sysdba:
      password: Hello@1234
    syssso:
      password: Hello@1234
    syssao:
      password: Hello@1234

  parameters:
    ssl: 'on'
    ssl_cert_file: /opt/highgo/hgdb-see-4.5.8/data/server.crt
    ssl_key_file: /opt/highgo/hgdb-see-4.5.8/data/server.key

  pg_hba:
  - local   all             all                                     sm3
  - host    all             all             ::1/128                 sm3
  - host    all             all             ::/0               sm3
  - local   replication     all                                     sm3
  - host    replication     all            ::1/128                 sm3
  - host       replication     all            ::/0               sm3
  - hostssl    replication     all            ::/0               sm3
  - hostssl    replication     all            ::1/128                 sm3
8、启动数据库主节点hac,状态无误后再启动备节点hac服务
①启动主节点hac服务,确认主节点状态正常
systemctl start hghac.service
hghactl list

②主节点启动成功后,启动备节点的hac服务,确认是否正常
systemctl start hghac.service
hghactl list
上图中,观察role列,存在leader及replica或sync standby节点,lag in MB为0则表明状态正常。
9、修改各节点vip-manger配置文件信息,将涉及到的ipv4地址替换为ipv6地址,将新版本的vip-manger命令上传到当前环境,替换旧版本vip-manager命令
vip-manager需使用4.2.5之后的版本才执行ipv6的使用,需要手动copy一个新版的vip-manger命令到当前环境下替换旧版本的vip-manager。
etcd-user及etcd-password使用第6步中配置的etcd的root用户及对应密码
vi /usr/local/hghac/vip-manager/vip-manager.yml

[root@host2 ~]# cat /usr/local/hghac/vip-manager/vip-manager.yml
interval: 1000
trigger-key: /service/test/leader
trigger-value: see_02
ip: "fd15:4ba5:5a2b:1008:a516:cbff:be1c:204c"
netmask: 64
interface: ens33
hosting-type: basic
dcs-type: etcd
dcs-endpoints:
"http://[fd15:4ba5:5a2b:1008:a516:cbff:be1c:2148]:2379,http://[fd15:4ba5:5a2b:1008:200c:29ff:fe0a:aeb0]:2379,http://[fd15:4ba5:5a2b:1008:fd42:d7ab:ea6e:5aef]:2379"     --格式显示问题,需要左侧缩进4格

etcd-user: "root"
etcd-password: "highgo"

retry-num: 2
retry-after: 250
verbose: false
10、启动各节点vip-manger服务,确认vip挂载情况,挂载正常则处理完毕
①启动vip-manager
systemctl start vip-manager.service
②查看服务状态
systemctl status vip-manager.service -l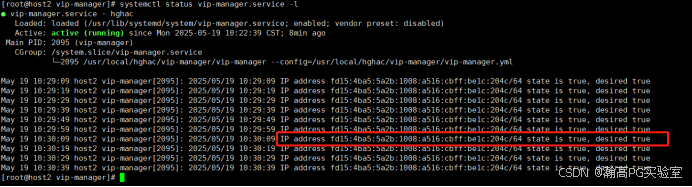
11、验证能否正常备份,查看修改pgpass文件。
检查密码文件,如果存在127.0.0.1的地址,修改为::1
vi ~/.pgpass
localhost:5867:highgo:sysdba:Hello@1234
::1:5867:highgo:sysdba:Hello@1234
检查定时任务中的备份任务,如果条件运行手动进行一次全备,也可以等第二天检查备份情况是否正常。

openEuler 是由开放原子开源基金会孵化的全场景开源操作系统项目,面向数字基础设施四大核心场景(服务器、云计算、边缘计算、嵌入式),全面支持 ARM、x86、RISC-V、loongArch、PowerPC、SW-64 等多样性计算架构
更多推荐

 10
10 0
0- 0


 已为社区贡献1条内容

所有评论(0)