多线程(Thread的基本用法)1
目录
一.初识多线程
1.什么是线程和进程
进程是每一个程序运行时的一次实例,是操作系统资源分配的最小单位。
由于进程整体是一个比较“重”的概念,创建和销毁进程开销比较大,为了解决这种问题,从而引入了线程(Thread)。
线程:进程内部执行的一个单元,是操作系统CPU调度的最小单位。
线程因为创建和销毁更小,因此也可以称为轻量级进程。
一句话总结:如果进程是一栋房子,那么线程就是房子里干活的人。
2.线程与进程的区别
1.进程包含线程。每一个进程中都会包含一个或多个线程。
2.进程是操作系统资源分配是基本单位。
3.线程是操作系统执行调度的进本单位。
4.同一个进程中的多个线程之间,共享同一份资源(内存,文件)。
二.Thread类的基本用法
1.线程的创建
1.1继承Thread类
//第一个线程
class MyThread extends Thread{
    @Override
//run方法相当于回调函数
//这里线程的入口,新的线程启动了,就要执行这里的代码。
    public void run() {
        while (true){
            System.out.println("hello Thread");
        }
    }
}

//第二个线程
public class Demo1 {
    public static void main(String[] args) {
        Thread t = new MYThread();
        t.start();//真正在系统中创建线程
        while (true) {
            System.out.println("hello main");
        }
    }
}
1.2创建Runnable接口
class MyRunnable implements Runnable{
    @Override
    public void run() {
        while (true){
            System.out.println("hello Thread");
        }
    }
}

public class Demo2 {
    public static void main(String[] args){
        Runnable runnable = new MyRunnable();
        Thread t = new Thread(runnable);
        t.start();
        while (true) {
            System.out.println("hello main");
        }
    }
}
1.3通过匿名内部类
1.3.1使用Thread
public class Demo3 {
    public static void main(String[] args) {
//创建了一个Thread子类并匿名
//{}立可以写子类的定义代码和需要的属性,方法.....
// 创建了这个匿名内部类的实例并把实例的引用赋值给t
        Thread t = new MYThread(){
            @Override
            public void run() {
                while (true) {
                    System.out.println("hello Thread");
                        Thread.sleep(1000);
                }
            }
        };
        t.start();
        while (true) {
            System.out.println("hello main");
        }

    }
}
1.3.2使用Runnable
public class Demo4 {
    public static void main(String[] args) {
        Runnable runnable = new Runnable(){
            @Override
            public void run() {
                while (true) {
                    System.out.println("hello Thread");
                        Thread.sleep(1000);
                  }
            }
        };
        Thread t = new Thread(runnable);
        t.start();
        while (true) {
            System.out.println("hello main");
        }
    }
}
1.4 引入lambda表达式(推荐使用)
lambda表达式本质上是一个“匿名函数” 它的主要用途就是作为“回调函数”
public class Demo5 {
    public static void main(String[] args){
        Thread t = new Thread(() -> {
            while (true) {
                System.out.println("hello Thread");
            }
        });
        t.start();
        while (true) {
            System.out.println("hello main");
        }
    }
}
1.5Thread类的其他属性和方法
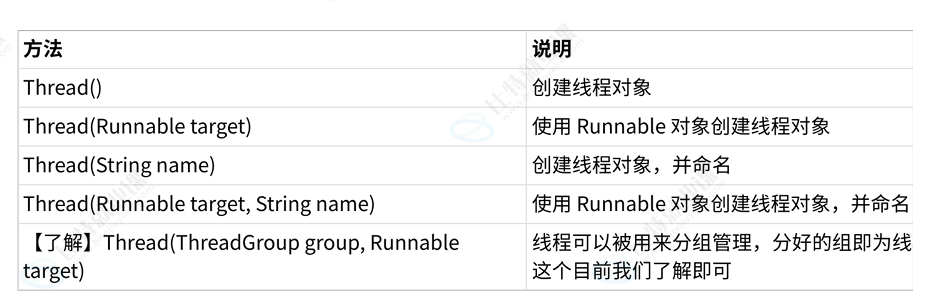
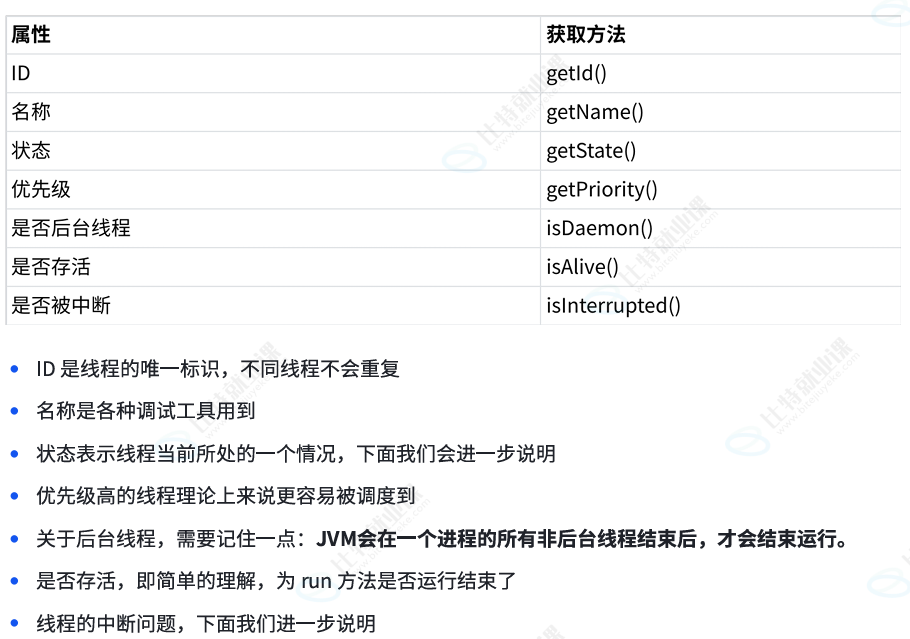
public class ThreadDemo {
    public static void main(String[] args) {
        Thread thread = new Thread(() -> {
            for (int i = 0; i < 10; i++) {
                    System.out.println(Thread.currentThread().getName() + ": 我还活着");
            }
            System.out.println(Thread.currentThread().getName() + ": 我即将死去");
        });
        System.out.println(Thread.currentThread().getName()  + ": ID: " + thread.getId());
        System.out.println(Thread.currentThread().getName()  + ": 名称: " + thread.getName());
        System.out.println(Thread.currentThread().getName() + ": 状态: " + thread.getState());
        System.out.println(Thread.currentThread().getName()  + ": 优先级: " + thread.getPriority());
        System.out.println(Thread.currentThread().getName()   + ": 后台线程: " + thread.isDaemon());
        System.out.println(Thread.currentThread().getName()  + ": 活着: " + thread.isAlive());
        System.out.println(Thread.currentThread().getName() + ": 被中断: " + thread.isInterrupted());
        thread.start();
        while (thread.isAlive()) {}
        System.out.println(Thread.currentThread().getName()   + ": 状态: " + thread.getState());
    }
}
2.线程中断
核心是让线程的入口方法,能够尽快结束(通过调用isInterrupted())
public class Demo10 {
    public static void main(String[] args) throws InterruptedException {
        Thread t = new Thread(() -> {
//Thread.currentThread()代表的是t(哪个线程调用,获取到的就是哪个线程的Thread引用)
//判断线程是否被终止
            while (!Thread.currentThread().isInterrupted()) {
                System.out.println("hello Thread");
                try {
                    Thread.sleep(1000);//让线程暂时休眠
                } catch (InterruptedException e) {
                    //throw new RuntimeException(e);
                    //1.break;立即终止
                    // 2.啥都不写,不终止
                    // 3.catch中 ,先执行一些其他逻辑在break,稍后终止
                }
            }
        });

        t.start();
        Thread.sleep(3000);
        System.out.println("main 线程尝试终止 t 线程");
//主动终止
        t.interrupt();
    }
}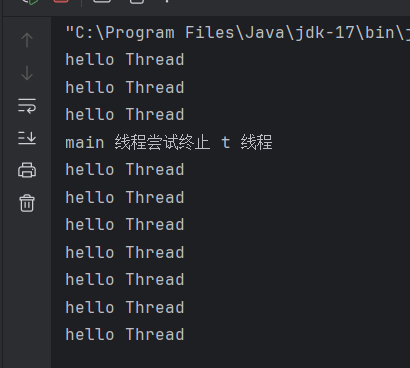
针对上述代码,其实是 sleep 在搞鬼,正常来说,调用 Internupt 方法就会修改 islnterruptted方法内部的标志位,设为 true,由于上述代码中,是把 sleep 给唤醒了,这种提前唤醒的情况下, sleep 就会在唤醒之后,把 isInterruptted 标志位给设置回 false。
3.线程等待(join)
多个线程之间并发执行,随机调度,join能够要求多个线程之间结束的先后顺序
public class Demo11 {
    public static void main(String[] args) throws InterruptedException {
        Thread t = new Thread(() -> {
            for (int i = 0; i < 3000; i++) {
                System.out.println("hello Tread");
                try {
                    Thread.sleep(1000);
                } catch (InterruptedException e) {
                    throw new RuntimeException(e);
                }
            }
            System.out.println("t 线程结束");
        });
        t.start();
        t.join();//谁调用谁后结束(main 等 t 结束 main 再结束)
        System.out.println("main 主线程结束");
    }
}
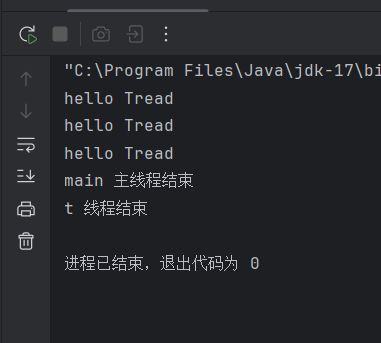
t.join();在main方法中的效果是让main线程等待t先结束
4.线程休眠
也就是上边调用的sleep,让当前线程暂停执行一段时间,释放cpu,时间到了以后在恢复运行
Thread.sleep(long ms)单位为毫秒
调用时会抛出InterruptedException受检异常
public class SleepDemo {
    public static void main(String[] args) {
        new Thread(() -> {
            try {
                System.out.println("开始休眠");
                // 休眠2秒
                Thread.sleep(2000);
                System.out.println("休眠结束");
            } catch (InterruptedException e) {
                e.printStackTrace();
            }
        }).start();
    }
}

openEuler 是由开放原子开源基金会孵化的全场景开源操作系统项目,面向数字基础设施四大核心场景(服务器、云计算、边缘计算、嵌入式),全面支持 ARM、x86、RISC-V、loongArch、PowerPC、SW-64 等多样性计算架构
更多推荐

 14
14 0
0- 0


 已为社区贡献5条内容

所有评论(0)