OAuth2 从糊涂到通透 — Spring Security + GitHub 实战全记录
文章目录
一、什么是OAuth2
(1)概念
OAuth 2.0 是一个授权框架,允许第三方应用有限地访问用户在另一服务上存储的资源(如照片、联系人、文件),而无需将用户名和密码直接交给第三方应用。
解决了一个问题:如何让用户在不把密码告诉第三方应用的前提下,授权第三方访问自己在服务提供商上的受保护资源?
(2)四类角色
在OAuth 2.0中,有四类角色,它们分别为
- 资源所有者(Resource Owner):用户本人
- 客户端(Client):想访问资源的第三方应用
- 授权服务器(Authorization Server):负责验证用户并颁发令牌
- 资源服务器(Resource Server):存放用户资源的地方(如照片服务器)
注意:很多企业内部系统中,授权服务器和资源服务器往往是同一台服务器。
举个例子,假如我开发了一个 Spring Boot Web 应用,用户可以在你的应用上点击「使用 GitHub 登录」,你的应用需要读取用户在 GitHub 上的部分信息(比如邮箱、用户名)。那么在这种情况下,角色关系可以这样对照:
| 角色 | 对应 | 说明 |
|---|---|---|
| 资源所有者 | 你的用户(用 GitHub 登录的那个人) | 他的 GitHub 账号数据属于他自己 |
| 资源服务器 | GitHub API 服务器(如 api.github.com) | 存放用户邮箱、仓库、组织等数据的地方 |
| 授权服务器 | GitHub OAuth 认证服务器(如 github.com/login/oauth/access_token) | 负责让用户登录、询问用户是否同意授权、颁发令牌 |
| 客户端 | 你的 Spring Boot 应用 | 它需要请求资源(用户数据),但拿不到用户密码,只能靠令牌 |
(3)基本工作流程
OAuth2.0工作流程可用下图说明
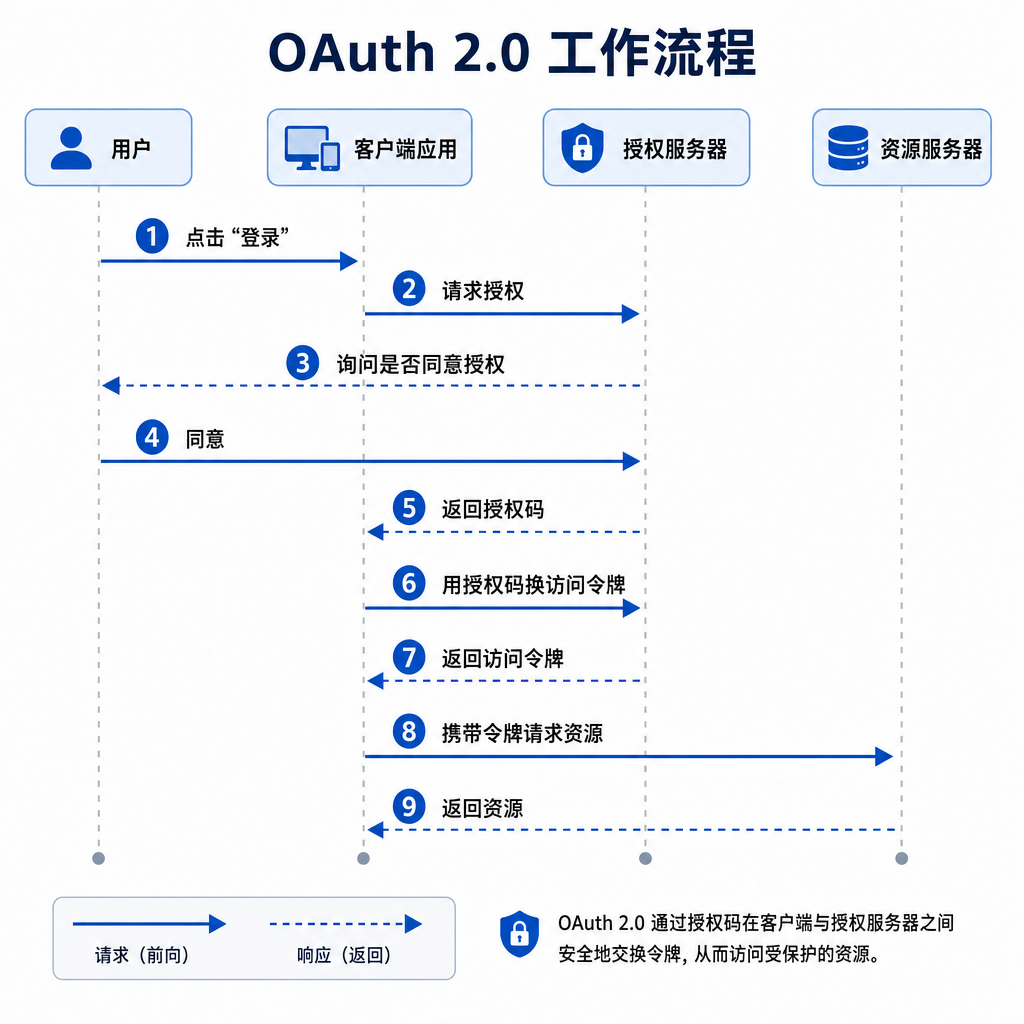
(4)授权码模式
OAuth 2.0定义了 4 种授权方式,分别为
- 授权码模式:最安全、最常用的模式,专门用于有后端服务器的Web应用。
- 授权码是一次性的,有效期很短(通常几分钟)
- 必须配合 Client Secret(客户端密钥)才能换令牌
- 令牌不经过前端,避免被浏览器插件、历史记录等拦截
- 支持刷新令牌,可以自动获取新访问令牌
- 隐式模式:已废弃,为纯前端应用设计,但存在安全缺陷
- 没有授权码环节,直接返回令牌
- 令牌出现在浏览器URL中(
#access_token=xxx) - 无法使用刷新令牌(但可以用iframe技巧延长,但非常麻烦)
- 密码模式:用户直接把用户名+密码交给客户端,客户端用它们去换令牌。
- 最简单直接,只需一次请求
- 客户端直接接触到用户密码
- 支持刷新令牌
- 客户端凭证模式:客户端以自己的名义(而不是用户的名义)访问资源
- 不涉及任何用户,没有“授权”环节
- 令牌代表客户端本身的身份
- 只能访问客户端自己的资源,不能访问用户数据
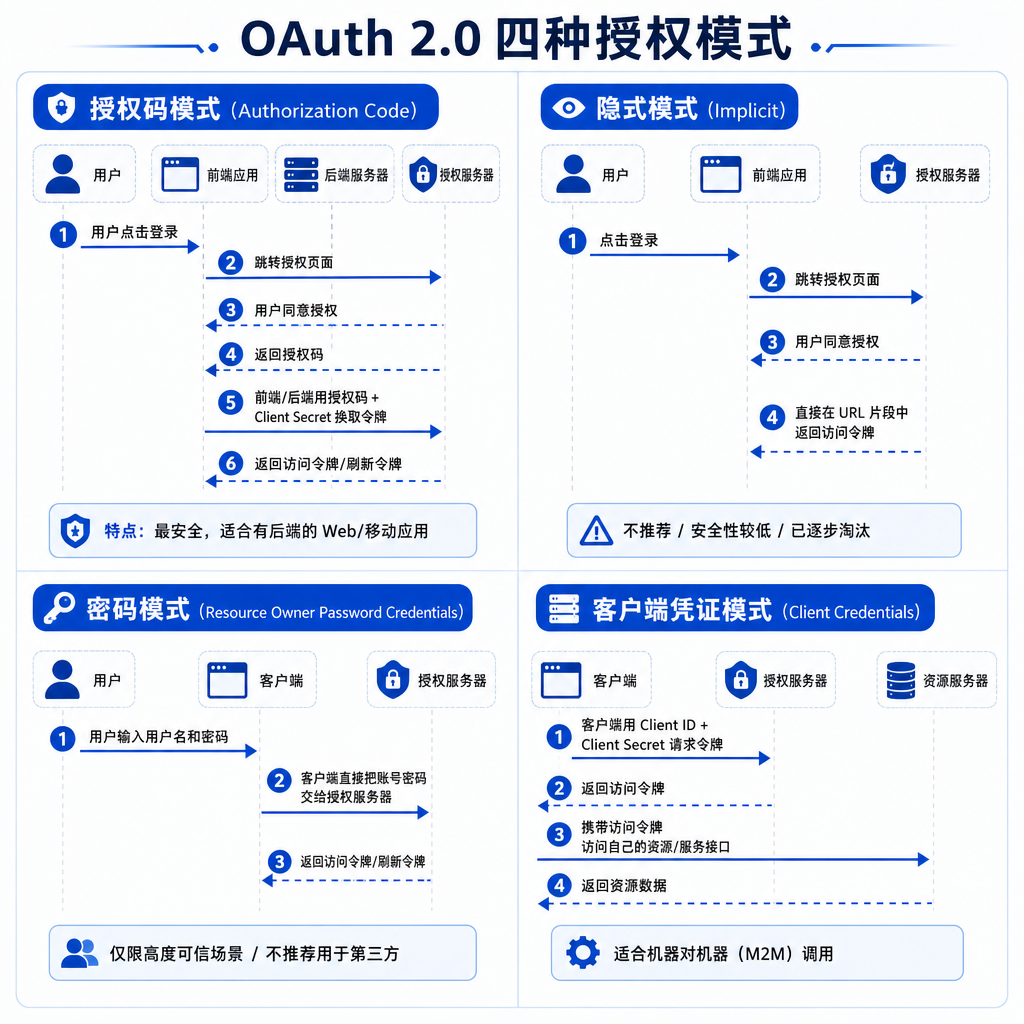
总结如下
| 模式 | 用户参与 | 获取令牌方式 | 刷新令牌 | 安全性 | 推荐程度 |
|---|---|---|---|---|---|
| 授权码模式 | 需要 | 授权码→令牌 | ✅ 支持 | ⭐⭐⭐⭐⭐ | 最推荐 |
| 隐式模式 | 需要 | 直接返回 | ❌ 不支持 | ⭐⭐ | 已废弃 |
| 密码模式 | 需要(交密码) | 直接返回 | ✅ 支持 | ⭐⭐⭐ | 仅特定场景 |
| 客户端模式 | 不需要 | 直接返回 | ✅ 支持 | ⭐⭐⭐⭐ | 服务间调用 |
二、Github OAuth App案例分析
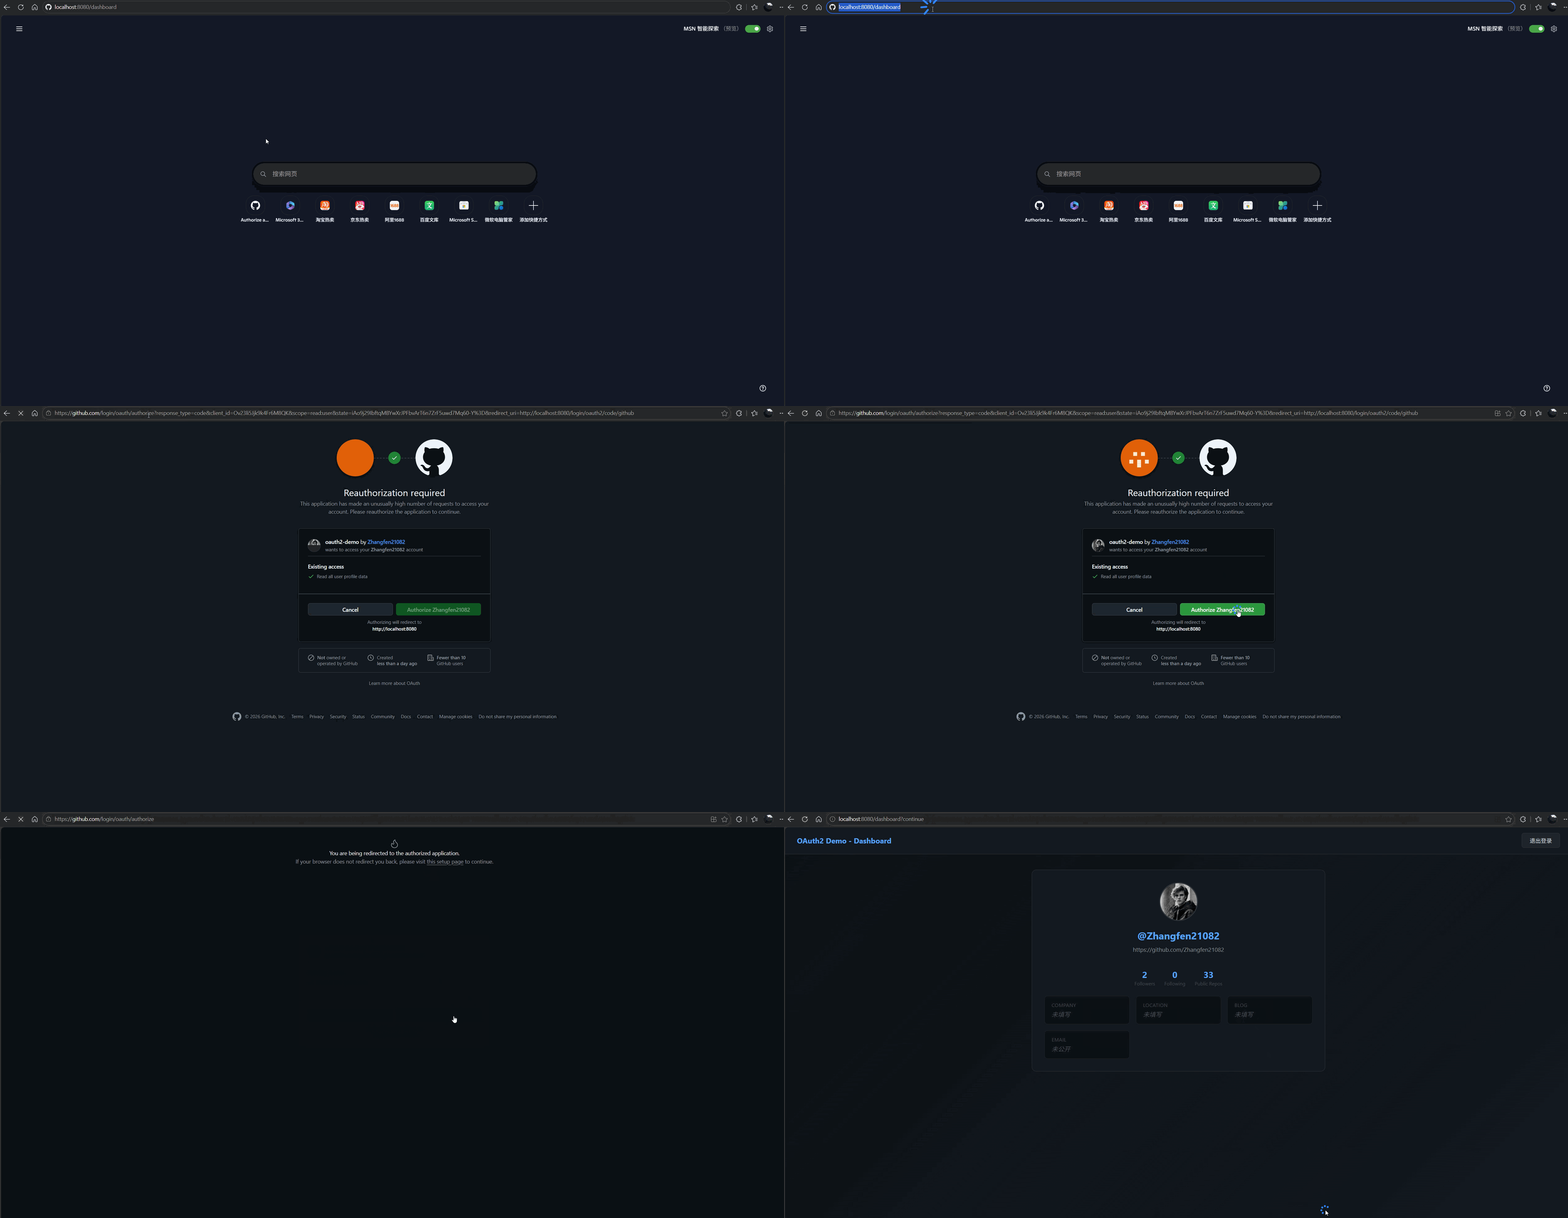
接下来,我们通过一个简单的dashboard应用,然后借助Github OAuth来展示这一过程。如下动图所示
(1)准备工作
A:GitHub OAuth2 App 注册
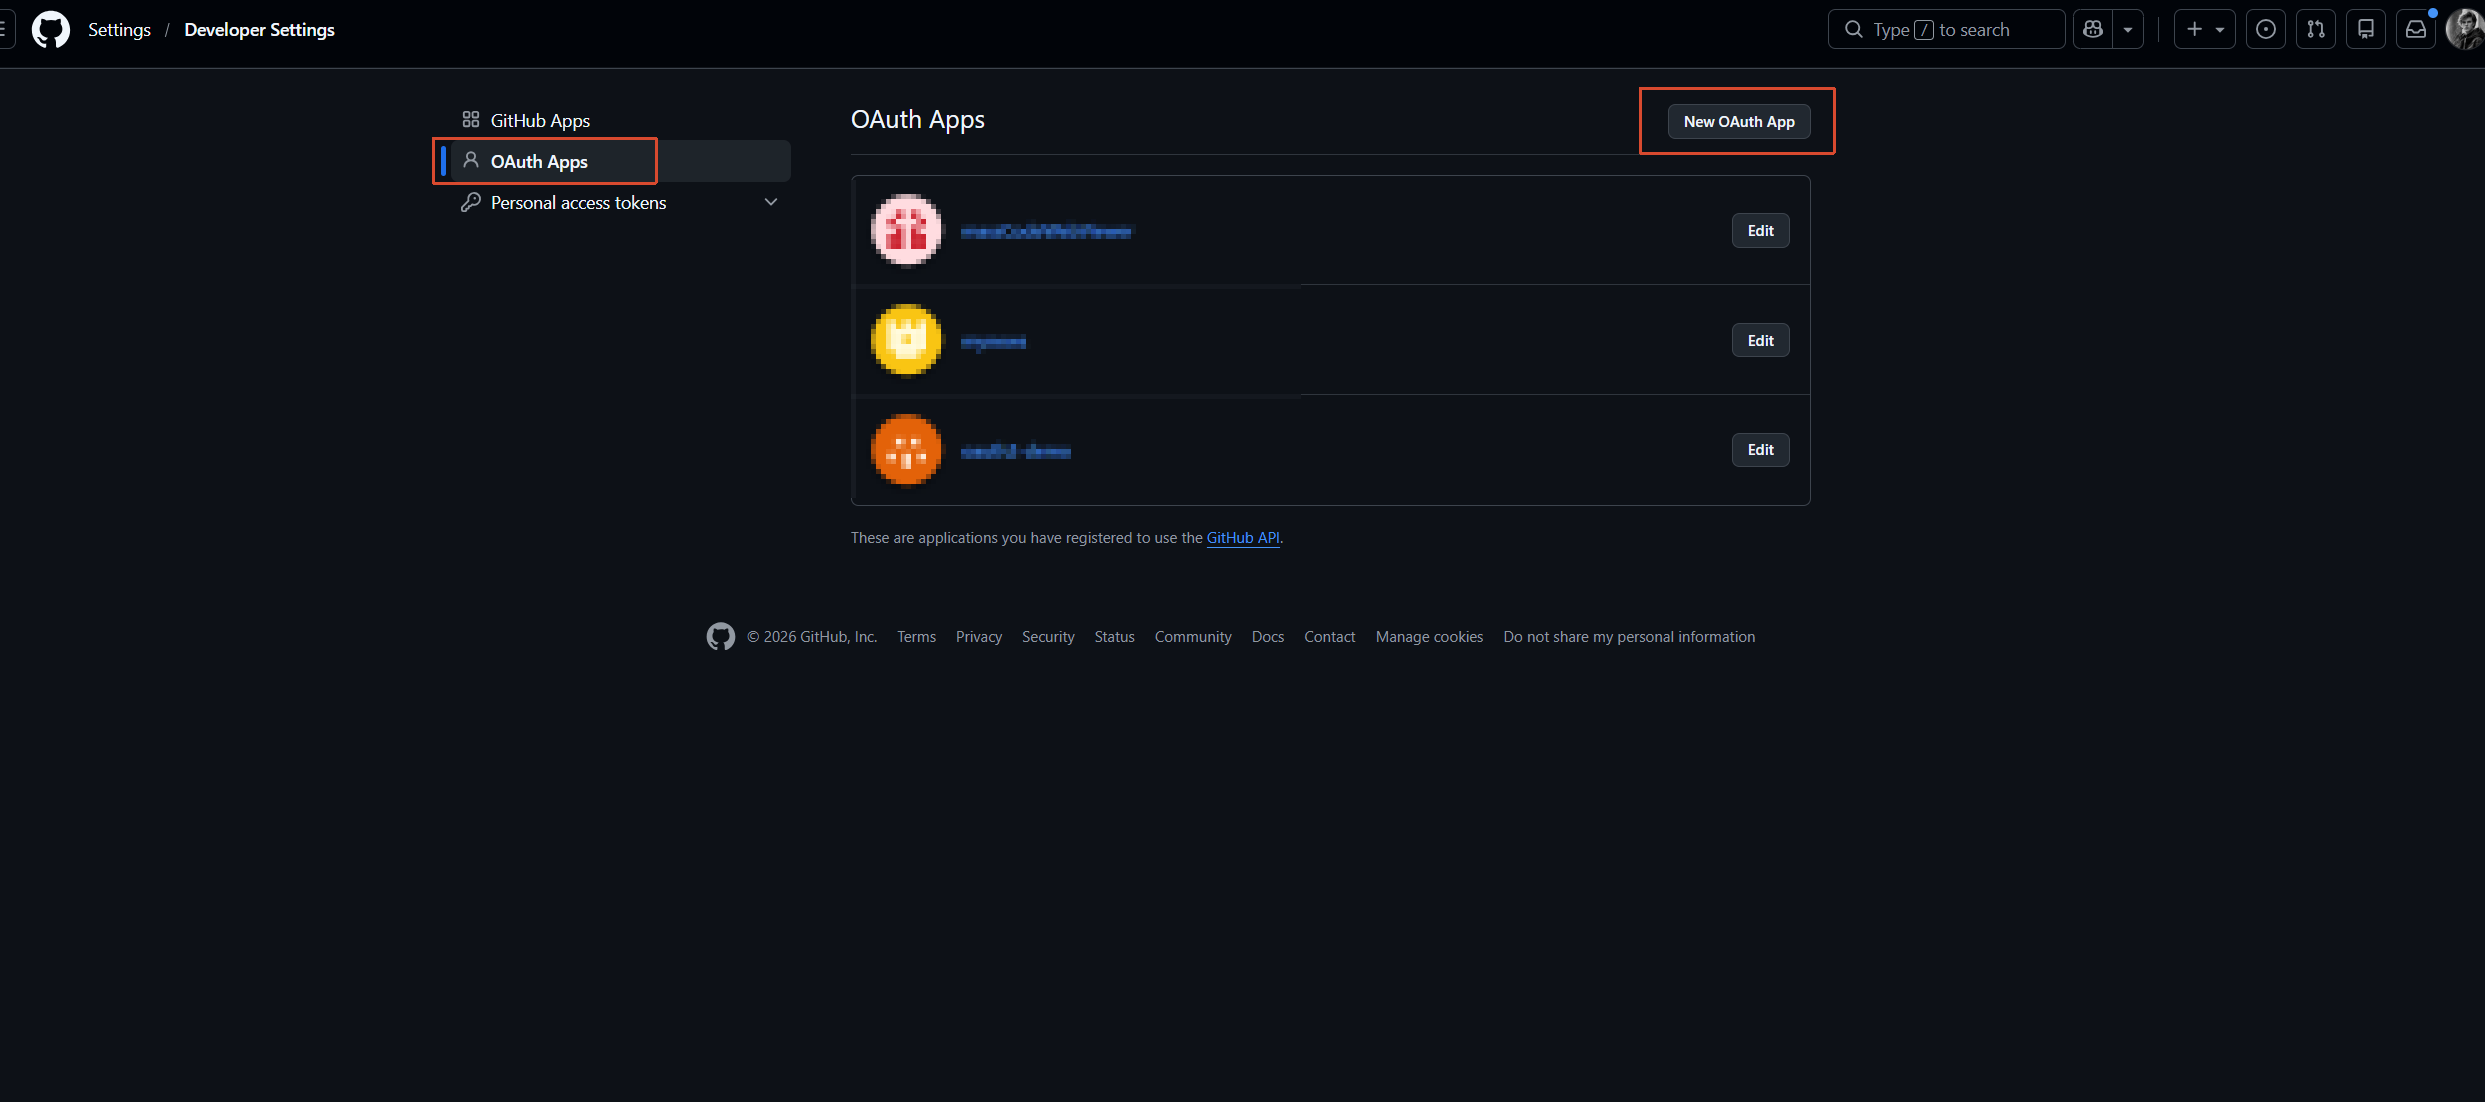
首先,要在 GitHub 注册 OAuth2 App,步骤如下
- 登录 GitHub → 右上角头像 → Settings
- 左侧菜单最底部 → Developer settings → OAuth Apps → New OAuth App
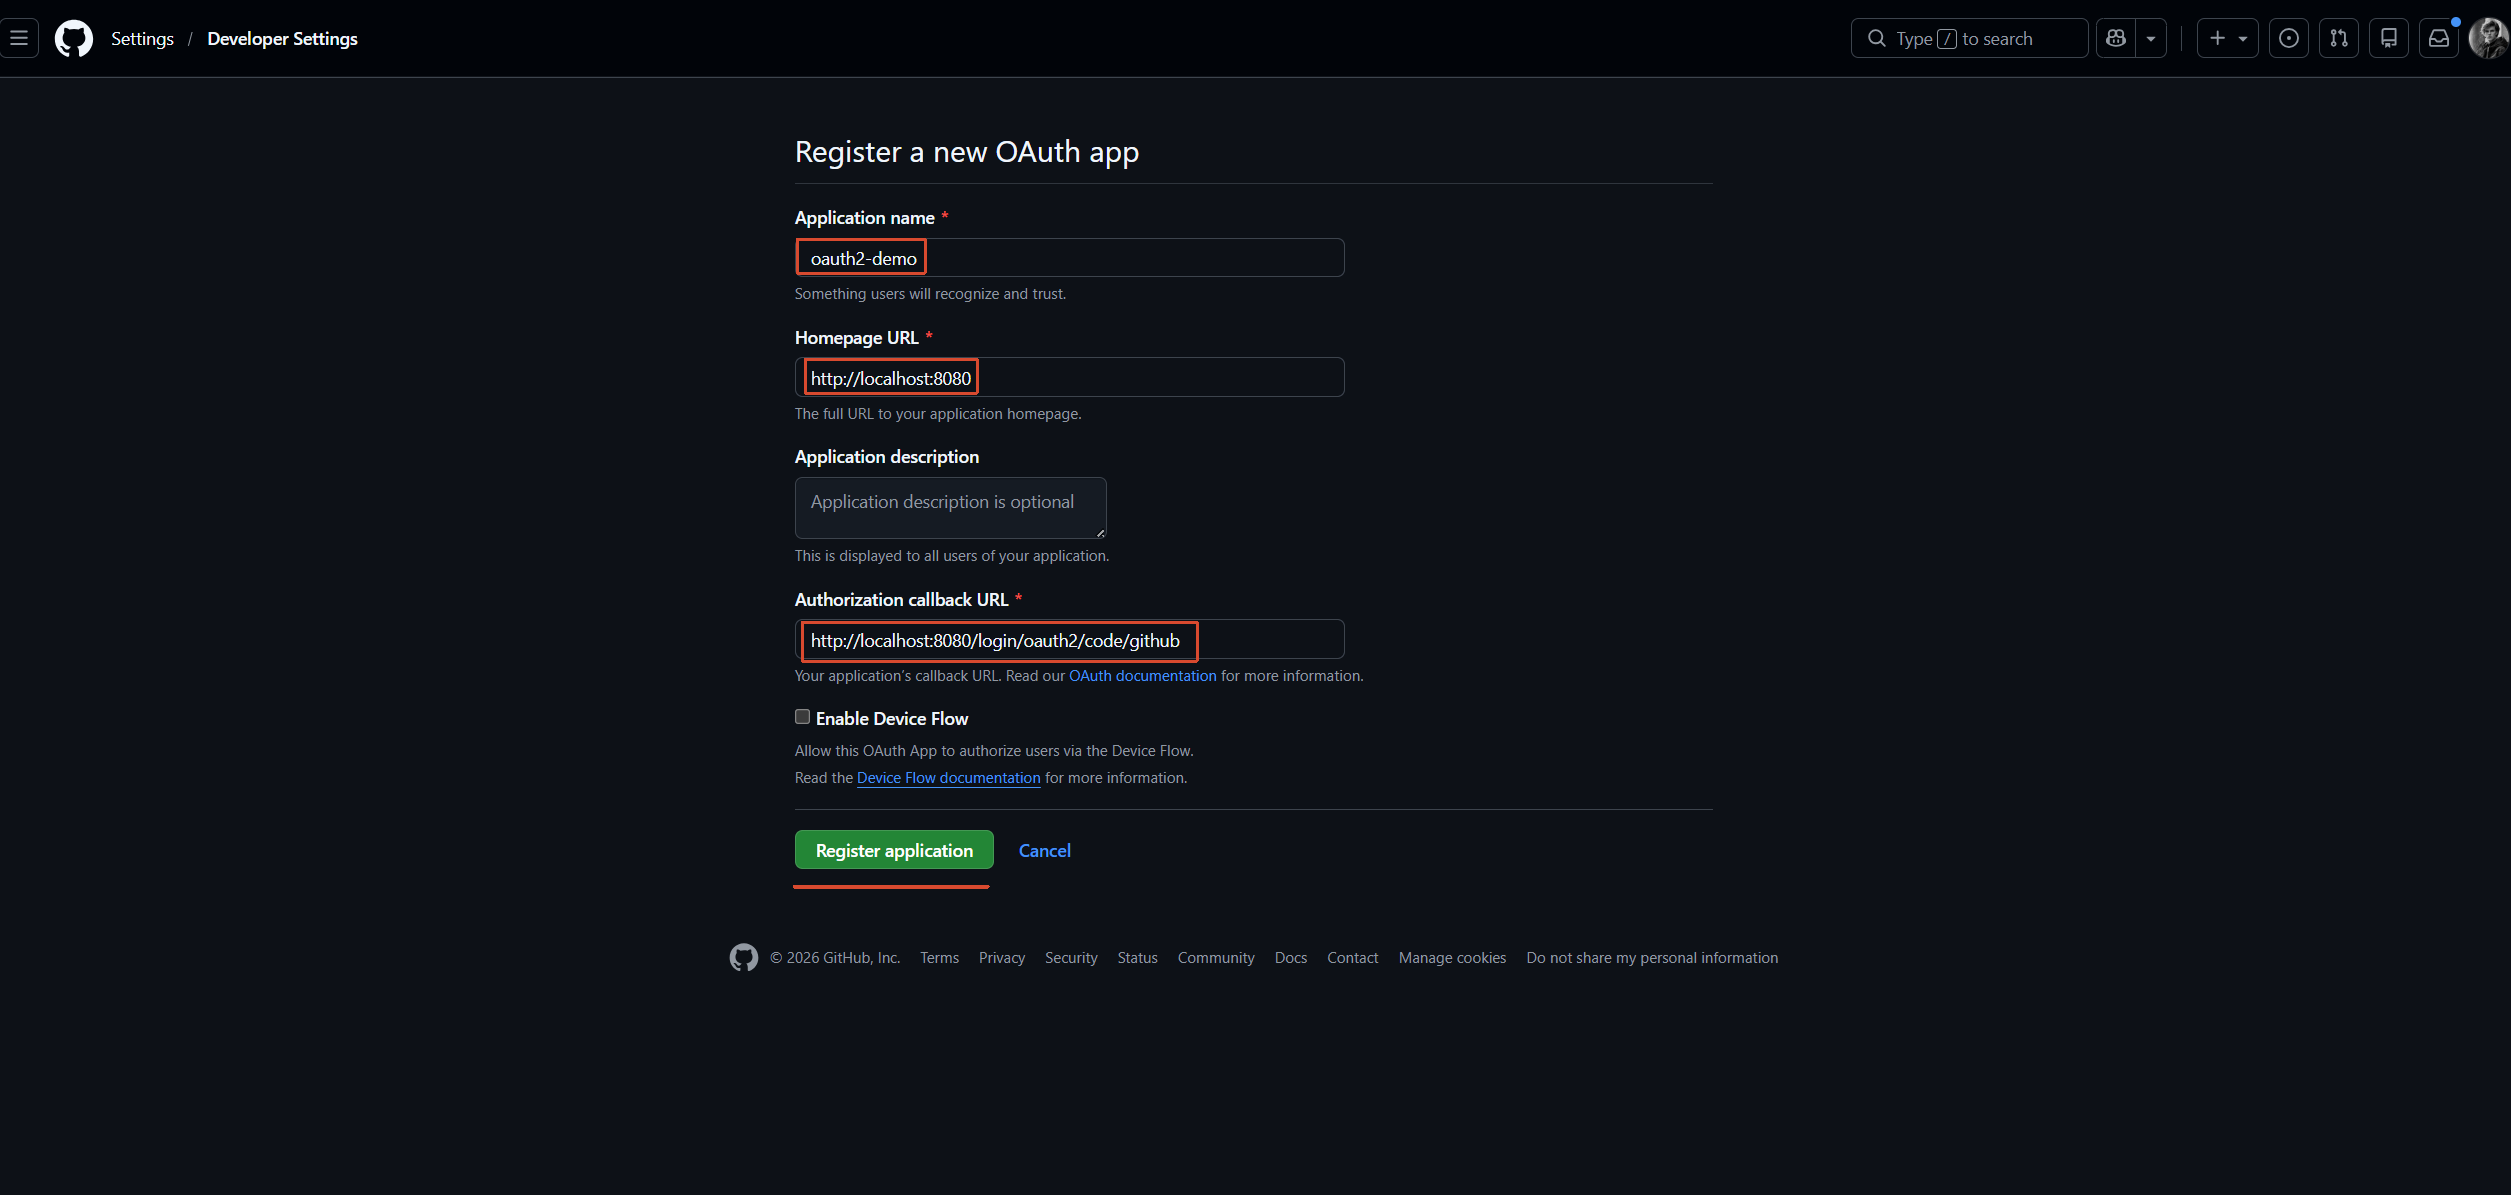
- 填写表单:
- Application name:表示应用名称,可填任意。这里我填
oauth2-demo - Homepage URL:表示应用首页地址。这里我填
http://localhost:8080 - Application description:描述信息
- Authorization callback URL:回调地址。当授权服务器在用户同意授权后,会把授权码或令牌发送到这个地址。必须填写正确,按照Github OAuth2约定,需要填
http://localhost:8080/login/oauth2/code/github
- Application name:表示应用名称,可填任意。这里我填
- 点击 Register application
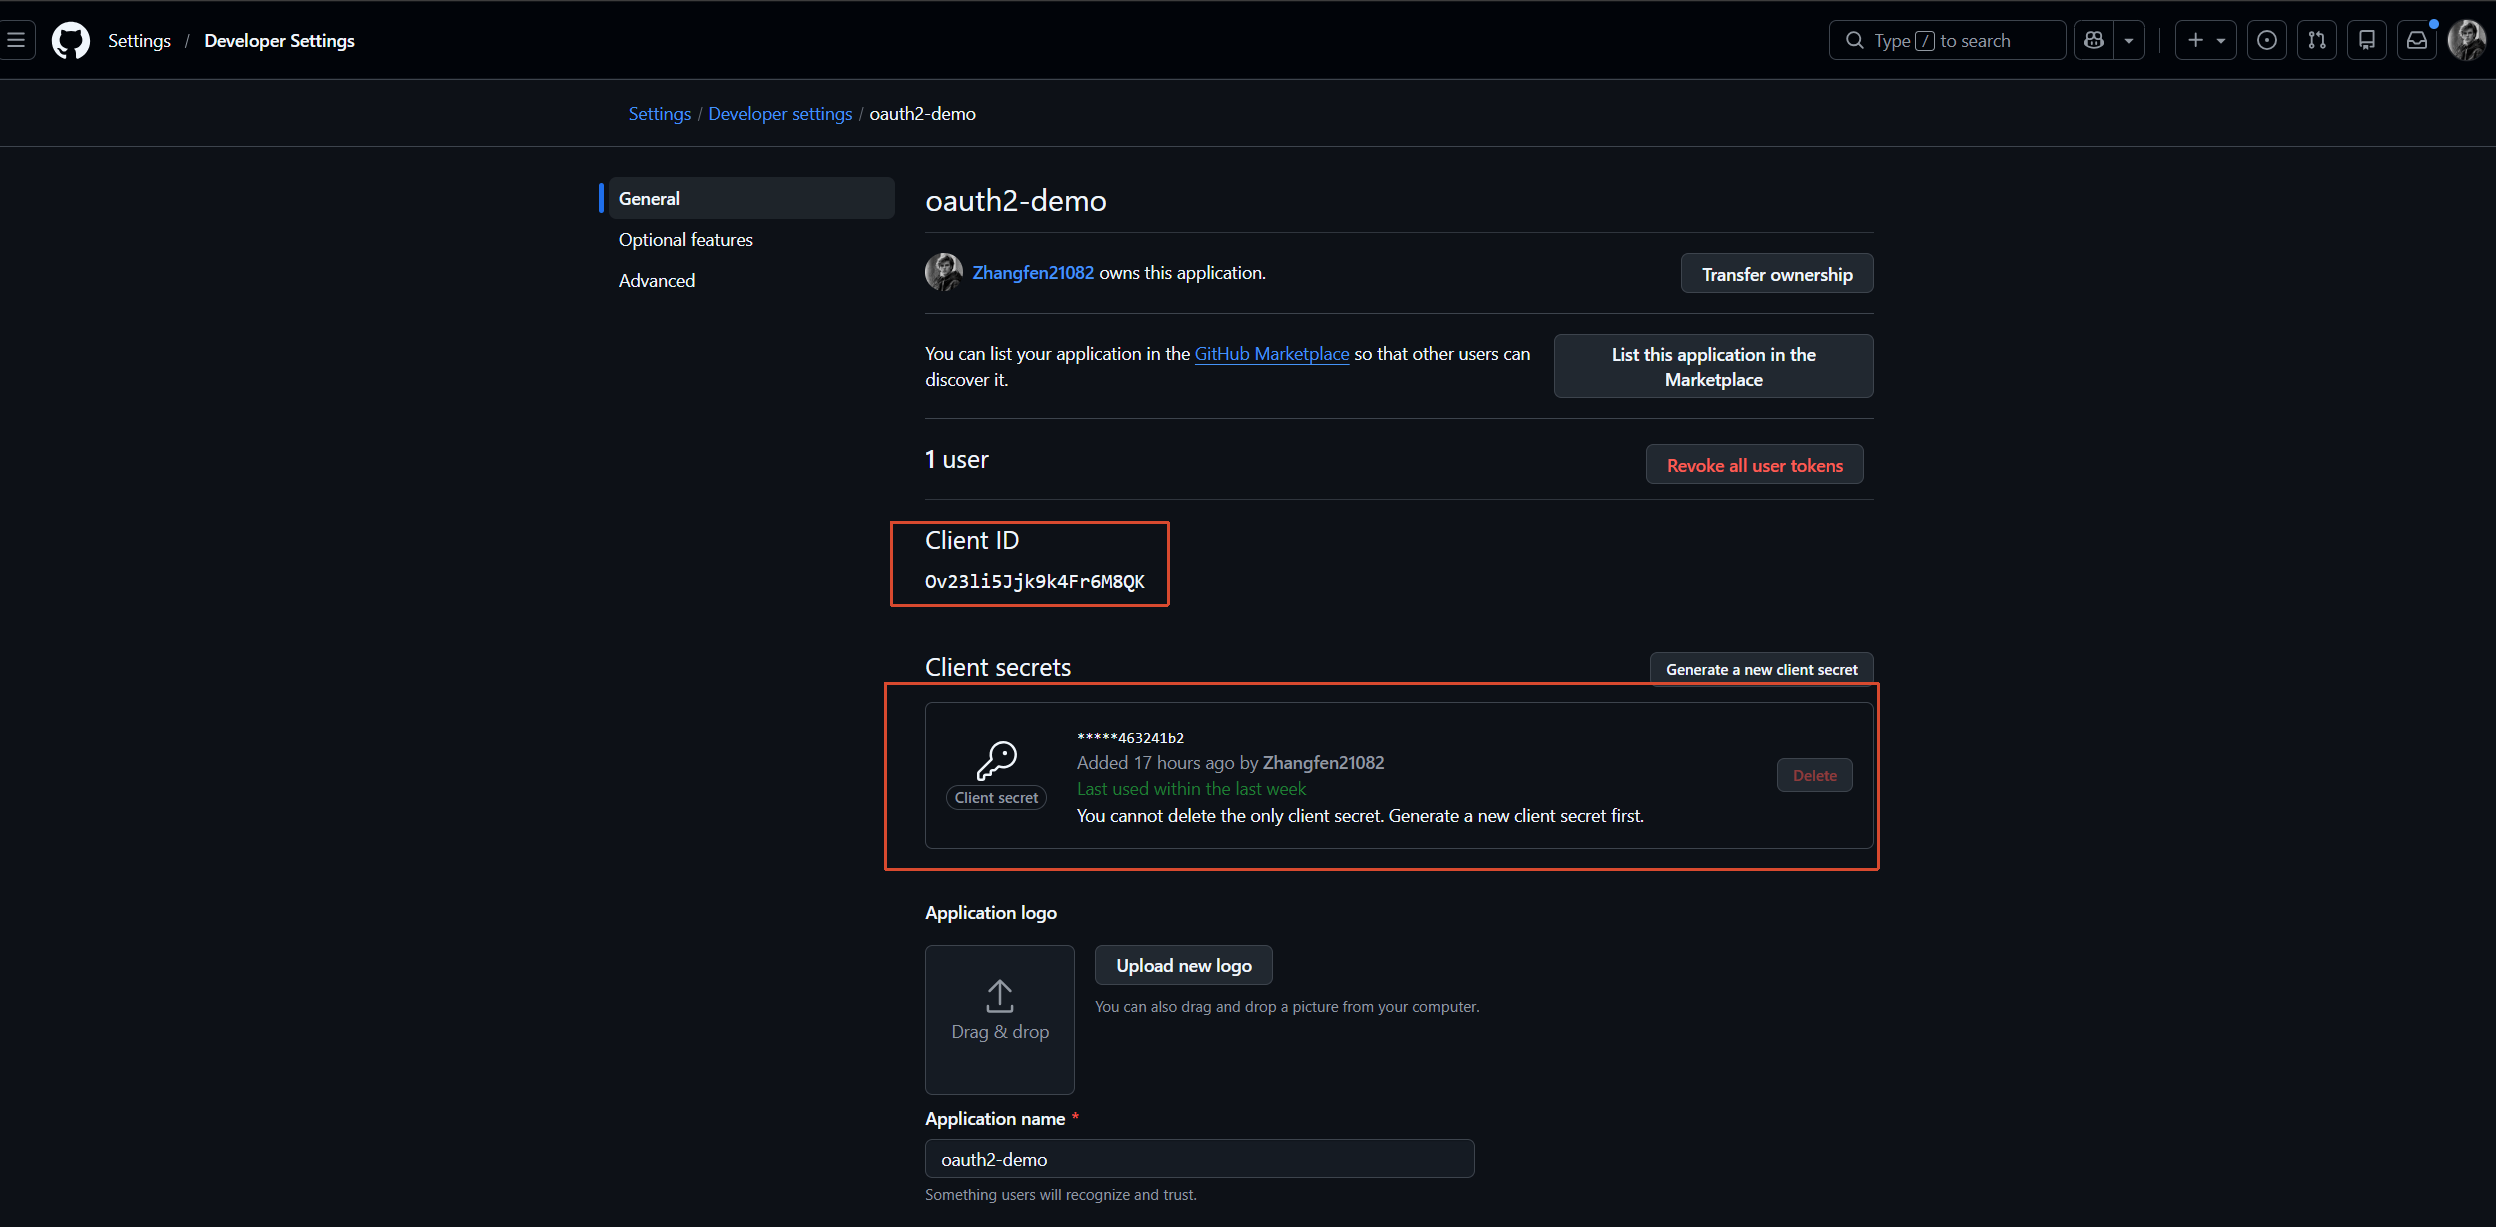
- 生成 Client Secret(点击 “Generate a new client secret”)
- 将
Client ID和Client Secret填入application.yml
注意:Spring Security OAuth2 Client 的回调地址是约定优于配置的体现:
/login/oauth2/code/{registrationId}
                        ↑
            application.yml 中的 key:github
/login/oauth2/code/是固定前缀,由OAuth2LoginAuthenticationFilter拦截{registrationId}是你配置的注册 ID(即spring.security.oauth2.client.registration.github中的github)
如果你配置了多个 OAuth2 提供方(比如同时用 GitHub 和 Google),就分别有:
/login/oauth2/code/github/login/oauth2/code/google
B:项目环境及启动应用
项目结构
oauth2-demo/
├── pom.xml                                      # Maven 依赖配置
├── src/main/java/com/example/oauth2/
│   ├── OAuth2DemoApplication.java               # Spring Boot 启动类
│   ├── config/
│   │   └── SecurityConfig.java                  # Spring Security + OAuth2 核心配置
│   └── controller/
│       └── HomeController.java                  # 页面控制器,获取 OAuth2 用户信息
└── src/main/resources/
    ├── application.yml                          # OAuth2 客户端注册信息
    └── templates/
        ├── index.html                           # 公开首页
        └── dashboard.html                       # 登录后仪表盘(显示 GitHub 用户数据)
技术栈
| 组件 | 版本 | 作用 |
|---|---|---|
| Spring Boot | 3.3.5 | 应用框架 |
| Spring Security | 6.3.4 | 安全框架 |
| spring-boot-starter-oauth2-client | 3.3.5 | OAuth2 客户端自动配置 |
| Thymeleaf | 3.1.2 | 服务端模板引擎 |
| Java | 21 | 运行环境 |
启动应用
mvn spring-boot:run
(2)工作流程
A:概述
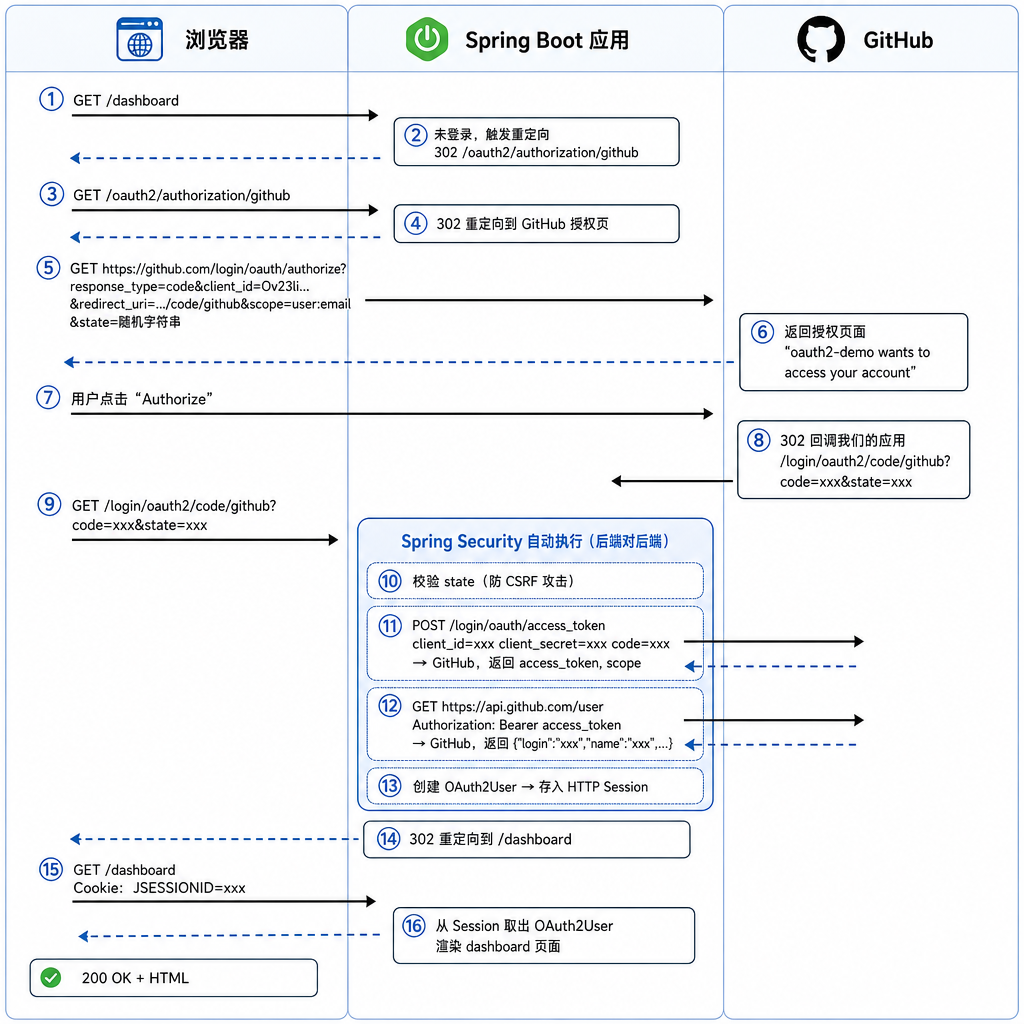
上面动图所展示流程,用语言描述如下
- 用户在浏览器访问
GET /dashboard,请求到达 Spring Boot 应用。 - Spring Security 检测到用户未登录,触发重定向,返回
302 /oauth2/authorization/github。 - 浏览器跟随重定向,发送
GET /oauth2/authorization/github。 - Spring Security 生成 OAuth2 授权请求,返回
302重定向到 GitHub 授权页。 - 浏览器跳转到 GitHub 的授权端点:
GET https://github.com/login/oauth/authorize?response_type=code&client_id=Ov23li...&redirect_uri=.../code/github&scope=user:email&state=随机字符串 - GitHub 返回授权页面,显示
"oauth2-demo wants to access your account",提示用户确认授权。 - 用户在 GitHub 授权页面上点击
"Authorize"。 - GitHub 处理授权同意后,
302回调我们的应用,地址为/login/oauth2/code/github?code=xxx&state=xxx。 - 浏览器发送
GET /login/oauth2/code/github?code=xxx&state=xxx到我们的应用。 - Spring Security 拦截该请求,首先校验 state 参数是否与之前存入 Session 的值一致,防止 CSRF 攻击。
- 校验通过后,Spring Security 在后端发起
POST /login/oauth/access_token请求到 GitHub,携带client_id、client_secret、code。GitHub 返回access_token。此过程浏览器不可见。 - Spring Security 拿到
access_token后,在后端发起GET https://api.github.com/user,请求头携带Authorization: Bearer access_token。GitHub 返回用户信息 JSON(login、name、avatar_url等)。 - Spring Security 将用户信息封装为
OAuth2User对象,创建OAuth2AuthenticationToken,并存入 HTTP Session。 - 认证完成,Spring Security 返回
302重定向到原始请求路径/dashboard。 - 浏览器发送
GET /dashboard,请求头携带Cookie: JSESSIONID=xxx。 - 应用从 HTTP Session 中取出
OAuth2User,渲染 dashboard 页面并返回200 OK + HTML。
上述过程就体现出了OAuth2中的一些概念和参数,我们再回顾和了解一下
| 概念 | 说明 | 代码体现 |
|---|---|---|
| Client ID | 应用的公开标识,类似"用户名" | Ov23li5Jjk9k4Fr6M8QK |
| Client Secret | 应用的密钥,类似"密码",绝对不能泄露到前端 | ae6ee87...(服务端持有) |
| Redirect URI | 授权成功后跳回的地址,必须与注册时完全一致 | /login/oauth2/code/github |
| Scope | 申请的权限范围(只读/读写/某子集) | user:email |
| State | 随机字符串,防 CSRF 攻击 | Spring Security 自动生成并校验 |
| Authorization Code | 一次性授权码,短时效(通常 10 分钟) | GitHub 回调 URL 中的 code 参数 |
| Access Token | 访问令牌,用 code 换来的凭证 | 后端持有,前端不可见 |
| Authorization Server | 颁发令牌的服务器 | https://github.com/login/oauth/authorize |
| Token Endpoint | 用 code 换 access_token 的端点 | https://github.com/login/oauth/access_token |
| UserInfo Endpoint | 获取用户信息的端点 | https://api.github.com/user |
B:另一个视角
接着,我们通过控制台网络请求日志的方式,来再次感受一下这个过程。如下,打开控制,勾选保留日志,然后依次进行授权操作
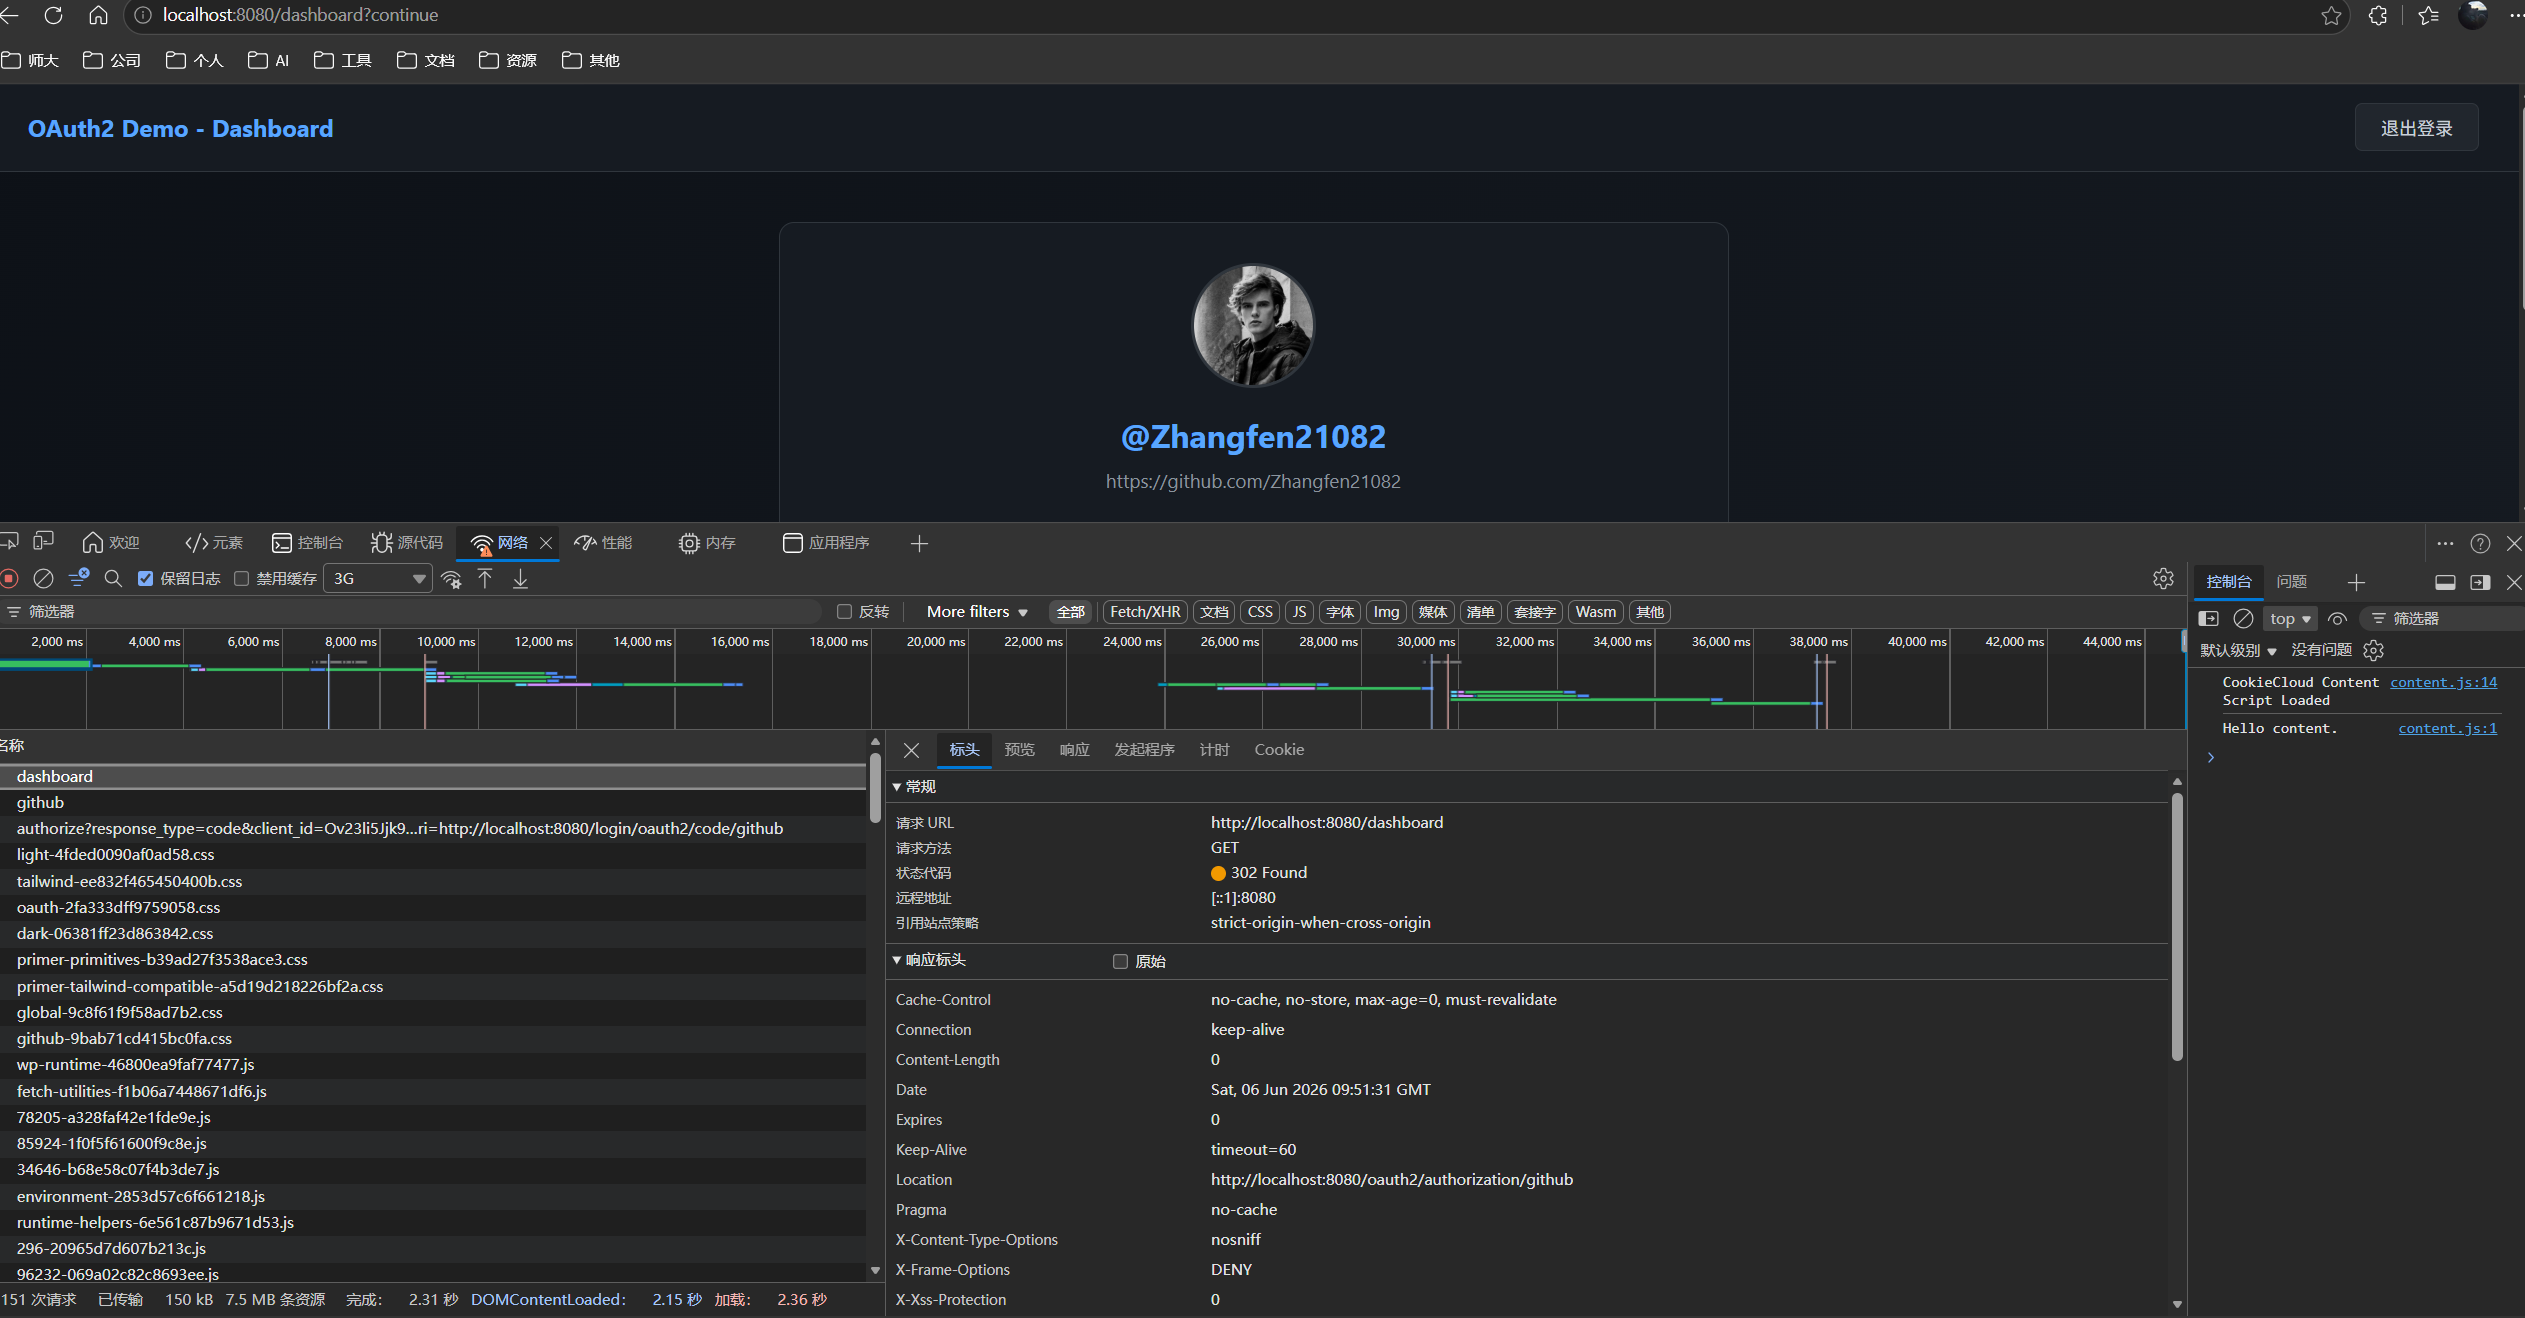
从这些请求中,就可以看到如下几个重要的请求
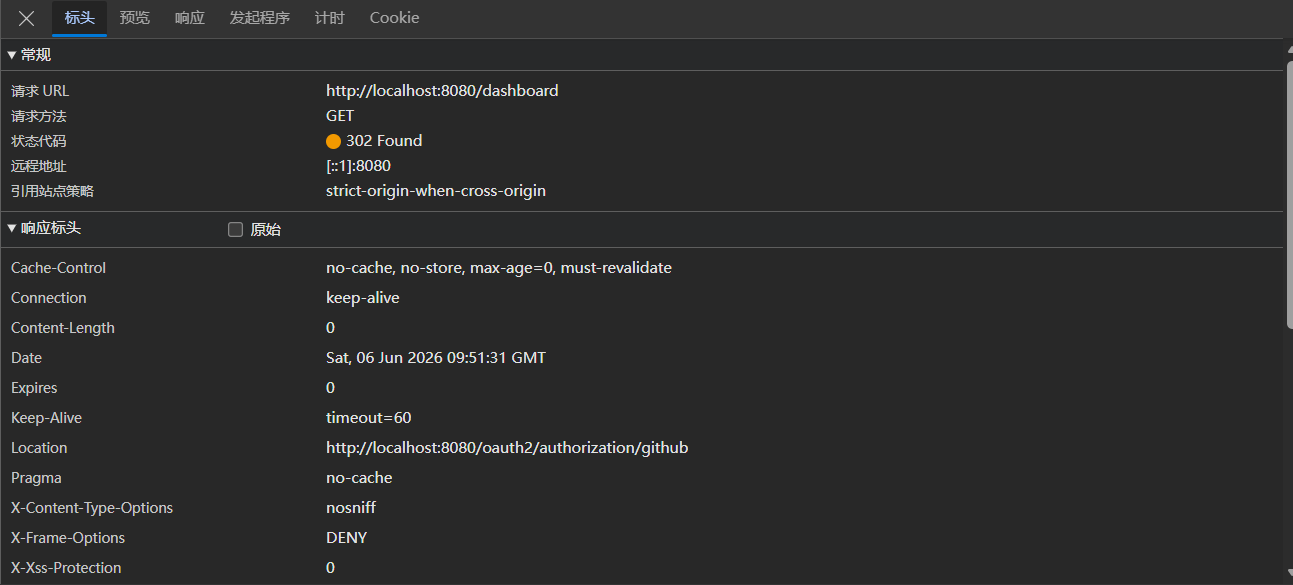
1、/dashboard → 302 — 请求到达应用,Spring Security 发现 SecurityContext 为空,未认证,拒绝放行。
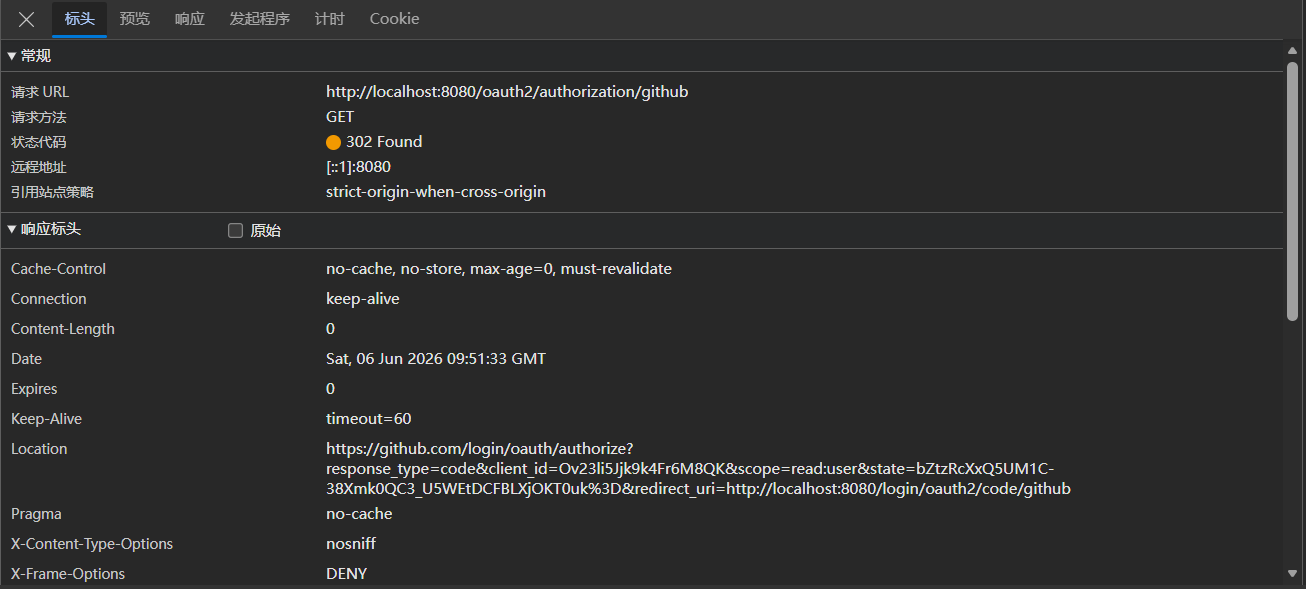
2、/oauth2/authorization/github → 302 — OAuth2AuthorizationRequestRedirectFilter 生成 state 存 Session,拼接完整授权 URL,重定向到 GitHub。
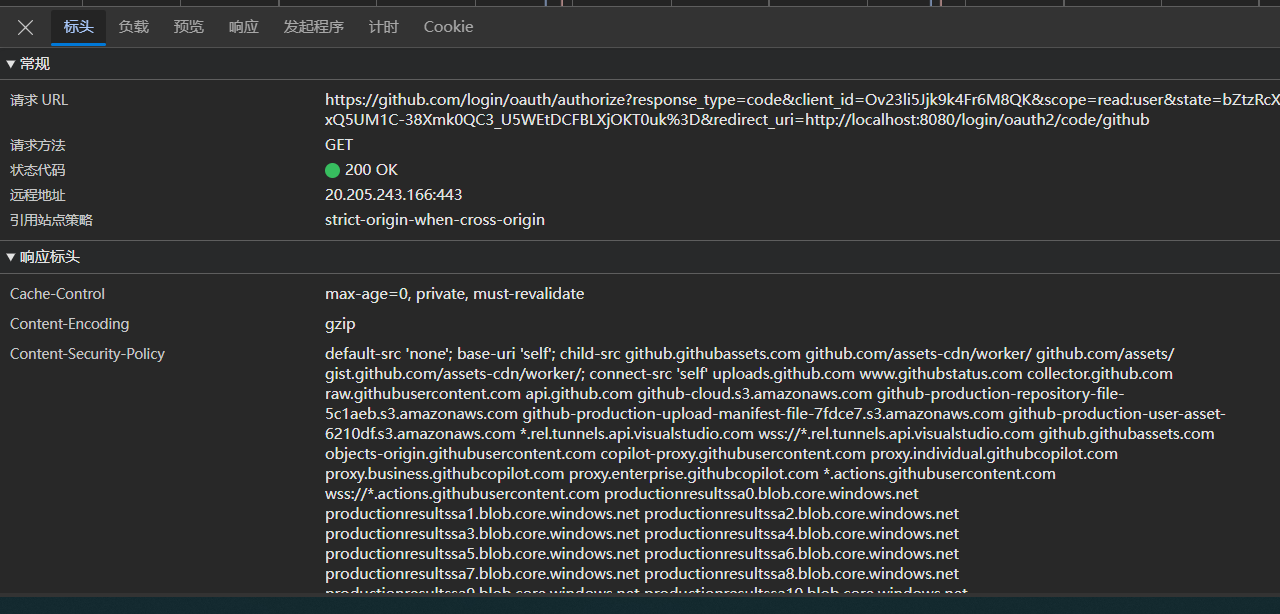
3、github.com/login/oauth/authorize?client_id=...&redirect_uri=...&scope=user:email&state=... → 302 — GitHub 检测到用户未登录则先让用户登录,已登录则展示授权页;用户点"Authorize"后 GitHub 生成一次性 code,302 回调我们的应用。
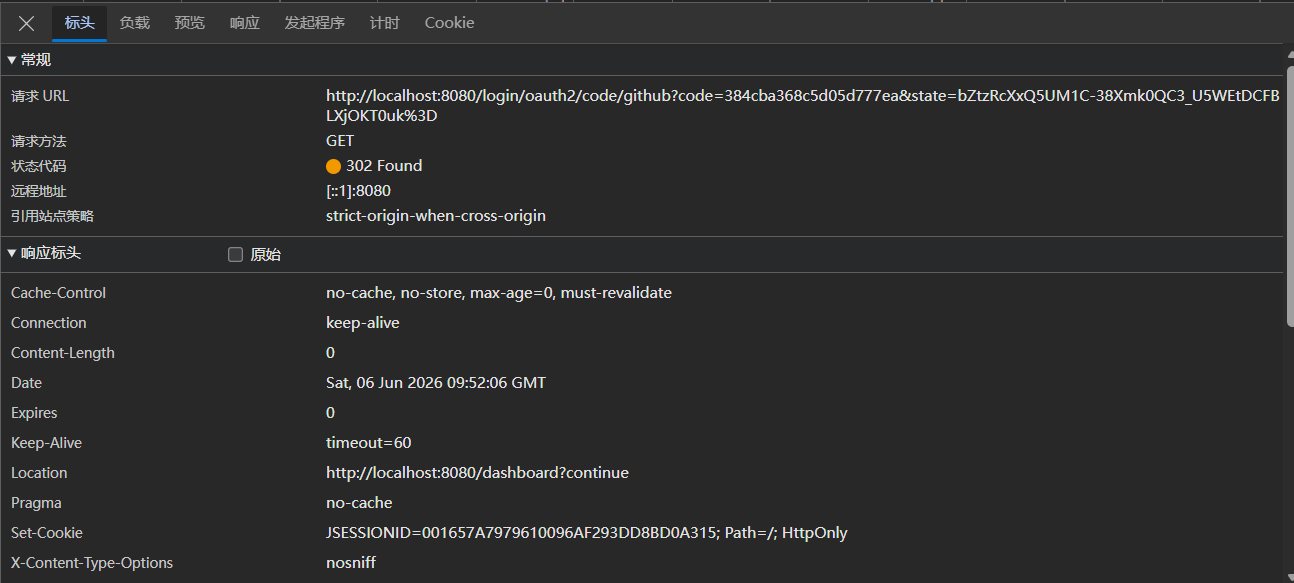
4、/login/oauth2/code/github?code=xxx&state=xxx → 302 — OAuth2LoginAuthenticationFilter 拦截该请求,校验 state,后端用 code 换 access_token,再用 access_token 取用户信息,创建 OAuth2User 存入 Session,最后重定向回 /dashboard。
5、/dashboard → 200 — 此时请求携带 JSESSIONID cookie,SecurityContextPersistenceFilter 从 Session 恢复认证信息,通过授权,渲染页面返回。
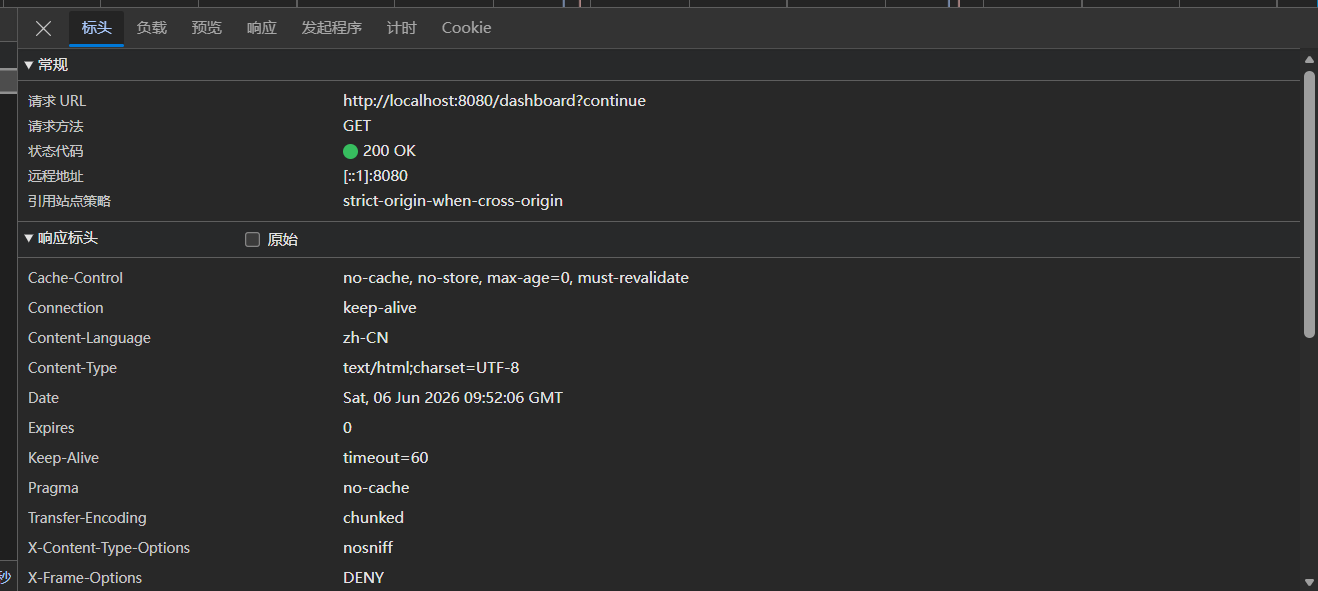
- 有时候会在后面加上
?continue参数,它是RequestCache在重建 URL 时附加的内部追踪参数,不影响功能。
(3)代码解析
https://github.com/Zhangfen21082/oauth2
A:pom.xml
最重要的依赖是 spring-boot-starter-oauth2-client,它自动注册了:
OAuth2LoginAuthenticationFilter— 拦截/login/oauth2/code/*路径OAuth2AuthorizationRequestRedirectFilter— 处理重定向到授权服务器OAuth2UserService— 加载用户信息
<dependencies>
    <!-- Spring Web:提供 Tomcat + Spring MVC -->
    <dependency>
        <groupId>org.springframework.boot</groupId>
        <artifactId>spring-boot-starter-web</artifactId>
    </dependency>

    <!-- Spring Security:提供认证授权框架 -->
    <dependency>
        <groupId>org.springframework.boot</groupId>
        <artifactId>spring-boot-starter-security</artifactId>
    </dependency>

    <!-- OAuth2 Client -->
    <!-- 提供:
         - OAuth2LoginAuthenticationFilter:拦截回调 URL
         - DefaultAuthorizationCodeTokenResponseClient:用 code 换 token
         - OAuth2UserService:用 token 取用户信息
         - CommonOAuth2Provider:预置 GitHub/Google/Facebook 等提供商配置
    -->
    <dependency>
        <groupId>org.springframework.boot</groupId>
        <artifactId>spring-boot-starter-oauth2-client</artifactId>
    </dependency>

    <!-- Thymeleaf:服务端渲染 HTML 模板 -->
    <dependency>
        <groupId>org.springframework.boot</groupId>
        <artifactId>spring-boot-starter-thymeleaf</artifactId>
    </dependency>
</dependencies>
B:application.yml
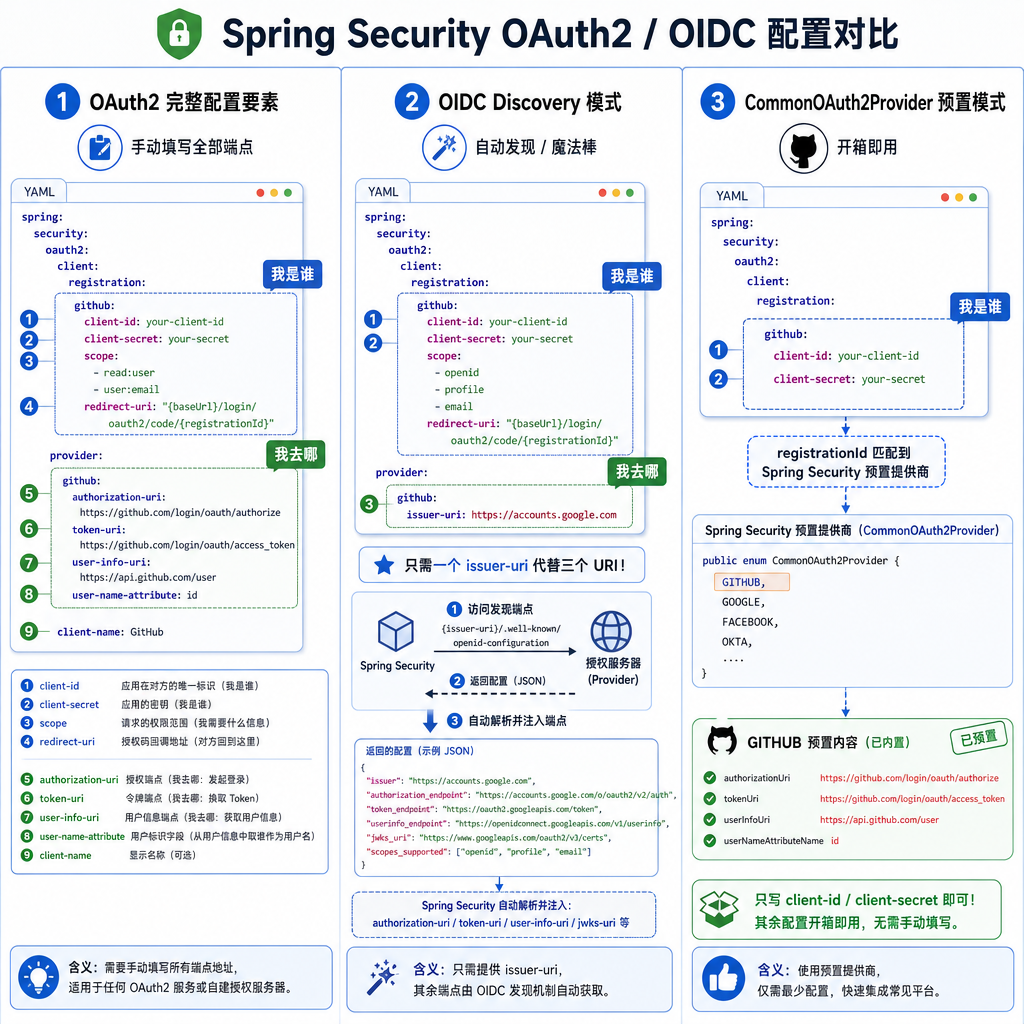
①:OAuth2完整配置要素
对接一个 OAuth2 提供商,本质上是告诉 Spring Security 两件事:“我是谁” 和 “我去哪”。完整的 YAML 配置结构分为 registration 和 provider 两部分:
spring:
  security:
    oauth2:
      client:
        # ── 第一部分:registration,回答"我是谁" ──
        registration:
          my-provider:                    # registrationId,自定义名称,后续 URL 中会用到
            client-id: xxxxx              # ① 客户端标识,提供商标识"你是谁"
            client-secret: xxxxx          # ② 客户端密钥,相当于密码,绝不能泄露
            scope: openid,profile,email   # ③ 申请的权限范围,由提供商定义
            redirect-uri: "{baseUrl}/login/oauth2/code/{registrationId}"
                                          # ④ 回调地址,baseUrl 和 registrationId 会自动替换

        # ── 第二部分:provider,回答"我去哪" ──
        provider:
          my-provider:                    # ⑤ 名称必须与上面 registration 的 key 一致
            authorization-uri: https://provider.com/oauth/authorize
                                          # ⑥ 授权端点,用户点"授权"时跳转到这个地址
            token-uri: https://provider.com/oauth/token
                                          # ⑦ 令牌端点,后端用 code 换 access_token 的地址
            user-info-uri: https://provider.com/userinfo
                                          # ⑧ 用户信息端点,后端用 token 获取用户资料的地址
            user-name-attribute: sub       # ⑨ UserInfo 返回 JSON 中,哪个字段是用户唯一标识
②:OIDC Discovery 模式(更简化的写法)
如果你的 OAuth2 提供商实现了 OpenID Connect(OIDC) 协议,provider 部分只需要一行 issuer-uri,无需手动写三个端点地址:
- 判断是否能用
issuer-uri:访问https://你的提供商域名/.well-known/openid-configuration,如果返回 JSON 就是支持 OIDC。
spring:
  security:
    oauth2:
      client:
        registration:
          my-app:
            provider: cloudos-iam             # ← 引用 provider 配置
            client-id: ${CLIENT_ID}           # 从环境变量读取,安全
            client-secret: ${CLIENT_SECRET}
            scope: openid,profile,email
            redirect-uri: ${REDIRECT_URI}     # 从环境变量读取
            authorization-grant-type: authorization_code  # 可省略(默认值)
            client-name: my-app               # 显示名称,不影响流程
        provider:
          cloudos-iam:
            issuer-uri: https://iam.company.com   # ← 一行替代三个 URI
issuer-uri 的工作原理:
Spring Security 启动时会自动请求 https://iam.company.com/.well-known/openid-configuration,该端点返回标准 JSON:
{
  "issuer": "https://iam.company.com",
  "authorization_endpoint": "https://iam.company.com/oauth/authorize",
  "token_endpoint": "https://iam.company.com/oauth/token",
  "userinfo_endpoint": "https://iam.company.com/userinfo",
  "jwks_uri": "https://iam.company.com/oauth/jwks",
  "scopes_supported": ["openid", "profile", "email"],
  "...": "..."
}
Spring Security 自动解析这个 JSON,把 authorization_endpoint、token_endpoint、userinfo_endpoint 注入到运行时配置,等价于你手动写了三个 URI。同时 user-name-attribute 也不需要你指定,因为 OIDC 标准规定 sub 字段就是用户唯一标识。
这种写法的优势:
- 端点地址变更时(比如 IAM 系统迁移),不需要改应用配置,只要 IAM 的
.well-known/openid-configuration返回新的地址即可 - 配置更简洁,不容易写错地址
- OIDC 兼容意味着各家 OIDC 提供商的对接方式完全一致
③:预置提供商 — 为什么 GitHub 只配两行
可以看到,对于本项目,application.yml 中的配置非常简单,只有:
spring:
  security:
    oauth2:
      client:
        registration:
          github:                      # ← registrationId,自定义名称
            client-id: xxxxxx
            client-secret: xxxxxx
这是因为,github 这个 registrationId 被 Spring Security 的 CommonOAuth2Provider 枚举匹配到了。Spring Security 预置了 GitHub、Google、Facebook、Okta 四个常用提供商的参数:
// spring-security-oauth2-client 源码
public enum CommonOAuth2Provider {
    GITHUB {
        @Override
        public Builder getBuilder(String registrationId) {
            return new Builder()
                .registrationId(registrationId)
                .authorizationUri("https://github.com/login/oauth/authorize")
                .tokenUri("https://github.com/login/oauth/access_token")
                .userInfoUri("https://api.github.com/user")
                .userNameAttributeName("id");
        }
    },
    GOOGLE { /* ... */ },
    FACEBOOK { /* ... */ },
    OKTA { /* ... */ }
}
对于这三种类型,总结如下
C:SecurityConfig.java
package com.example.oauth2.config;

import org.springframework.context.annotation.Bean;
import org.springframework.context.annotation.Configuration;
import org.springframework.security.config.annotation.web.builders.HttpSecurity;
import org.springframework.security.config.annotation.web.configuration.EnableWebSecurity;
import org.springframework.security.config.Customizer;
import org.springframework.security.web.SecurityFilterChain;

@Configuration
@EnableWebSecurity
public class SecurityConfig {

    @Bean
    public SecurityFilterChain filterChain(HttpSecurity http) throws Exception {
        http
            // ① 定义访问控制规则
            .authorizeHttpRequests(auth -> auth
                .requestMatchers("/", "/error").permitAll()
                .anyRequest().authenticated()
            )
            // ② 启用 OAuth2 登录
            .oauth2Login(Customizer.withDefaults())
            // ③ 退出登录配置
            .logout(logout -> logout
                .logoutSuccessUrl("/")
                .invalidateHttpSession(true)
                .clearAuthentication(true)
                .deleteCookies("JSESSIONID")
            );
        return http.build();
    }
}
@EnableWebSecurity — 启用 Spring Security 的 Web 安全支持,会导入 HttpSecurityConfiguration 等自动配置。
authorizeHttpRequests(...) — 定义 HTTP 请求的访问控制:
.requestMatchers("/", "/error").permitAll()—/和/error任何人(包括未登录用户)都可访问.anyRequest().authenticated()— 除上述两个路径外,所有请求都必须已认证- 当未登录用户访问
/dashboard时,Spring Security 会自动触发 OAuth2 授权流程(重定向到 GitHub)
.logout(...) — 退出登录配置:
.logoutSuccessUrl("/")— 退出后跳转到首页.invalidateHttpSession(true)— 失效 HTTP Session.clearAuthentication(true)— 清除认证信息.deleteCookies("JSESSIONID")— 删除 Session Cookie
三、SSO 简介
(1)概念
SSO(Single Sign-On,单点登录)解决的是这样一个问题:
公司内部有多个系统(OA、Wiki、Jenkins、GitLab……),每个都要求登录。用户能不能只登录一次,就能访问所有这些系统?
答案就是 SSO。它和 OAuth2 的关系如下:
| OAuth2 | SSO | |
|---|---|---|
| 本质 | 授权协议 | 一种使用场景 |
| 核心问题 | “怎么让第三方应用安全地访问用户资源” | “怎么让用户一次登录,处处可用” |
| 实现方式 | — | 通常是 OAuth2 + OIDC(部分场景也用 SAML) |
| 关系 | 基础设施 | 上层目标 |
简单说:SSO 是目标,OAuth2 + OIDC 是当前主流实现手段。
(2)扩展
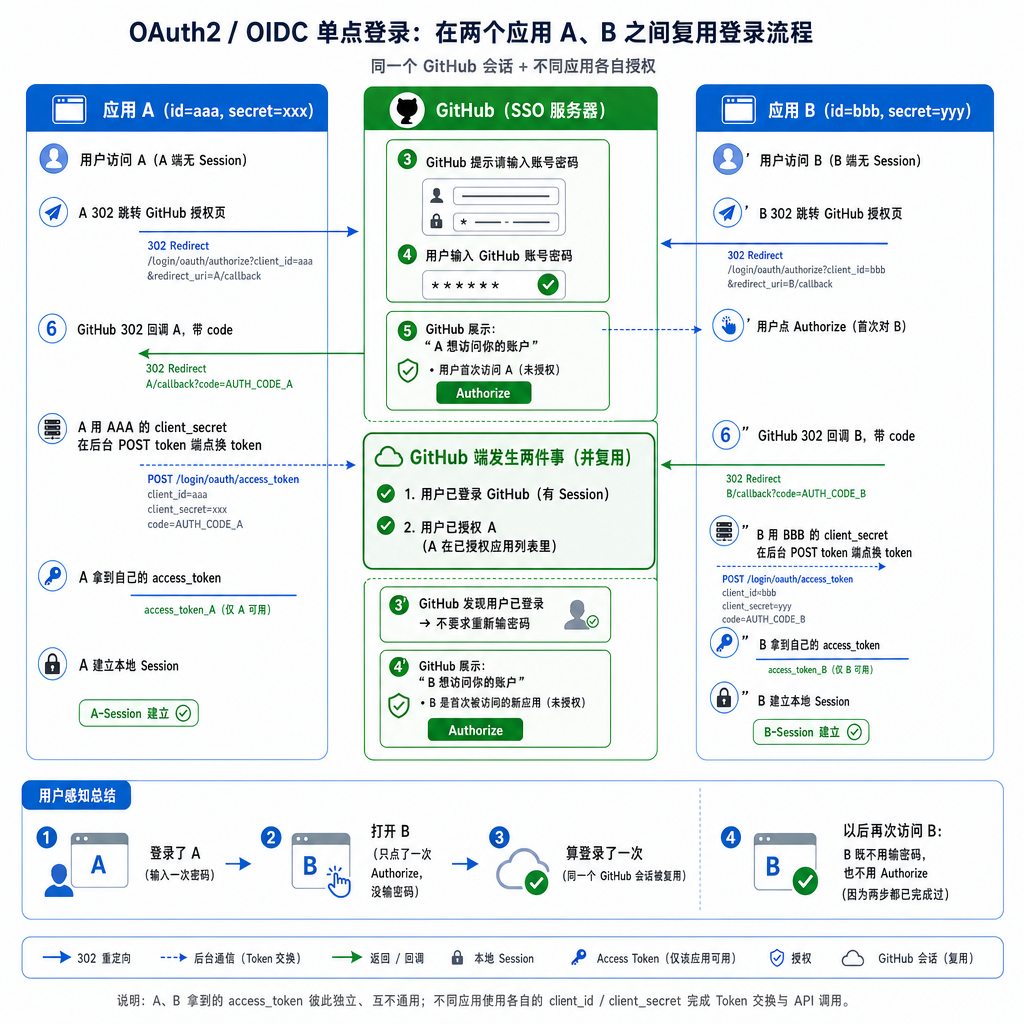
把场景扩展为两个应用(A 和 B),两个应用各自注册了不同的 Client ID / Client Secret,但都对接同一个 GitHub:
需要注意:
- A 和 B 各自有独立的 Client ID 和 Client Secret,各自走完整的 OAuth2 授权码流程(各自拿到各自的 code,各自用自己的 secret 换各自的 token)
- B 没有"直接拿令牌",它同样经历:跳转 → code → 换 token → 取用户 → 建 Session,一步没少
- SSO 省掉的只有两样:输入密码(因为 GitHub 已登录)和部署这套相同的流程
- “Authorize” 这一步,每个新应用首次访问都要点一次。点过之后,GitHub 记入授权列表,下次再访问该应用才跳过
(3)SSO 的核心前提
| 前提 | 说明 |
|---|---|
| 同一个授权服务器 | 所有应用都接同一个 SSO 服务器(如公司 IAM 系统) |
| 用户在该服务器上已登录 | 浏览器携带了 SSO 服务器的 Session Cookie |
| 每个应用独立注册 | A 和 B 各自有独立的 Client ID / Secret,各自独立完成 OAuth2 流程 |
三条缺一不可。如果用户在 GitHub 上主动退出了(Revoke 或 Sign out),重新访问任意应用都会再次要求输入密码(登录这一步要从头来)。如果某个应用从未被该用户授权过,首次访问仍会弹"Authorize"。

openEuler 是由开放原子开源基金会孵化的全场景开源操作系统项目,面向数字基础设施四大核心场景(服务器、云计算、边缘计算、嵌入式),全面支持 ARM、x86、RISC-V、loongArch、PowerPC、SW-64 等多样性计算架构
更多推荐

 8
8 0
0- 0


 已为社区贡献1条内容

所有评论(0)