分布式认证中心第二集 密码模式中转站
·
前情提要
上一集,我们成功用 Postman 调通了密码模式,拿到了令牌,像极了黑客帝国里 Neo 第一次看到代码雨——兴奋又迷茫。
但是!问题来了——
如果前端直接跟授权服务器打交道,那 client-id 和 client-secret 就相当于把银行卡密码写在便利贴上,贴在显示器边框。谁路过都能瞟一眼,安全?不存在的。
今天的工程:建一座"中转站"
我们要搞一个 登录微服务,让它当前端的"传声筒"。前端只跟它唠嗑,它再去跟授权服务器勾兑。
一句话总结:前端不直接见"大佬",中间加个"经纪人"。
- 引入pom依赖
<dependency>
    <groupId>org.springframework.boot</groupId>
    <artifactId>spring-boot-starter-web</artifactId>
</dependency>
<dependency>
    <groupId>org.springframework.boot</groupId>
    <artifactId>spring-boot-starter-security</artifactId>
</dependency>

<!-- OAuth2 资源服务器依赖 -->
<dependency>
    <groupId>org.springframework.security.oauth.boot</groupId>
    <artifactId>spring-security-oauth2-autoconfigure</artifactId>
    <version>2.3.9.RELEASE</version>
</dependency>

<!-- JWT 依赖 -->
<dependency>
    <groupId>io.jsonwebtoken</groupId>
    <artifactId>jjwt-api</artifactId>
    <version>0.11.5</version>
</dependency>
<dependency>
    <groupId>io.jsonwebtoken</groupId>
    <artifactId>jjwt-impl</artifactId>
    <version>0.11.5</version>
    <scope>runtime</scope>
</dependency>
<dependency>
    <groupId>io.jsonwebtoken</groupId>
    <artifactId>jjwt-jackson</artifactId>
    <version>0.11.5</version>
    <scope>runtime</scope>
</dependency>

<dependency>
    <groupId>org.projectlombok</groupId>
    <artifactId>lombok</artifactId>
</dependency>
- 编写配置文件,client:属性是用来向授权服务器用密码模式请求令牌的参数,key-uri是它本身作为oauth2的资源服务器的验证token的地址(非对称)
spring:
    application:
        name: login
server:
    port: 8124

security:
    oauth2:
        resource:
            jwt:
                key-uri: http://localhost:8129/oauth/token_key

auth:
    server:
        base:
            url: http://localhost:8129
client:
    client-id: client-app
    client-secret: secret123
- 创建 ResourceServerConfig 类 ,放行一个 /login 接口,用于前端登录
@Configuration
@EnableResourceServer
public class ResourceServerConfig extends ResourceServerConfigurerAdapter {
    @Override
    public void configure(HttpSecurity http) throws Exception {
        http
                .authorizeRequests()
                .antMatchers("/api/login").permitAll()
                .anyRequest().authenticated();
    }
}
- 写两个实体 ,请求和响应
@Data
public class LoginRequest {
    private String username;
    private String password;
}

@Data
@AllArgsConstructor
@NoArgsConstructor
public class LoginResponse {
    private String accessToken;
    private String refreshToken;
    private String tokenType;
    private Long expiresIn;
    private String scope;
}
创建接口测试
@RestController
@RequestMapping("/api")
public class AuthController {

    @Value("${auth.server.base.url}")
    private String authServerUrl;

    @Value("${client.client-id}")
    private String clientId;

    @Value("${client.client-secret}")
    private String clientSecret;

    private final RestTemplate restTemplate;

    public AuthController(RestTemplate restTemplate) {
        this.restTemplate = restTemplate;
    }

    @PostMapping("/login")
    public LoginResponse login(@RequestBody LoginRequest loginRequest) {
        String tokenUrl = authServerUrl + "/oauth/token";

        HttpHeaders headers = new HttpHeaders();
        headers.setContentType(MediaType.APPLICATION_FORM_URLENCODED);
        headers.setBasicAuth(clientId, clientSecret);

        MultiValueMap<String, String> body = new LinkedMultiValueMap<>();
        body.add("grant_type", "password");
        body.add("username", loginRequest.getUsername());
        body.add("password", loginRequest.getPassword());
        body.add("scope", "read write");

        HttpEntity<MultiValueMap<String, String>> request = new HttpEntity<>(body, headers);

        ResponseEntity<Map> response = restTemplate.postForEntity(tokenUrl, request, Map.class);

        if (response.getStatusCode() == HttpStatus.OK && response.getBody() != null) {
            Map<String, Object> tokenInfo = response.getBody();

            return new LoginResponse(
                    (String) tokenInfo.get("access_token"),
                    (String) tokenInfo.get("refresh_token"),
                    (String) tokenInfo.get("token_type"),
                    ((Number) tokenInfo.get("expires_in")).longValue(),
                    (String) tokenInfo.get("scope")
            );
        } else {
            throw new RuntimeException("获取令牌失败");
        }
    }

    @GetMapping("/userinfo")
    public Map<String, Object> getUserInfo(Authentication authentication) {

        if (authentication == null || !authentication.isAuthenticated()) {
            throw new RuntimeException("未认证或Token无效");
        }

        Map<String, Object> userInfo = new HashMap<>();

        if (authentication instanceof OAuth2Authentication) {
            OAuth2Authentication oauth2Auth = (OAuth2Authentication) authentication;
            userInfo.put("username", oauth2Auth.getUserAuthentication().getName());
            userInfo.put("principal", oauth2Auth.getUserAuthentication().getPrincipal());
            userInfo.put("authorities", oauth2Auth.getUserAuthentication().getAuthorities());
            userInfo.put("clientId", oauth2Auth.getOAuth2Request().getClientId());
            userInfo.put("scope", oauth2Auth.getOAuth2Request().getScope());
            userInfo.put("grantType", oauth2Auth.getOAuth2Request().getGrantType());
        } else {
            userInfo.put("username", authentication.getName());
            userInfo.put("authorities", authentication.getAuthorities());
        }

        return userInfo;
    }
}
现在我们用 postman来测试一下
等会儿 ,授权服务器上一集写的是对称 ,我们先来改造一下 。。变成非对称
在 授权服务器中 改造一下 OAuth2AuthorizationServerConfig类的令牌转换器
//JWT 令牌转换器
@Bean
public JwtAccessTokenConverter accessTokenConverter() {
    JwtAccessTokenConverter converter = new JwtAccessTokenConverter();

    // ✅ 2. 生成 RSA 密钥对
    KeyPair keyPair = generateRsaKeyPair();

    converter.setKeyPair(keyPair);

    return converter;
}

private KeyPair generateRsaKeyPair() {
    try {
        KeyPairGenerator keyPairGenerator = KeyPairGenerator.getInstance("RSA");
        keyPairGenerator.initialize(2048);
        return keyPairGenerator.generateKeyPair();
    } catch (Exception e) {
        throw new RuntimeException("生成 RSA 密钥对失败", e);
    }
}
好了,现在我们来测试一下 /login接口 和 /userinfo 接口,
这时候 我们就可以用 最 熟悉的 方式 post + body(JSON)了
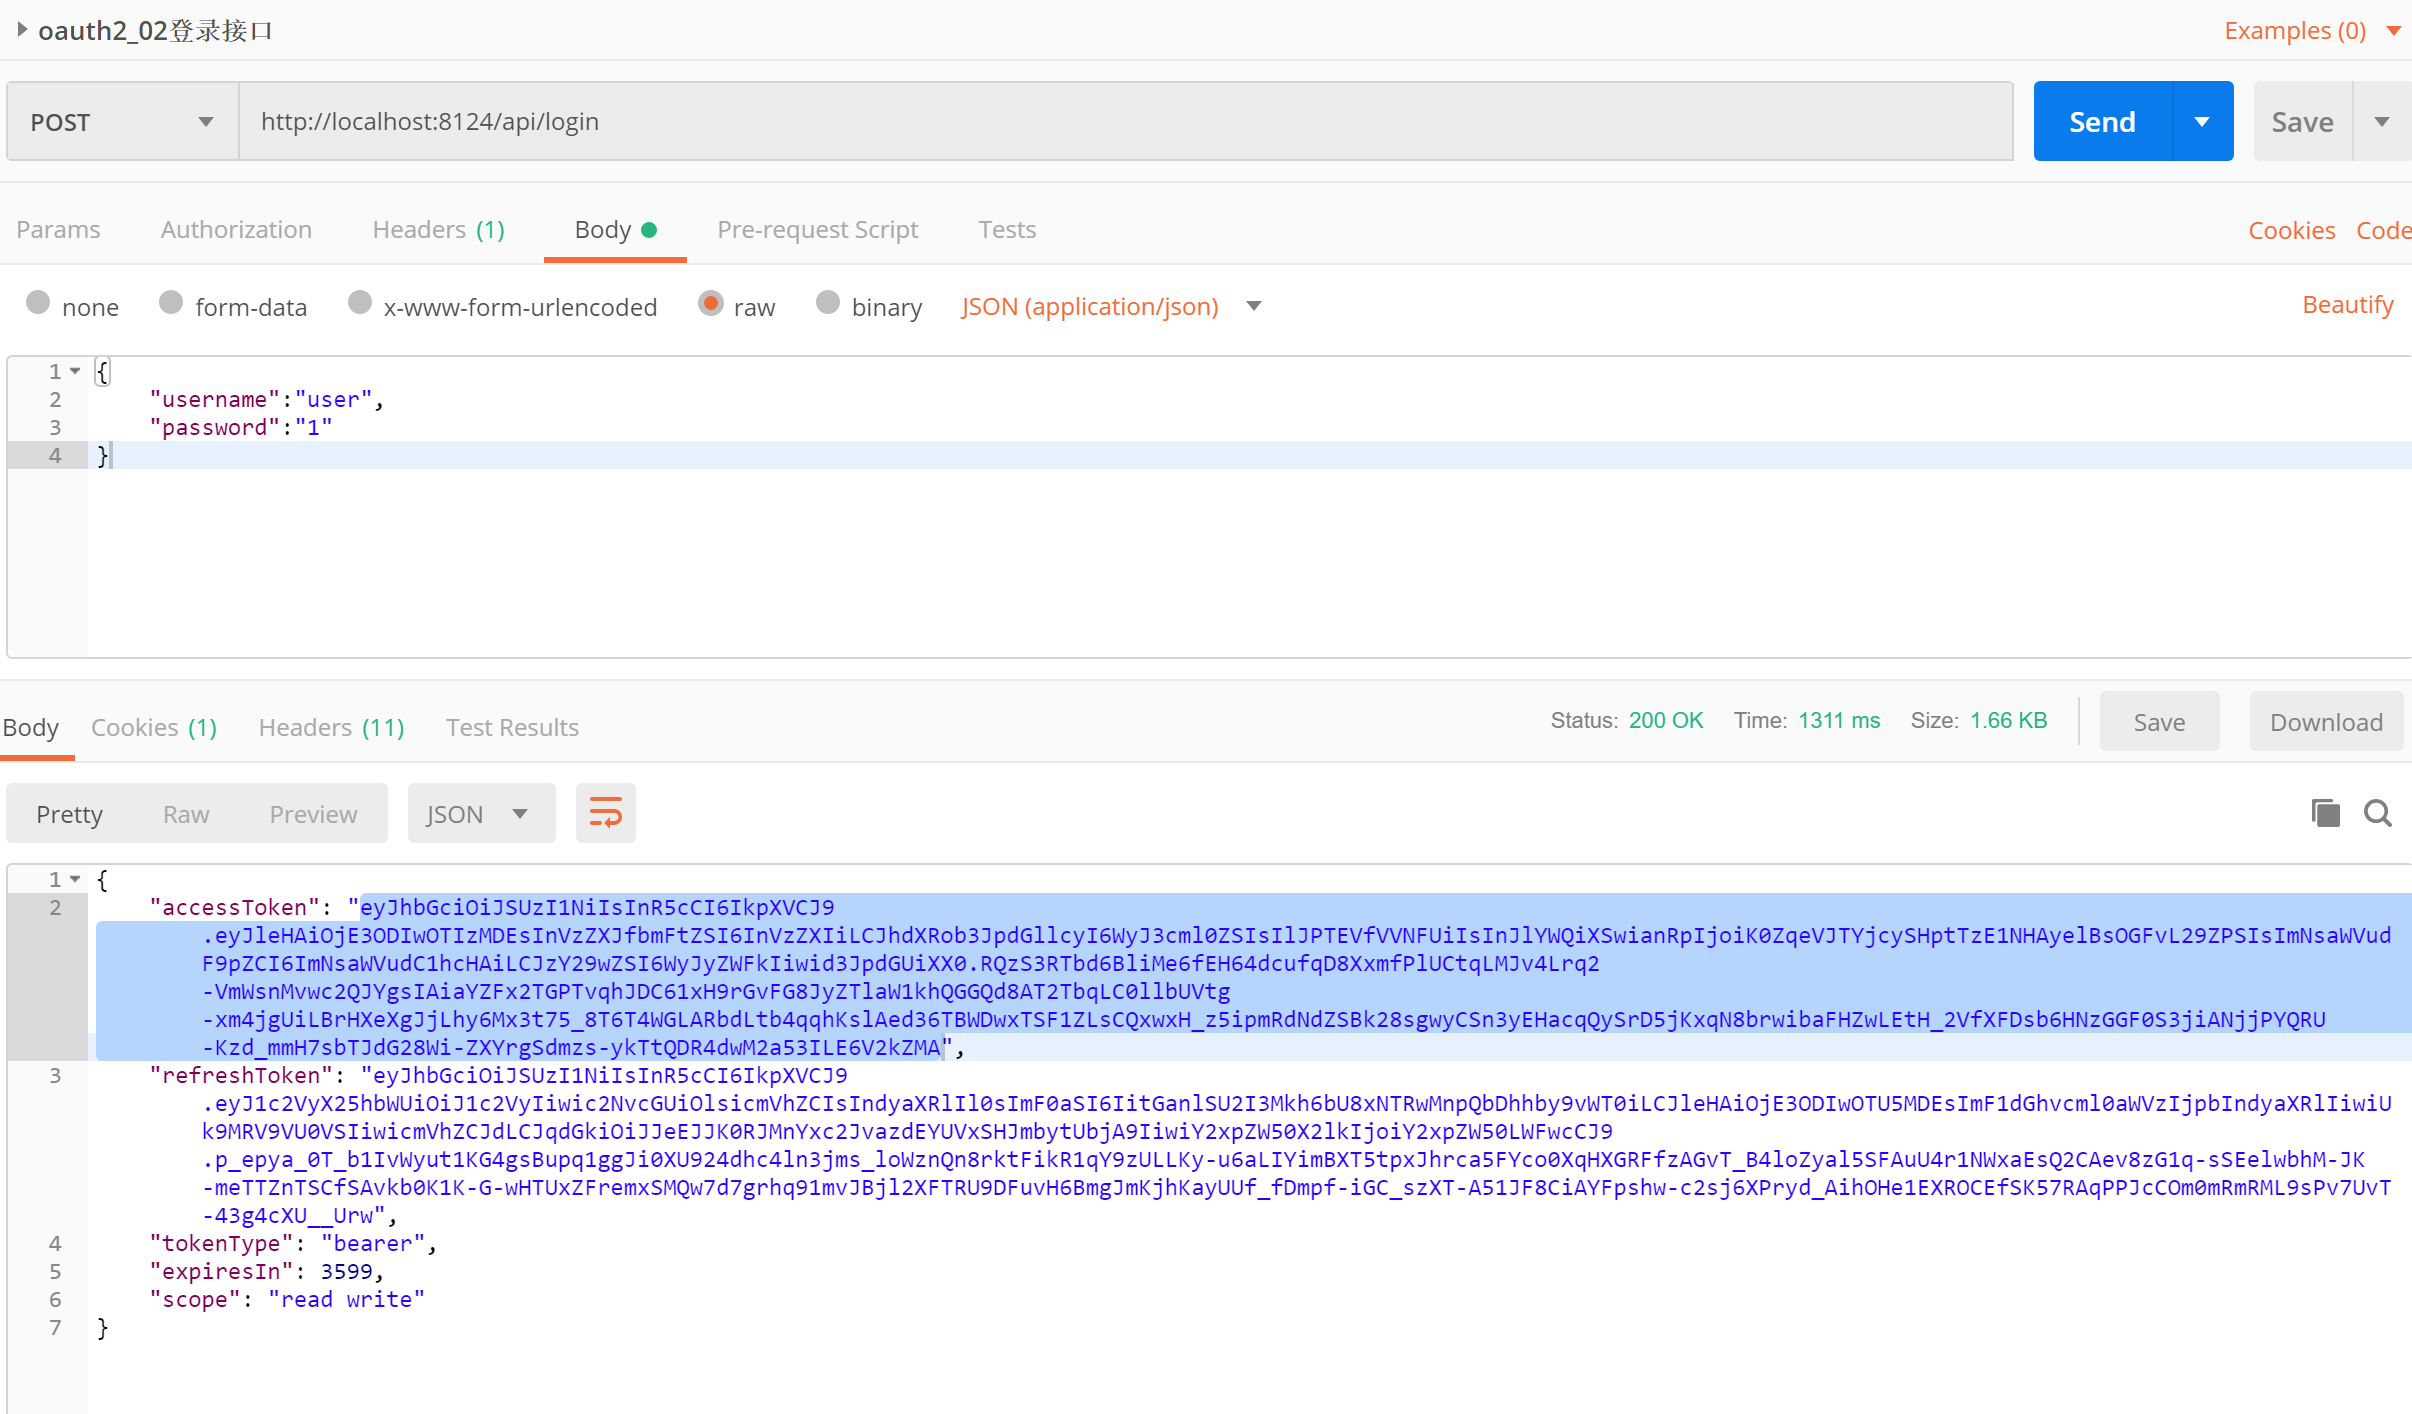
果然,已经成功获取了 令牌
现在来试试 userinfo 接口,注意 这个 接口就需要 携带token访问了。
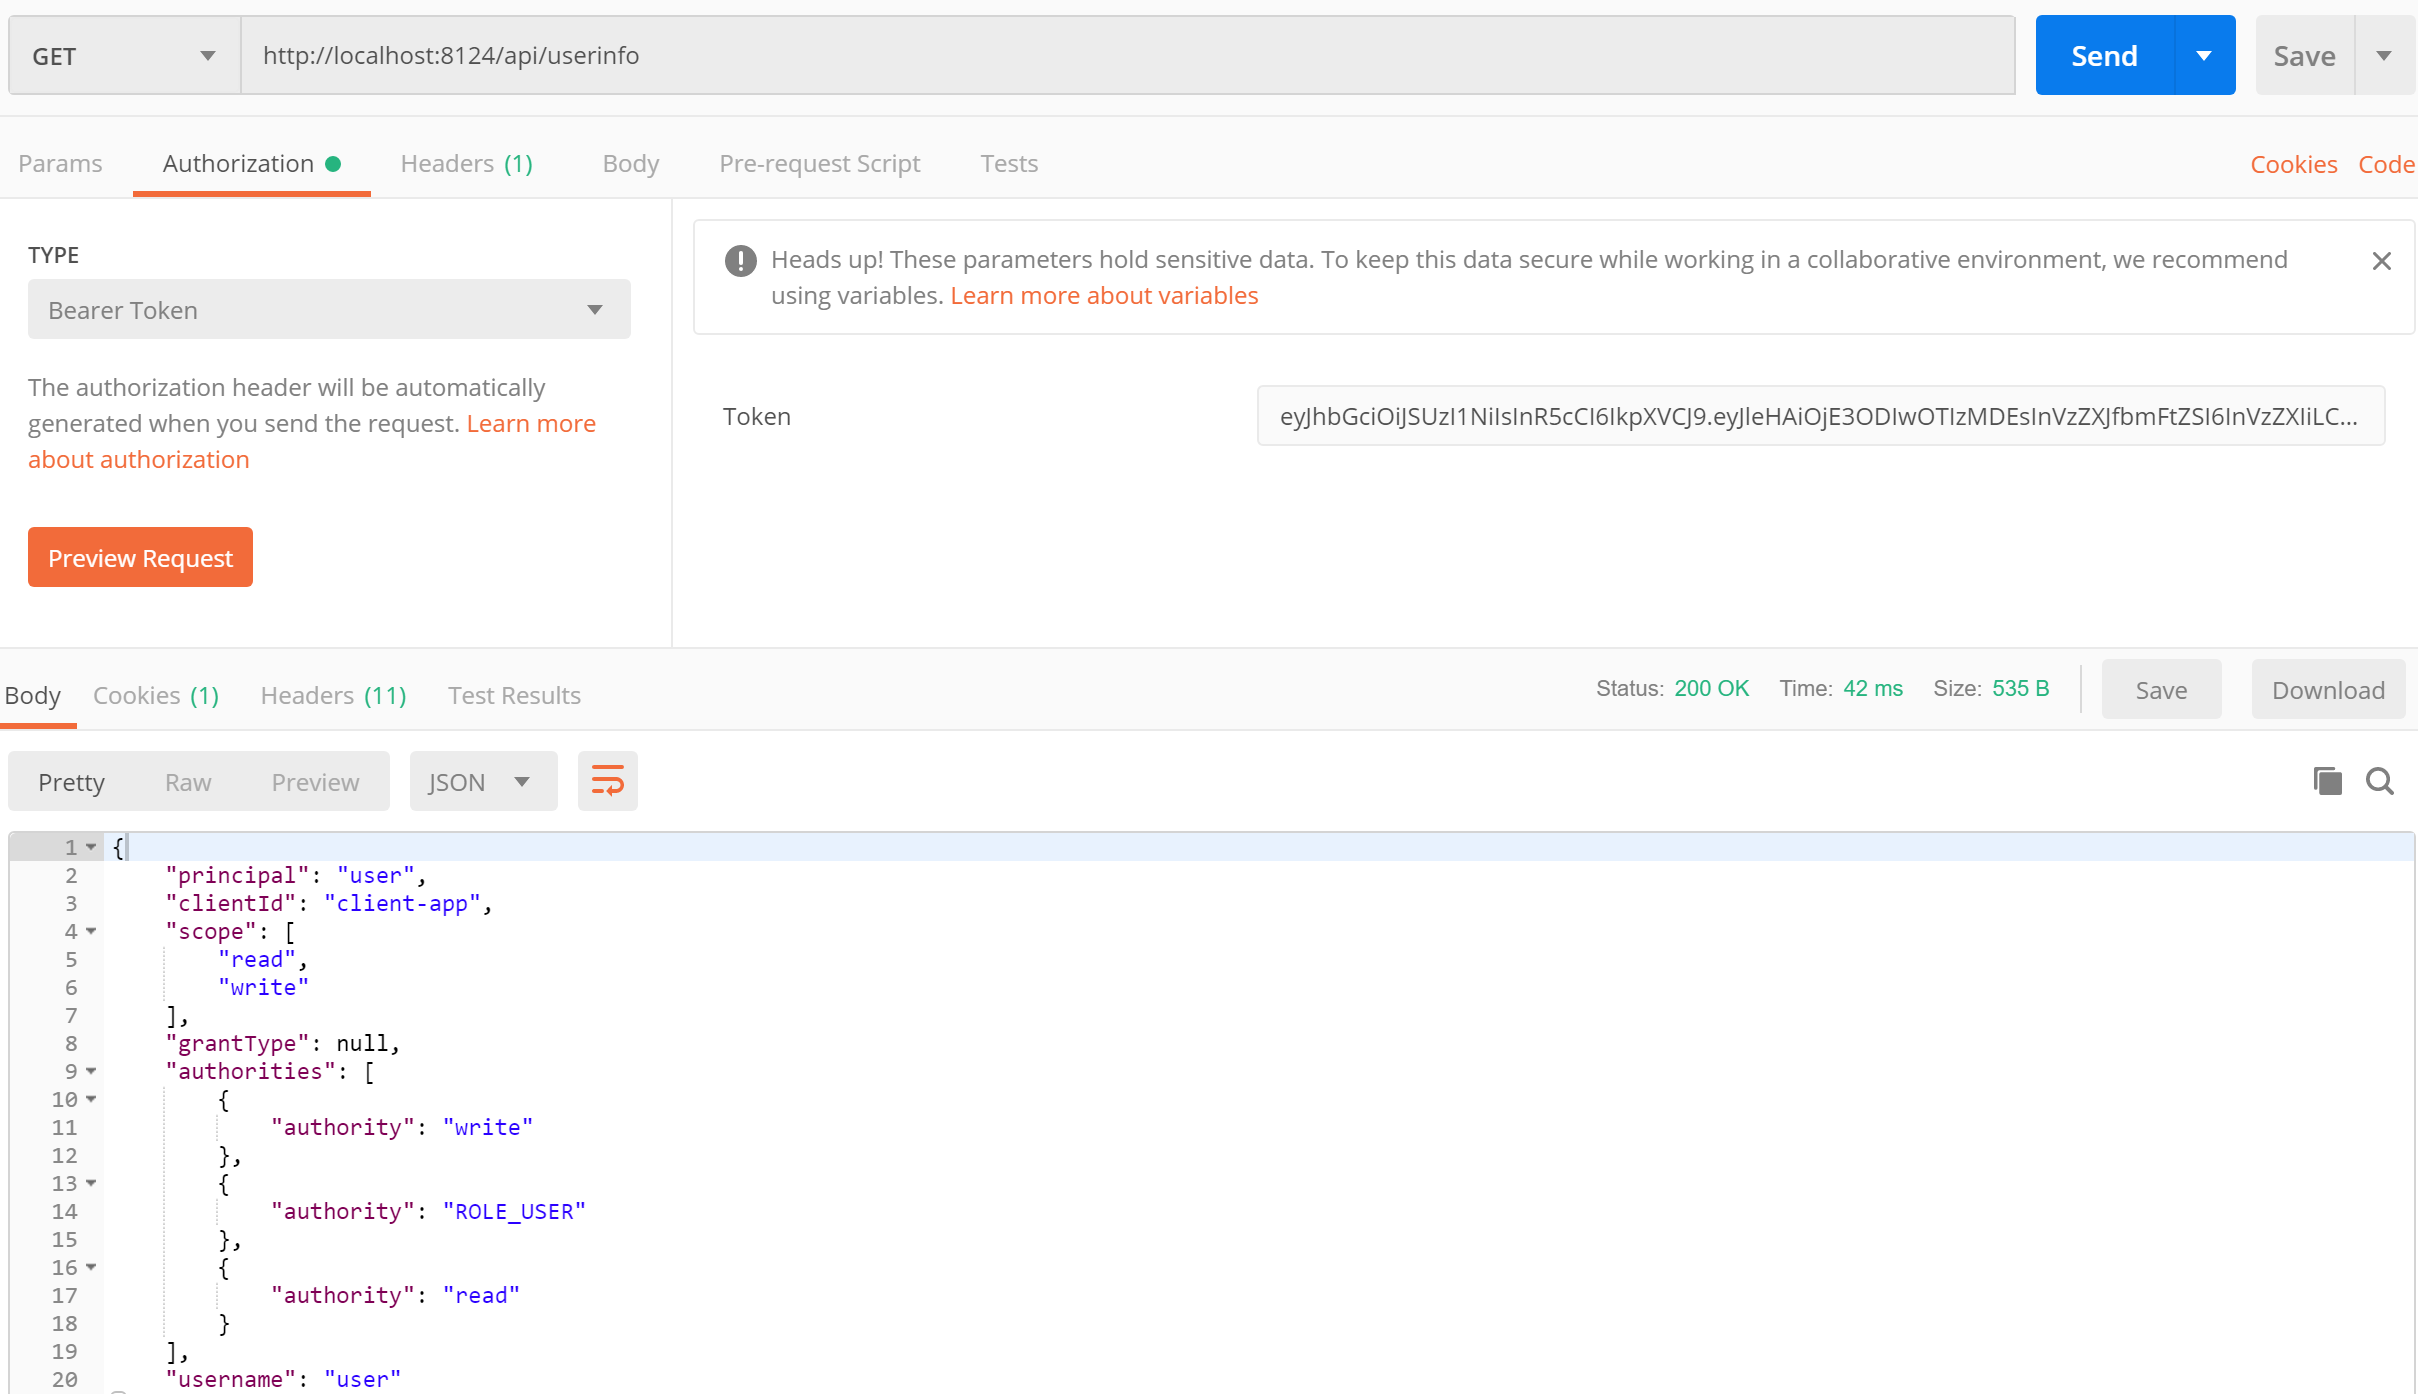
总结:
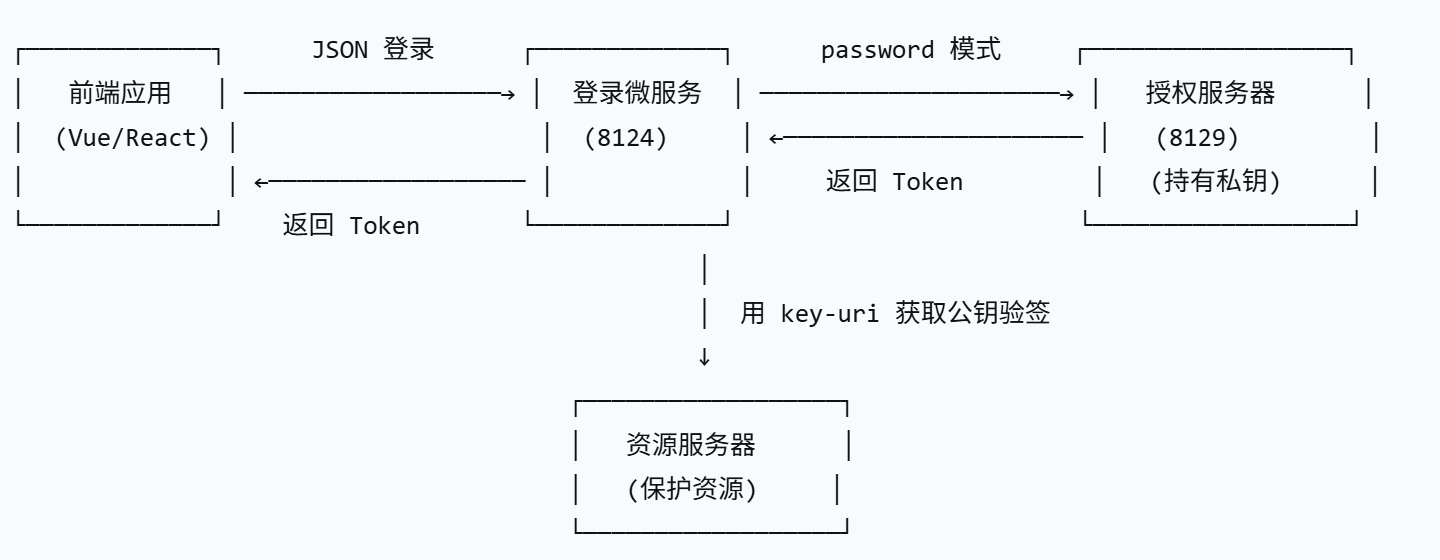
核心思想
- 前端只认识登录微服务(亲切友好,只说 JSON)
- 登录微服务去跟授权服务器打交道(用 password 模式,发的是表单数据)
- client-secret 永远不离开服务端,就像你的银行卡密码永远不会告诉别人
关于前端应用 我写了一半,有点累了 ,而且篇幅挺长,我就给删除了 ,下一集再说吧!!
下集预告
这一集,我们搞定了密码模式,前端可以通过 /api/login 拿到令牌,通过 /api/userinfo 拿到用户信息。
下一集,这回真的要创建前端应用了

openEuler 是由开放原子开源基金会孵化的全场景开源操作系统项目,面向数字基础设施四大核心场景(服务器、云计算、边缘计算、嵌入式),全面支持 ARM、x86、RISC-V、loongArch、PowerPC、SW-64 等多样性计算架构
更多推荐
 8
8 0
0- 0


 已为社区贡献3条内容

所有评论(0)