分布式认证中心第四集 授权码模式
前情提要
上一集,我们给 Vue 前端留了个"授权码登录"的按钮,像个待填的坑。今天,我们亲手把这个坑填平了!
1. 改造Login.vue ,让按钮真正干活
axios.get('http://localhost:8124/api/oauth/authorize')
            .then(response => {
              // ✅ axios 已经把 JSON 转好了,直接取 response.data
              window.location.href = response.data.authorizeUrl;
            })
            .catch(error => {
              console.error('获取授权地址失败:', error);
              // 如果错误,可以跳转到登录页或提示
              // window.location.href = '/login';
            });
前端 → 登录微服务 → 获取授权地址
前端拿到地址后,浏览器整页跳转到授权服务器
2.登录微服务 —— 生成授权地址
登录微服务需要提供一个接口,帮前端生成完整的授权地址:
@GetMapping("/oauth/authorize")
public Map<String, String> getAuthorizeUrl() {
    String authorizeUrl = UriComponentsBuilder.fromHttpUrl(authorizeUri)
            .queryParam("client_id", clientId)
            .queryParam("redirect_uri", redirectUri)
            .queryParam("response_type", "code")
            .queryParam("scope", "read write")
            .build()
            .toUriString();

    log.info("🔐 生成授权地址: {}", authorizeUrl);

    Map<String,String> resultMap = new HashMap<>();
    resultMap.put("authorizeUrl",authorizeUrl);
    return resultMap;
}
关键点:redirect_uri 指向的是 Vue 前端的 /callback 页面,不是登录微服务!
3.创建 CallbackPage.vue —— 接收授权码
授权服务器登录成功后,会重定向到 http://localhost:8080/callback?code=xxxxx,这个页面就是负责接收 code 并换 Token 的
<template>
  <div>正在处理授权...</div>
</template>

<script>
export default {
  async mounted() {
    const urlParams = new URLSearchParams(window.location.search);
    const code = urlParams.get('code');
    if (code) {
      try {
        // 调用后端接口,用 code 换 token
        const response = await fetch('http://localhost:8124/api/callback?code=' + code);
        const tokenData = await response.json();

        // 存储 token(这里假设后端返回的是 JSON)
        localStorage.setItem('token', tokenData.accessToken);

        // 跳转到首页
        this.$router.push('/home');
      } catch (error) {
        console.error('授权失败', error);
        this.$router.push('/login');
      }
    } else {
      this.$router.push('/login');
    }
  }
};
</script>
修改一下路由 main.js
import CallbackPage from './components/CallbackPage.vue'
const routes = [
    { path: '/', redirect: '/login' },
    { path: '/login', component: Login },
    { path: '/callback', component: CallbackPage },
    { path: '/home', component: Home }
]
4.登录微服务的 Callback 接口 —— 换 Token
@GetMapping("/callback")
public LoginResponse callback(@RequestParam("code") String code) {
    log.info("📨 收到授权码回调: {}", code);

    try {
        // 用授权码换取 Token
        LoginResponse tokenResponse = exchangeCodeForToken(code);
        log.info("✅ Token 换取成功");
        return tokenResponse;
    } catch (Exception e) {
        log.error("❌ 换取 Token 失败", e);
        throw new RuntimeException("授权码换取 Token 失败: " + e.getMessage());
    }
}

/**
 * 3. 用授权码换 Token(核心逻辑)
 */
private LoginResponse exchangeCodeForToken(String code) {
    HttpHeaders headers = new HttpHeaders();
    headers.setContentType(MediaType.APPLICATION_FORM_URLENCODED);
    headers.setBasicAuth(clientId, clientSecret);  // 后端持有 client-secret

    MultiValueMap<String, String> body = new LinkedMultiValueMap<>();
    body.add("grant_type", "authorization_code");
    body.add("code", code);
    body.add("redirect_uri", redirectUri);  // 必须和获取授权码时一致

    HttpEntity<MultiValueMap<String, String>> request = new HttpEntity<>(body, headers);

    ResponseEntity<Map> response = restTemplate.postForEntity(
            tokenUri,
            request,
            Map.class
    );

    if (response.getStatusCode() == HttpStatus.OK && response.getBody() != null) {
        Map<String, Object> tokenInfo = response.getBody();
        return new LoginResponse(
                (String) tokenInfo.get("access_token"),
                (String) tokenInfo.get("refresh_token"),
                (String) tokenInfo.get("token_type"),
                ((Number) tokenInfo.get("expires_in")).longValue(),
                (String) tokenInfo.get("scope")
        );
    } else {
        throw new RuntimeException("获取令牌失败,状态码: " + response.getStatusCode());
    }
}
client-secret 只在服务端出现,前端完全不知道!
redirect_uri 必须和获取授权码时完全一致,否则授权服务器会拒绝!
5.配置大汇总
spring:
    application:
        name: login
server:
    port: 8124

security:
    oauth2:
        resource:
            jwt:
                key-uri: http://localhost:8129/oauth/token_key

auth:
    server:
        base:
            url: http://localhost:8129
        # 新增授权码模式相关配置
        authorize:
            uri: ${auth.server.base.url}/oauth/authorize
        token:
            uri: ${auth.server.base.url}/oauth/token
client:
    client-id: client-app
    client-secret: secret123
    # 新增回调地址(登录微服务的回调接口)
    redirect-uri: http://localhost:8080/callback
授权服务器配置
// 回调地址
.redirectUris("http://localhost:8080/callback")
6.授权服务器 Security 配置
protected void configure(HttpSecurity http) throws Exception {
        http.csrf().disable();
        http.authorizeRequests()
                .antMatchers("/login.html").permitAll()
                .antMatchers("/.well-known/**").permitAll()
//                .antMatchers("/oauth/**").permitAll()
                .anyRequest().authenticated()
                .and()
                .formLogin()
                .loginPage("/login.html")
                .loginProcessingUrl("/login")
                .successHandler(new SavedRequestAwareAuthenticationSuccessHandler())
                .failureHandler(new SimpleUrlAuthenticationFailureHandler() {
                    @Override
                    public void onAuthenticationFailure(javax.servlet.http.HttpServletRequest request,
                                                        javax.servlet.http.HttpServletResponse response,
                                                        AuthenticationException exception) throws java.io.IOException {
                        response.sendError(401, "Authentication Failed");
                    }
                });
    }
security有自带的 登录页面 ,如果不想自定义 可以把.loginPage(“/login.html”)
.loginProcessingUrl(“/login”)注释掉
7.授权服务器创建自定义登录页面(如果选择自定义)
resources —> static ----> login.html
<!DOCTYPE html>
<html lang="zh-CN">
<head>
    <meta charset="UTF-8">
    <meta name="viewport" content="width=device-width, initial-scale=1.0">
    <title>统一授权登录</title>
    <style>
        * {
            margin: 0;
            padding: 0;
            box-sizing: border-box;
        }

        body {
            font-family: 'Microsoft YaHei', -apple-system, BlinkMacSystemFont, 'Segoe UI', Roboto, sans-serif;
            background: linear-gradient(135deg, #667eea 0%, #764ba2 100%);
            height: 100vh;
            display: flex;
            justify-content: center;
            align-items: center;
            margin: 0;
        }

        .login-container {
            background: white;
            padding: 48px 40px 40px;
            border-radius: 16px;
            box-shadow: 0 20px 60px rgba(0, 0, 0, 0.3);
            width: 420px;
            max-width: 95%;
            animation: fadeIn 0.5s ease-out;
        }

        @keyframes fadeIn {
            from {
                opacity: 0;
                transform: translateY(-20px);
            }
            to {
                opacity: 1;
                transform: translateY(0);
            }
        }

        .login-header {
            text-align: center;
            margin-bottom: 32px;
        }

        .login-header .logo {
            font-size: 48px;
            margin-bottom: 8px;
        }

        .login-header h2 {
            color: #333;
            font-size: 24px;
            font-weight: 700;
            margin-bottom: 4px;
        }

        .login-header .subtitle {
            color: #999;
            font-size: 13px;
        }

        .login-header .client-info {
            background: #f0f4ff;
            color: #667eea;
            padding: 8px 16px;
            border-radius: 20px;
            font-size: 13px;
            display: inline-block;
            margin-top: 10px;
        }

        .form-group {
            margin-bottom: 20px;
        }

        .form-group label {
            display: block;
            margin-bottom: 6px;
            color: #555;
            font-weight: 500;
            font-size: 14px;
        }

        .form-group input {
            width: 100%;
            padding: 12px 16px;
            border: 2px solid #e8ecf1;
            border-radius: 10px;
            font-size: 15px;
            transition: border-color 0.3s, box-shadow 0.3s;
            background: #fafbfc;
            box-sizing: border-box;
        }

        .form-group input:focus {
            outline: none;
            border-color: #667eea;
            box-shadow: 0 0 0 4px rgba(102, 126, 234, 0.15);
            background: white;
        }

        .form-group input::placeholder {
            color: #b0b8c4;
        }

        .btn-login {
            width: 100%;
            padding: 14px;
            background: linear-gradient(135deg, #667eea 0%, #764ba2 100%);
            color: white;
            border: none;
            border-radius: 10px;
            font-size: 16px;
            font-weight: 600;
            cursor: pointer;
            transition: transform 0.2s, box-shadow 0.2s;
            margin-top: 8px;
        }

        .btn-login:hover {
            transform: translateY(-2px);
            box-shadow: 0 8px 25px rgba(102, 126, 234, 0.4);
        }

        .btn-login:active {
            transform: translateY(0);
        }

        .error-msg {
            background: #fef2f2;
            color: #dc2626;
            padding: 12px 16px;
            border-radius: 10px;
            margin-bottom: 20px;
            font-size: 14px;
            display: none;
            border-left: 4px solid #dc2626;
        }

        .error-msg.show {
            display: block;
        }

        .login-footer {
            text-align: center;
            margin-top: 24px;
            color: #b0b8c4;
            font-size: 12px;
        }

        .login-footer a {
            color: #667eea;
            text-decoration: none;
        }

        .security-badge {
            display: flex;
            justify-content: center;
            gap: 16px;
            margin-top: 16px;
            font-size: 12px;
            color: #b0b8c4;
        }

        .security-badge span {
            display: flex;
            align-items: center;
            gap: 4px;
        }
    </style>
</head>
<body>
<div class="login-container">
    <div class="login-header">
        <div class="logo">🔐</div>
        <h2>安全授权登录</h2>
        <p class="subtitle">请输入您的账号信息以继续</p>
        <div class="client-info" id="clientDisplay">
            📱 正在为 <strong>未知应用</strong> 授权
        </div>
    </div>

    <div class="error-msg" id="errorMsg">
        ❌ 用户名或密码错误,请重新输入
    </div>

    <form id="loginForm" method="post" action="/login">
        <div class="form-group">
            <label for="username">👤 用户名</label>
            <input
                    type="text"
                    id="username"
                    name="username"
                    placeholder="请输入用户名"
                    value="user"
                    required
                    autofocus
            >
        </div>

        <div class="form-group">
            <label for="password">🔒 密码</label>
            <input
                    type="password"
                    id="password"
                    name="password"
                    placeholder="请输入密码"
                    value="password"
                    required
            >
        </div>


        <button type="submit" class="btn-login">🚀 立即授权登录</button>
    </form>

    <div class="security-badge">
        <span>🔒 SSL 加密</span>
        <span>🛡️ 安全认证</span>
        <span>✅ OAuth 2.0</span>
    </div>

    <div class="login-footer">
        授权服务器 v2.0 · 您的密码不会被存储
    </div>
</div>

<script>

</script>
</body>
</html>
测试!见证奇迹的时刻
1.点击授权码登录 按钮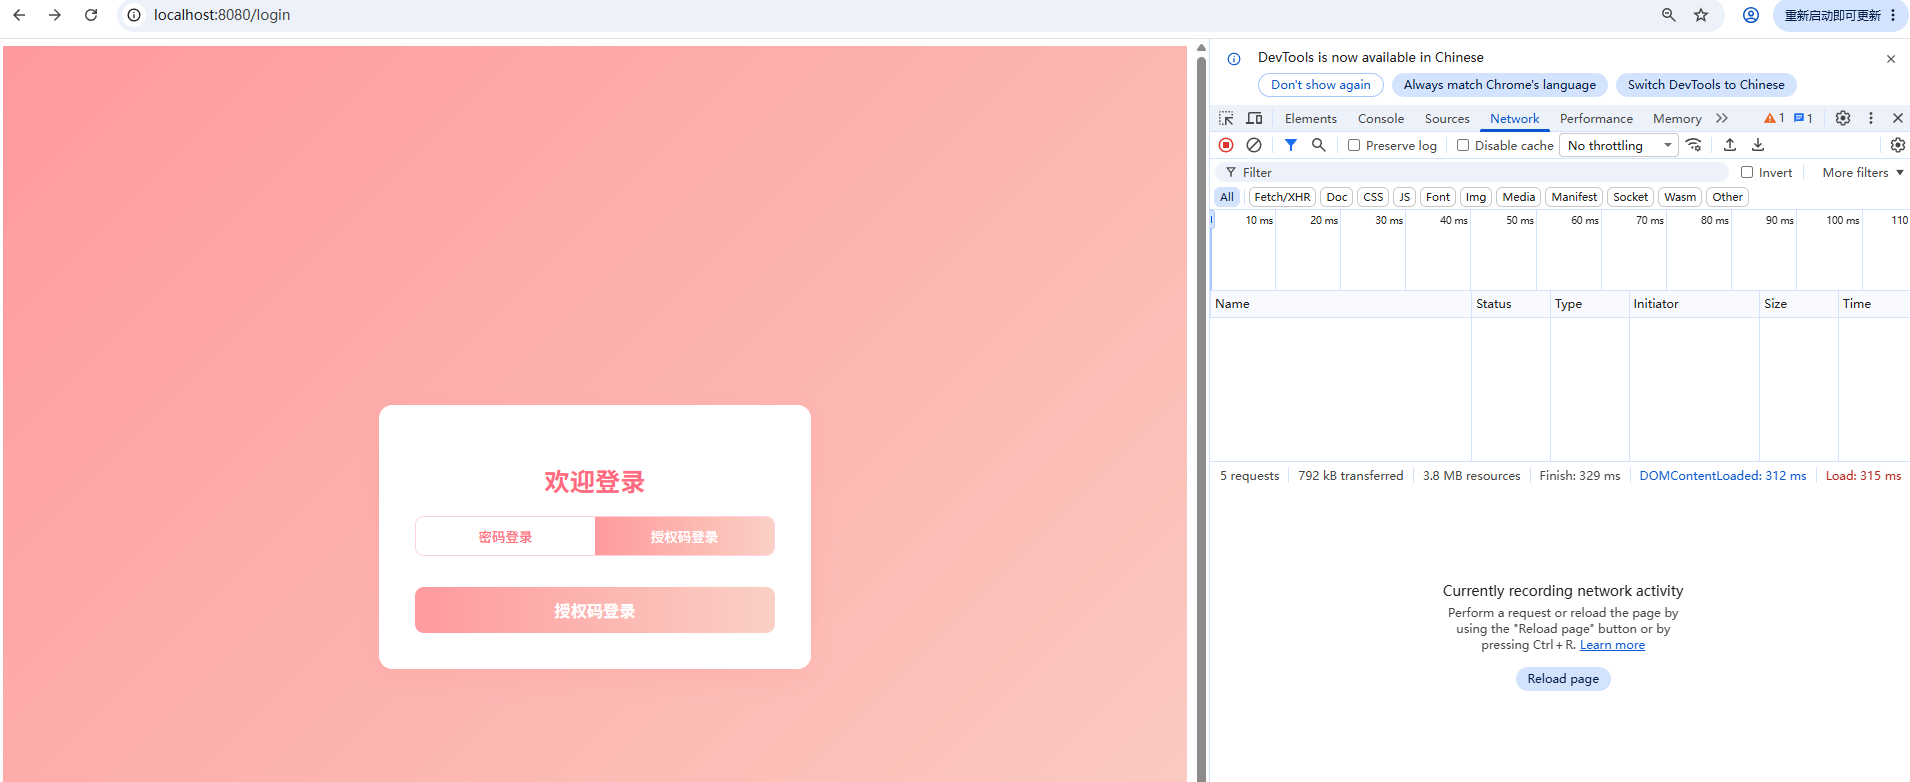
2.重定向到授权服务器的 login.html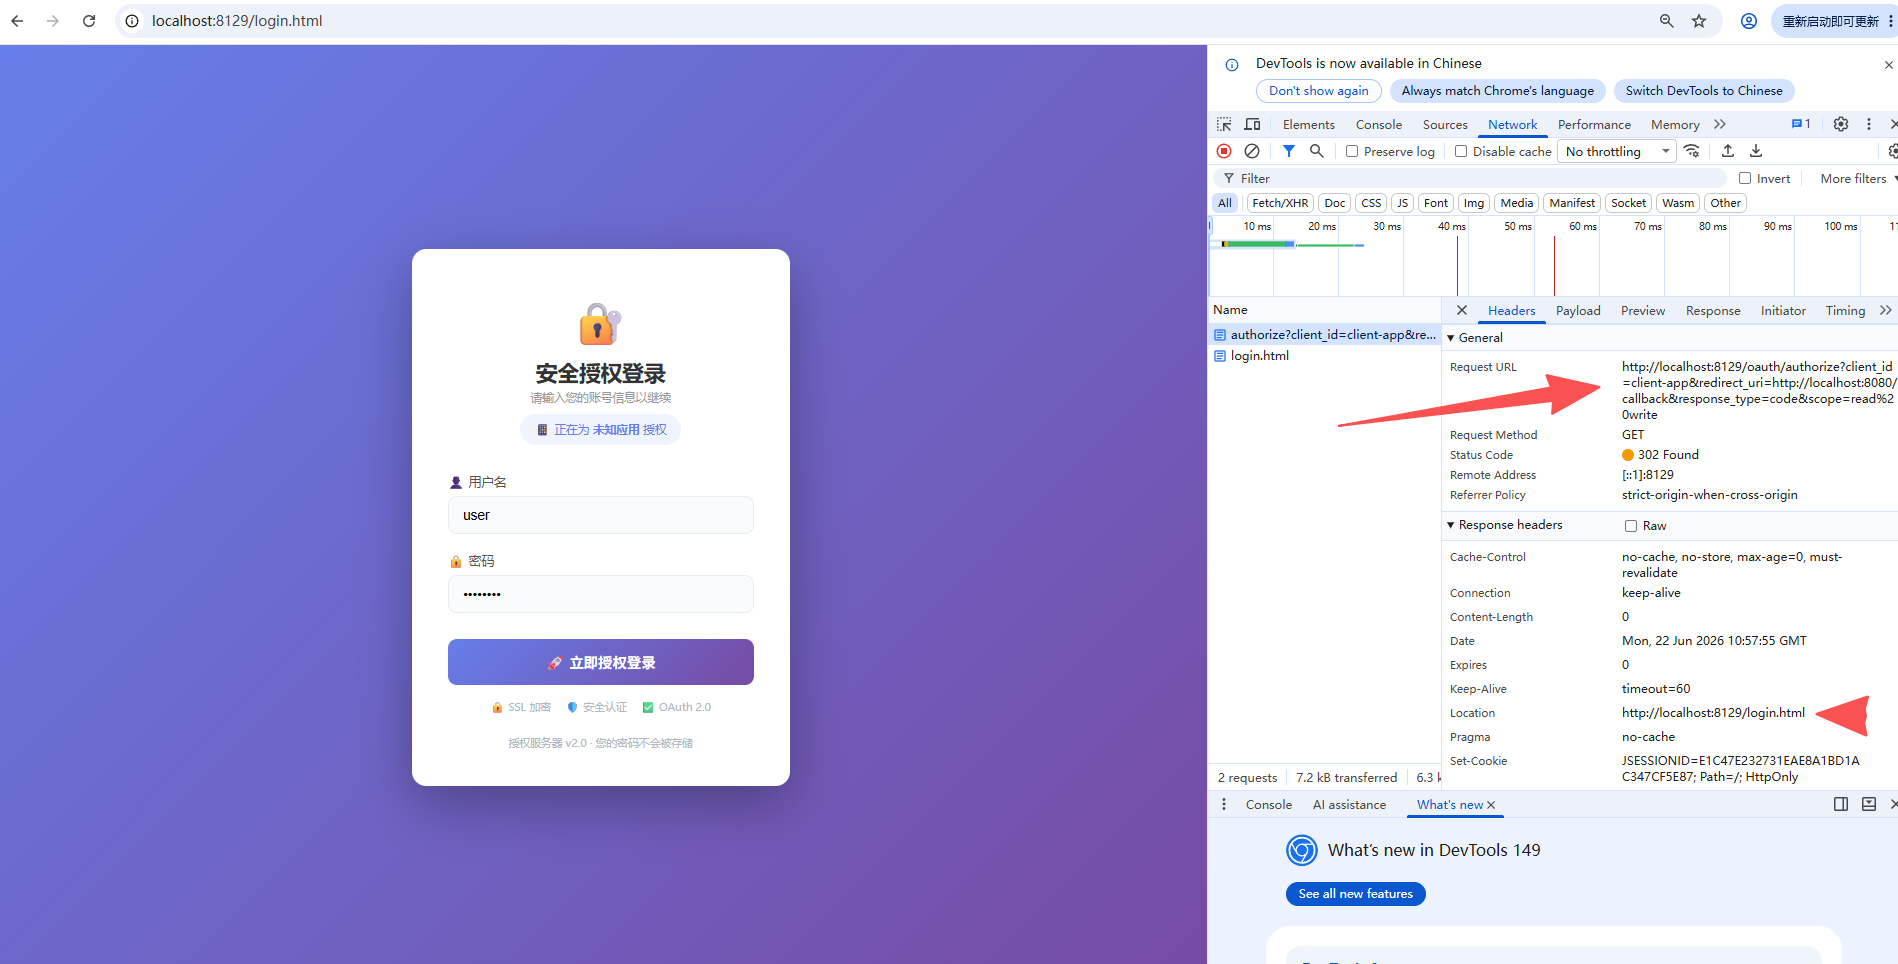
3. 输入用户名密码 user 1,点击立即授权登录,登录成功后,自动跳转到 http://localhost:8080/callback?code=xxxxx,然后自动换 Token,最后进入 Home 页面: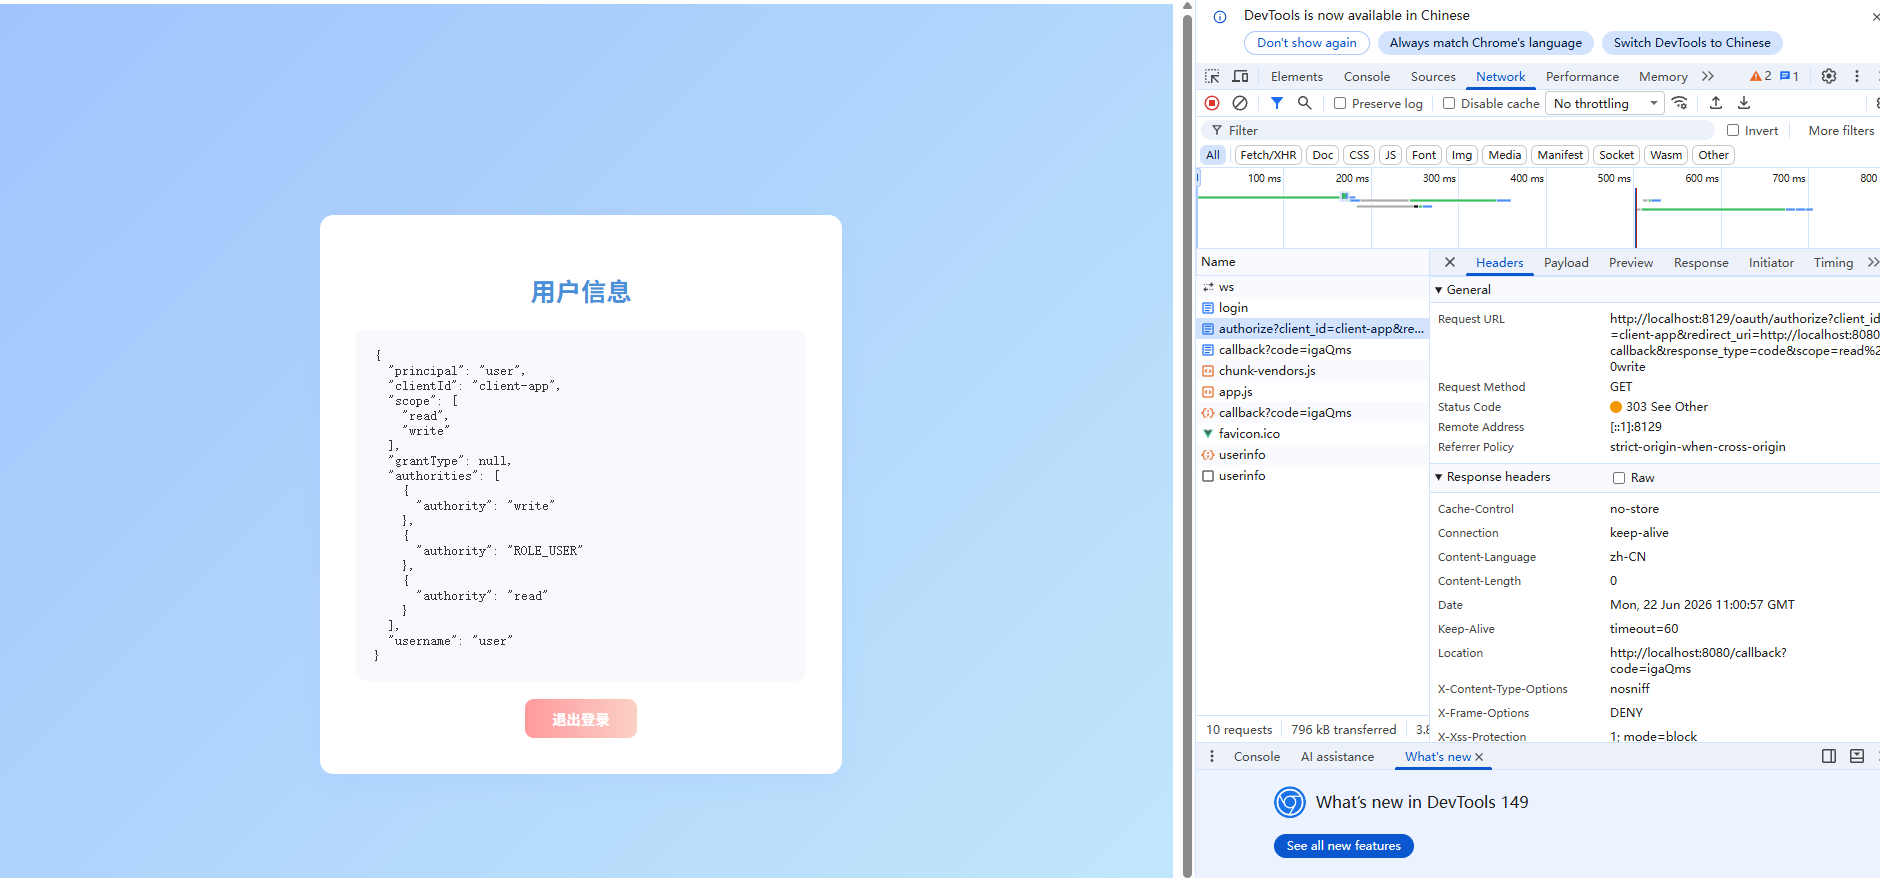
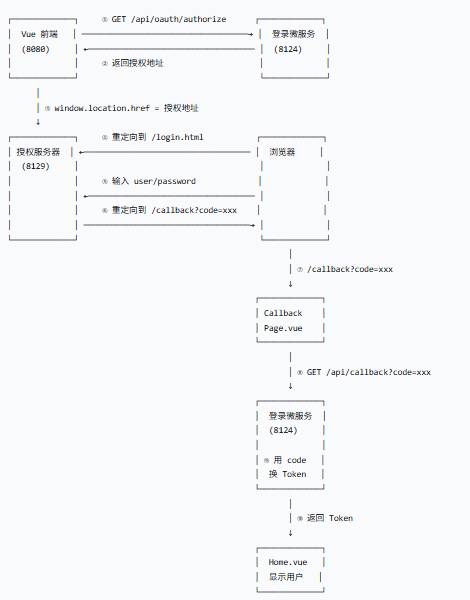
完整流程
分享一个此案例中遇到的一个坑
如果你在点击授权页面(login.html)的登录 之后 出现下面这个页面。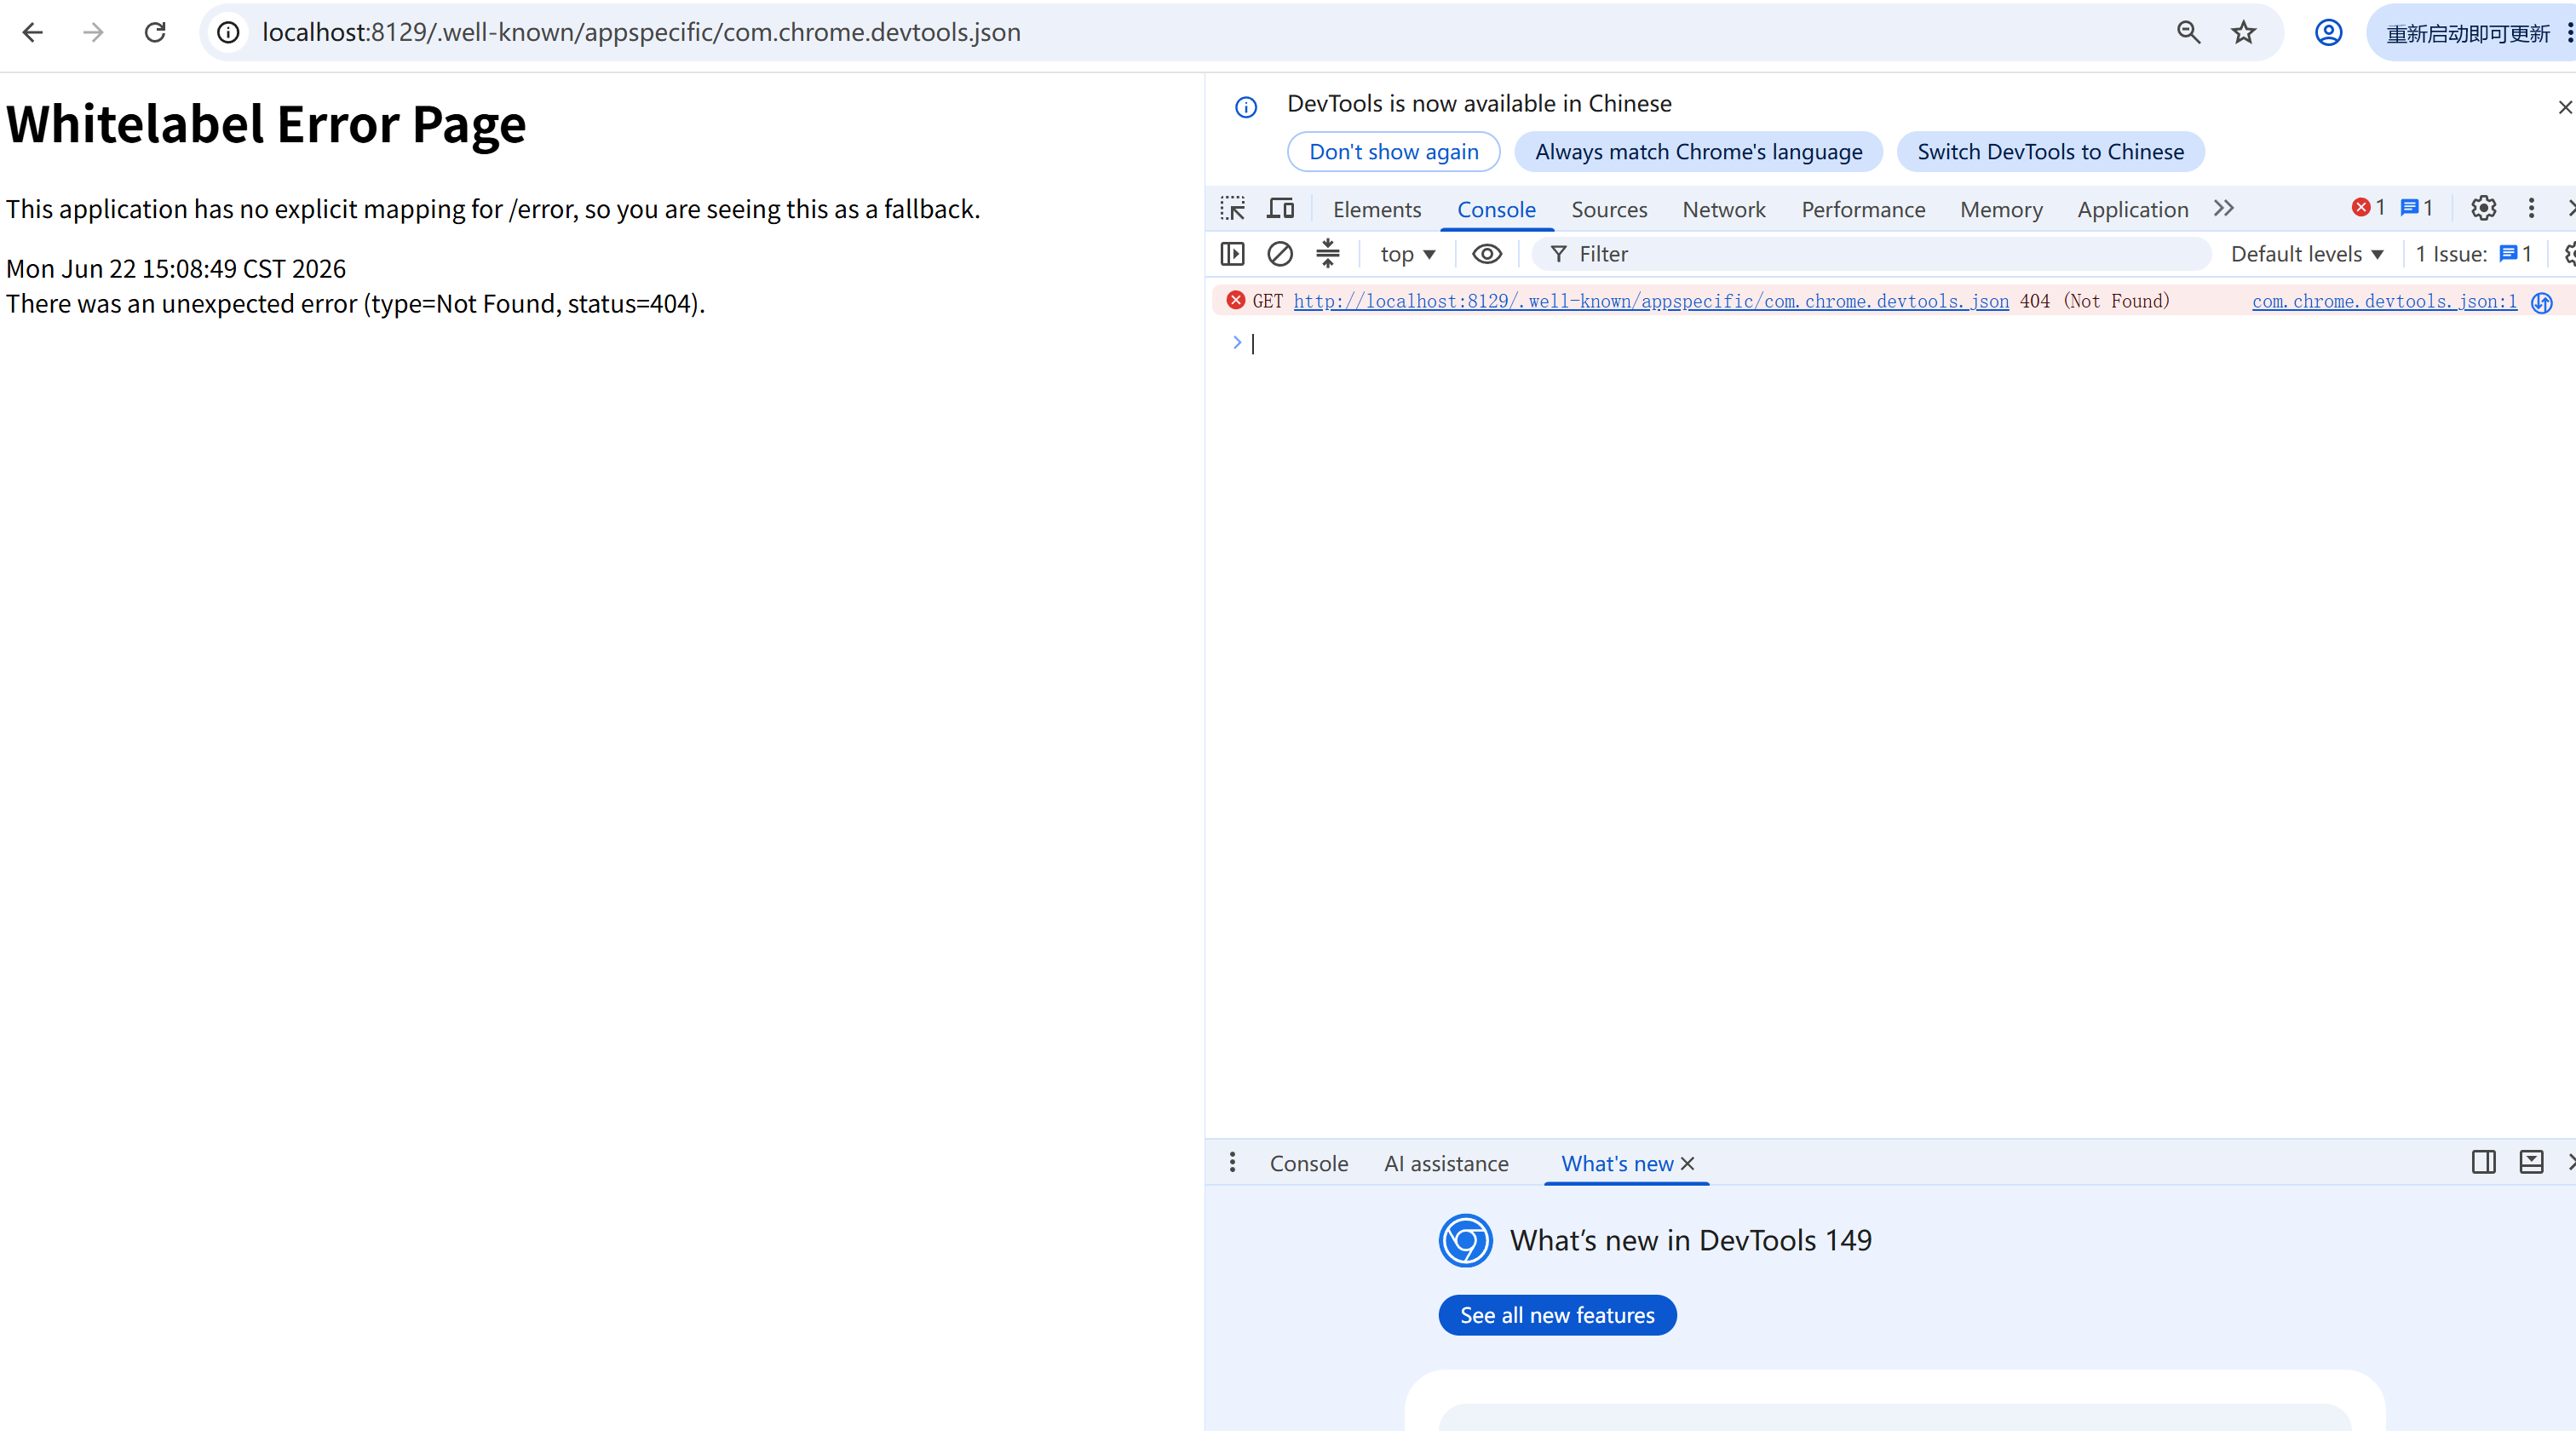
不用慌 ,在 MyWebSecurityConfigAdapter 中去掉 .well-known的认证
 http.csrf().disable();
        http.authorizeRequests()
                .antMatchers("/login.html").permitAll()
                .antMatchers("/.well-known/**").permitAll()		//这里这里
今天遇到这个问题的时候 ,我还思考了半天,一开始我寻思是个小问题,就让 灵码 给我解决,没想到 这货一直跟我说不可能 ,还说google的插件问题,几个小时也没解决了,后来又去问了问 deepseek,它回答的也不咋地。没办法 自己研究吧
原因是
- 第一次请求 /oauth/authorize?client_id=xxx 被 Spring Security 保存到 Session
- 紧接着,Chrome DevTools
偷偷发了一个请求:/.well-known/appspecific/com.chrome.devtools.json - 这个请求也被 Spring Security 拦截,覆盖了 Session 中保存的原始请求!
- 登录成功后,SavedRequestAwareAuthenticationSuccessHandler 从 Session 取到的是
.well-known 地址 - 跳转到 .well-known → 404

openEuler 是由开放原子开源基金会孵化的全场景开源操作系统项目,面向数字基础设施四大核心场景(服务器、云计算、边缘计算、嵌入式),全面支持 ARM、x86、RISC-V、loongArch、PowerPC、SW-64 等多样性计算架构
更多推荐
 2
2 0
0- 0


 已为社区贡献3条内容

所有评论(0)