Rocky、OpenEuler安装nginx并设置开机自启
概述
整体流程分为三大块:
1. 安装 Nginx
2. 配置 Nginx(3套生产可用配置模板)
3. 配套补充知识点
   1)Nginx 负载均衡配置
   2)Nginx HTTPS 证书配置
   3)IDEA2023 多 SpringBoot 实例运行
一、安装 Nginx(CentOS/Rocky Linux dnf 编译安装)
1. 安装编译依赖
首次安装依赖:
dnf install -y gcc-c++ pcre pcre-devel zlib zlib-devel openssl openssl-devel
若升级 openSSL高版本,则升级排除;仅升级nginx 不建议执行依赖安装;
dnf install -y gcc-c++ pcre pcre-devel zlib zlib-devel --exclude=openssl,openssl-devel,openssl-libs
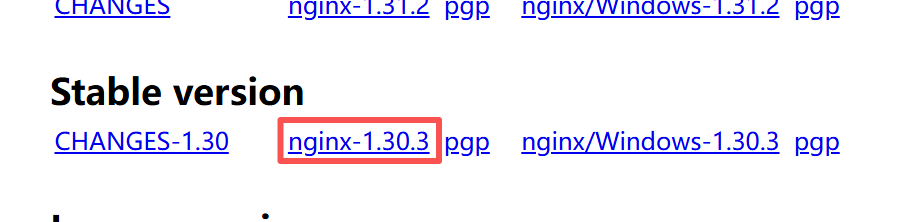
2. 官网下载稳定版 Nginx
官网地址:http://nginx.org/en/download.html
脚本一键下载(2026-07-06 更新,1.30.3 稳定版):
cd /usr/local
wget https://nginx.org/download/nginx-1.30.3.tar.gz
3. 解压源码包
无 tar 工具先安装:
dnf install tar
解压命令:
tar -xzvf nginx-1.30.3.tar.gz
4. 编译安装 Nginx
4.1 进入源码目录
cd /usr/local/nginx-1.30.3
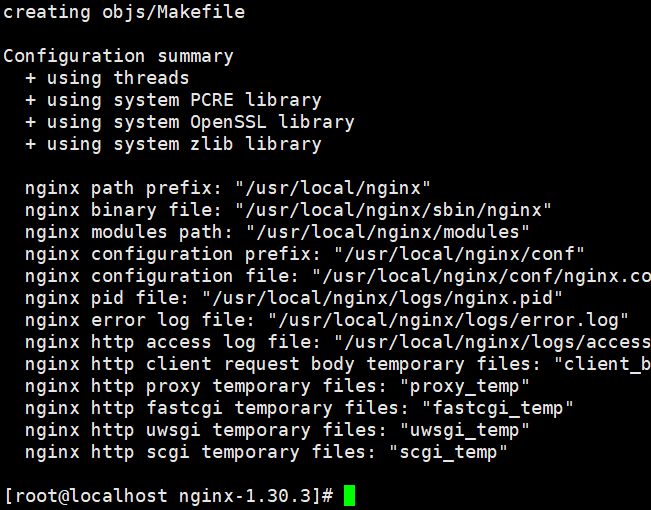
4.2 configure 编译参数(带完整模块)
./configure --prefix=/usr/local/nginx \
--user=www \
--group=www \
--with-http_stub_status_module \
--with-http_ssl_module \
--with-http_gzip_static_module \
--with-http_v2_module \
--with-file-aio \
--with-threads \
--with-http_realip_module \
--with-pcre \
--with-pcre-jit
参数说明:
| 参数 | 作用 |
|---|---|
--prefix=/usr/local/nginx |
Nginx 安装根目录 |
--user=www |
运行进程用户 |
--group=www |
运行进程用户组 |
--with-http_stub_status_module |
监控状态模块 |
--with-http_ssl_module |
HTTPS SSL 支持 |
--with-http_gzip_static_module |
静态资源预压缩 |
--with-http_v2_module |
HTTP/2 协议 |
--with-file-aio |
文件异步IO,提升静态文件性能 |
--with-threads |
线程并发支持 |
--with-http_realip_module |
反向代理获取真实客户端IP |
--with-pcre --with-pcre-jit |
正则JIT加速 |
4.3 编译安装
make install
查看安装目录:
whereis nginx

安装完成后可删除源码包:
cd ..
rm -rf /usr/local/nginx-1.30.3
5. 配置系统自启动 & 运行用户
5.1 创建 www 用户与用户组
groupadd -f www
useradd -g www www
5.2 创建 systemd 服务文件
cd /etc/systemd/system
vi nginx.service
nginx.service 完整内容:
[Unit]
Description=nginx-The High-performance HTTP Server
After=network.target

[Service]
Type=forking
PIDFile=/usr/local/nginx/logs/nginx.pid
ExecStartPre=/usr/local/nginx/sbin/nginx -t -c /usr/local/nginx/conf/nginx.conf
ExecStart=/usr/local/nginx/sbin/nginx -c /usr/local/nginx/conf/nginx.conf
ExecReload=/usr/local/nginx/sbin/nginx -s reload
ExecStop=/usr/local/nginx/sbin/nginx -s stop
PrivateTmp=true

[Install]
WantedBy=multi-user.target
6. 加载服务 & 设置开机自启
# 重载systemd服务列表
systemctl daemon-reload
# 启动Nginx
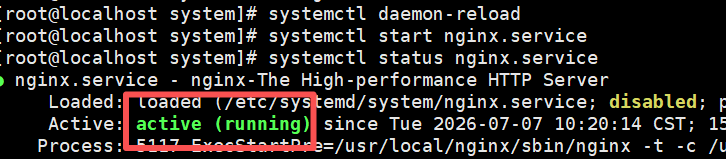
systemctl start nginx.service
# 查看运行状态
systemctl status nginx.service
# 设置开机自启
systemctl enable nginx.service
7. 开机自启验证 & 防火墙放行
7.1 重启验证端口监听
reboot
# 安装netstat工具
dnf install net-tools
# 查看80端口占用
netstat -tlunp |grep 80

7.2 防火墙永久放行80端口
firewall-cmd --zone=public --add-port=80/tcp --permanent
firewall-cmd --reload
验证:浏览器直接访问服务器IP测试页面
8. Nginx 运维常用操作
8.1 基础启停、重载、校验命令
# 启动
systemctl start nginx.service
# 平滑重载配置(不中断业务)
systemctl reload nginx.service
# 重启服务
systemctl restart nginx.service
# 正常停止(等待现有连接处理完)
systemctl stop nginx.service
# 强制快速停止
/usr/local/nginx/sbin/nginx -s quit
# 查看运行状态
systemctl status nginx.service
# 校验配置文件是否合法
/usr/local/nginx/sbin/nginx -t
# 查看编译参数、已启用模块
/usr/local/nginx/sbin/nginx -V
8.2 简易重装流程
先停止服务;再删除,nginx编译后的位置
# 停止服务
systemctl stop nginx.service
# 删除编译后的源码
rm -rf /usr/local/nginx
再按本章安装步骤重新编译安装,最后启动服务。
# 重新编译覆盖安装(执行本章4.1~4.3步骤)
# 启动服务
systemctl start nginx.service
二、Nginx 生产配置模板
模板1:基础 Vue 前后端分离 HTTP 配置(通用无特殊业务)
说明:开启gzip、大文件超时、文件上传限制、后端接口反向代理、前端history路由刷新兼容
# Nginx 进程数,一般设置为和 CPU 核数一样,可设置 auto:会自动根据 CPU 核数分配适当的进程数
worker_processes  auto;

# 日志严重程度:debug < info < notice < warn < error(默认) < crit < alert < emerg,生产一般如下3种
error_log  logs/error.log; # Nginx 的错误日志存放目录
# error_log  logs/error.log  notice;
# error_log  logs/error.log  info;

#pid        logs/nginx.pid; # Nginx 服务启动时的 pid 存放位置

events {
	# 根据操作系统自动选择:建议指定事件驱动模型,避免 Nginx 误判环境
	use epoll;
	# 每个进程允许最大并发数
	# 小规模的服务器:512或1024,中等规模的服务器:2048或4096,大规模的服务器:8192 或更高
	# 考虑到内存占用和CPU的利用率,一般建议不要将worker_connections设置得过高
    worker_connections  2048;
	# 默认:off,高并发下建议开,让 worker 每次尽量多 accept 新连接
	multi_accept on;
	# 默认:on,避免多个 worker 同时抢占 accept,减少惊群现象
	accept_mutex on;
}

http {
    include       mime.types;# 文件扩展名与类型映射表
    default_type  application/octet-stream;# 默认文件类型

	# 设置日志模式
    #log_format  main  '$remote_addr - $remote_user [$time_local] "$request" '
    #                  '$status $body_bytes_sent "$http_referer" '
    #                  '"$http_user_agent" "$http_x_forwarded_for"';

    # 全局关闭访问日志
    access_log off;
    #access_log  logs/access.log  main; # Nginx访问日志存放位置

    sendfile        on;# 开启高效传输模式
    #tcp_nopush     on;# 减少网络报文段的数量
    keepalive_timeout  30;# 保持连接的时间,也叫超时时间,单位秒

    gzip on;#表示开启压缩功能

	gzip_static on;#静态文件压缩开启

	# 设置压缩的最低文件大小(默认值是 20 字节)
    gzip_min_length 5k;# 设置为 1KB 或更大,避免对小文件压缩

    # 设置使用的压缩算法(一般是 gzip)
    gzip_comp_level 5;# 范围是 1-9,数字越大压缩率越高,但占用 CPU 更多

    # 开启对特定文件类型的压缩(不建议压缩紧凑格式:图片)
	gzip_types text/plain text/css application/javascript application/json application/xml text/xml application/xml+rss text/javascript application/font-woff2 application/font-woff application/font-otf;

    # 不压缩的 MIME 类型
    gzip_disable "msie6";# 禁止压缩 IE6 浏览器

    # 压缩缓存控制
    gzip_vary on;# 设置响应头 `Vary: Accept-Encoding`

    # 压缩后文件传输
    gzip_buffers 4 16k;# 设定缓冲区大小

	#认证后台
	server {
		listen       80; # 88 ssl 本服务监听的端口号
		server_name  localhost; # 主机名称

		client_body_timeout 3600s;   # 客户端上传 body 超时
		send_timeout        3600s;   # 向客户端发送响应超时

		client_max_body_size 2148m;
		client_body_buffer_size 128k;

		proxy_connect_timeout 600;
		proxy_read_timeout 3600; # 1h 保证大文件能正常传输
		proxy_send_timeout 3600; # 1h 保证大文件能正常传输
		proxy_buffer_size 64k;
		proxy_buffers   4 32k;
		proxy_busy_buffers_size 64k;
		proxy_temp_file_write_size 64k;

		location / {
			# root 规定了通过监听的端口号访问的文件目录
			root  /usr/share/nginx/html/grain/dist;
			# 配置资源重新跳转,防止刷新后页面丢失
			try_files $uri $uri/  /index.html;
			# index 规定了该目录下指定哪个文件
			index  index.html index.htm;
		}

		# 配置后端接口的跨域代理
		# 对于路径为 "api 的接口,帮助他跳转到指定的地址
		location /api/ {
			proxy_set_header Host $http_host;
			proxy_set_header X-Real-IP $remote_addr;
			proxy_set_header REMOTE-HOST $remote_addr;
			proxy_set_header X-Forwarded-For $proxy_add_x_forwarded_for;
			# 本机上运行的后端接口
			proxy_pass http://jar-grain-9000:9000/;
		}

		location /status{
			stub_status on;
		}
	}
}
模板2:Vite Vue 增强版(含缓存策略、SSE长连接、文件上传下载优化)
新增特性:
- index.html 禁止缓存,发版即时生效
- assets 静态资源缓存7天
- SSE 消息推送长连接专用配置
- 文件上传/下载关闭缓冲区,直传优化
# Nginx 进程数,一般设置为和 CPU 核数一样,可设置 auto:会自动根据 CPU 核数分配适当的进程数
worker_processes  auto;

# 日志严重程度:debug < info < notice < warn < error(默认) < crit < alert < emerg,生产一般如下3种
error_log  logs/error.log; # Nginx 的错误日志存放目录
# error_log  logs/error.log  notice;
# error_log  logs/error.log  info;

#pid        logs/nginx.pid; # Nginx 服务启动时的 pid 存放位置

events {
	# 根据操作系统自动选择:建议指定事件驱动模型,避免 Nginx 误判环境
	use epoll;
	# 每个进程允许最大并发数
	# 小规模的服务器:512或1024,中等规模的服务器:2048或4096,大规模的服务器:8192 或更高
	# 考虑到内存占用和CPU的利用率,一般建议不要将worker_connections设置得过高
    worker_connections  2048;
	# 默认:off,高并发下建议开,让 worker 每次尽量多 accept 新连接
	multi_accept on;
	# 默认:on,避免多个 worker 同时抢占 accept,减少惊群现象
	accept_mutex on;
}

http {
    include       mime.types;# 文件扩展名与类型映射表
    default_type  application/octet-stream;# 默认文件类型

	# 设置日志模式
    #log_format  main  '$remote_addr - $remote_user [$time_local] "$request" '
    #                  '$status $body_bytes_sent "$http_referer" '
    #                  '"$http_user_agent" "$http_x_forwarded_for"';

    # 全局关闭访问日志
    access_log off;
    #access_log  logs/access.log  main; # Nginx访问日志存放位置

    sendfile        on;# 开启高效传输模式
    #tcp_nopush     on;# 减少网络报文段的数量
    keepalive_timeout  30;# 保持连接的时间,也叫超时时间,单位秒

    gzip on;#表示开启压缩功能

	gzip_static on;#静态文件压缩开启

	# 设置压缩的最低文件大小(默认值是 20 字节)
    gzip_min_length 5k;# 设置为 1KB 或更大,避免对小文件压缩

    # 设置使用的压缩算法(一般是 gzip)
    gzip_comp_level 5;# 范围是 1-9,数字越大压缩率越高,但占用 CPU 更多

    # 开启对特定文件类型的压缩(不建议压缩紧凑格式:图片)
	gzip_types text/plain text/css application/javascript application/json application/xml text/xml application/xml+rss text/javascript application/font-woff2 application/font-woff application/font-otf;

    # 不压缩的 MIME 类型
    gzip_disable "msie6";# 禁止压缩 IE6 浏览器

    # 压缩缓存控制
    gzip_vary on;# 设置响应头 `Vary: Accept-Encoding`

    # 压缩后文件传输
    gzip_buffers 4 16k;# 设定缓冲区大小

	#认证后台
	server {
		listen       80; # 88 ssl 本服务监听的端口号
		server_name  localhost; # 主机名称

		client_body_timeout 3600s;   # 客户端上传 body 超时
		send_timeout        3600s;   # 向客户端发送响应超时

		client_max_body_size 2148m;
		client_body_buffer_size 128k;

		proxy_connect_timeout 600;
		proxy_read_timeout 3600; # 1h 保证大文件能正常传输
		proxy_send_timeout 3600; # 1h 保证大文件能正常传输
		proxy_buffer_size 64k;
		proxy_buffers   4 32k;
		proxy_busy_buffers_size 64k;
		proxy_temp_file_write_size 64k;

		# 首页 index.html — 禁止缓存,保证每次发版生效
        location = /index.html {
            root /opt/sm-crypto/process-center-web/dist;
            add_header Cache-Control "no-cache, no-store, must-revalidate";
            add_header Pragma "no-cache";
            add_header Expires "0";
            try_files $uri =404;
        }

		# 静态资源 /assets/,缓存7天,不带immutable,允许刷新更新
        location /assets/ {
            root /opt/sm-crypto/process-center-web/dist;
            expires 7d;
            add_header Cache-Control "public";
        }

		location / {
			# root 规定了通过监听的端口号访问的文件目录
			root  /usr/share/nginx/html/grain/dist;
			# 配置资源重新跳转,防止刷新后页面丢失
			try_files $uri $uri/  /index.html;
			# index 规定了该目录下指定哪个文件
			index  index.html index.htm;
		}

        # SSE 专用
        location /api/common/stream/connect/ {
			proxy_set_header Host $http_host;
            proxy_set_header X-Real-IP $remote_addr;
            proxy_set_header X-Forwarded-For $proxy_add_x_forwarded_for;
			# sse配置
            proxy_http_version 1.1;        # SSE 必须 HTTP/1.1
            proxy_set_header Connection ''; # 保持长连接
            chunked_transfer_encoding off; # 保证消息实时
			# 本机上运行的后端接口
			proxy_pass http://jar-grain-9000:9000/common/stream/connect/;
        }

		# 文件上传/预览接口,关闭缓冲区
        location /api/common/file/ {
            proxy_set_header Host $http_host;
            proxy_set_header X-Real-IP $remote_addr;
            proxy_set_header X-Forwarded-For $proxy_add_x_forwarded_for;
			# 文件接口
			proxy_request_buffering off;   # 上传直传
            proxy_buffering off;           # 下载直传
            proxy_max_temp_file_size 0;    # 禁止写临时文件
			# 禁止 Nginx gzip 压缩
			gzip off;
			# 本机上运行的后端接口
			proxy_pass http://jar-grain-9000:9000/common/file/;
        }

		# 配置后端接口的跨域代理
		# 对于路径为 "api 的接口,帮助他跳转到指定的地址
		location /api/ {
			proxy_set_header Host $http_host;
			proxy_set_header X-Real-IP $remote_addr;
			proxy_set_header REMOTE-HOST $remote_addr;
			proxy_set_header X-Forwarded-For $proxy_add_x_forwarded_for;
			# 本机上运行的后端接口
			proxy_pass http://jar-grain-9000:9000/;
		}

		location /status{
			stub_status on;
		}
	}
}
模板3:完整通用 Nginx 配置大全(含 upstream 负载均衡、多虚拟主机、IP黑白名单)
# 以下是全局段配置
#user administrator administrators;  #配置用户或者组,默认为nobody nobody。
#worker_processes 2;  #设置进程数,默认为1
#pid /nginx/pid/nginx.pid; #指定nginx进程运行文件存放地址
error_log log/error.log debug;  #制定日志路径,级别:debug|info|notice|warn|error|crit|alert|emerg
# events段配置信息
events {
    accept_mutex on;   #设置网路连接序列化,防止惊群现象发生,默认为on
    multi_accept on;  #设置一个进程是否同时接受多个网络连接,默认为off
    #use epoll;      #事件驱动模型,select|poll|kqueue|epoll|resig|/dev/poll|eventport
    worker_connections  1024;    #最大连接数,默认为512
}
# http、配置请求信息
http {
    include       mime.types;   #文件扩展名与文件类型映射表
    default_type  application/octet-stream; #默认文件类型,默认为text/plain
    #access_log off; #取消服务日志
    log_format myFormat '$remote_addr–$remote_user [$time_local] $request $status $body_bytes_sent $http_referer $http_user_agent $http_x_forwarded_for'; #自定义格式
    access_log log/access.log myFormat;  #combined为日志格式的默认值
    sendfile on;   #允许sendfile方式传输文件,默认为off,可以在http块,server块,location块。
    sendfile_max_chunk 100k;  #每个进程每次调用传输数量不能大于设定的值,默认为0,即不设上限。
    keepalive_timeout 65;  #连接超时时间,默认为75s,可以在http,server,location块。


    upstream mysvr {
      server 127.0.0.1:7878;
      server 192.168.10.121:3333 backup;  #热备
    }
    error_page 404 https://www.baidu.com; #错误页
    # 第一个Server区块开始,表示一个独立的虚拟主机站点
    server {
        keepalive_requests 120; #单连接请求上限次数。
        listen       4545;   #监听端口
        server_name  127.0.0.1;   #监听地址
        location  ~*^.+$ {       #请求的url过滤,正则匹配,~为区分大小写,~*为不区分大小写。
           #root path;  #根目录
           #index vv.txt;  #设置默认页
           proxy_pass  http://mysvr;  #请求转向mysvr 定义的服务器列表
           deny 127.0.0.1;  #拒绝的ip
           allow 172.18.5.54; #允许的ip
        }
    }
}
三、配套补充知识点
1. Nginx 负载均衡配置
参考文档:CSDN-Nginx4种负载均衡实现方式 https://blog.csdn.net/m0_64210833/article/details/131954254
内容包含:配置文件解析、轮询/加权轮询/ip_hash/最少连接四种负载策略实操。
2. Nginx HTTPS 证书配置(自签名证书)
参考文档:CSDN-OpenSSL生成Nginx自签名证书https://blog.csdn.net/qq_26408545/article/details/135966610
覆盖 openssl req 核心参数、自签名证书生成、Nginx ssl 模块绑定证书配置。
3. IDEA2023 运行多 SpringBoot 实例
参考文档:CSDN-IDEA2023 运行多 SpringBoot 实例https://blog.csdn.net/qq_26408545/article/details/136801288

openEuler 是由开放原子开源基金会孵化的全场景开源操作系统项目,面向数字基础设施四大核心场景(服务器、云计算、边缘计算、嵌入式),全面支持 ARM、x86、RISC-V、loongArch、PowerPC、SW-64 等多样性计算架构
更多推荐

 4
4 0
0- 0


 已为社区贡献2条内容

所有评论(0)