彭于晏一个月带你玩转Linux操作系统3
Linux 中获取帮助
Man 手册
man 简介
man,manual 简称。man使用不同 section 区分手册类别。
| SECTION | 内容类型 |
|---|---|
| 1 | **用户命令(**可执行命令和shell程序) |
| 2 | 系统调用(从用户空间调用的内核例程) |
| 3 | 库函数(由程序库提供) |
| 4 | 特殊文件(如设备文件) |
| 5 | 文件格式(用于许多配置文件和结构) |
| 6 | 游戏(过去的有趣程序章节) |
| 7 | 惯例、标准和其他(协议、文件系统) |
| 8 | 系统管理和特权命令(维护任务) |
| 9 | Linux内核API(内核调用) |
man 命令
作用:man是Linux中最重要的求助工具
语法:man [选项] [章节号] 命令/关键词
常见选项:
-k 关键词搜索
-f 显示命令的简短描述
-a 显示所有匹配的手册
-w 显示手册文件的路径
-L 指定语言
-s 指定章节号
核心用法:
- 查看命令的手册 例:man ls
- 指定章节号查看 例:man 5 passwd
- 搜索关键词 例:man -k password
- 显示命令的简短描述 例:man -f ls
[pengyuyan@centos7 ~]$ man --help
Usage: man [OPTION...] [SECTION] PAGE...
# man命令将会调用less打开/usr/share/man/相关文件

# passwd(1)描述passwd命令更改密码
[pengyuyan@CentOS7  ~]$ man 1 passwd

# passwd(5)解释/etc/passwd文件格式
[pengyuyan@CentOS7  ~]$ man 5 passwd

# 查看英文的帮助手册,指定LANG变量
[pengyuyan@centos7 ~]$ LANG=en_US.utf8 man gedit
# 或者
[pengyuyan@centos7 ~]$ LANG=en_US.utf8
[pengyuyan@centos7 ~]$ man gedit
man手册页面交互操作指令(less程序)
| 命令 | 结果 |
|---|---|
| PageDown或者空格键 | 向前(向下)滚动一个屏幕 |
| PageUp | 向后(向上)滚动一个屏幕 |
| 向下箭头 | 向前(向下)滚动一行 |
| 向上箭头 | 向后(向上)滚动一行 |
| d | 向前(向下)滚动半个屏幕 |
| u | 向后(向上)滚动半个屏幕 |
| /string | 在man page中向前(向下)搜索string |
| n | 在man page中重复之前的向前(向下)搜索 |
| N | 在man page中重复之前的向后(向上)搜索 |
| g | 转到man page的第一行。 |
| G | 转到man page的最后一行。 |
| q | 退出man ,并返回到shell命令提示符 |
# 使用root用户更新man page库
[root@centos7 ~]# mandb
正在删除 /usr/share/man 里的旧数据库条目...
mandb: 警告:/usr/share/man/man8/fsck.fat.8.manpage-fix.gz:忽略错误的文件名
... ...
正在处理 /usr/share/man/en 下的手册页...
正在删除 /usr/local/share/man 里的旧数据库条目...
正在处理 /usr/local/share/man 下的手册页...
0 man subdirectories contained newer manual pages.
0 manual pages were added.
0 stray cats were added.
17 old database entries were purged.

# 使用 -k 选线搜索关键字
[pengyuyan@centos7 ~]$ man -k passwd
chgpasswd (8)        - 批量更新组密码
chpasswd (8)         - 批量更新密码
gpasswd (1)          - administer /etc/group and /etc/gshadow
mkpasswd (1)         - 为用户产生新口令
passwd (5)           - (未知的主题)
... ...

[pengyuyan@centos7 ~]$ man -k ext4
.....
resize2fs (8)        - ext2/ext3/ext4 file system resizer
......
[pengyuyan@centos7 ~]$ man resize2fs
补充:命令的来源
- 安装软件包之后获得
- shell 自带的工具
查看 shell 自带命令
man查看外部程序
help专门查shell内置命令
# 不建议使用man查询
[pengyuyan@centos7 ~]$ man history

# 使用 help command
[pengyuyan@centos7 ~]$ help history
history: history [-c] [-d 偏移量] [n] 或 history -anrw [文件名] 或 history -ps 参数 [参数...]
    显示或操纵历史列表。

    带行号显示历史列表,将每个被修改的条目加上前缀 `*'。
    参数 N 会仅列出最后的 N 个条目。
......
**重要:**通用选项–help,也用于查看命令帮助。
/usr/share/doc
Linux系统中的文档仓库,这是Linux系统存放各种软件“说明书”和“参考资料”的地方
[pengyuyan@centos7 ~]$ cat /usr/share/doc/dhclient-4.2.5/dhclient.conf.example
cat打开这个文件,就能看到dhclient这个软件的配置文件模板,通常里面包含注释说明和配置样例
which 和 whereis 命令
which命令
作用:查找命令的“程序位置”
核心作用:在PATH环境变量指定的路径中,搜索某个命令的程序文件所在位置
whereis命令
作用:查找命令的“全套文件”
核心作用:搜索命令的二进制程序文件、源代码文件和手册页文件的存放位置
# 查看vi命令代表什么
[pengyuyan@centos7 ~]$ which vi
alias vi='vim'
	/usr/bin/vim

# whereis 查看关键字对应的程序位置,帮助文档,源码
[pengyuyan@centos7 ~]$ whereis man
man: /usr/bin/man /usr/share/man /usr/share/man/man1/man.1.gz /usr/share/man/man1p/man.1p.gz /usr/share/man/man7/man.7.gz

[pengyuyan@centos7 ~]$ whereis passwd
passwd: /usr/bin/passwd /etc/passwd /usr/share/man/man1/passwd.1.gz /usr/share/man/man5/passwd.5.gz
which命令和whereis命令的区别:
| which | whereis | |
|---|---|---|
| 搜索范围 | 只在PATH环境变量定义的路径中搜索 | 在系统默认的标准路径中搜索 |
| 搜索内容 | 只查程序文件(二进制文件) | 查程序文件+手册页+源代码 |
| 显示别名 | 会显示命令的别名 | 不显示别名 |
| 搜索速度 | 快(直接查PATH) | 也很快(查预设数据库) |
| 使用场景 | 想知道“命令的实际路径是什么” | 想知道“命令相关的所有文件都在哪” |
vim 编辑器
vim 编辑器介绍
每一个系统管理员都有一个偏爱的文本编辑器。有的管理员偏爱gedit,有的偏爱nano,甚至有的偏爱emacs。即使已经有偏爱的编辑器,了解vim还是有必要的。因为vim可以安装在任何系统。
vim版本,Linux 系统中可以安装vim三个不同版本:
- vim-minimal:只提供vi和相关命令。
- vim-enhanced:提供vim命令,提供语法高亮,拼写检查等特性。
- vim-X11:提供gvim,图形界面下的vim。gvim包涵菜单栏。当用户不知道命令的时候,可以通过菜单操作。
# 安装 vim 工具
[root@centos7 ~]# yum install vim
vim 模式
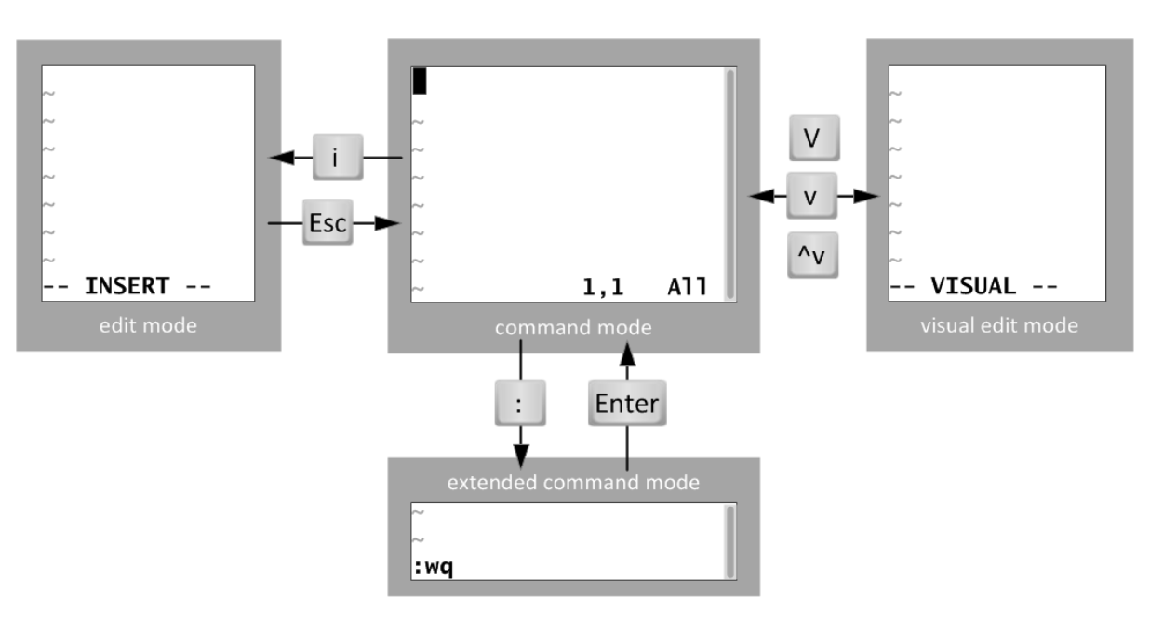
- command 模式(命令模式):该模式下键盘中的字母有特殊含义。例如G,跳转到最后一行;gg,跳转到第一行。
- edit 模式(编辑模式):在
command模式下按i,进入该模式。在该模式可以输入内容。在该模式下按Esc返回command模式。 - extended command 模式(扩展命令模式):在
command模式下按:,进入该模式。在该模式下,可以保存文件(:w),退出编辑(:q),强制退出编辑(:q!),报错并退出(:wq)。 - visual edit 模式(可视模式):在
command模式下按 v(单个字符选中)、V(整行选中)或者ctrl+v(按矩形选中),进入该模式。在该模式下,用于选中文件,随后可以复制或删除选中的内容。
[pengyuyan@centos7 ~]$ cp /etc/profile ./profile.sh
[pengyuyan@centos7 ~]$ vim ./profile.sh
命令行模式快捷键
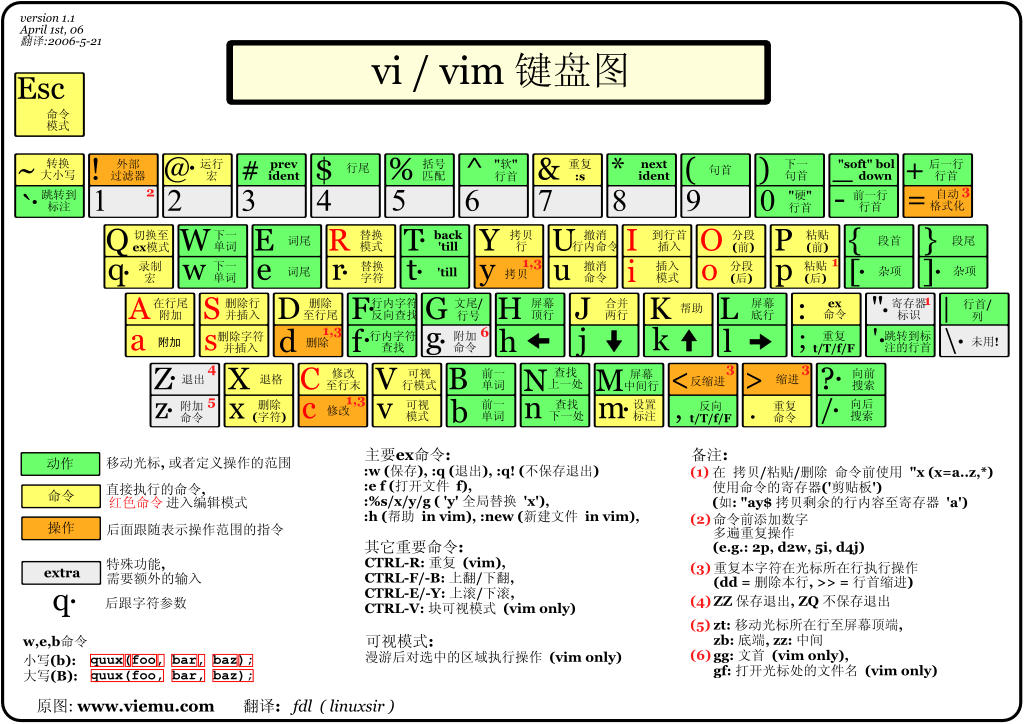
定位文件内容:
w,向后1个word(光标在单词开头);e,向后1个word(光标在单词末尾)b,向前1个word^或0,行首$,行尾(,上一个句子头部;),下一个句子尾部。{,上一个自然段;},下一个自然段。gg,第一行;G,最后一行。
less 使用
g,第一行;G,最后一行。
进入插入模式:
- i ,当前位置插入。(insert)
- I,行首插入。
- a,当前位置追加。(append)
- A,行末追加。
- o,向下新开一个空白行。
- O,向上新开一个空白行。
复制:yy,复制1行,相当于y1y。
以此类推 y2y 复制两行
y2w 复制两个单词
y2b 向前复制两个单词
粘贴:p 当前位置后粘贴,P 当前位置前粘贴
删除:
- x,删除当前单个字符。5x,删除当前字符和后续4个字符。
- X,删除前一单个字符。
- dw,删除1个word,以此类推 d5w d3b d2d d$。
- D,从当前删除到最后,相当于d$。
回退:
- u,撤销上一个操作。
- U,撤销整行修改。
- Ctrl+r,反向撤销,与u相反。
修改,相当于删除后插入:
- s,删除当前字符,并进入编辑模式。
- S,删除当前行,并进入编辑模式。
- c,代表替换动作,例如cw,删除1个word,并进入编辑模式。以此类推 c5w。
- C,从当前删除到最后,并进入编辑模式。
替换:
- r,替换单个字符后回退到命令行模式。
- R,替换模式,一直替换直到按
Ese返回命令行模式。
vim 配置
两个位置:
- 全局:
/etc/vimrc,给所有用户设置一些默认值。 - 用户:
~/.vimrc,特定用户的个性化设置。
常见的设置命令:
[pengyuyan@centos7 ~]$ vim ~/.vimrc
set number
set showcmd
set ai ts=2
set cursorcolumn
set cursorline

# 参数说明:
# 显示行号 set number
# 显示操作命令 set showcmd
# ai,自动缩进;ts,tabspace使用2个空格代替 set ai ts=2
# 列高亮对齐显示 set cursorcolumn
# 行高亮对齐显示 set cursorline
Linux 输入输出重定向
Linux 输入输出重定向介绍
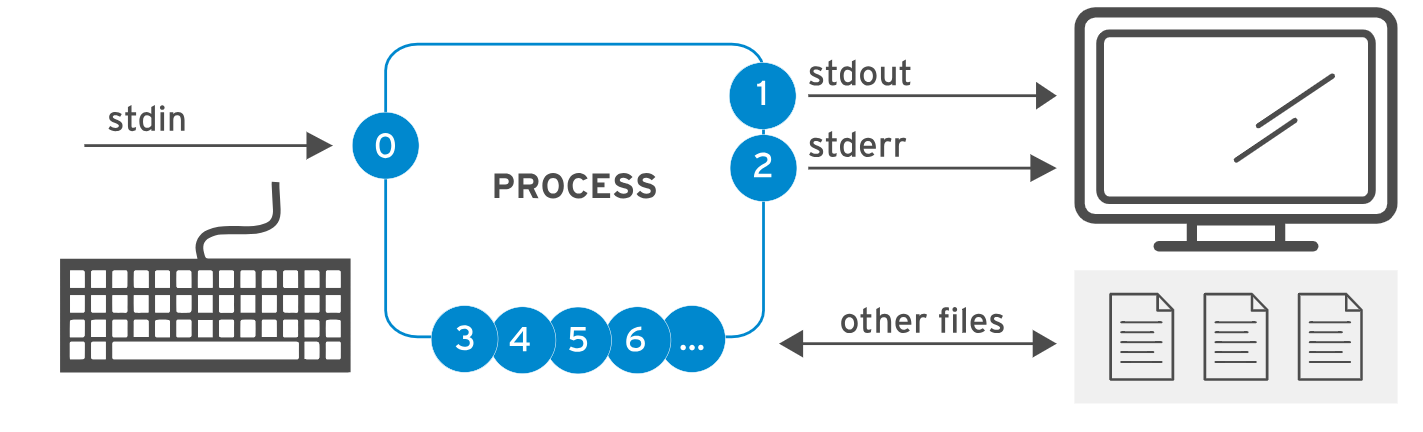
上图显示了 Unix/Linux 系统中进程(PROCESS)的输入输出流(I/O Streams)模型,核心是 “标准流(Standard Streams)” 的概念,用于描述进程如何与外部(如键盘、屏幕、文件)进行数据交互。
标准流的核心组成
- stdin(标准输入,编号 0):
- 是进程接收输入数据的通道,默认连接到键盘,程序通过它读取用户输入(如
scanf、read等操作会从stdin获取数据)。 - 用法为仅读取(只能从该通道输入数据到进程)。
- 是进程接收输入数据的通道,默认连接到键盘,程序通过它读取用户输入(如
- stdout(标准输出,编号 1):
- 是进程输出正常结果的通道,默认连接到终端屏幕,程序的普通打印(如
printf、echo等)会输出到stdout。 - 用法为仅写入(进程只能向该通道输出数据)。
- 是进程输出正常结果的通道,默认连接到终端屏幕,程序的普通打印(如
- stderr(标准错误,编号 2):
- 是进程输出错误信息的通道,默认也连接到终端屏幕,用于区分正常输出和错误提示(如程序崩溃、逻辑错误的提示信息)。
- 用法为仅写入(专门用于输出错误内容)。
- 3+ 号通道(其他文件,filename):
- 代表进程与自定义文件的交互通道(非标准流),没有默认连接,需要手动指定文件。
- 用法为读取和 / 或写入(可根据需求对文件进行读、写操作)。
流程逻辑
- 输入:用户通过键盘向
stdin输入数据,进程从stdin读取这些输入。 - 输出:进程将正常结果写入
stdout,错误信息写入stderr,两者默认都显示在终端;同时,进程也可通过 3+ 号通道与其他文件进行数据的读写交互。
这种模型是 Unix/Linux 系统中 “一切皆文件” 思想的体现,让进程能以统一的方式处理不同来源 / 目标的数据,也为 重定向(Redirect) 等操作(如把 stdout 输出到文件、把文件内容作为 stdin 输入)提供了基础。
标准输出重定向到文件
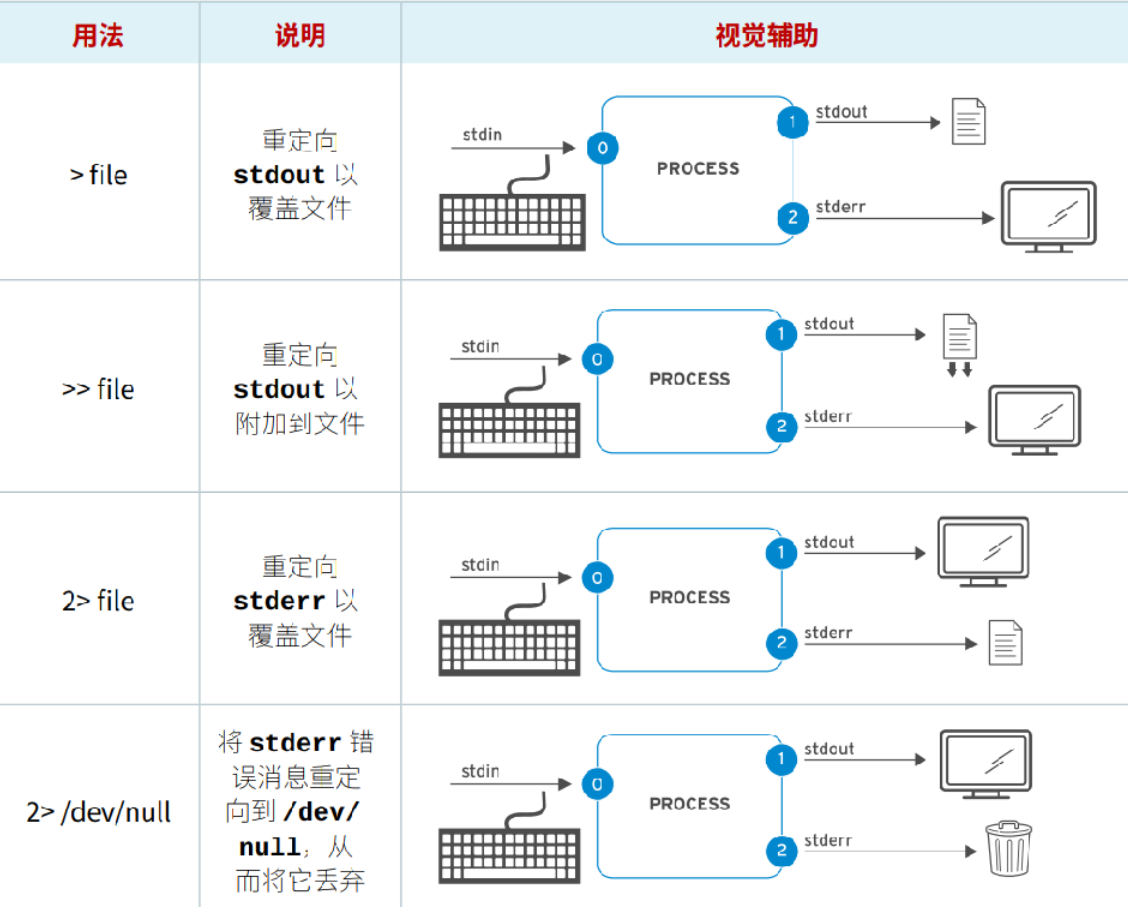
补充:
find命令
作用:根据各种条件在指定目录下查找文件和目录
语法:find [搜索路径] [匹配条件] [处理动作]
常见匹配条件:
-name 按文件名查找(区分大小写)
-iname 按文件名查找(忽略大小写)
-type 按文件类型查找
-size [±]大小 按文件大小查找
-mtime [±]天数 按修改时间(天)查找
-user 用户名 按所有者查找
-perm 权限 按权限查找
常用处理动作:
-print 打印文件名(默认)
-ls 以ls -l格式显示详细信息
-delete 删除找到的文件(危险)
-exec 命令 {} \ 对每个找到的文件执行指定命令
-ok 命令 {} \ 类似-exec,但执行前会询问确认
例:find . -name “*.conf” -exec cp {} ./backup/ \
查找所有“.conf”文件并复制到备份目录
# 查找 /etc 目录下 文件名是passwd的所有文件
[pengyuyan@centos7 ~]$ find /etc -name 'passwd'
find: ‘/etc/pki/CA/private’: 权限不够
find: ‘/etc/pki/rsyslog’: 权限不够
find: ‘/etc/grub.d’: 权限不够
/etc/pam.d/passwd
/etc/passwd
find: ‘/etc/dhcp’: 权限不够
find: ‘/etc/lvm/archive’: 权限不够
find: ‘/etc/lvm/backup’: 权限不够
.......

# 将找到的文件名清单覆盖写入到passwd.list文件中
[pengyuyan@centos7 ~]$ find /etc -name 'passwd' 1>passwd.list
find: ‘/etc/pki/CA/private’: 权限不够
find: ‘/etc/pki/rsyslog’: 权限不够
find: ‘/etc/grub.d’: 权限不够
......
[pengyuyan@centos7 ~]$ cat passwd.list
/etc/pam.d/passwd
/etc/passwd

# 补充说明
# 1>passwd.list可简写为>passwd.list
# 1和>之间不能有空格

# 将多个文件内容合并为1个
[pengyuyan@centos7 ~]$ cat /etc/fstab /etc/hosts > allinone

# 将找到的文件名清单追加写入到passwd.list文件中
[pengyuyan@centos7 ~]$ find /etc -name 'passwd' 1>>passwd.list
find: ‘/etc/pki/CA/private’: 权限不够
find: ‘/etc/pki/rsyslog’: 权限不够
find: ‘/etc/grub.d’: 权限不够
......
[pengyuyan@centos7 ~]$ cat passwd.list
/etc/pam.d/passwd
/etc/passwd
/etc/pam.d/passwd
/etc/passwd

# 将错误信息覆盖写入到passwd.err文件中
[pengyuyan@centos7 ~]$ find /etc -name 'passwd' 2>passwd.err
/etc/pam.d/passwd
/etc/passwd
[pengyuyan@centos7 ~]$ cat passwd.err
find: ‘/etc/pki/CA/private’: 权限不够
find: ‘/etc/pki/rsyslog’: 权限不够
find: ‘/etc/grub.d’: 权限不够
......

# 将错误信息扔掉
[pengyuyan@centos7 ~]$ find /etc -name 'passwd' 2>/dev/null
/etc/pam.d/passwd
/etc/passwd

# 将错误信息追加写入到passwd.err文件中
[pengyuyan@centos7 ~]$ find /etc -name 'passwd' 2>>passwd.err
/etc/pam.d/passwd
/etc/passwd
[pengyuyan@centos7 ~]$ cat passwd.err
find: ‘/etc/pki/CA/private’: 权限不够
find: ‘/etc/pki/rsyslog’: 权限不够
find: ‘/etc/grub.d’: 权限不够
......

# 将错误信息、正确信息 覆盖 写入到不同文件
[pengyuyan@centos7 ~]$ find /etc -name 'passwd' >passwd.list 2>passwd.err
# 将错误信息、正确信息 追加 写入到不同文件
[pengyuyan@centos7 ~]$ find /etc -name 'passwd' >>passwd.list 2>>passwd.err

# 用于清空文件内容,也可用于创建一个空文件testfile
[pengyuyan@centos7 ~]$ > testfile

# 如果不存在,则创建一个文件;如果文件存在,则啥也不干。
[pengyuyan@centos7 ~]$ >> testfile
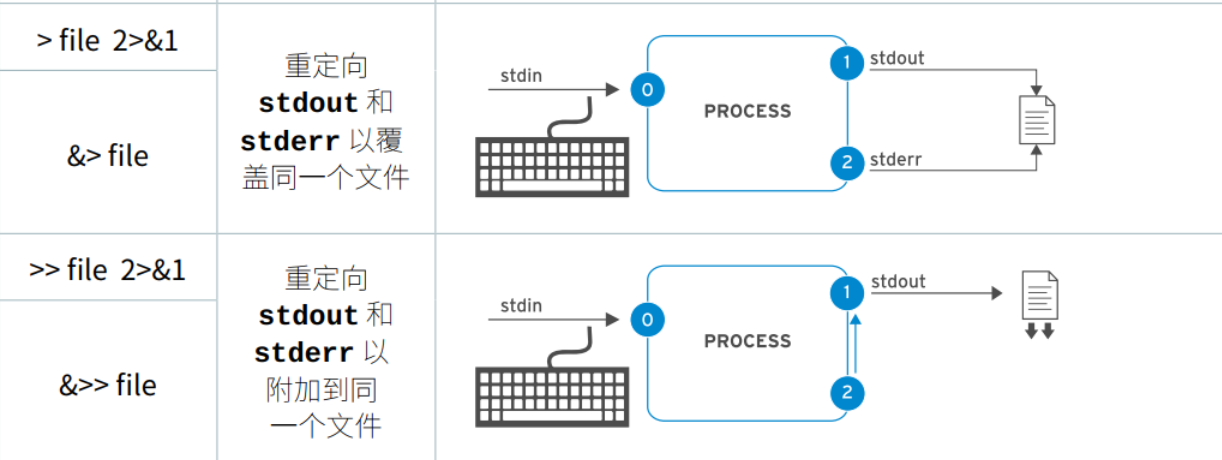
# 同时将错误信息、正确信息 覆盖 写入到相同文件
[pengyuyan@centos7 ~]$ find /etc -name 'passwd' &> passwd.all

# 同时将错误信息、正确信息 追加 写入到相同文件
[pengyuyan@centos7 ~]$ find /etc -name 'passwd' &>> passwd.all
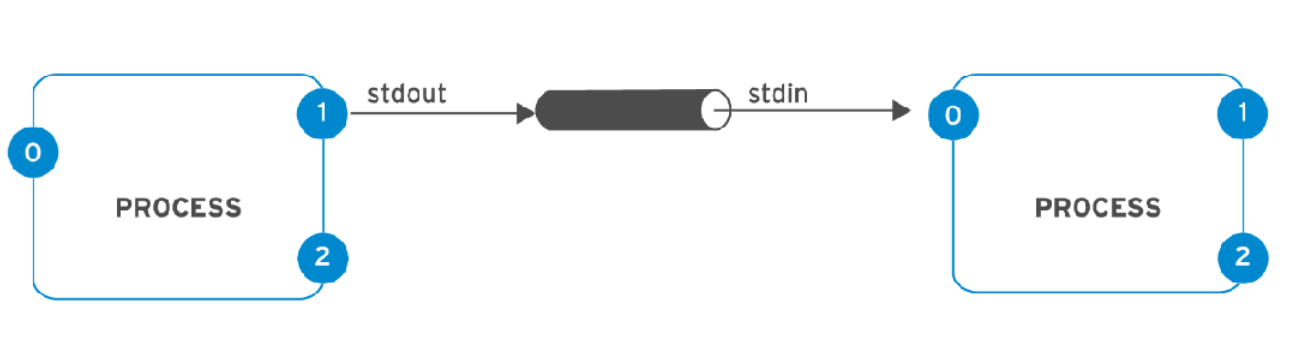
标准输出重定向到程序
管道符(|)实现:将上一个命令的输出作为标准输入传递给下一个命令。
补充:
grep 命令
作用:查找内容(与find不同,find是按文件名查找文件,grep是按照内容找到匹配的行)
语法:grep [选项] “搜索内容” [文件/路径]
常见选项:
-i 搜索时忽略大小写
-v 反向匹配
-r或-R 递归搜索子目录
-n 显示匹配行的行号
-l 只显示文件名
-L 显示不包含匹配模式的文件名
-c 只输出匹配的行数
-w 匹配整个单词
-AN 同时显示匹配行后面N行
-BN 同时显示匹配行前面N行
-CN 同时显示匹配行前后各N行
cut 命令
作用:按行处理文本,从每一行中“切”出你想要的部分
语法:cut [选项] [文件名]
三种切割模式:
按字段(列)切 -d±f 指定分隔符,然后取第几个字段(列)
按字符切 -c 直接按字符位置取
按字节切 -b 按字节位置去
例:cut -d / -f1
切去"/"后的第一个字段
awk 命令
作用:按行读取文件,将每一行按分隔符切成字段,然后对字段进行筛选、计算和格式化输出
语法:awk [选项] ‘条件{动作}’ [文件名]
- 条件:哪些行需要处理(可省略表示所有行)
- 动作:对符合条件的行执行什么操作
- 文件名:要处理的文件(如果不指定,则从标准输入读取,即来自管道)
核心概念:
$0 当前行的全部内容
$1 当前行的第一个字段
$2 当前行的第二个字段
$NF 当前行的最后一个字段
常见选项:
-F 指定字段分隔符
-v 定义变量
-f 从文件读取awk脚本
# 示例1 查看哪个man page 可以resize ext4文件系统大小

# 搜索所有ext4相关手册,并保存到ext4.man文件中
[pengyuyan@centos7 ~]$ man -k ext4 > ext4.man

# 过滤ext4.man文件中含有resize的行
[pengyuyan@centos7 ~]$ grep resizer ext4.man

# 以上两个命令和合并为一行
[pengyuyan@centos7 ~]$ man -k ext4 | grep resizer
resize2fs (8)        - ext2/ext3/ext4 file system resizer

# 示例2 获取ens33网卡ip地址
[pengyuyan@centos7 ~]$ ip addr | grep 'ens33$' | awk '{print $2}' | cut -d/ -f1
10.1.8.88
**注意:**管道符号后的命令必须能够接收标准输入,例如 ls ==不==接收管道传递过来的标准输入。
[pengyuyan@centos7 ~]$ echo /etc/passwd | ls -l
总用量 2
-rw-rw-r--. 1 laoma laoma  0 12月 15 15:08 file
-rw-rw-r--. 1 laoma laoma  0 12月 15 15:08 file-a
补充:|& 标准错误和标准输出同时传递给下一个命令,作为下一个命令的标准输入。
[student@servera ~]$ ls -l file-{01..06}
ls: cannot access 'file-04': No such file or directory
ls: cannot access 'file-05': No such file or directory
ls: cannot access 'file-06': No such file or directory
-rw-rw-r--. 1 student student 0 Dec 24 14:53 file-01
-rw-rw-r--. 1 student student 0 Dec 24 14:53 file-02
-rw-rw-r--. 1 student student 0 Dec 24 14:53 file-03

[student@servera ~]$ ls -l file-{01..06} |grep file-06
ls: cannot access 'file-04': No such file or directory
ls: cannot access 'file-05': No such file or directory
ls: cannot access 'file-06': No such file or directory

[student@servera ~]$ ls -l file-{01..06} |grep file-03
ls: cannot access 'file-04': No such file or directory
ls: cannot access 'file-05': No such file or directory
ls: cannot access 'file-06': No such file or directory
-rw-rw-r--. 1 student student 0 Dec 24 14:53 file-03

# |&
[student@servera ~]$ ls -l file-{01..06} |& grep file-06
ls: cannot access 'file-06': No such file or directory
tee 命令
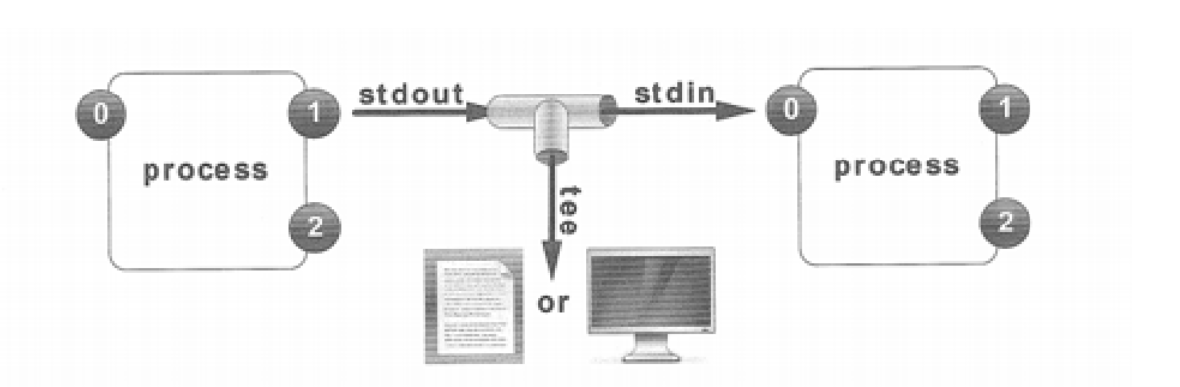
作用:把数据同时发给两个地方——一个是屏幕(标准输出),一个是文件
语法:| tee [选项] 文件名
常见选项:
-a 追加到文件末尾,而不是覆盖
-i 忽略中断信号,让tee不受干扰的写完
[pengyuyan@centos7 ~]$ > passwd.list
[pengyuyan@centos7 ~]$ cat passwd.list
# tee命令覆盖保存到文件
[pengyuyan@centos7 ~]$ find /etc -name 'passwd' 2>/dev/null | tee passwd.list
/etc/pam.d/passwd
/etc/passwd
[pengyuyan@centos7 ~]$ cat passwd.list
/etc/pam.d/passwd
/etc/passwd

# tee命令追加保存到文件
[pengyuyan@centos7 ~]$ find /etc -name 'passwd' 2>/dev/null |tee -a passwd.list
/etc/pam.d/passwd
/etc/passwd
[pengyuyan@centos7 ~]$ cat passwd.list
/etc/pam.d/passwd
/etc/passwd
/etc/pam.d/passwd
/etc/passwd

# tee的标准输出继续通过管道传递下去
[pengyuyan@centos7 ~]$ man -k passwd | tee passwd.man | grep passwd
标准输入重定向给程序
分为两种重定向方式:<和<<
# 常规查看文件
[pengyuyan@centos7 ~]$ cat /etc/hosts
127.0.0.1   localhost localhost.localdomain localhost4 localhost4.localdomain4
::1         localhost localhost.localdomain localhost6 localhost6.localdomain6

# cat 命令标准输入数据
[pengyuyan@centos7 ~]$ cat < /etc/hosts
127.0.0.1   localhost localhost.localdomain localhost4 localhost4.localdomain4
::1         localhost localhost.localdomain localhost6 localhost6.localdomain

[pengyuyan@centos7 ~]$ cat
hello  # 键盘输入hello后回车
hello  # 屏幕上显示hello
ctrl+d # 输入完成,退出

# shell读取到EOF时候,代表标准输入完成
[student@servera ~]$ cat << EOF
> hello
> world
> EOF
hello
world

[pengyuyan@centos7 ~]$ cat <<< 'hello world'
hello world
判定一个命令是否接收标准输入:最简单的方式就是将文件内容作为标准输入重定向给程序。
**思考:**如何一次性将多行内容写入到文件中?
# 方法1:使用引号
[pengyuyan@centos7 ~]$ echo 'hello world
> hello python
> hello linux' > multi_lines.txt

[pengyuyan@centos7 ~]$ cat multi_lines.txt
hello world
hello python
hello linux

# 方法2:使用cat重定向
[pengyuyan@centos7 ~]$ cat > multi_lines.txt << EOF
> hello world
> hello python
> hello linux
> EOF
[pengyuyan@centos7 ~]$ cat multi_lines.txt
hello world
hello python
hello linux
Shell 基础
变量定义和查看
变量用于保存字符串值,便于后续引用,变量值存储在当前会话内存中。
变量名只能包含:
- 字母
- 数字
- 下划线
注意: 变量名不能以数字开头。
shell中变量的类型,一般不需要明确指明。
补充:
declare 命令
作用:是bash shell中用于声明变量并设置其属性的内置命令,它不仅可以定义变量,还能限制变量类型
语法:daclare [选项] 变量名=值
常见选项:
-i 声明变量为整数(用于算数运算)
-r 声明变量为只读(不可修改)
-x 声明变量为环境变量(导出到子进程)
-a 声明索引数组(普通数组)
-A 声明关联数组(类似字典)
-l 变量值转为小写
-u 变量值转为大写
-n 创建引用变量(指向另一个变量)
-p 显示变量的属性和值
取消定义变量
unset [变量名]
# 变量定义
[pengyuyan@centos7 ~]$ var1=key1

# 标准格式如下
[pengyuyan@centos7 ~]$ declare var1=key1

# 使用$引用变量值
[pengyuyan@centos7 ~]$ echo $var1
key1

# 示例2
[pengyuyan@centos7 ~]$ first_name=facai
[pengyuyan@centos7 ~]$ last_name=zhang
[pengyuyan@centos7 ~]$ echo $last_name $first_name
zhang facai

# 使用多个空格,效果一样
[pengyuyan@centos7 ~]$ echo $last_name   $first_name
zhang facai
# 使用引号保留多个空格
[pengyuyan@centos7 ~]$ echo "$first_name   $last_name"
zhang   facai

[pengyuyan@centos7 ~]$ echo $last_name-$first_name
zhang-facai
[pengyuyan@centos7 ~]$ echo $last_name_$first_name
facai

# 使用{}限定变量范围(重要)
[pengyuyan@centos7 ~]$ echo ${last_name}_$first_name
zhang_facai

# 当前shell中所有变量
[pengyuyan@centos7 ~]$ set

# set命令还会显示函数
[pengyuyan@centos7 ~]$ set | grep first_name
first_name=facai

# 取消变量定义
[pengyuyan@centos7 ~]$ unset first_name
[pengyuyan@centos7 ~]$ echo $first_name

# 定义变量时候,转换变量大小写
[pengyuyan@centos7 ~]$ declare -l name=James
[pengyuyan@centos7 ~]$ echo $name
james
[pengyuyan@centos7 ~]$ declare -u name=James
[pengyuyan@centos7 ~]$ echo $name
JAMES
变量范围(后续介绍)
- 局部变量,只在当前shell中生效。
- 全局变量,在当前shell以及shell子程序都生效。
[pengyuyan@centos7 ~]$ username=tom
[pengyuyan@centos7 ~]$ echo $username
tom
[pengyuyan@centos7 ~]$ bash
[pengyuyan@centos7 ~]$ echo $username

[pengyuyan@centos7 ~]$ export username=tom
# 或者
[pengyuyan@centos7 ~]$ username=tom;export username
[pengyuyan@centos7 ~]$ echo $username
[pengyuyan@centos7 ~]$ bash
[pengyuyan@centos7 ~]$ echo $username
tom
环境变量
根据变量是否是用户定义:
- shell 环境内置变量:设置shell的运行环境。
- 用户自定义变量:字面意思,用户自己定义的变量,也就是普通变量。
部分shell环境变量如下:
| 环境变量名 | 作用 |
|---|---|
| EDITOR | 默认编辑器 |
| HISTFILE | 历史文件位置 |
| HISTFILESIZE | 历史命令个数 |
| HISTTIMEFORMAT | 历史命令时间格式 |
| PS1 | 命令行提示符 |
| LANG | shell环境语言 |
| PATH | 命令搜素路径 |
| HOME | 当前用户家目录 |
| USER | 当前用户 |
| PWD | 当前shell路径 |
完整的shell 环境变量参考bash(1)。
EDITOR
[root@centos7 ~]# visudo
# 以上命令默认使用vi 编辑文件/etc/sudoers,不显示语法高亮

[root@centos7 ~]# export EDITOR=/bin/vim
[root@centos7 ~]# visudo
# 以上命令使用vim 编辑文件/etc/sudoers,显示语法高亮
LANG
[root@centos7 ~]# date
2022年 11月 07日 星期一 13:38:31 CST
[root@centos7 ~]# export LANG=en_US.utf8
[root@centos7 ~]# date
Mon Nov  7 13:38:55 CST 2022

[root@centos7 ~]# export LANG=zh_CN.utf8
[root@centos7 ~]# date
2022年 11月 07日 星期一 13:40:49 CST
常见 LANG代码:
- 英语:en_US.utf8
- 简体中文:zh_CN.utf8
- 繁体中文:zh_TW.utf8
PATH
[root@centos7 ~]# echo $PATH
/usr/local/sbin:/usr/local/bin:/usr/sbin:/usr/bin:/root/bin
[root@centos7 ~]# mv /usr/bin/ls .
[root@centos7 ~]# ls
bash: ls: command not found...
Similar command is: 'lz'
[root@centos7 ~]# which ls
alias ls='ls --color=auto'
Similar command is: 'lz'

# 设置为原来的值
[root@centos7 ~]# PATH=/usr/local/sbin:/usr/local/bin:/usr/sbin:/usr/bin:/root/bin
# 将/root目录追加到PATH中
[root@centos7 ~]# export PATH=$PATH:/root
[root@centos7 ~]# ls
anaconda-ks.cfg  initial-setup-ks.cfg  ls
[root@centos7 ~]# which ls
alias ls='ls --color=auto'
	/root/ls

# ls移动到原来为止
[root@centos7 ~]# mv ./ls /usr/bin
PS1
[pengyuyan@centos7 ~]$ echo $PS1
[\u@\h \W]\$

man bash 搜索PROMPTING
# 扩展说明:
  \h     主机名,第一个 `.' 之前的部分
  \H     主机名
  \n     新行符
  \t     当前时间,采用 24小时制的 HH:MM:SS 格式
  \T     当前时间,采用 12小时制的 HH:MM:SS 格式
  \@     当前时间,采用 12小时制上午/下午 (am/pm) 格式
  \A     当前时间,采用 24小时制上午/下午格式
  \u     当前用户的用户名 the username of the current user
  \w     当前工作目录
  \W     当前工作目录的基本部分
  \$     如果有效 UID 是 0,就是 #, 其他情况下是 $

# 提示符变为了'HELLO '
[pengyuyan@centos7 ~]$ PS1='HELLO '
HELLO echo hello world
hello world

# 提示符带时间
[pengyuyan@centos7 ~]$ PS1='[\u@\h \W \t]\$ '
[pengyuyan@centos7 ~ 13:52:08]$

# 显示完整工作目录
[pengyuyan@centos7 ~ 13:52:08]$ PS1='[\u@\h \w \t]\$ '
[pengyuyan@centos7 ~ 13:52:56]$ cd /usr/share/doc
[pengyuyan@centos7 /usr/share/doc 13:53:04]$
彩色提示符
# 代码:
# \[\e[0;30m\]:黑色
# \[\e[0;31m\]:红色
# \[\e[0;32m\]:绿色
# \[\e[0;33m\]:黄色
# \[\e[0;34m\]:蓝色
# \[\e[0;35m\]:紫色
# \[\e[0;36m\]:青色
# \[\e[0;37m\]:白色
# \[\e[0m\]:恢复默认颜色
示例:
# vim /etc/bashrc 文件末尾添加一行
PS1='[\[\e[91m\]\u\[\e[0m\]\[\e[93m\]@\[\e[0m\]\[\e[92;1m\]\h\[\e[0m\]\[\e[94m\] \W\[\e[0m\] \[\e[35m\]\t\[\e[0m\]]\[\e[93m\]\$\[\e[0m\] '

# 或者 echo 追加
echo "PS1='[\[\e[91m\]\u\[\e[0m\]\[\e[93m\]@\[\e[0m\]\[\e[92;1m\]\h\[\e[0m\]\[\e[94m\] \W\[\e[0m\] \[\e[35m\]\t\[\e[0m\]]\[\e[93m\]\\\$\[\e[0m\] '" >> /etc/bashrc

# 注意 echo追加的PS1与直接vim的是不一致的,体现在\\\$。

HISTTIMEFORMAT
控制历史命令时间格式。通过设置该变量,可以在执行 history 命令时显示每条历史命令的执行时间。
常用配置示例
-
显示年月日时分秒(如
2024-10-24 15:30:45):export HISTTIMEFORMAT="%F %T "效果:
history输出会类似1000 2024-10-24 15:30:45 ls -l -
显示更简洁的时间格式(如
10-24 15:30):export HISTTIMEFORMAT="%m-%d %H:%M "
HISTTIMEFORMAT 支持的常见时间格式符:
%F:完整日期(年 - 月 - 日,如2024-10-24)%T:完整时间(时:分: 秒,如15:30:45)%Y:四位年份(如2024)%m:两位月份(01-12)%d:两位日期(01-31)%H:24 小时制小时(00-23)%M:分钟(00-59)%S:秒(00-59)
变量持久化保存
- login shell 启动的时候,会按顺序加载以下配置文件中配置:
- /etc/profie,限定所有用户,设置操作系统级别。
- ~/.bash_profile,只限定特定用户
- ~/.bashrc,只限定特定用户
- /etc/bashrc,限定所有用户
- nologin shell启动的时候,会按顺序加载以下配置文件中配置:
- ~/.bashrc,只限定特定用户,例如限定laoma用户 /home/laoma/.bashrc。
- /etc/bashrc,限定所有用户
# login shell 示例
[root@centos7 ~]# echo 'export LANG=en_US.utf8' >> /etc/profile

# 验证
[c:\~]$ ssh laoma@10.1.8.88
Connecting to 10.1.8.88:22...
Connection established.
To escape to local shell, press 'Ctrl+Alt+]'.

Last login: Mon Nov  7 14:19:57 2022 from 10.1.8.1
[pengyuyan@centos7 ~]$ date
Mon Nov  7 14:20:42 CST 2022

# nologin shell 示例
[root@centos7 ~]# echo 'export EDITOR=vim' >> /etc/bashrc

# 验证
[pengyuyan@centos7 ~]$ bash
[pengyuyan@centos7 ~]$ echo $EDITOR
vim
命令替换
格式如下:
- $(COMMAND)
- `COMMAND`
效果如下:
[pengyuyan@centos7 ~]$ echo Today is `date +%A`
[pengyuyan@centos7 ~]$ echo The time is $(date +%M) minutes past $(date +%l%p).

[pengyuyan@centos7 ~]$ touch file-$(date +%Y%m%d)
# 或者
[pengyuyan@centos7 ~]$ touch file-`date +%Y%m%d`
[pengyuyan@centos7 ~]$ ls
file-20221107
如何计算 1+2+…+99+100的值?
# 计算数值
[pengyuyan@centos7 ~]$ echo $[ 1+2+3 ]
6

# 获取序列
[pengyuyan@centos7 ~]$ echo {1..3}
1 2 3
# 替换空格为+号
[pengyuyan@centos7 ~]$ echo {1..3} | tr ' ' '+'
1+2+3

# 计算结果
[pengyuyan@centos7 ~]$ echo $[ $(echo {1..100} | tr ' ' '+') ]
5050
保留字符字面含义
许多字符在bash中有特殊的意义,忽略这些含义,使用引号和转义字符。
- \,取消后面单个字符的特殊含义。
- 双引号(“”),压缩shell扩展含义,不压缩命令替换、变量替换和转义字符(\)。
- 单引号(‘’),可以压缩单引号内部的所有字符含义。
# \ 示例
[pengyuyan@centos7 ~]$ echo $PATH
/usr/local/bin:/usr/bin:/usr/local/sbin:/usr/sbin:/home/laoma/.local/bin:/home/laoma/bin
[pengyuyan@centos7 ~]$ echo \$PATH
$PATH

# "" 示例
[pengyuyan@centos7 ~]$ username=XieBaiQi
[pengyuyan@centos7 ~]$ echo ******* Welcome $username to Linux Classroom On $(date +%F) *******
公共 模板 视频 图片 文档 下载 音乐 桌面 Welcome XieBaiQi to Linux Classroom On 2025-07-23 公共 模板 视频 图片 文档 下载 音乐 桌面

[pengyuyan@centos7 ~]$ echo "******* Welcome $username to Linux Classroom On $(date +%F) *******"
******* Welcome XieBaiQi to Linux Classroom On 2025-07-23 *******

# \和"" 示例
[pengyuyan@centos7 ~]$ echo "******* Welcome \$username to Linux Classroom On $(date +%F) *******"
******* Welcome $username to Linux Classroom On 2025-07-23 *******

# '' 示例
[pengyuyan@centos7 ~]$ echo '******* Welcome $username to Linux Classroom On $(date +%F) *******'
******* Welcome $username to Linux Classroom On $(date +%F) *******
思考:
# 下面命令的输出
[pengyuyan@centos7 ~]$ echo \\
# 最终输出一个 \ 符号

[pengyuyan@centos7 ~]$ echo \\\
# 最终输出一个 \ 符号

# 下面命令的输出
[pengyuyan@centos7 ~]$ echo 'Let\'s go'
> '
Let\s go

# 使用 echo 一次性在文件中输入多行字符串
[pengyuyan@centos7 ~]$ echo "hello 1
hello 2
hello 3"> hello.txt
[pengyuyan@centos7 ~]$ cat hello.txt
hello 1
hello 2
hello 3

openEuler 是由开放原子开源基金会孵化的全场景开源操作系统项目,面向数字基础设施四大核心场景(服务器、云计算、边缘计算、嵌入式),全面支持 ARM、x86、RISC-V、loongArch、PowerPC、SW-64 等多样性计算架构
更多推荐

 8
8 0
0- 0


 已为社区贡献7条内容

所有评论(0)