彭于晏一个月带你玩转Linux操作系统4
Linux 用户和组管理
用户和组介绍
用户介绍
用户帐户是系统安全的基础。 系统上的每个进程(运行程序)都以特定用户身份运行。 每个文件都有一个特定用户作为其所有者。 文件所有权有助于系统对文件用户实施访问控制。正在运行的进程关联的用户确定该进程可访问的文件和目录。用户使用username标识并使其更易于使用。在内部,系统通过分配给它们的唯一标识号,用户ID或UID来区分用户帐户。 如果用户使用用户帐户,则通常会为其分配一个密码,用户在登录时将使用该密码来证明他们是实际的授权用户。
用户帐户主要有三种类型:
- superuser:用于管理系统,用户名称为root,UID为0,对系统具有完全访问权限。
- system users:系统具有系统用户帐户,由提供支持服务的进程使用。 这些进程或守护进程通常不需要以超级用户身份运行。 它们是非特权帐户,用户保护自己文件和其他资源。系统用户帐户不用于交互方式登录系统。
- regular users:大多数用户拥有常规用户帐户,用于日常工作。
passwd 文件
/etc/passwd 文件保存操作系统登录用户信息。每行包含一个登录用户信息,以冒号分隔七个域。
格式:
name:password:UID:GID:GECOS:directory:shell
示例:
laoma:x:1000:1000:software admin:/home/laoma:/bin/bash
解释如下:
-
name:用户登录名
-
password:用户密码,以x表示
-
UID:用户ID
-
GID:用户主组ID
-
GECOS:用户描述信息,通常为用户的真实姓名
-
directory:用户主目录,启动shell时的工作目录,默认位于/home/username
-
shell:用户打开终端时运行的程序,默认是shell。
对于system user,它的shell是/sbin/nologin。
示例:
[pengyuyan@centos7 ~]$ grep postfix /etc/passwd
postfix:x:89:89::/var/spool/postfix:/sbin/nologin
group 文件
**组是用户的集合,组中用户继承组权限。**与用户一样,组具有组名称以使其更易于使用。系统通过分配给它们的唯一标识号,组ID或GID来区分组。
/etc/group 文件保存操作系统组信息。每行包含一个组信息,以冒号分隔4个域。格式:
group_name:password:GID:user_list
示例:
[pengyuyan@centos7 ~]$ grep wheel /etc/group
wheel:x:10:laoma
解释如下:
- group_name:组名称
- password:组密码,用x表示
- GID:组ID,唯一表示组
- user_list:作为补充的成员
组的类型
- 主要组:每个用户只有一个主要组,/etc/passwd 文件中的GID编号定义。 默认情况下,**用户创建的新文件组所有者为用户的主要组。**通常,在创建新的常规用户时,会创建一个与该用户同名的新组。该组用作新用户的主要组,该用户是此用户专用组的唯一成员,有助于简化文件权限管理。
- 补充组:用户还可以拥有补充组。 补充组的成员资格由/etc/group文件确定。 根据用户的任何组是否具有访问权限,授予用户访问权限的权限。例如,如果用户user01具有主要组user01和补充组wheel和webadmin,则该用户可以读取这三个组中任何一个组可读的文件。
# 查看用户信息
[pengyuyan@centos7 ~]$ id
uid=1000(laoma) gid=1000(laoma) groups=1000(laoma),10(wheel)

# 查看用户 uid
[pengyuyan@centos7 ~]$ id -u laoma
1000
本地用户管理
whoami 命令
查看当前终端中登录的用户。
[root@centos7 ~]# whoami
root
who 和 w 命令
查看当前系统中所有终端上登录的用户,以及用户登录的时间。
[pengyuyan@centos7 ~]$ who
root     pts/0        Dec 22 08:43 (10.1.8.1)
laoma    pts/1        Dec 22 09:23 (10.1.8.1)
laoma    pts/2        Dec 22 09:07 (10.1.8.1)

[pengyuyan@centos7 ~]$ w
 09:23:19 up  1:10,  3 users,  load average: 0.00, 0.01, 0.05
USER     TTY      FROM             LOGIN@   IDLE   JCPU   PCPU WHAT
root     pts/0    10.1.8.1         08:43   39:27   0.06s  0.06s -bash
laoma    pts/1    10.1.8.1         09:23    2.00s  0.05s  0.01s w
laoma    pts/2    10.1.8.1         09:07    7.00s  0.05s  0.05s -bash
users 命令
查看当前系统中所有终端上登录的用户名。
[root@centos7 ~]# users
pengyuyan pengyuyan root
useradd 命令
作用:创建用户
语法:useradd [选项] 用户名
常见选项:
-u 指定UID
-g 指定主组
-G 指定附加组
-d 指定家目录路径
-c 指定描述信息
-s 指定登录shell
# 用户1
[root@centos7 ~]# useradd user01
[root@centos7 ~]# grep user01 /etc/passwd
user01:x:1003:1003::/home/user01:/bin/bash

# 用户2
[root@centos7 ~]# useradd -u 8888 -d /opt/user02 -c "user for software manage" -g wheel -s /sbin/nologin user02
# -u uid
# -d 用户的家目录
# -c 描述信息
# -g 用户的主组
# -s 用户shell程序

[root@centos7 ~]# grep user02 /etc/passwd
user02:x:8888:10:user for software manager:/opt/user02:/sbin/nologin
[root@centos7 ~]# ls -d /opt/user02/
/opt/user02/

# 创建一个没有密码的账户,该用户在图形化界面中可以直接登录
[root@centos7 ~]# useradd -p '' tom
新用户家目录中的文件来源于 /etc/skel/ 目录。
[root@centos7 ~]# ls -a ~tom
.  ..  .bash_logout  .bash_profile  .bashrc  .mozilla
[root@centos7 ~]# ls -a /etc/skel/
.  ..  .bash_logout  .bash_profile  .bashrc  .mozilla
创建用户的时候,用户属性默认参数配置在 /etc/login.defs 文件。
[root@centos7 ~]# vim /etc/login.defs
MAIL_DIR        /var/spool/mail
UMASK           022
HOME_MODE       0700

PASS_MAX_DAYS   99999
PASS_MIN_DAYS   0
PASS_MIN_LEN    5
PASS_WARN_AGE   7

# Min/max values for automatic uid selection in useradd
UID_MIN                  1000
UID_MAX                 60000
# System accounts
SYS_UID_MIN               201
SYS_UID_MAX               999

# Min/max values for automatic gid selection in groupadd
GID_MIN                  1000
GID_MAX                 60000
# System accounts
SYS_GID_MIN               201
SYS_GID_MAX               999

CREATE_HOME     yes
USERGROUPS_ENAB yes
...
usermod 命令
作用:修改用户属性
语法:usermad [选项] 用户名
常见选项:
-u 修改用户的UID
-g 修改用户的主组
-G 修改用户的附加组列表
-a 追加附加组(必须和-G一起使用)
-d 修改用户的家目录路径
-m 和-d一起用,迁移旧家目录内容到新位置
-s 修改用户的登录shell
-c 修改用户的描述信息
-l 修改用户的登录名
-e 设置账户过期日期
-f 密码过期后多少天禁用账户
-L 锁定用户密码
-U 解锁用户密码
-R 在chroot环境中执行操作
[root@centos7 ~]# usermod user02 -u 1008 -md /home/user02 -s /bin/bash
# -m 移动家目录到新的位置

[root@centos7 ~]# grep user02 /etc/passwd
user02:x:1008:10:user for software manager:/home/user02:/bin/bash
[root@centos7 ~]# ls -d /home/user02/
/home/user02/

[root@centos7 ~]# su - user02
Last login: Mon Nov  7 17:08:58 CST 2022 on pts/2
[user02@centos7 ~]$

# 添加补充组,如果没有-a选项,则代表将补充组设置为user01,原先的补充组就被覆盖了。
[root@centos7 ~]# usermod -aG user01 user02
[root@centos7 ~]# id user02
uid=1008(user02) gid=10(wheel) groups=10(wheel),1003(user01)
userdel 命令
作用:用于删除用户账户的命令
语法:userdel [选项] 用户名
常见选项:
-r 同时删除用户的家目录和邮件池
-f 强制删除(及时用户正在登录)
进量不要强制删除,要找到无法删除的原因
# 正常删除
[root@centos7 ~]# useradd user03
[root@centos7 ~]# userdel user03

# 强制删除
[root@centos7 ~]# userdel user02
userdel: user user02 is currently used by process 9071
[root@centos7 ~]# id user02
uid=1008(user02) gid=10(wheel) groups=10(wheel),1003(user01)

# 尽量不要强制删除,要找到无法删除的原因
[root@centos7 ~]# userdel -f user02
userdel: user user02 is currently used by process 9071
[root@centos7 ~]# id user02
id: user02: no such user
综合案例
手动创建一个用户
# 1 添加账户
[root@centos7 ~]# vim /etc/passwd
# 最后一行添加如下内容,注意uid要在原有的基础上增加1
zhangsan:x:1002:1002::/home/zhangsan:/bin/bash


# 2 添加组
[root@centos7 ~]# vim /etc/group
# 最后一行添加如下内容
zhangsan:x:1002:

# 3 添加密码
[root@centos7 ~]# vim /etc/shadow
# 最后一行添加如下内容
zhangsan:$6$FgUNKn74yoEDbcXD$pxDk9AEhsxkJGYi76Rv91zLy5LRns8olgAyGuNssQYG07ypaidhuX0gHAU4hrNi9Zp9A7vtMEvbyzCQ0e/gbk1::0:99999:7:::

# 4 准备家目录
[root@centos7 ~]# cp -r /etc/skel/ /home/zhangsan
# 修改zhangsan家目录所属有zhangsan用户和组
[root@centos7 ~]# chown -R zhangsan:zhangsan /home/zhangsan
[root@centos7 ~]# ll -d /home/zhangsan
drwxr-xr-x. 16 zhangsan zhangsan 4096 7月  19 14:00 zhangsan

# 测试
[root@centos7 ~]# ssh zhangsan@localhost
bash 提示符变为初始字符
提示符如下: bash-4.2$
模拟:
[root@centos7 ~]# mv /etc/bashrc{,.ori}
[root@centos7 ~]# bash
bash-4.2#
原因:nologin shell打开的时候执行 /etc/bashrc 配置。
恢复:
bash-4.2# mv /etc/bashrc{.ori,}
bash-4.2# bash
[root@centos7 ~]#
误删用户家目录
故障:
[root@centos7 ~]# ssh zhangsan@localhost
zhangsan@localhost's password:
Activate the web console with: systemctl enable --now cockpit.socket

Last login: Fri Jul 19 14:13:47 2024 from ::1
Could not chdir to home directory /home/zhangsan: No such file or directory
-bash-4.2$
模拟:
[root@centos7 ~]# rm -fr /home/zhangsan
解决
[root@centos7 ~]# cp -r /etc/skel/ /home/zhangsan
[root@centos7 ~]# chown zhangsan:zhangsan /home/zhangsan
没有权限切换家目录
故障
Could not chdir to home directory /home/zhangsan: Permission denied
-bash: /home/zhangsan/.bash_profile: 权限不够
模拟
[root@centos7 ~]# chmod u=- /home/zhangsan
解决
[root@centos7 ~]# chown -R zhangsan:zhangsan /home/zhangsan
[root@centos7 ~]# chmod u=rwx /home/zhangsan
[root@centos7 ~]# ll -d /home/zhangsan
drwx------. 3 zhangsan zhangsan 78 7月  19 14:17 /home/zhangsan
本地组管理
groupadd 命令
作用:创建新用户组
语法:groupadd [选项] 组名
常见选项:
-g 指定GID
-r 创建系统组(GID通常<1000)
-f 组已存在时不报错,强制继续
-o 允许使用非唯一的GID(不推荐)
# 创建名称为 admin 的组
[root@centos7 ~]# groupadd admin

# 创建名称为sysadmin的组,组id为2000
[root@centos7 ~]# groupadd sysadmin -g 2000

# 验证
[root@centos7 ~]# grep admin /etc/group
printadmin:x:997:
admin:x:1002:
sysadmin:x:2000:
groupmod 命令
作用:修改已有用户组属性
语法:groupmod [选项] 组名
常见选项:
-n 修改组名
-g 修改GID
-o 允许使用非唯一的GID
# 修改组名称
[root@centos7 ~]# groupmod --new-name admins admin

# 修改组id
[root@centos7 ~]# groupmod -g 2002 admins

# 验证
[root@centos7 ~]# grep 'admins' /etc/group
admins:x:2002:
groupdel 命令
作用:用于删除用户组
语法:groupdel [选项] 组名
常见选项:
-f 强制删除(即使用户组是某些用户的主组)
-R 在chroot环境中执行操作
[root@centos7 ~]# groupdel sysadmin
[root@centos7 ~]# grep sysadmin /etc/group
groupmems 命令
作用:管理用户组成员关系,查看、添加、删除或清空一个组中的用户
语法:groupmems [选项] 组名
常见选项:
-g 指定要操作的组名 示例:groupmems -g developers -l
-l 列出该组的所有成员 示例:groupmems -g developers -l
-a 向组中添加用户 示例:groupmems -g developers -a Tony
-d 从组中删除用户 示例:groupmems -g developers -d Tony
-p 清空组内所有成员 示例:groupmems -g developers -p
[root@centos7 ~]# groupmems --help
用法:groupmems [选项] [动作]

选项:
  -g, --group groupname         更改组 groupname,而不是用户的组(只 root)
  -R, --root CHROOT_DIR         chroot 到的目录

动作:
  -a, --add username            将用户 username 添加到组成员中
  -d, --delete username         从组的成员中删除用户 username
  -h, --help                    显示此帮助信息并推出
  -p, --purge                   从组中移除所有成员
  -l, --list                    列出组中的所有成员

# 添加成员
[root@centos7 ~]# groupmems -g admins -a pengyuyan
[root@centos7 ~]# groupmems -g admins -l
pengyuyan
[root@centos7 ~]# id pengyuyan
uid=1000(pengyuyan) gid=1000(pengyuyan) 组=1000(pengyuyan),10(wheel),2002(admins)

# 删除成员
[root@centos7 ~]# groupmems -g admins -d pengyuyan
[root@centos7 ~]# groupmems -g admins -l

# 清空组中所有成员
[root@centos7 ~]# groupmems -g admins -a pengyuyan
[root@centos7 ~]# groupmems -g admins -p
管理用户密码
shadow 文件
/etc/shadow 文件保存操作系统登录用户密码信息。
每行包含一个登录用户信息,以冒号分隔九个域。
示例:
[root@centos7 ~]# grep pengyuyan /etc/shadow
pengyuyan:$6$m0OgWyIu$P2TF1pB8MO...J3LopEUdhmp/Ir/:19300:0:99999:7:::
解释如下:
- login name:用户登录名。
- encrypted password:加密的密码。
- date of last password change:上一次密码更改日期,以距离1970-1-1过去的天数表示。设置为0,强制用户下次登录时更改密码。
- minimum password age:最小密码生命周期。设置为0,密码可以随时更改。
- maximum password age:最大密码生命周期。
- password warning period:密码过期前,提前多少天告警。设置为0,不提示过期。
- password inactivity period:密码过期后,非活跃天数,在期间密码仍可以使用。
- account expiration date:账户过期时间,以距离1970-1-1过去的天数表示。
- reserved field:保留域。
chage 命令
作用:管理用户密码过期和老化策略
语法:chage [选项] 用户名
常见选项:
-l(小写L) 显示用户密码老化信息
-m 密码最小修改间隔(多少天内不能更改)
-M 密码最大有效期(多少天后必须更改)
-W 密码过期前的警告天数
-I(大写i) 密码过期多少天锁定账户
-E 设置密码过期日期
例:chage -M 100 pengyuyan #最长有效期100天
# 查看用户密码信息
[root@centos7 ~]# chage -l pengyuyan
最近一次密码修改时间					:11月 08, 2022
密码过期时间					:从不
密码失效时间					:从不
帐户过期时间						:从不
两次改变密码之间相距的最小天数		:0
两次改变密码之间相距的最大天数		:99999
在密码过期之前警告的天数	:7

# 修改用户密码要求
[root@centos7 ~]# chage -M 100 pengyuyan
[root@centos7 ~]# chage -l pengyuyan
最近一次密码修改时间					:11月 08, 2022
密码过期时间					:2月 16, 2023
密码失效时间					:从不
帐户过期时间						:从不
两次改变密码之间相距的最小天数		:0
两次改变密码之间相距的最大天数		:100

[root@centos7 ~]# chage -m 10 pengyuyan
[root@centos7 ~]# chage -l pengyuyan
最近一次密码修改时间					:11月 08, 2022
密码过期时间					:2月 16, 2023
密码失效时间					:从不
帐户过期时间						:从不
两次改变密码之间相距的最小天数		:10
两次改变密码之间相距的最大天数		:100
在密码过期之前警告的天数	:7

[root@centos7 ~]# chage -d 0 pengyuyan
# 验证
[root@centos7 ~]# ssh pengyuyan@localhost
laoma@localhost's password:
You are required to change your password immediately (root enforced)
Last login: Tue Nov  8 11:13:51 2022 from localhost
WARNING: Your password has expired.
You must change your password now and login again!
更改用户 pengyuyan 的密码 。
为 pengyuyan 更改 STRESS 密码。
(当前)UNIX 密码:

# 设置用户密码过期时间是过去的一个时间,以便确保用户密码过期,登录时强制用户更改密码
# 设置为1,确保密码很久未改动
[root@centos7 ~]# chage -d 1 pengyuyan

# 设置用户账户过期时间是过去的一个时间,以便锁定用户账户
[root@centos7 ~]# chage -E 1970-1-1 pengyuyan
usermod -p 更改用户密码
# 更改pengyuyan的密码与wuyanzu一致
[root@centos7 ~]# grep wuyanzu /etc/shadow
laowang:$6$dQcDSqtz$Nboi6QLMzscWSLvnnRO86gm3XI/qbgfnK5zVv2Ix13EktQ97vwNsqQlrfI2K/b1mVnHNgzmMNIb0P4HnTugog/:19304:0:99999:7:::
[root@centos7 ~]# usermod -p '$6$dQcDSqtz$Nboi6QLMzscWSLvnnRO86gm3XI/qbgfnK5zVv2Ix13EktQ97vwNsqQlrfI2K/b1mVnHNgzmMNIb0P4HnTugog/' pengyuyan

# 删除用户密码
[root@centos7 ~]# usermod -p '' pengyuyan
usermod -s 限定用户shell
# 默认情况下,root用户可以切换到任何用户而且不需要密码
[root@centos7 ~]# su - wuyanzu
上一次登录:二 11月  8 11:19:14 CST 2022tty1 上
[wuyanzu@centos7 ~]$ 登出

# 更改用户shell为 /sbin/nologin (账户本身存在,但封掉这个用户的登陆权限,禁止登录)
[root@centos7 ~]# usermod -s /sbin/nologin wuyanzu
[root@centos7 ~]# su - wuyanzu
上一次登录:二 11月  8 11:21:23 CST 2022pts/0 上
This account is currently not available.

# 将用户shell改为/bin/bash(用户正常登录)
[root@centos7 ~]# usermod -s /bin/bash wuyanzu
usermod -L 锁定用户密码
等效于 passwd -l
[root@centos7 ~]# usermod -L wuyanzu

# 输入正确的密码也无法登录
[pengyuyan@centos7 ~]$ su - wuyanzu
Password:
su: Authentication failure
[pengyuyan@centos7 ~]$
usermod -U 解锁用户密码
等效于 passwd -u
[root@centos7 ~]# usermod -U wuyanzu

# 输入正确的密码登录
[pengyuyan@centos7 ~]$ su - wuyanzu
Password:
[wuyanzu@centos7 ~]$
passwd -d 删除密码
# 删除用户密码即可
[root@centos7 ~]# passwd -d wuyanzu
清除用户的密码 wuyanzu。
passwd: 操作成功
用户登录的时候,输入用户名即可登录。
设置账户过期
等效于 passwd -e
# 设置账户过期时间为过去的某一个日期
[root@centos7 ~]# usermod -e 2024-7-18 wuyanzu

# 或者
[root@centos7 ~]# chage -E 2024-7-18 wuyanzu
增加一个 uid 为 0 的用户
方法一
[root@centos7 ~]# vim /etc/passwd
# 将自己的用户id该为0,此时pengyuyan用户可以行使root权限了
pengyuyan:x:0:1000:pengyuyan:/home/pengyuyan:/bin/bash
方法二
[root@centos7 ~]# useradd -o -u 0 pengyuyan
[root@centos7 ~]# id pengyuyan
uid=0(root) gid=0(root) 组=0(root)
pengyuyan 和 root 账户是两个不同的账户,但是pengyuyan用户获得了root账户权限。
其他 shell
# 查看系统中 shell 清单
[root@centos7 ~]# cat /etc/shells
/bin/sh
/bin/bash
/usr/bin/sh
/usr/bin/bash

[root@centos7 ~]# ll /bin/sh /usr/bin/sh
lrwxrwxrwx. 1 root root 4 2月  10 20:31 /bin/sh -> bash
lrwxrwxrwx. 1 root root 4 2月  10 20:31 /usr/bin/sh -> bash

# 新增 tmux shell
[root@centos7 ~]# yum install -y tmux

# 新增 c shell
[root@centos7 ~]# yum install -y tcsh
[root@centos7 ~]# ll /bin/csh /usr/bin/csh
lrwxrwxrwx. 1 root root 4 4月  23 2022 /bin/csh -> tcsh
lrwxrwxrwx. 1 root root 4 4月  23 2022 /usr/bin/csh -> tcsh
tmux 控制键 ctrl+b:
- c,新建一个会话
- N,切换到N号会话,例如数字1,切换到1号会话。
Linux 提权管理
大多数时候Linux系统管理员以非特权用户身份登录系统,并使用工具暂时获得特权用户root管理系统。
su 命令
- 示例1:
su username启动一个非登录shell,使用当前的环境设置(上一个用户) - 示例2:
su -l username启动一个登录shell,设置了shell环境
username 省略时,代表切换到root账户。
# 不加用户名的 nologin shell
[pengyuyan@centos7 ~]$ su
Password: `redhat`
# 很多环境变量仍保留为pengyuyan用户
[root@centos7 pengyuyan]# env | grep pengyuyan
LOGNAME=pengyuyan
MAIL=/var/spool/mail/pengyuyan
PATH=/usr/local/bin:/usr/bin:/usr/local/sbin:/usr/sbin:/home/pengyuyan/.local/bin:/homepengyuyan/bin
PWD=/home/pengyuyan
USER=pengyuyan
XDG_DATA_DIRS=/home/pengyuyan/.local/share/flatpak/exports/share:/var/lib/flatpak/exports/share:/usr/local/share:/usr/share

# 不加用户名的 login shell
[pengyuyan@centos7 ~]$ su -l
Password: `redhat`
Last login: Mon Nov  7 15:40:31 CST 2022 on pts/2
# 所有环境变量都更改为了root用户
[root@centos7 ~]# set | grep pengyuyan
[root@centos7 ~]#
提示: 尽可能使用 loging shell 登录。
准备一个用户
# 添加一个用户
[root@centos7 ~]# useradd wuyanzu
# 设置密码为redhat
[root@centos7 ~]# echo redhat | passwd --stdin wuyanzu
Changing password for user wuyanzu.
passwd: all authentication tokens updated successfully.
[pengyuyan@centos7 ~]$ grep wuyanzu /etc/passwd
wuyanzu:x:1001:1001::/home/wuyanzu:/bin/bash
补充:su -l 用户名 -c ‘命令’(单引号必不可少)
注释:su -l 切换用户
-c 的作用是切换后,只执行一条指令的命令,执行完立即退出
# 以特定用户身份执行特定命令
[pengyuyan@centos7 ~]$ su -l wuyanzu -c id
Password:
uid=1001(wuyanzu) gid=1001(wuyanzu) groups=1001(wuyanzu) context=unconfined_u:unconfined_r:unconfined_t:s0-s0:c0.c1023

# 加单引号
[pengyuyan@centos7 ~]$ su -l wuyanzu -c 'cat /etc/hosts'
Password:
127.0.0.1   localhost localhost.localdomain localhost4 localhost4.localdomain4
::1         localhost localhost.localdomain localhost6 localhost6.localdomain6

# 不加单引号
[pengyuyan@centos7 ~]$ su -l wuyanzu -c cat /etc/hosts
Password:
hello
hello
# 原因:没有把 "cat /etc/hosts" 当作整体
其他使用方法
# 创建的文件位置在 ~laoma/haha
[root@centos7 ~]# su -l -c 'touch haha' pengyuyan

# 无权创建
[root@centos7 ~]# su -c 'touch haha' pengyuyan
touch: 无法创建 'haha': 权限不够
# 原因:nologin shell 执行,当前位置不变,导致pengyuyan用户无法在/root下创建

# 切换 nologin shell 账户
[root@centos7 ~]# grep adm /etc/passwd
adm:x:3:4:adm:/var/adm:/sbin/nologin

[root@centos7 ~]# su -l adm -c id
This account is currently not available.

[root@centos7 ~]# su -l adm -s /bin/bash -c id
uid=3(adm) gid=4(adm) 组=4(adm)
# 只有 root 用户可以指定 shell

[root@centos7 ~]# su -l adm -s /bin/bash
-bash-4.2$
# 提示符不正常,原因是家目录中缺少bash相关配置文件
# 处理方法如下:
[root@centos7 ~ 16:18:06]# grep adm /etc/passwd
adm:x:3:4:adm:/var/adm:/sbin/nologin
[root@centos7 ~ 16:17:37]# cp /etc/skel/{.bash_profile,.bashrc} /var/adm
[root@centos7 ~ 16:17:52]# su adm -l -s /bin/bash
上一次登录:三 7月 23 16:16:32 CST 2025pts/0 上
[adm@centos7 ~ 16:17:55]$
sudo 命令
从根本上说,Linux实现了一个非常粗糙的获得权限模型:root 可以做任何事情,其他用户与系统相关什么也不能做。
- su 缺点:
- 用户必须知道 root 用户密码获取 root 用户所有权限。
- 未记录用户执行命令。
- 无法以
/sbin/nologin的用户身份运行命令。
- sudo 优点:
- sudo 允许用户以其他用户身份执行特定命令。
- sudo 需要用户输入用户自己的密码,而非他们想访问的用户密码。
- sudo 执行的命令会记录在
/var/log/secure文件中。
sudo 语法:sudo [-u username] command
使用sudo命令,需要用户在授权列表中
# 有sudo权限的用户,输入自己的密码,确认是否是本人在操作
[pengyuyan@centos7 ~]$ sudo id
[sudo] password for pengyuyan:
uid=0(root) gid=0(root) groups=0(root) context=unconfined_u:unconfined_r:unconfined_t:s0-s0:c0.c1023

# 没有sudo权限的用户
[wuyanzu@centos7 ~]$ sudo id

We trust you have received the usual lecture from the local System
Administrator. It usually boils down to these three things:

    #1) Respect the privacy of others.
    #2) Think before you type.
    #3) With great power comes great responsibility.

[sudo] password for wuyanzu:
wuyanzu is not in the sudoers file.  This incident will be reported.
sudo 配置
[root@centos7 ~]# export EDITOR=vim
[root@centos7 ~]# visudo
# 其中两条记录,wheel组中成员,可以以任何用户身份执行任何命令
root    ALL=(ALL)       ALL
# 组以%开头
%wheel  ALL=(ALL)       ALL
示例1:
# wuyanzu 记录如下
wuyanzu    ALL=(ALL)       ALL
验证:
[wuyanzu@centos7 ~]$ sudo id
[sudo] password for wuyanzu:
uid=0(root) gid=0(root) groups=0(root) context=unconfined_u:unconfined_r:unconfined_t:s0-s0:c0.c1023
**示例2:**不需要输入密码情况下,直接执行命令。
# wuyanzu 记录如下
wuyanzu    ALL=(ALL)       NOPASSWD:ALL
验证:
[wuyanzu@centos7 ~]$ sudo id
uid=0(root) gid=0(root) groups=0(root) context=unconfined_u:unconfined_r:unconfined_t:s0-s0:c0.c1023
**示例3:**只能够执行特定命令。
# wuyanzu 记录如下
wuyanzu    ALL=(ALL)       /sbin/useradd,/sbin/usermod,/sbin/userdel
验证:
[wuyanzu@centos7 ~]$ sudo id
[sudo] password for wuyanzu:
Sorry, user wuyanzu is not allowed to execute '/bin/id' as root on centos7.wanho.net.
[wuyanzu@centos7 ~]$ sudo useradd chenguanxi
[sudo] password for wuyanzu:
[wuyanzu@centos7 ~]$ id chenguanxi
uid=1002(chenguanxi) gid=1002(chenguanxi) groups=1002(chenguanxi)
**总结:**在分配命令的时候,切记只给用户特定功能的命令(例如用户管理相关命令),而不是通用功能的工具(例如 vim)。
配置文件路径:
- 主配置文件:
/etc/sudoers,正常情况不要修改。 - 从配置文件:
/etc/sudoer.d/*,如果想添加配置,在此处添加。
示例:
[root@centos7 ~]# echo 'wuyanzu    ALL=(ALL)       NOPASSWD:ALL' >> /etc/sudoers.d/wuyanzu
[root@centos7 ~]# cat /etc/sudoers.d/wuyanzu
wuyanzu    ALL=(ALL)       NOPASSWD:ALL
命令别名
Cmnd_Alias SOFTWARE = /bin/rpm, /usr/bin/up2date, /usr/bin/yum
# sys组中成员执行以下命令别名中的所有命令
%sys ALL = NETWORKING, SOFTWARE, SERVICES, STORAGE, DELEGATING, PROCESSES, LOCATE, DRIVERS
案例
- 配置用户 xiaoniuma 可以以root身份运行vim命令
- 用户 xiaoniuma 将自己提权为 root 用户
- 方法一:使用vim将/etc/passwd中用户的uid改为0
- 方法二:将sudo规则中vim程序改为bash或者ALL
操作过程:
# 创建用户
[root@centos7 ~]# useradd xiaoniuma
[root@centos7 ~]# echo 123 | passwd --stdin xiaoniuma

# 配置sudo
[root@centos7 ~]# echo 'xiaoniuma ALL=(ALL) /bin/vim' > /etc/sudoers.d/xiaoniuma

# 切换用户并修改用户id
[xiaoniuma@centos7 ~]$ sudo vim /etc/passwd
# 修改 xiaoniuma 的 UID 为0
xiaoniuma:x:0:1001::/home/xiaoniuma:/bin/bash

# 验证
[xiaoniuma@centos7 ~]$ su -l xiaoniuma
密码:
[root@centos7 ~]#
还原环境
# 修改用户id为原来的1001
[xiaoniuma@centos7 ~]$ sudo vim /etc/passwd
xiaoniuma:x:1001:1001::/home/xiaoniuma:/bin/bash

# 删除用户
[root@centos7 ~]# userdel -r xiaoniuma

# 删除sudo规则
[root@centos7 ~]# rm -f /etc/sudoers.d/xiaoniuma
提权总结
以下是关于 Linux 中 su 和 sudo 使用的几条建议:
- 优先使用
sudo而非susudo允许临时获取管理员权限,操作完成后自动退回普通用户状态,降低误操作风险;而su会直接切换到 root 身份,长期保持高权限状态存在安全隐患。 - 限制
su的使用范围
尽量仅在需要长时间执行多个管理员操作时使用su,且完成后立即通过exit退出 root 身份,避免在 root 权限下进行日常操作。 - 合理配置
sudoers文件
通过visudo命令配置sudoers,精确控制用户可执行的管理员命令(如user ALL=(ALL) /bin/apt),避免授予无限制的sudo权限。 - 注意命令的完整路径
使用sudo时,尽量指定命令的绝对路径(如sudo /usr/bin/apt update),防止因环境变量篡改导致的安全风险。 - 避免在脚本中硬编码
sudo密码
不要在脚本中直接写入sudo密码(如通过管道传递),可通过配置sudoers实现特定命令免密执行,或使用更安全的权限管理方式。 - 定期审计操作日志
sudo的操作会记录在/var/log/auth.log(或/var/log/secure)中,定期检查日志可追踪权限使用情况,及时发现异常操作。 - 使用
sudo -i替代su进行交互式操作
若需要类似su的交互式 root 环境,可使用sudo -i,它会加载 root 的环境变量,同时保留sudo的日志记录功能。
Linux 文件权限管理
文件系统权限介绍
文件系统权限介绍
Linux文件权限简单灵活,易于理解和应用,能够处理大多数权限使用情况。
文件有三个适用权限的用户类别:
- 单个用户拥有者,通常是创建该文件的用户。
- 单个组拥有者,通常是创建该文件的用户的主要组。
- 除了用户拥有者和组拥有者之外的其他用户。
[pengyuyan@centos7 ~]$ ls -l myfile
-rw-r-----. 1 pengyuyan wheel 2262 Dec 23 08:47 myfile
对于/etc/passwd文件来说,-rw-r–r–字符串分成四份,格式如下:
- 第一位代表文件类型,例如,**-**代表普通文件,d代表目录,l(L的小写)代表软链接等。
- 第二到第四位,代表user-owner具有的权限,也就是pengyuyan用户具有的权限。
- 第五到第七位,代表group-owner具有的权限,也就是pengyuyan组中成员具有的权限。
- 第八到第十位,代表user-owner和group-owner之外的用户具有的权限。
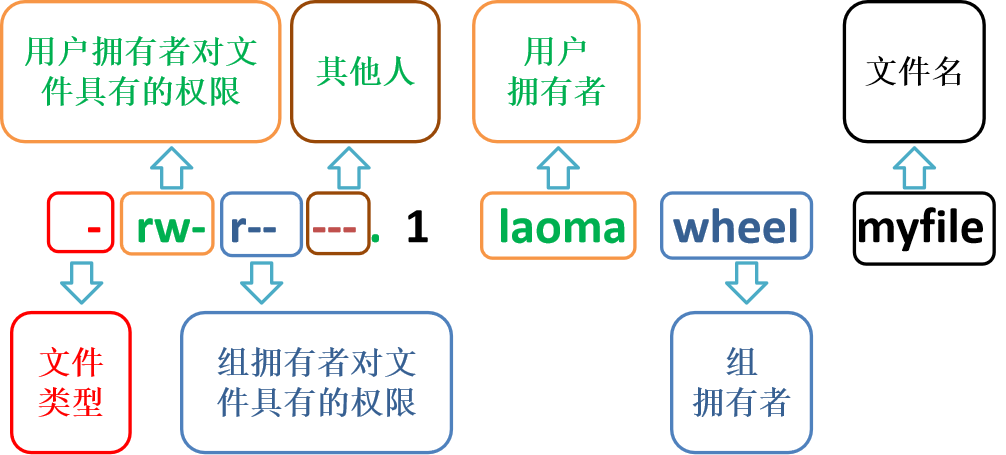
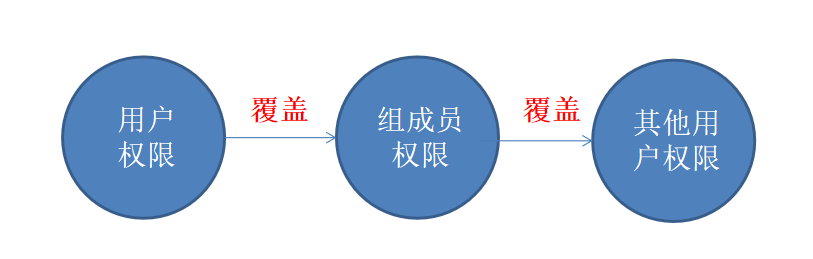
权限优先级
如果文件的用户是laoma,组成员中也有pengyuyan用户,那么pengyuyan获得最终权限是pengyuyan用户拥有者的权限,而不是组中成员具有的权限。
rwx 权限解读
目录中保存文件,文件中保存数据(例如字符串)。
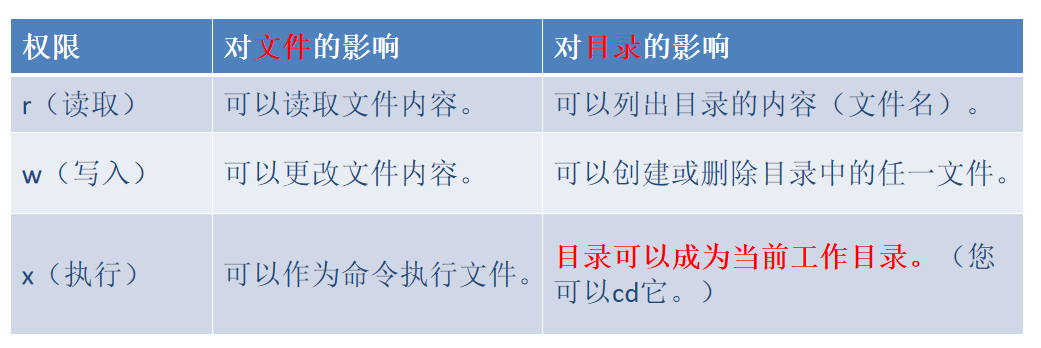
-代表没权限(占位符)
文件系统权限管理
chmod 命令
作用:更改文件不同owner权限。
**语法1:**chmod WhoHowWhat 文件/目录
- Who: u(user) g(group) o(other) a(all)
- How: +(添加) -(减去) =(精确设置)
- What: r(read) w(write) x(excute) -(不具有权限)
针对文件
[root@centos7 ~]# mkdir /lab
[root@centos7 ~]# cd /lab
[root@centos7 lab]# cp /etc/passwd .
[root@centos7 lab]# ls -l passwd
-rw-r--r--. 1 root root 2312 11月  8 14:17 passwd

# 给user增加x权限
[root@centos7 lab]# chmod u+x ./passwd
[root@centos7 lab]# ls -l passwd
-rwxr--r--. 1 root root 2312 11月  8 14:17 passwd

# 一次性设置多个
[root@centos7 lab]# chmod u-wx,g+w,o=- passwd
[root@centos7 lab]# ls -l passwd
-r--rw----. 1 root root 2312 11月  8 14:17 passwd

# 一次性设置所有对象
[root@centos7 lab]# chmod a=rwx passwd
[root@centos7 lab]# ls -l passwd
-rwxrwxrwx. 1 root root 2312 11月  8 14:17 passwd
[root@centos7 lab]# chmod a-wx passwd
[root@centos7 lab]# ls -l passwd
-r--r--r--. 1 root root 2312 11月  8 14:17 passwd
针对目录
# 针对目录,准备目录和文件
[root@centos7 lab]# mkdir dir01
[root@centos7 lab]# touch dir01/file01
[root@centos7 lab]# ls -ld dir01 dir01/file01
drwxr-xr-x. 2 root root 20 11月  8 14:22 dir01
-rw-r--r--. 1 root root  0 11月  8 14:22 dir01/file01

# 递归清除所有对象所有权限
[root@centos7 lab]# chmod -R a=- dir01
[root@centos7 lab]# ls -ld dir01 dir01/*
d---------. 2 root root 20 11月  8 14:22 dir01
----------. 1 root root  0 11月  8 14:22 dir01/file01

# 递归设置user对象权限为rwx
[root@centos7 lab]# chmod -R u+rwx dir01
[root@centos7 lab]# ls -ld dir01 dir01/*
drwx------. 2 root root 20 11月  8 14:22 dir01
-rwx------. 1 root root  0 11月  8 14:22 dir01/file01
语法2: chmod ### 文件/目录
- 第1个#,代表user权限
- 第2个#,代表group权限
- 第3个#,代表other权限
#,是一个数字范围是0(—)到7(rwx)。
补充:二进制与10进制转换
二进制 十进制 对应权限
000 0 — 无
001 1 --x 执行
010 2 -w- 写
011 3 -wx 写和执行
100 4 r-- 读
101 5 r-x 读和执行
110 6 rw- 读和写
111 7 rwx 读、写、执行
# 示例1,文件权限为 -rw- r-- r--
# 用二进制表达权限为 110 100 100,对应10进制为644

# 示例2,文件权限为 -rwx rw- r-x
# 用二进制表达权限为 111 110 101,对应10进制为765

# 文件权限为634对应的权限
[root@centos7 ~]# mkdir /lab;cd /lab
[root@centos7 lab]# cp /etc/passwd .
[root@centos7 lab]# chmod 634 passwd
[root@centos7 lab]# ls -l passwd
-rw--wxr--. 1 root root 2312 11月  8 14:17 passwd

[root@centos7 lab]# stat -c %A passwd
-rw--wxr--
[root@centos7 lab]# stat -c %a passwd
634

# 文件权限为755对应的权限
[root@centos7 lab]# chmod 755 passwd
[root@centos7 lab]# ls -l passwd
-rwxr-xr-x. 1 root root 2312 11月  8 14:17 passwd
权限补充说明:
对文件来说:赋予w权限的时候,也会赋予r权限
赋予x权限的时候,也会赋予r权限
对目录来说:赋予r权限的时候,也会赋予x权限
赋予w权限的时候,也会赋予rx权限
chown chgrp 命令
作用:更改文件属主
| 命令 | 作用 |
|---|---|
| chown | 修改文件的所有者 |
| chgrp | 修改文件的所属组 |
| chown 用户:组 | 同时修改所有者和所属组 |
[root@centos7 lab]# ls -l passwd
-rwxr-xr-x. 1 root root 2312 11月  8 14:17 passwd

# 修改user owner
[root@centos7 lab]# chown pengyuyan passwd
[root@centos7 lab]# ls -l passwd
-rwxr-xr-x. 1 pengyuyan root 2312 11月  8 14:17 passwd

# 修改 group owner
[root@centos7 lab]# chgrp wheel passwd
[root@centos7 lab]# ls -l passwd
-rwxr-xr-x. 1 pengyuyan wheel 2312 11月  8 14:17 passwd

# 同时修改 user和group owner
[root@centos7 lab]# chown wuyanzu:root passwd
[root@centos7 lab]# ls -l passwd
-rwxr-xr-x. 1 wuyanzu root 2312 11月  8 14:17 passwd

# 对目录递归修改
[root@centos7 lab]# ls -R -ld dir01 dir01/*
drwxrwx---. 2 root root 20 11月  8 14:22 dir01
-rwxrwx---. 1 root root  0 11月  8 14:22 dir01/file01

# 对目录递归修改user owner
[root@centos7 lab]# chown -R pengyuyan dir01/
[root@centos7 lab]# ls -R -ld dir01 dir01/*
drwxrwx---. 2 pengyuyan root 20 11月  8 14:22 dir01
-rwxrwx---. 1 pengyuyan root  0 11月  8 14:22 dir01/file01

# 对目录递归同时修改user和group owner
[root@centos7 lab]# chown -R wuyanzu:wheel dir01/
[root@centos7 lab]# ls -R -ld dir01 dir01/*
drwxrwx---. 2 wuyanzu wheel 20 11月  8 14:22 dir01
-rwxrwx---. 1 wuyanzu wheel  0 11月  8 14:22 dir01/file01
案例:准备一个普通用户家目录
模拟:创建一个用户tom,该用户没有自动创建家目录
[root@centos7 ~]# useradd -M tom
准备用户家目录
[root@centos7 ~]# cp -r /etc/skel/ /home/tom
[root@centos7 ~]# ls -ld /home/tom
drwxr-xr-x. 3 root root 78 7月  22 11:52 /home/tom

[root@centos7 ~]# chmod u=rwx,go=- /home/tom
[root@centos7 ~]# ls -ld /home/tom
drwx------. 3 root root 78 7月  22 11:52 /home/tom

[root@centos7 ~]# chown -R tom:tom /home/tom

# 验证
[root@centos7 ~]# su - tom
[tom@centos7 ~]$
验证 rwx 权限-针对文件
# 初始环境准备
[root@centos7 ~]# mkdir /lab
[root@centos7 lab]# cd /lab
[root@centos7 lab]# cp /etc/hosts .
[root@centos7 lab]# chmod o=- hosts
[root@centos7 lab]# cat hosts
127.0.0.1   localhost localhost.localdomain localhost4 localhost4.localdomain4
::1         localhost localhost.localdomain localhost6 localhost6.localdomain6

# 验证
[pengyuyan@centos7 ~]$ cd /lab
[pengyuyan@centos7 lab]$ ls -l hosts
-rw-r-----. 1 root root 158 Nov  8 14:57 hosts
[pengyuyan@centos7 lab]$ cat hosts
cat: hosts: Permission denied
[pengyuyan@centos7 lab]$ echo hello world > hosts
-bash: hosts: Permission denied
[pengyuyan@centos7 lab]$ /lab/hosts
-bash: /lab/hosts: Permission denied

# r权限验证--准备
[root@centos7 lab]# chmod o=r hosts

# r权限验证
[pengyuyan@centos7 lab]$ ls -l hosts
-rw-r--r--. 1 root root 158 Nov  8 14:57 hosts
[pengyuyan@centos7 lab]$ cat hosts
127.0.0.1   localhost localhost.localdomain localhost4 localhost4.localdomain4
::1         localhost localhost.localdomain localhost6 localhost6.localdomain6

# w权限验证--准备
[root@centos7 lab]# chmod o=w hosts

# w权限验证
[pengyuyan@centos7 lab]$ ls -l hosts
-rw-r---w-. 1 root root 158 Nov  8 14:57 hosts
[pengyuyan@centos7 lab]$ echo ni hao > hosts
[pengyuyan@centos7 lab]$ cat hosts
cat: hosts: Permission denied

# 是否可以使用vim修改文件内容
[pengyuyan@centos7 lab]$ vim hosts
# 仍然无法读取文件内容,只能覆盖修改

[pengyuyan@centos7 lab]$ echo hello world >> hosts
[root@centos7 lab]# cat hosts
ni hao
hello world

# x权限验证--准备
[root@centos7 lab]# chmod o=x hosts
[root@centos7 lab]# echo 'echo hello world' > mycommand
[root@centos7 lab]# cat /lab/mycommand
echo hello world
[root@centos7 lab]# chmod u+x mycommand
[root@centos7 lab]# ls -l mycommand
-rwxr----x. 1 root root 17 11月  8 15:07 hosts
[root@centos7 lab]# /lab/mycommand
hello world

# x权限验证
[pengyuyan@centos7 lab]$ /lab/mycommand
bash: /lab/hosts: Permission denied
# 原因:无法读取文件代码
[root@centos7 lab]# chmod o=rx mycommand
[pengyuyan@centos7 lab]$ /lab/mycommand
hello world
验证 rwx 权限-针对目录
# 初始环境准备
[root@centos7 lab]# mkdir dir01
[root@centos7 lab]# mv hosts dir01
[root@centos7 lab]# chown -R root:root dir01/
[root@centos7 lab]# chmod -R a=- dir01
[root@centos7 lab]# chmod o=r dir01/hosts
[root@centos7 lab]# ls -ld dir01 dir01/*
d---------. 2 root root 19 11月  8 15:29 dir01
-------r--. 1 root root 17 11月  8 15:07 dir01/hosts

# 无权限验证
[pengyuyan@centos7 lab]$ ls dir01/
ls: cannot open directory dir01/: Permission denied
[pengyuyan@centos7 lab]$ cd dir01/
-bash: cd: dir01/: Permission denied
[pengyuyan@centos7 lab]$ touch dir01/file01
touch: cannot touch 'dir01/file01': Permission denied

# r权限--准备
[root@centos7 lab]# chmod o=r dir01/

# r权限--验证
[pengyuyan@centos7 lab]$ ls dir01/
hosts
[pengyuyan@centos7 lab]$ ls -l dir01/
ls: cannot access dir01/hosts: Permission denied
total 0
-????????? ? ? ? ?            ? hosts

# x权限--准备
[root@centos7 lab]# chmod o=x dir01/
[root@centos7 lab]# ls -ld dir01 dir01/*
d--------x. 2 root root 19 11月  8 15:29 dir01
-------r--. 1 root root 17 11月  8 15:07 dir01/hosts

# x权限--验证
[pengyuyan@centos7 lab]$ cat dir01/hosts
echo hello world
[pengyuyan@centos7 lab]$ cd dir01/
[pengyuyan@centos7 dir01]$ ls
ls: cannot open directory .: Permission denied
[pengyuyan@centos7 dir01]$ cat hosts
echo hello world

# w权限--准备
[root@centos7 lab]# chmod o=w dir01/
[root@centos7 lab]# ls -ld dir01 dir01/*
d-------w-. 2 root root 19 11月  8 15:29 dir01
-------r--. 1 root root 17 11月  8 15:07 dir01/hosts

# w权限--验证
[pengyuyan@centos7 lab]$ touch dir01/file01
touch: cannot touch 'dir01/file01': Permission denied
[pengyuyan@centos7 lab]$ rm dir01/hosts
rm: cannot remove 'dir01/hosts': Permission denied

# 追加x权限
[root@centos7 lab]# chmod o=wx dir01/
[root@centos7 lab]# ls -ld dir01 dir01/*
d-------wx. 2 root root 19 11月  8 15:29 dir01
-------r--. 1 root root 17 11月  8 15:07 dir01/hosts

# 体会wx效果
[pengyuyan@centos7 lab]$ cat dir01/hosts
echo hello world
[pengyuyan@centos7 lab]$ touch dir01/file01
[pengyuyan@centos7 lab]$ rm dir01/hosts
rm: remove write-protected regular file 'dir01/hosts'? yes
[root@centos7 lab]# ls -ld dir01 dir01/*
d-------wx. 2 root  root  20 11月  8 15:41 dir01
-rw-r--r--. 1 laoma laoma  0 11月  8 15:41 dir01/file01
权限补充说明
- 对于文件来说:
- 赋予 w 权限的时候,也会赋予 r 权限。
- 赋予 x 权限的时候,也会赋予 r 权限。
- 对于目录来说:
- 赋予 r 权限的时候,也会赋予 x 权限。
- 赋予 w 权限的时候,也会赋予 rx 权限。
文件权限总结
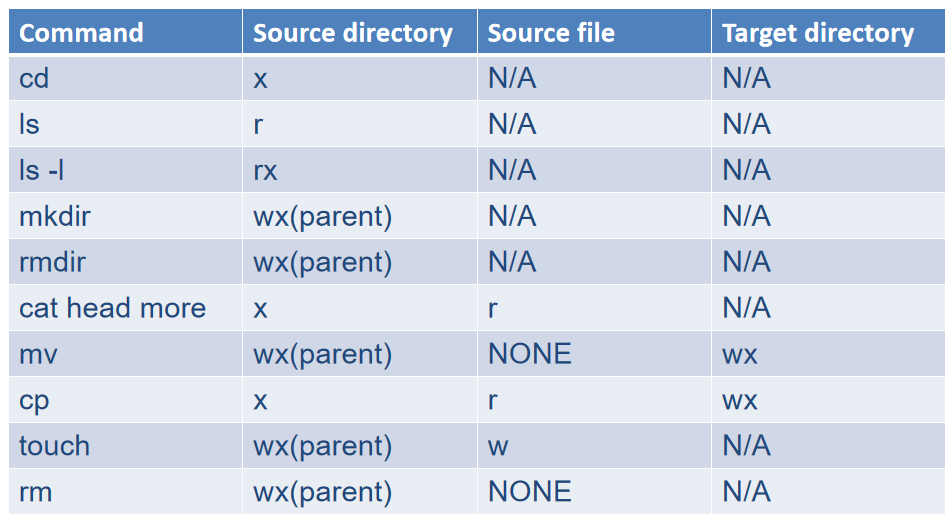
管理文件默认权限
umask 命令(只影响新文件)
作用:控制新创建的文件和目录的默认权限
语法:umask [选项] [掩码值]
补充:
实际权限=默认权限-umask
文件默认权限:666
目录默认权限:777
例:umask 027 #文件640,目录750
# 默认情况
[pengyuyan@centos7 ~]$ mkdir lab;cd lab
[pengyuyan@centos7 lab]$ touch f1;mkdir d1
[pengyuyan@centos7 lab]$ ls -l
total 0
drwxr-xr-x. 2 pengyuyan pengyuyan 6 Nov  8 17:05 d1
-rw-r--r--. 1 pengyuyan pengyuyan 0 Nov  8 17:05 f1

# umask值中权限是要剔除掉的
[pengyuyan@centos7 lab]$ umask
0022
# 设置为0
[pengyuyan@centos7 lab]$ umask 0
[pengyuyan@centos7 lab]$ umask
0000

# 再次创建文件
[pengyuyan@centos7 lab]$ touch f2;mkdir d2
[pengyuyan@centos7 lab]$ ls -ld *2
drwxrwxrwx. 2 pengyuyan pengyuyan 6 Nov  8 17:07 d2
-rw-rw-rw-. 1 pengyuyan pengyuyan 0 Nov  8 17:07 f2

# 此时目录的权限是777,文件的权限是666

# 根据用户需求定制umask值,例如希望group和other位置不具有权限
[pengyuyan@centos7 lab]$ umask 077
[pengyuyan@centos7 lab]$ umask
0077

[pengyuyan@centos7 lab]$ touch f3;mkdir d3
[pengyuyan@centos7 lab]$ ls -ld *3
drwx------. 2 pengyuyan pengyuyan 6 Nov  8 17:10 d3
-rw-------. 1 pengyuyan pengyuyan 0 Nov  8 17:10 f3
umask 持久化生效
# 针对单个用户
[pengyuyan@centos7 lab]$ echo 'umask 077' >> ~/.bashrc

# 针对所有用户
[root@centos7 ~]# echo 'umask 077' >> /etc/bashrc
管理文件特殊权限
命令对文件能执行哪些操作,取决于执行者。
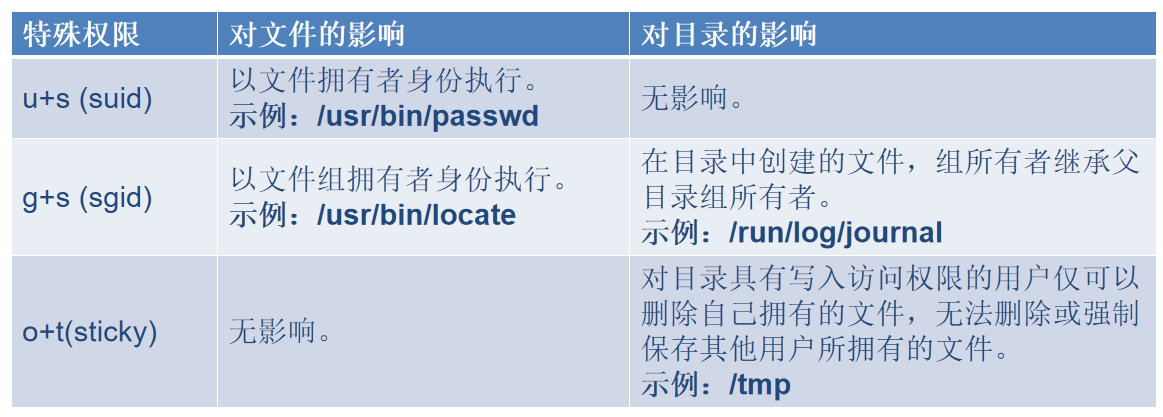
SUID 针对文件
# 普通用户执行passwd命令可以修改/etc/shadow文件原因
[pengyuyan@centos7 ~]$ passwd
Changing password for user pengyuyan.
Changing password for pengyuyan.
(current) UNIX password:
New password:
Retype new password:
passwd: all authentication tokens updated successfully.
[pengyuyan@centos7 ~]$ ls -l /etc/shadow
----------. 1 root root 1264 Nov  8 16:38 /etc/shadow

# 查看passwd程序权限
[pengyuyan@centos7 ~]$ ls -l $(which passwd)
-rwsr-xr-x. 1 root root 27856 Apr  1  2020 /usr/bin/passwd

# 普通用户执行passwd的命令时候,有效身份是root用户, root用户是可以修改shadow文件内容。

# 添加 suid 权限
[root@centos7 ~]# chmod u+s /usr/bin/vim
[root@centos7 ~]# ls -l /usr/bin/vim
-rwsr-xr-x. 1 root root 2337216 10月 14 2020 /usr/bin/vim

# 此时普通用户就可以修改任意文件
[pengyuyan@centos7 ~]$ vim /etc/passwd

# 删除suid权限
[root@centos7 ~]# chmod u-s /usr/bin/vim
SGID 针对目录
# 准备用户和组
[root@centos7 lab]# pwd
/lab
[root@centos7 lab]# groupadd devops
[root@centos7 lab]# useradd -G devops dev1
[root@centos7 lab]# useradd -G devops dev2

# 准备目录
[root@centos7 lab]# mkdir webapp
[root@centos7 lab]# chgrp devops webapp
[root@centos7 lab]# chmod g=rwx webapp
# 准备默认权限
[root@centos7 lab]# echo "umask 002" >> /etc/bashrc

# 实验一:普通用户创建文件,只有自己可以编辑
[root@centos7 lab]# su dev1
[dev1@centos7 lab]$ touch webapp/dev-f1
[dev1@centos7 lab]$ ll webapp/dev-f1
-rw-rw-r--. 1 dev1 dev1 0 7月  22 15:12 webapp/dev-f1

# 实验二:普通用户创建文件,组中成员也可以编辑
[root@centos7 lab]# chmod g+s webapp

[root@centos7 lab]# su dev1
[dev1@centos7 lab]$ touch webapp/dev-f2
[dev1@centos7 lab]$ ll webapp
总用量 0
-rw-rw-r--. 1 dev1 dev1   0 7月  22 15:12 dev-f1
-rw-rw-r--. 1 dev1 devops 0 7月  22 15:13 dev-f2

[root@centos7 lab]# su dev2
[dev2@centos7 lab]$ echo hello world >> webapp/dev-f2
[dev2@centos7 lab]$ cat webapp/dev-f2
hello world
sticky 针对目录
# 示例文件
[root@centos7 lab]# ls -ld /tmp
drwxrwxrwt. 20 root root 4096 11月  8 16:50 /tmp
[root@centos7 lab]# stat -c %a /tmp
1777
[pengyuyan@centos7 ~]$ rm /tmp/storage.log
rm: remove write-protected regular empty file '/tmp/storage.log'? yes
rm: cannot remove '/tmp/storage.log': Operation not permitted

# 用户只能删除自己创建的文件
[pengyuyan@centos7 ~]$ touch /tmp/pengyuyan-f1
[pengyuyan@centos7 ~]$ ls /tmp/pengyuyan-f1
/tmp/laoma-f1
[pengyuyan@centos7 ~]$ rm /tmp/pengyuyan-f1
查找系统中特殊权限文件
# 查找系统中所有具有suid权限的文件
[root@centos7 ~]# find / -perm -4000
# 或者
[root@centos7 ~]# find / -perm -u+s
管理文件扩展权限
需求:创建一个文件,root用户也无法编辑和删除?
解答:文件扩展属性。
chattr 命令
作用:修改文件或目录的"隐藏/拓展属性(即chattr属性)"
语法:chattr [选项] 操作符[属性] 文件/目录
操作符说明:
+:添加属性(开启某项保护)
-:移除属性(关闭某项保护)
=:设置属性(覆盖原有属性)
常用属性:
字母 作用 不可修改 i 文件或目录被锁定,任何人(包括root)都不能删除、重命名、修改或追加内容,除非先移除i属性 只能追加 a 文件只能以追加的方式写入
append only
[root@centos7 ~]# touch /opt/operator.log
[root@centos7 ~]# chattr +a /opt/operator.log

[root@centos7 ~]# echo hello world > /opt/operator.log
-bash: /opt/operator.log: 不允许的操作

[root@centos7 ~]# echo hello world 1 >> /opt/operator.log
[root@centos7 ~]# echo hello world 2 >> /opt/operator.log

[root@centos7 ~]# rm -f /opt/operator.log
rm: 无法删除'/opt/operator.log': 不允许的操作
immutable 属性
[root@centos7 ~]# cp /etc/passwd ./passwd

[root@centos7 ~]# chattr +i passwd
[root@centos7 ~]# echo 'lw:x:1000:1000:lw:/home/lw:/bin/bash' >> passwd
-bash: passwd: 不允许的操作
[root@centos7 ~]# rm -f passwd
rm: 无法删除'passwd': 不允许的操作

[root@centos7 ~]# chattr -i passwd
[root@centos7 ~]# echo 'lw:x:1000:1000:lw:/home/lw:/bin/bash' >> passwd

# 重要的文件,内容改完后,再把i属性加回去。
[root@centos7 ~]# chattr +i passwd
管理文件访问控制列表(了解)
需求:如何给不同的用户赋予不同的权限?
解答:访问控制列表。
针对用户
# 准备文件
[root@centos7 lab]# cp /etc/passwd ./passwd
[root@centos7 lab]# chmod o=- passwd
[root@centos7 lab]# ll passwd
-rw-r-----. 1 root root 2539 7月  22 16:36 passwd

# 赋予laoma读取权限
[root@centos7 lab]# setfacl -m u:pengyuyan:rw passwd

# 此时 group 位置对应的权限是mask权限,也就是特定用户、所有组和other用户能够获得的最大权限。
[root@centos7 lab]# ls -l passwd
-rw-rw----+ 1 root root 2539 7月  22 16:36 passwd
[root@centos7 lab]# getfacl passwd
# file: passwd
# owner: root
# group: root
user::rw-
user:laoma:rw-
group::r--
mask::rw-
other::---

# 验证
[pengyuyan@centos7 ~]$ ll /lab/passwd
-rw-r-----+ 1 root root 2539 7月  22 16:36 /lab/passwd
[pengyuyan@centos7 ~]$ head -n 1 /lab/passwd
root:x:0:0:root:/root:/bin/bash

# 同时设置多个规则,参照如下
[root@centos7 lab]# setfacl -m u:tom:rwx,u:pengyuyan:r passwd
针对组
[root@centos7 lab]# setfacl -m g:wheel:rwx passwd

# 此时 mask 值变为 rwx
[root@centos7 lab]# ls -l passwd
-rw-rwx---+ 1 root root 2539 7月  22 16:36 passwd
[root@centos7 lab]# getfacl passwd
# file: passwd
# owner: root
# group: root
user::rw-
user:laoma:rw-
group::r--
group:wheel:rwx
mask::rwx
other::---
mask 设置
为了防止权限失控,最后一步设置相关用户的最大权限。
[root@centos7 lab]# setfacl -m m:- passwd

[root@centos7 lab]# ls -l passwd
-rw-------+ 1 root root 2539 7月  22 16:36 passwd
[root@centos7 lab]# getfacl passwd
# file: passwd
# owner: root
# group: root
user::rw-
user:laoma:rw-                  #effective:---
group::r--                      #effective:---
group:wheel:rwx                 #effective:---
mask::---
other::---
针对目录的 acl
在具有默认acl规则的目录中创建文件,文件会继承目录的默认acl。
[root@centos7 lab]# mkdir test
[root@centos7 lab]# setfacl -m u:pengyuyan:rw test
[root@centos7 lab]# ls -ld test
drwxrwxr-x+ 2 root root 6 7月  22 16:47 test

[root@centos7 lab]# touch test/f1
[root@centos7 lab]# ls -l test/f1
-rw-r--r--. 1 root root 0 7月  22 16:47 test/f1

# 设置目录默认 acl
[root@centos7 lab]# setfacl -m d:u:pengyuyan:rw test
[root@centos7 lab]# getfacl test/
# file: test/
# owner: root
# group: root
user::rwx
user:pengyuyan:rw-
group::r-x
mask::rwx
other::r-x
default:user::rwx
default:user:pengyuyan:rw-
default:group::r-x
default:mask::rwx
default:other::r-x

[root@centos7 lab]# touch test/f2
[root@centos7 lab]# ls -l test/f2
-rw-rw-r--+ 1 root root 0 7月  22 16:48 test/f2
[root@centos7 lab]# getfacl test/f2
# file: test/f2
# owner: root
# group: root
user::rw-
user:laoma:rw-
group::r-x                      #effective:r--
mask::rw-
other::r--
oot:/bin/bash

# 同时设置多个规则,参照如下
[root@centos7 lab]# setfacl -m u:tom:rwx,u:pengyuyan:r passwd
针对组
[root@centos7 lab]# setfacl -m g:wheel:rwx passwd

# 此时 mask 值变为 rwx
[root@centos7 lab]# ls -l passwd
-rw-rwx---+ 1 root root 2539 7月  22 16:36 passwd
[root@centos7 lab]# getfacl passwd
# file: passwd
# owner: root
# group: root
user::rw-
user:laoma:rw-
group::r--
group:wheel:rwx
mask::rwx
other::---
mask 设置
为了防止权限失控,最后一步设置相关用户的最大权限。
[root@centos7 lab]# setfacl -m m:- passwd

[root@centos7 lab]# ls -l passwd
-rw-------+ 1 root root 2539 7月  22 16:36 passwd
[root@centos7 lab]# getfacl passwd
# file: passwd
# owner: root
# group: root
user::rw-
user:laoma:rw-                  #effective:---
group::r--                      #effective:---
group:wheel:rwx                 #effective:---
mask::---
other::---
针对目录的 acl
在具有默认acl规则的目录中创建文件,文件会继承目录的默认acl。
[root@centos7 lab]# mkdir test
[root@centos7 lab]# setfacl -m u:pengyuyan:rw test
[root@centos7 lab]# ls -ld test
drwxrwxr-x+ 2 root root 6 7月  22 16:47 test

[root@centos7 lab]# touch test/f1
[root@centos7 lab]# ls -l test/f1
-rw-r--r--. 1 root root 0 7月  22 16:47 test/f1

# 设置目录默认 acl
[root@centos7 lab]# setfacl -m d:u:pengyuyan:rw test
[root@centos7 lab]# getfacl test/
# file: test/
# owner: root
# group: root
user::rwx
user:pengyuyan:rw-
group::r-x
mask::rwx
other::r-x
default:user::rwx
default:user:pengyuyan:rw-
default:group::r-x
default:mask::rwx
default:other::r-x

[root@centos7 lab]# touch test/f2
[root@centos7 lab]# ls -l test/f2
-rw-rw-r--+ 1 root root 0 7月  22 16:48 test/f2
[root@centos7 lab]# getfacl test/f2
# file: test/f2
# owner: root
# group: root
user::rw-
user:laoma:rw-
group::r-x                      #effective:r--
mask::rw-
other::r--

openEuler 是由开放原子开源基金会孵化的全场景开源操作系统项目,面向数字基础设施四大核心场景(服务器、云计算、边缘计算、嵌入式),全面支持 ARM、x86、RISC-V、loongArch、PowerPC、SW-64 等多样性计算架构
更多推荐

 17
17 0
0- 0


 已为社区贡献9条内容

所有评论(0)