彭于晏一个月带你玩转Linux操作系统6
Linux 服务管理
windows 开机的时候,有些程序自动启动了。
命令行运行services.msc
services.msc是 Windows 系统里的一个管理工具文件,它的全称是服务管理器,作用就是查看、启动、停止、禁用所有 Windows 服务的图形化界面。
systemd 介绍
基本概念
CentOS 7 使用 Systemd 引导系统启动,速度最快,所有进程无论有无依赖关系则都是并行启动(很多时候进程没有真正启动而是只有一个信号或者说是标记而已,在真正利用的时候才会真正启动)。Systemd为了解决上文的问题而诞生。它的目标是,为系统的启动和管理提供一套完整的解决方案。
系统引导程序:
- 用户空间,systemd,pid为1
- 内核空间,kthreadd,pid为2
服务:从业务角度来称呼,例如 web 服务,数据库服务。
守护进程(daemon):web 服务器对外提供 web 服务,由 web 相关的进程提供支持。
以web服务为例:
-
服务:web服务
-
守护进程:httpd
systemctl命令
作用:用于管理系统服务、查看系统状态、控制系统启动项
**语法:**systemctl [选项] [子命令] [服务名]
常见选项:
| 选项 | 作用 | 示例 |
|---|---|---|
| -a | 显示所有单元(含未加载的) | systemctl list-units --all |
| -l | 不截断输出(显示完整信息) | systemctl status httpd -l |
| -n | 显示最近 N 条日志 | systemctl status httpd -n 20 |
| -f | 强制操作(跳过安全检查) | systemctl poweroff -f |
| -H | 远程管理其他主机的服务 | systemctl -H root@192.168.1.100 status httpd |
| -t | 按类型筛选单元(如 service、timer、socket) | systemctl list-units --type=service |
| –state=状态 | 按状态筛选单元(如 running、failed、enabled) | systemctl list-units --state=running |
常见的 list-units 参数:
| 参数 | 作用 | 等价写法 |
|---|---|---|
| –failed | 列出失败的单元 | –state=failed |
| –all | 列出所有单元(包括非活跃的) | 无 |
| –state=STATE | 按状态筛选 (active, inactive, failed) |
无 |
| -t SERVICE | 按类型筛选 (service, timer, socket) |
–type=SERVICE |
**systemctl start httpd:**在运行上的系统中启动httpd服务
例如:
# 安装软件包
[root@centos7 ~]# yum install -y httpd

# 启动服务
[root@centos7 ~]# systemctl start httpd

# 查看进程
[root@centos7 ~]# ps -C httpd f
   PID TTY      STAT   TIME COMMAND
  5271 ?        Ss     0:00 /usr/sbin/httpd -DFOREGROUND
  5288 ?        S      0:00  \_ /usr/sbin/httpd -DFOREGROUND
  5289 ?        S      0:00  \_ /usr/sbin/httpd -DFOREGROUND
  5290 ?        S      0:00  \_ /usr/sbin/httpd -DFOREGROUND
  5291 ?        S      0:00  \_ /usr/sbin/httpd -DFOREGROUND
  5292 ?        S      0:00  \_ /usr/sbin/httpd -DFOREGROUND
httpd 服务对应的守护进程是5271、5288…
systemd 架构
守护进程:systemd,由守护进程干活。
工具:systemctl,提供给用户要用来跟机器交互的工具。
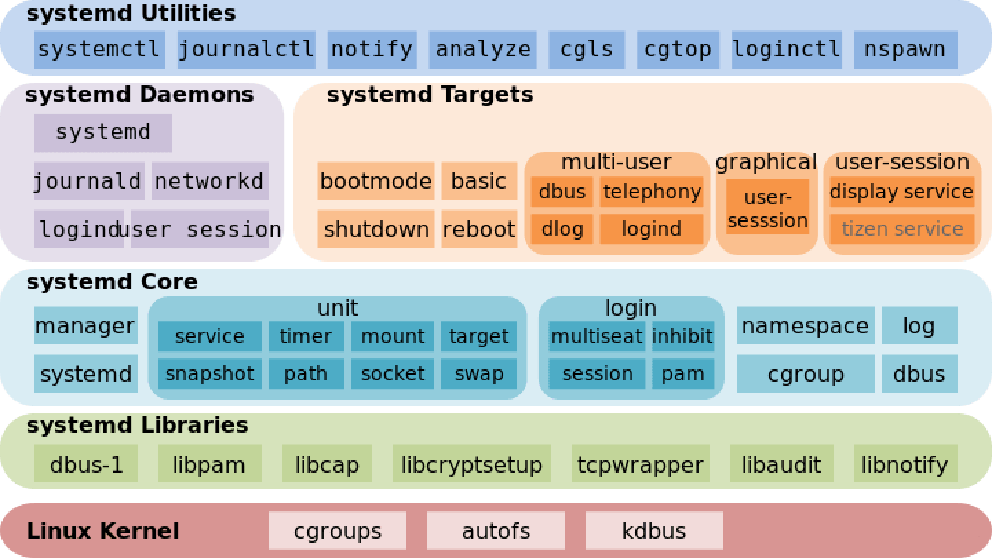
unit 类型
systemctl 命令用于管理不同类型的系统对象,这些对象称之为 units。
- Service unit:用于定义系统服务,文件扩展名为**.service**,例如httpd.service
- Socket unit:用于标识进程间通信用的 socket文件,文件扩展名为.socket
- Target unit:用于模拟实现“运行级别”,文件扩展名为.target
- Timer unit:用于管理计划任务,文件扩展名为.timer
- Device unit:用于定义内核识别的设备,文件扩展名为.device
- Mount unit:用于定义文件系统挂载点,文件扩展名为.mount
- Snapshot unit:管理系统快照,文件扩展名为.snapshot
- Swap unit:用于标识swap设备,文件扩展名为.swap
- Automount unit:文件系统的自动挂载点,文件扩展名为.automount
- Path unit:用于根据文件系统上特定对象的变化来启动其他服务,文件扩展名为.path
- Slice unit:用于资源管理,文件扩展名为.slice
查看 unit 列表信息
# 列出状态为loaded units
[root@centos7 ~]# systemctl list-units
loaded units:在 systemd 里,指的就是那些 systemd 已经成功读取并加载到内存里的服务配置文件(
.service文件)。systemctl list-units:是 systemd 服务管理工具中最常用的查看命令之一。它的核心作用就是列出当前系统中所有“已加载”(loaded)的服务单元(units)及其运行状态。
systemctl list-units命令输出说明:
- UNIT:服务单元名称。
- LOAD:systemd是否正确解析了单元的配置并将该单元加载到内存中。
- ACTIVE:单元的高级别激活状态。此信息表明单元是否已成功启动。
- SUB:单元的低级别激活状态。此信息指示有关该单元的更多详细信息。信息视单元类型、 状态以及单元的执行方式而异。
- DESCRIPTION:单元的简短描述。
# -t选项查看特定类型unit 清单
[pengyuyan@centos7 ~]$ systemctl list-units -t timer
UNIT                         LOAD   ACTIVE SUB     DESCRIPTION
systemd-tmpfiles-clean.timer loaded active waiting Daily Cleanup of Temporary Directories
unbound-anchor.timer         loaded active waiting daily update of the root trust anchor for DNSSEC

LOAD   = Reflects whether the unit definition was properly loaded.
ACTIVE = The high-level unit activation state, i.e. generalization of SUB.
SUB    = The low-level unit activation state, values depend on unit type.

2 loaded units listed. Pass --all to see loaded but inactive units, too.
To show all installed unit files use 'systemctl list-unit-files'.

# 列出类型为service,状态为active和inactive unit
[root@centos7 ~]# systemctl list-units --type service --all

# 列出系统中所有unit,包括未loaded的unit
[root@centos7 ~]# systemctl list-unit-files

# 查看失败的服务
[root@centos7 ~]# systemctl --failed --type service
查看单个 unit 信息
[pengyuyan@centos7 ~]$ systemctl status sshd.service
● sshd.service - OpenSSH server daemon
   Loaded: loaded (/usr/lib/systemd/system/sshd.service; enabled; vendor preset: enabled)
   Active: `active` (`running`) since 三 2022-11-09 08:45:45 CST; 5h 50min ago
     Docs: man:sshd(8)
           man:sshd_config(5)
 Main PID: 1167 (sshd)
    Tasks: 1
   CGroup: /system.slice/sshd.service
           └─1167 /usr/sbin/sshd -D
......
注释:
| 关键字 | 概述 |
|---|---|
| loaded | 单元配置文件已处理 |
| active(running) | 正在运行 |
| active(exited) | 已成功完成一次性配置 |
| active(waiting) | 运行中,正在等待事件 |
| inactive | 不再运行 |
| enabled | 系统引导时启动 |
| disabled | 系统引导时不启动 |
| static | 无法启动,依赖其他单元启动 |
控制系统服务
| 命令 | 任务 |
|---|---|
| systemctl status UNIT | 查看单元状态的详细信息。 |
| systemctl stop UNIT | 在运行中的系统上停止一项服务。 |
| systemctl start UNIT | 在运行中的系统上启动一项服务。 |
| systemctl restart UNIT | 在运行中的系统上重新启动一项服务。 |
| systemctl reload UNIT | 重新加载运行中服务的配置文件。 |
| systemctl mask UNIT | 禁用服务,使其无法手动启动或在系统引导时启动。 |
| systemctl unmask UNIT | 使屏蔽的服务变为可用。 |
| systemctl enable UNIT | 将服务配置为在系统引导时启动。使用 --now 选项也会启动该服务。 |
| systemctl disable UNIT | 禁止服务在系统引导时启动。使用 --now 选项也会停止该服务。 |
| systemctl is-enabled UNIT | 检查服务是否已设置开机自启 |
ssh命令
作用:是 Linux 中用于远程连接到另一台服务器的命令
**语法:**ssh [选项] [用户名@]主机地址
常见的连接方式:
| 场景 | 命令 | 说明 |
|---|---|---|
| 登陆服务器 | ssh root@192.168.1.100 | 指定用户名和 IP |
| 使用域名登录 | ssh tony@example.com | 跟 IP 一样,域名也可以 |
| 不指定用户名 | ssh 192.168.1.100 | 默认用当前电脑的用户名去登录 |
常见选项:
| 选项 | 作用 | 示例 |
|---|---|---|
| -p 端口 | 指定端口号(默认 22) | ssh -p 2222 root@192.168.1.100 |
| -l 用户名 | 指定登录用户名 | ssh -l root 192.168.1.100 |
| -i 密钥文件 | 使用私钥登录(免密码) | ssh -i ~/.ssh/id_rsa root@192.168.1.100 |
| -v | 显示详细连接过程(调试用) | ssh -v root@192.168.1.100 |
| -C | 启用压缩(适合慢速网络) | ssh -C root@192.168.1.100 |
| -x | 启用图形界面转发(显示远程图形程序) | ssh -X root@192.168.1.100 |
| -N | 只建立连接,不执行命令(用于端口转发) | ssh -N -L 8080:localhost:80 root@192.168.1.100 |
| -f | 后台运行(配合 -N 使用) |
ssh -f -N -L 8080:localhost:80 root@192.168.1.100 |
# 停止服务
[root@centos7 ~]# systemctl stop sshd.service

# 客户端连接测试
[root@centos7 ~]# ssh pengyuyan@centos7 hostname

# 启动服务
[root@centos7 ~]# systemctl start sshd.service
# 客户端连接测试
[root@centos7 ~]# ssh pengyuyan@centos7 hostname

# 重启服务,相当于stop再start
[root@centos7 ~]# systemctl restart sshd.service

# 一般用于配置文件变动后,重新加载
[root@centos7 ~]# systemctl reload sshd.service
# 重新加载服务,服务对应的主进程不会重启,只会重新加载一次配置文件。

# 禁止服务开机自启
[root@centos7 ~]# systemctl disable sshd.service
[root@centos7 ~]# systemctl is-enabled sshd
disabled
# 重启系统验证
[root@centos7 ~]# reboot

# 设置服务开机自启
[root@centos7 ~]# systemctl enable sshd.service
[root@centos7 ~]# systemctl is-enabled sshd
enabled
# 重启系统验证
[root@centos7 ~]# reboot

# 禁用服务:服务被禁用后,将无法start,因为服务的配置文件指向/dev/null
[root@centos7 ~]# systemctl mask sshd.service

# 取消禁用
[root@centos7 ~]# systemctl unmask sshd.service
unit 配置文件
unit 配置文件存放在多个位置:
- /etc/systemd/system/unit.service,优先生效。一般是管理员自定义的配置。
- /usr/lib/systemd/system/unit.service,其次生效。软件包自带的默认配置。
两个位置的区别:
| 存放位置 | 谁放的? | 用途 | 优先级 |
|---|---|---|---|
| /usr/lib/systemd/system/ | 软件包安装时自动放进去的 | 软件包自带的默认配置(比如 httpd、sshd 安装后就有的 .service 文件) |
低(会被覆盖) |
| /etc/systemd/system/ | 系统管理员手动放的 | 管理员自定义的配置(比如你手动写或修改的 .service 文件) |
高(优先生效) |
配置文件说明
示例单元文件 /usr/lib/systemd/system/sshd.service说明
# 标识该部分为 Unit 配置,用于描述服务的基本信息、依赖关系等。
[Unit]

# 服务的描述信息,说明这是 "OpenSSH 服务器守护进程",便于管理员识别服务用途。
Description=OpenSSH server daemon

# 指定服务的文档路径,这里指向 sshd 命令的手册页(man 8 sshd)和配置文件的手册页(man 5 sshd_config),方便用户查阅帮助。
Documentation=man:sshd(8) man:sshd_config(5)

# 定义服务的启动顺序:sshd 服务必须在 network.target(网络服务就绪)和 sshd-keygen.service(SSH 密钥生成服务)之后启动,确保依赖的资源已准备好。
After=network.target sshd-keygen.service

# 表示 sshd 服务 "希望" sshd-keygen.service 运行(但不是强制依赖)。如果 sshd-keygen.service 启动失败,sshd 仍会尝试启动(通常用于生成初始 SSH 密钥,若密钥已存在则不影响)。
Wants=sshd-keygen.service


# 标识该部分为 Service 配置,用于定义服务的启动方式、执行命令、重启策略等。
[Service]

# 定义服务的类型为 notify:表示服务启动后会主动通知 systemd 自己已就绪(通过 sd_notify() 函数),systemd 会等待这个通知后再继续后续流程,确保服务真正可用。
Type=notify

# 指定环境变量文件的路径,/etc/sysconfig/sshd 中通常定义 OPTIONS 等变量(如额外的 sshd 启动参数),这些变量会被后续的 ExecStart 引用。
EnvironmentFile=/etc/sysconfig/sshd

# 服务启动时执行的命令:
ExecStart=/usr/sbin/sshd -D $OPTIONS
# /usr/sbin/sshd:sshd 守护进程的可执行文件路径。
# -D:表示 sshd 以非守护进程模式运行(前台运行),因为 systemd 通常管理前台进程,便于监控。
# $OPTIONS:引用 EnvironmentFile 中定义的额外参数(如 -p 2222 指定端口)。

# 服务重载配置时执行的命令:
ExecReload=/bin/kill -HUP $MAINPID
# kill -HUP 发送 SIGHUP 信号给 sshd 主进程,使其重新加载配置文件(无需重启服务)。
# $MAINPID 是 systemd 自动维护的服务主进程 ID。

# 定义服务停止时的杀死模式:process 表示只杀死服务的主进程(sshd 主进程),其子进程(如已建立的 SSH 连接)会被保留(避免强制中断现有连接)。
KillMode=process

# 定义服务的重启策略:当服务因非正常退出(如崩溃、信号终止)时,systemd 会自动重启服务;正常退出(如主动停止)则不重启。
Restart=on-failure

# 服务重启前的等待时间,这里设置为 42 秒,避免频繁重启导致资源耗尽。
RestartSec=42s


# 标识该部分为 Install 配置,用于定义服务如何被 "启用"(即系统启动时自动运行)。
[Install]

# 表示当系统启动到 multi-user.target(多用户命令行模式,非图形界面)时,该服务会被自动启动。这是服务器的默认运行级别,确保 SSH 服务在系统启动后可用。
WantedBy=multi-user.target
开发一个 study 服务
- 开发 studyd 服务主程序 study
脚本说明:这是一个无限循环的脚本,每 5 秒会向 /var/log/study.log 文件中追加一行包含当前时间的日志,内容为 [时间]: I'M studying [ Linux ]。
[root@centos7 ~ 16:15:19]# vim /usr/local/bin/study
#!/bin/bash
# 第一行内容是脚本的 "解释器声明"(shebang),指定该脚本使用 /bin/bash 作为解释器执行。系统会根据这一行找到对应的 shell 程序来解析后续命令。

# 启动一个无限循环:while 是循环关键字,true 是一个永远为真的条件,因此这个循环会一直执行下去,直到被外部终止(如 Ctrl+C)。
while true

# 循环体的开始标记,do 和后面的 done 之间的内容是循环中重复执行的命令。
do

  # 执行 date 命令(获取当前系统时间),并通过 $(...) 捕获其输出,将结果赋值给变量 DATE。
  DATE=$(date)

  # echo 命令输出字符串,其中 $DATE 会被替换为变量的值
  # >> 是追加重定向符号,将输出内容追加到 /var/log/study.log 文件中
  # 最终输出内容类似 Fri Oct 31 10:00:00 CST 2025: I'M studying [ Linux ]。
  echo "$DATE: I'M studying [ Linux ]" >> /var/log/study.log

  # 让脚本暂停执行 5 秒(sleep 命令用于延迟,单位默认为秒),避免循环执行过快。
  sleep 5

# 循环体的结束标记,与前面的 while 和 do 配合,标志着一次循环的结束。
done
[root@centos7 ~ 16:24:17]# chmod +x /usr/local/bin/study
- 创建 studyd 服务单元文件
# 参考 sshd.service
[root@centos7 ~ 16:25:51]# cp /usr/lib/systemd/system/sshd.service \
/etc/systemd/system/studyd.service
[root@centos7 ~ 16:26:32]# vim /etc/systemd/system/studyd.service
[Unit]
Description=study server daemon

[Service]
ExecStart=/usr/local/bin/study

[Install]
WantedBy=multi-user.target
# 通知 systemd 读取 unit 变化
[root@centos7 ~ 16:26:36]# systemctl daemon-reload

# 启用并启动服务
[root@centos7 ~ 16:28:29]# systemctl enable studyd --now

# 查看服务状态
[root@centos7 ~ 16:28:34]# systemctl status studyd
● studyd.service - study server daemon
   Loaded: loaded (/etc/systemd/system/studyd.service; enabled; vendor preset: disabled)
   Active: `active (running)`` since 五 2025-10-31 16:28:34 CST; 1s ago
 Main PID: 2786 (study)
    Tasks: 2
   CGroup: /system.slice/studyd.service
           ├─2786 /bin/bash /usr/local/bin/study
           └─2788 sleep 5

10月 31 16:28:34 centos7.laoma.cloud systemd[1]: Started study server daemon.
- 验证日志
[root@centos7 ~ 16:28:36]# tail -f /var/log/study.log
2025年 10月 31日 星期五 16:28:29 CST: I'M studying [ Linux ]
2025年 10月 31日 星期五 16:28:34 CST: I'M studying [ Linux ]
2025年 10月 31日 星期五 16:28:39 CST: I'M studying [ Linux ]
2025年 10月 31日 星期五 16:28:44 CST: I'M studying [ Linux ]
2025年 10月 31日 星期五 16:28:49 CST: I'M studying [ Linux ]
2025年 10月 31日 星期五 16:28:54 CST: I'M studying [ Linux ]
......
Linux OpenSSH 服务管理
环境准备
准备两台虚拟机:
- server 虚拟机,并设置ip地址为10.1.8.10/24。
- client 虚拟机,并设置ip地址为 10.1.8.11/24。
设置主机名称和名称解析,以client为例:
hostname命令
作用:查看和修改系统的主机名(临时修改)
语法:hostname [选项] [新主机名]
常用用法:
| 用法 | 作用 | 示例 |
|---|---|---|
| hostname | 查看当前主机名 | hostname→ 输出centos7 |
| hostname 新主机名 | 临时修改主机名(重启后失效) | hostname my-server |
| hostname -i | 显示主机的 IP 地址 | hostname -i→ 输出192.168.1.100 |
| hostname -I | 显示所有 IP 地址(含多个网卡) | hostname -I→ 输出192.168.1.100 10.0.0.1 |
| hostname -f | 显示完整域名(FQDN) | hostname -f→ 输出centos7.example.com |
| hostname -s | 只显示短主机名(不含域名部分) | hostname -s→ 输出centos7 |
hostnamectl命令
作用:不仅能查看主机名,还能查看系统信息,并且修改是永久生效的
语法:hostnamectl [选项] [子命令]
常见用法:
| 用法 | 作用 | 示例 |
|---|---|---|
| hostnamectl | 查看系统信息(含主机名、系统版本、内核等) | hostnamectl |
| hostnamectl status | 同上,查看系统信息 | hostnamectl status |
| hostnamectl set-hostname 新主机名 | 永久修改主机名(重启后仍生效) | hostnamectl set-hostname my-server |
| hostnamectl set-hostname 新主机名 --static | 修改静态主机名(存于 /etc/hostname) |
hostnamectl set-hostname my-server --static |
| hostnamectl set-hostname 新主机名 --transient | 修改临时主机名(重启失效) | hostnamectl set-hostname my-server --transient |
| hostnamectl set-hostname 新主机名 --pretty | 修改友好主机名(可含空格,仅展示用) | hostnamectl set-hostname “My Web Server” --pretty |
# 永久设置主机名
[root@localhost ~]# hostnamectl set-hostname client.pengyuyan.cloud

# 临时设置
[root@localhost ~]# hostname client.pengyuyan.cloud

# 验证
[root@localhost ~]# hostname
client.pengyuyan.cloud

# 准备名称解析
[root@client ~]# echo "
10.1.8.10 server.pengyuyan.cloud server
10.1.8.11 client.pengyuyan.cloud client" >> /etc/hosts
IP地址通过图形化配置(nmtui),过程省略。
OpenSSH 服务介绍
SSH 介绍
SSH 全称是 Secure Shell,SSH协议是基于应用层的协议,为远程登录会话和其他网络服务提供安全性的协议。
实现此功能的传统方式,如 telnet (终端仿真协议)、 rcp、ftp、 rlogin、rsh都是极为不安全的,并且会使用明文传送密码。OpenSSH 提供了服务端后台程序和客户端工具,用来加密远程控件和文件传输过程中的数据,并由此来代替原来的类似服务。
SSH 建立连接的过程
主要分为下面几个阶段:
- SSH协议版本协商阶段,SSH目前包括SSH1和SSH2两个大版本。
- 密钥和算法协商阶段,SSH支持多种加密算法,双方根据自己和对端支持的算法进行协商,最终决定要使用的算法。
- 认证阶段,服务器和客户端互相进行身份验证。
- 会话请求阶段,客户端会向服务器端发送会话请求。会话请求分为这样几类:申请对数据传送进行压缩、申请伪终端、启动 X11、TCP/IP 端口转发、启动认证代理等。
- 交互会话阶段,会话请求通过后,服务器端和客户端进行信息的交互。例如运行 shell、执行命令、传递文件。
加密类型
- 对称加密,加密和解密都使用一个钥匙。确保数据的完整性、速度快。
- 非对称加密,一对钥匙。公钥用来加密数据。私钥用来解密数据。确保数据的安全性。
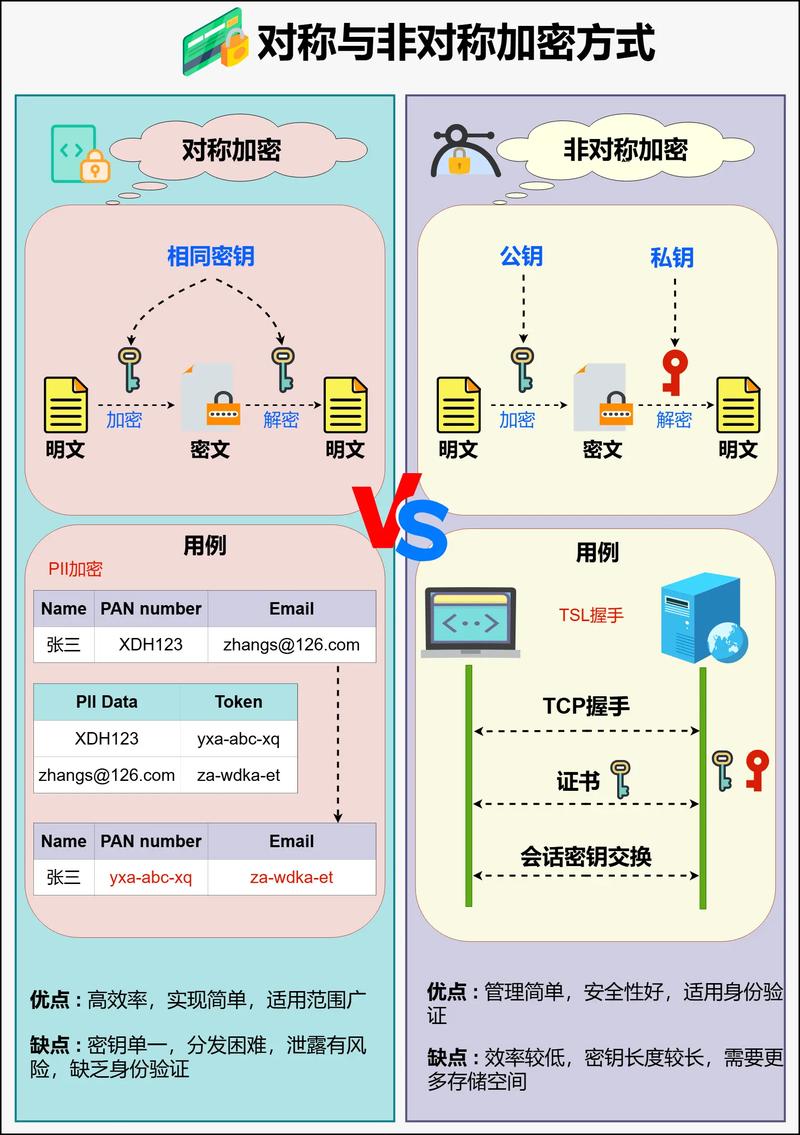
双向加密过程
SSH协议是基于非对称加密方法的,服务器和客户端都会生成自己的公钥和私钥。
- 公钥用来加密数据。
- 私钥用来解密数据。
双向加密过程:
-
服务器创建密钥对。远程服务器会在/etc/ssh目录下生成一个名为多个密钥对,例如ecdsa类型的密钥对:ssh_host_ecdsa_key.pub 公钥和 ssh_host_ecdsa_key 私钥。之后每回启动sshd服务的时候,系统会自动在此路径下查找公钥。
客户端请求连接。服务器接到请求后,把公钥传给客户端使用。
-
客户端记录服务器公钥并计算自己的公私钥。客户端将服务器传来的公钥记录在**~/.ssh/known_hosts** 中,若是已经记录有该服务器公钥,则比对是否一致,一致后就计算客户端自己的公私钥。
-
客户端使用服务器的公钥加密自己的公钥并发送给服务器。服务器端拥有客户端公钥+自己私钥,客户端拥有服务器公钥+自己私钥,组成了非对称加密系统。
-
双向加解密。服务器发送数据:用客户端公钥加密,客户端收到数据后用自己私钥解密。客户端发送数据:用服务器公钥加密,服务器收到数据后用自己私钥解密。
使用 ssh 访问远端CLI
ssh 工具演示(上文已阐述过)
方式一:只指定IP或主机名
# 通过IP地址
[pengyuyan@client ~]$ ssh 10.1.8.10
The authenticity of host '10.1.8.10 (10.1.8.10)' can't be established.
ECDSA key fingerprint is SHA256:pplZ4EZPQ8M/f7qvKaAffxbf+vKYJg9HCojrmqctkck.
Are you sure you want to continue connecting (yes/no/[fingerprint])? `yes`
Warning: Permanently added '10.1.8.10' (ECDSA) to the list of known hosts.
pengyuyan@10.1.8.10's password: `redhat`
Activate the web console with: systemctl enable --now cockpit.socket

Last login: Wed Jul 24 19:25:34 2024 from 10.1.8.1


# 通过主机名称
[pengyuyan@client ~]$ ssh server
The authenticity of host 'server (10.1.8.10)' can't be established.
ECDSA key fingerprint is SHA256:pplZ4EZPQ8M/f7qvKaAffxbf+vKYJg9HCojrmqctkck.
Are you sure you want to continue connecting (yes/no/[fingerprint])? `yes`
Warning: Permanently added 'server,10.1.8.10' (ECDSA) to the list of known hosts.
pengyuyan@server's password: `redhat`
Activate the web console with: systemctl enable --now cockpit.socket

Last login: Wed Jul 24 19:25:34 2024 from 10.1.8.1
方式二:额外指定用户名
# 指定root用户登录
[pengyuyan@client ~]$ ssh root@server
# 或者
[pengyuyan@client ~]$ ssh -l root server
方式三:额外指定命令
# 同时指定用户和命令
[pengyuyan@client ~]$ ssh pengyuyan@server hostname
pengyuyan@server's password: `redhat`
server.pengyuyan.cloud
# shell提示符,仍然是本机。
[pengyuyan@client ~]$


[pengyuyan@client ~]$ ssh root@server 'hostname;id'
root@server's password: `redhat`
server.pengyuyan.cloud
uid=0(root) gid=0(root) 组=0(root) 环境=unconfined_u:unconfined_r:unconfined_t:s0-s0:c0.c1023
ssh工具配置文件
参考 SSH_CONFIG(5) 。
[root@client ~]# man ssh_config
-
~/.ssh/config,用户自己的配置,优先级高于全局配置。文件权限不得高于644。
-
/etc/ssh/ssh_config,全局配置,应用于所有用户。
示例:
[pengyuyan@client ~]$ mkdir .ssh
[pengyuyan@client ~]$ chmod 700 .ssh
[pengyuyan@client ~]$ vim ~/.ssh/config
Host *
  StrictHostKeyChecking no
  User root
  PreferredAuthentications Pubkey
[pengyuyan@client ~]$ chmod 600 .ssh/config

# 清空其他主机秘钥
[pengyuyan@client ~]$ > .ssh/known_hosts

# 再次登录不会提示主机key是否校验,验证用户也是root
[pengyuyan@client ~]$ ssh server
Warning: Permanently added 'server,10.1.8.10' (ECDSA) to the list of known hosts.
root@server's password:
参数说明:
- **Host ***,匹配所有目标服务器。
- StrictHostKeyChecking no,连接目标服务器不校验主机key,直接接受。
- User root,连接目标服务器默认使用laoma账户。
- PreferredAuthentications password,连接目标服务器使用密码认证。
- IdentityFile,指定私钥位置。
配置文件权限:建议设置为只能用户自己读写。
[pengyuyan@client ~]$ ssh server
Bad owner or permissions on /home/pengyuyan/.ssh/config

[pengyuyan@client ~]$ chmod 600 .ssh/config
[pengyuyan@client ~]$ ssh server
root@server's password:
配置 ssh 密钥认证
使用密钥登录,避免输入密码,更安全。
配置过程
ssh-keygen
作用:生成密钥
常见选项:
| 选项 | 作用 | 示例 |
|---|---|---|
| -t rsa | 指定密钥类型(默认 RSA) | ssh-keygen -t rsa |
| -b 4096 | 指定密钥长度(默认 2048,建议 4096) | ssh-keygen -t rsa -b 4096 |
| -f 文件名 | 指定密钥存放路径 | ssh-keygen -f ~/.ssh/mykey |
| -C “备注” | 添加注释(方便识别) | ssh-keygen -C “penguyan@client” |
| -N “密码” | 直接设置密钥密码(不交互) | ssh-keygen -N “mypassword” |
# 客户端生成密钥对
[pengyuyan@client ~]$ ssh-keygen
Generating public/private rsa key pair.

# 私钥保存位置
Enter file in which to save the key (/home/pengyuyan/.ssh/id_rsa):`回车`

# 私钥加密密码,回车表示不加密
Enter passphrase (empty for no passphrase): `回车`
# 再次回车
Enter same passphrase again: `回车`

Your identification has been saved in /home/pengyuyan/.ssh/id_rsa.
Your public key has been saved in /home/pengyuyan/.ssh/id_rsa.pub.
The key fingerprint is:
SHA256:OAfLyL6KIXr44DV7vhpystqqXwsbFl2tGP6HZP4GLR4 pengyuyan@server.pengyuyan.cloud
The key's randomart image is:
+---[RSA 2048]----+
|                 |
|       .         |
|    . o .        |
|   + * =         |
|  . * O.S        |
|   o =E+.        |
|+++=o.++.        |
|=*B=++.o.        |
|OB*+*o...        |
+----[SHA256]-----+

# 查看生成的文件
[pengyuyan@client ~]$ ls .ssh/
config  id_rsa  id_rsa.pub  known_hosts

# 将公钥推动给目标服务器上的目标用户
[pengyuyan@client ~]$ ssh-copy-id pengyuyan@server

# 验证
[pengyuyan@client ~]$ ssh pengyuyan@server hostname
server.pengyuyan.cloud

# 推送公钥相当于:
# 将公钥内容保存到目标服务器上目标用户家目录下.ssh/authorized_keys中
[pengyuyan@client ~]$ cat .ssh/id_rsa.pub
ssh-rsa AAAAB3NzaC1yc2EAAAADAQABAAABAQDtFoo/sD+pB1uBw9XMuXLcO//RgghgHeYjdibXMCtw5UUf/H5lYcP4ZjCbQTdmH7n0ZkxYriIU+Q6atY0Jel3+sWzCD3K9DSU8g5Ux2wjCrVhFJGTtsMXeI+XqQW0MqY2Gn9KtC098JKlzikUz+SbDe61vyqCYHVeBNmWtTtZORhywHlN4HxLIGOlGvnPrXI8+uhdgBqV6Sxo0XkpOvB2y+0Kjxb0SQUCYpdkT/cJqUz2Bm/diPEDmHPvlVn3/chD7Uvt++wQhGCFEPGBawQIsb7sT73UpIQ20vaxjs8okQ1XZNzHW1KnLBhYskrtWU7HIHHTWObpw5mwoXj64wcPX pengyuyan@client.pengyuyan.cloud

# 在server端查看
[pengyuyan@server ~]$ cat .ssh/authorized_keys
ssh-rsa AAAAB3NzaC1yc2EAAAADAQABAAABAQDtFoo/sD+pB1uBw9XMuXLcO//RgghgHeYjdibXMCtw5UUf/H5lYcP4ZjCbQTdmH7n0ZkxYriIU+Q6atY0Jel3+sWzCD3K9DSU8g5Ux2wjCrVhFJGTtsMXeI+XqQW0MqY2Gn9KtC098JKlzikUz+SbDe61vyqCYHVeBNmWtTtZORhywHlN4HxLIGOlGvnPrXI8+uhdgBqV6Sxo0XkpOvB2y+0Kjxb0SQUCYpdkT/cJqUz2Bm/diPEDmHPvlVn3/chD7Uvt++wQhGCFEPGBawQIsb7sT73UpIQ20vaxjs8okQ1XZNzHW1KnLBhYskrtWU7HIHHTWObpw5mwoXj64wcPX pengyuyan@client.pengyuyan.cloud

# 推给目标主机root用户
[root@server ~]# mkdir -m 700 .ssh
[root@server ~]# cp ~pengyuyan/.ssh/authorized_keys .ssh

# 客户端验证
[pengyuyan@client ~]$ ssh root@server hostname
server.pengyuyan.cloud
以非交互方式生成密钥对
[pengyuyan@client ~]$ ssh-keygen -t rsa -N '' -f id_rsa_new
[pengyuyan@client ~]$ ls *new*
id_rsa_new  id_rsa_new.pub
其他选项
# -i 指定私钥位置
[pengyuyan@client ~]$ mv .ssh/id_rsa /tmp
[pengyuyan@client ~]$ ssh -i /tmp/id_rsa root@server hostname
server.pengyuyan.cloud

# 如果找不到密钥,则使用密码登录

# -p 选项指定目标服务器 sshd 服务端口号,默认22
[pengyuyan@client ~]$ ssh -l root -p 1022 server hostname
root@server's password:
server.pengyuyan.cloud
排故
故障:配置密钥登录后,远程登录仍要需要输入密码验证。
[root@client ~]# ssh 'root@10.1.8.10' hostname
root@10.1.8.10's password:
模拟:将目标主机上目标用户的家目录的权限改为777。
[root@server ~]# chmod 777 /root
处理过程:
-
查看日志
# 客户端登录的时候,监控服务端日志
[root@server ~]# tail -f /var/log/secure
......
Jul 31 16:13:41 server sshd[3693]: Authentication refused: bad ownership or modes for directory /root
......
发现提示:文件权限有问题。
-
查找文件权限。
[root@server ~]# ls -ld /root
drwxrwxrwx. 3 root root 4096 Jul 31 16:09 /root

# 更改权限
[root@server ~]# chmod 700 /root
加固 SSH 服务
配置文件
sshd服务配置文件:/etc/ssh/sshd_config。帮助 sshd_config(5)
常见配置:
- PermitRootLogin prohibit-password,禁止root用户通过密码登录。
- PermitRootLogin no,禁止 root 用户登录。
- root用户权限不受限制。
- root用户存在每个linux系统,只需要猜密码就可以。
- 从审计角度来看,很难跟踪哪个授权用户以root身份登录并进行了更改。 如果用户必须以普通用户身份登录并切换到root帐户,则会生成一个日志事件,可用于帮助提供问责制。
- PasswordAuthentication no,禁止用户使用密码登录。
- AllowUsers exampleuser,允许特定用户登录,该用户可以提权为root。
- UseDNS no,客户端连接服务器的时候,服务器不需要反向解析服务端IP地址,提高连接速度。
1. 禁止 root 密码登录
环境准备:提前配置好 root 秘钥登录。
[root@server ~]# vim /etc/ssh/sshd_config
#PermitRootLogin yes
# 添加一行
PermitRootLogin prohibit-password

# 重启服务
[root@server ~]# systemctl reload sshd
连接测试
# 即使使用正确的密码,也无法远程登录
[pengyuyan@client ~]$ ssh root@server
root@server's password:
Permission denied, please try again.
root@server's password:
Permission denied, please try again.
root@server's password:
Permission denied (publickey,gssapi-keyex,gssapi-with-mic,password).

# 如果配置了秘钥登录,则需要使用选项强制密码认证
[pengyuyan@client ~]$ ssh -o PreferredAuthentications=password root@server
2. 禁止 root 登录
环境准备:
[root@server ~]# vim /etc/ssh/sshd_config
#PermitRootLogin yes
# 添加一行
PermitRootLogin no

# 重启服务
[root@server ~]# systemctl reload sshd
连接测试:不管是密码还是秘钥都无法登录
# 即使配置了免密登录,也无法远程登录
[pengyuyan@client ~]$ ssh root@server
root@server's password:
Permission denied, please try again.
root@server's password:
Permission denied, please try again.
root@server's password:
Permission denied (publickey,gssapi-keyex,gssapi-with-mic,password).

# 但是可以使用普通用户登录,然后提权为root用户
[pengyuyan@client ~]$ ssh pengyuyan@server
[pengyuyan@server ~]$ su -
[root@server ~]#
3. 禁止密码登录
环境准备:
[root@server ~]# vim /etc/ssh/sshd_config
# 注释原有行
#PasswordAuthentication yes
# 添加新行,设置为no
PasswordAuthentication no

# 重启服务
[root@server ~]# systemctl reload sshd
连接测试:秘钥可以登录
# pengyuyan账户未配置密钥登录,直接拒绝
[pengyuyan@client ~]$ ssh -o PreferredAuthentications=password pengyuyan@server
Permission denied (publickey,gssapi-keyex,gssapi-with-mic).

# 秘钥登录,仍然支持
[pengyuyan@client ~]$ ssh pengyuyan@server
Last login: Thu May 14 10:35:05 2026 from 10.1.8.11
4. 只允许特定用户登录
环境准备:wuyanzu用户也可以秘钥登录。
[root@server ~]# useradd wuyanzu
[root@server ~]# echo 123 | passwd --stdin wuyanzu
[root@server ~]# mkdir -m 700 /home/wuyanzu/.ssh/
[root@server ~]# cp .ssh/authorized_keys /home/wuyanzu/.ssh/
[root@server ~]# chown -R wuyanzu:wuyanzu /home/wuyanzu/.ssh/
配置sshd服务
[root@server ~]# vim /etc/ssh/sshd_config
# 最后添加一行
AllowUsers pengyuyan

# 重启服务
[root@server ~]# systemctl reload sshd
测试连接:pengyuyan 可以通过秘钥认证登录;wuyanzu不管通过什么方式认证都不可以登录。
[pengyuyan@client ~]$ ssh wuyanzu@server hostname
Permission denied (publickey,gssapi-keyex,gssapi-with-mic).

[pengyuyan@client ~]$ ssh wuyanzu@server hostname
server.pengyuyan.cloud
dAuthentications=password pengyuyan@server
Permission denied (publickey,gssapi-keyex,gssapi-with-mic).
秘钥登录,仍然支持
[pengyuyan@client ~]$ ssh pengyuyan@server
Last login: Thu May 14 10:35:05 2026 from 10.1.8.11
### 4. 只允许特定用户登录

环境准备:wuyanzu用户也可以秘钥登录。

```bash
[root@server ~]# useradd wuyanzu
[root@server ~]# echo 123 | passwd --stdin wuyanzu
[root@server ~]# mkdir -m 700 /home/wuyanzu/.ssh/
[root@server ~]# cp .ssh/authorized_keys /home/wuyanzu/.ssh/
[root@server ~]# chown -R wuyanzu:wuyanzu /home/wuyanzu/.ssh/
配置sshd服务
[root@server ~]# vim /etc/ssh/sshd_config
# 最后添加一行
AllowUsers pengyuyan

# 重启服务
[root@server ~]# systemctl reload sshd
测试连接:pengyuyan 可以通过秘钥认证登录;wuyanzu不管通过什么方式认证都不可以登录。
[pengyuyan@client ~]$ ssh wuyanzu@server hostname
Permission denied (publickey,gssapi-keyex,gssapi-with-mic).

[pengyuyan@client ~]$ ssh wuyanzu@server hostname
server.pengyuyan.cloud

openEuler 是由开放原子开源基金会孵化的全场景开源操作系统项目,面向数字基础设施四大核心场景(服务器、云计算、边缘计算、嵌入式),全面支持 ARM、x86、RISC-V、loongArch、PowerPC、SW-64 等多样性计算架构
更多推荐

 17
17 0
0- 0


 已为社区贡献13条内容

所有评论(0)