VM 实战:从两种方式安装到热迁移,一篇打通
KVM 实战:从安装到热迁移
一、安装KVM-方式1-系统自带
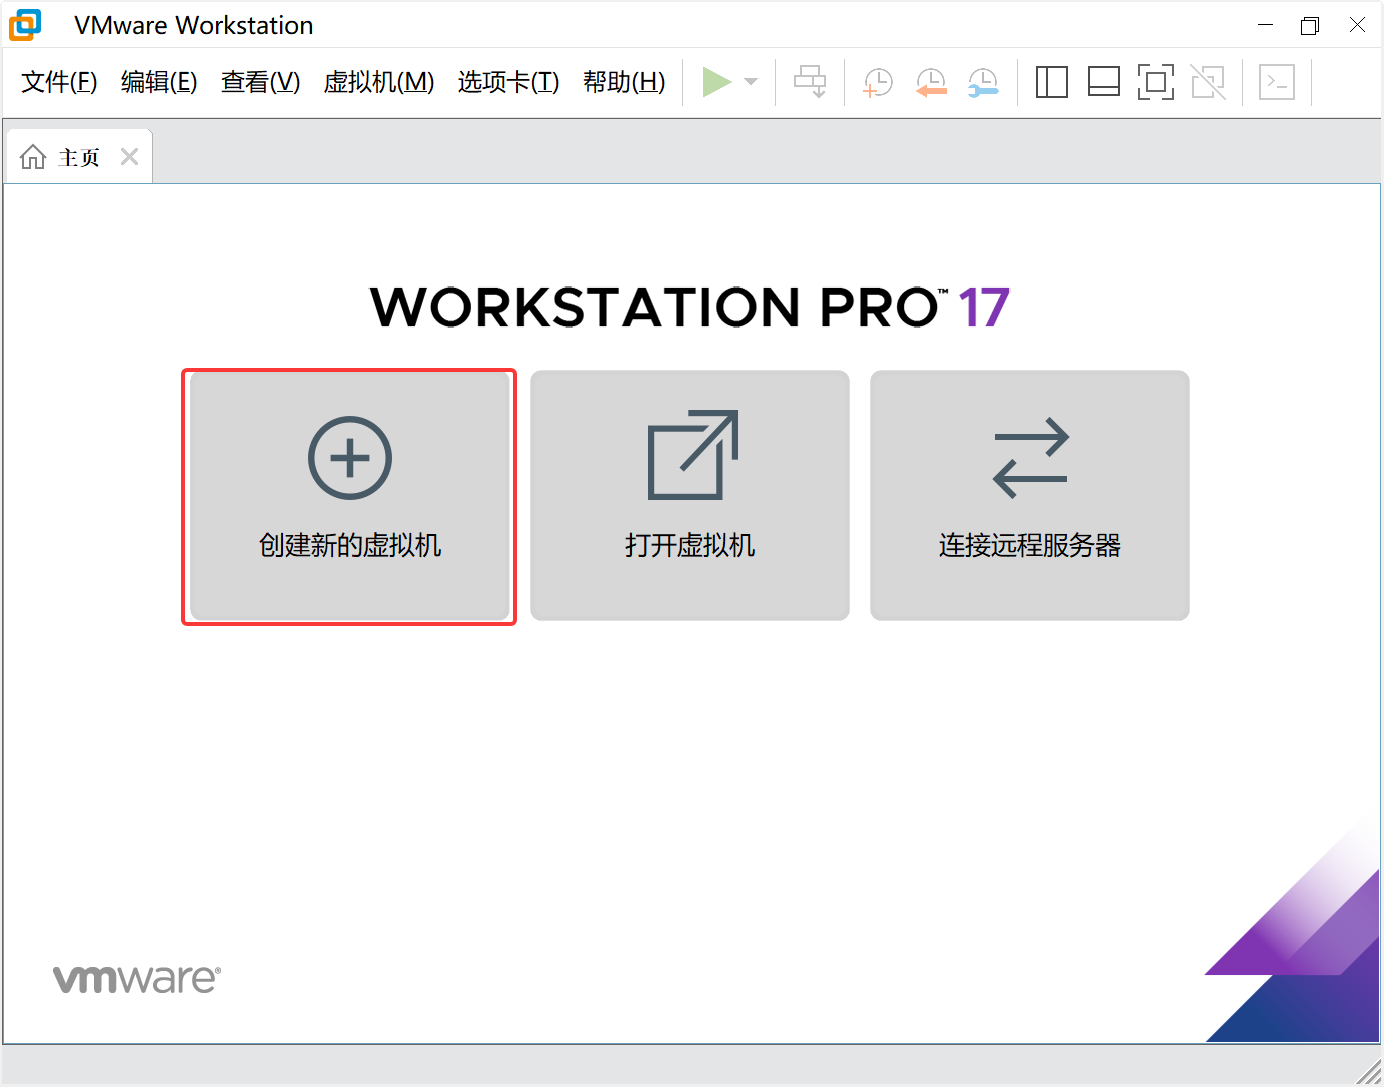
点击创建新的虚拟机
选择自定义
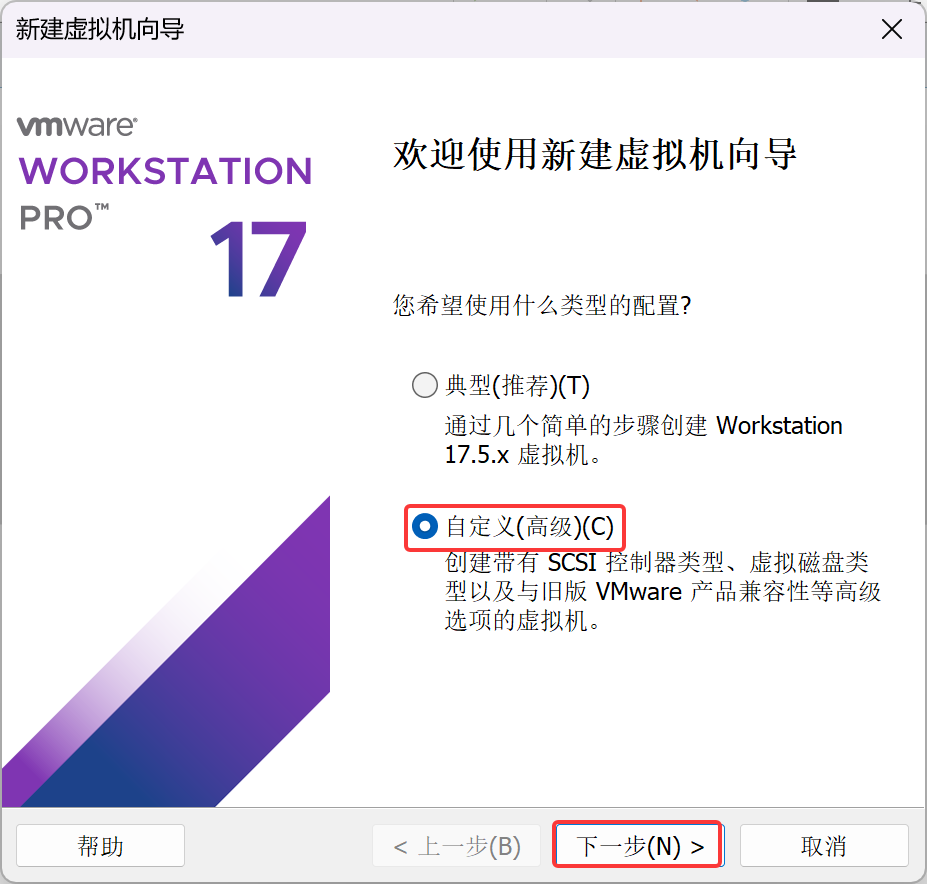
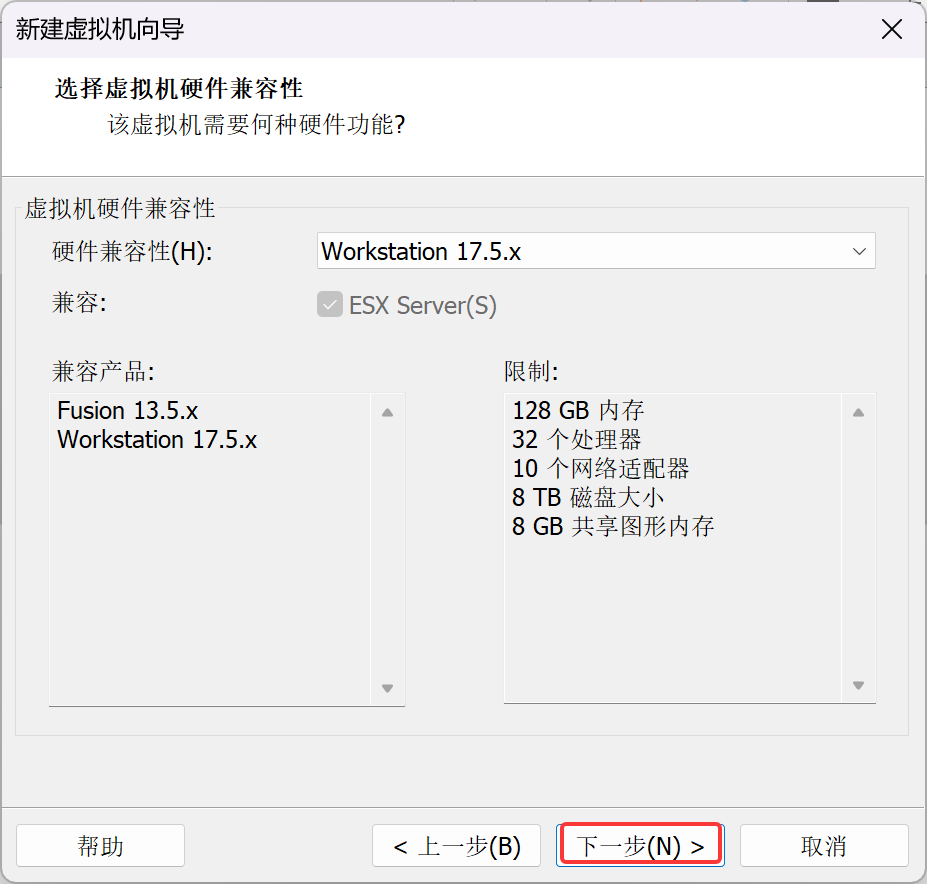
下一步
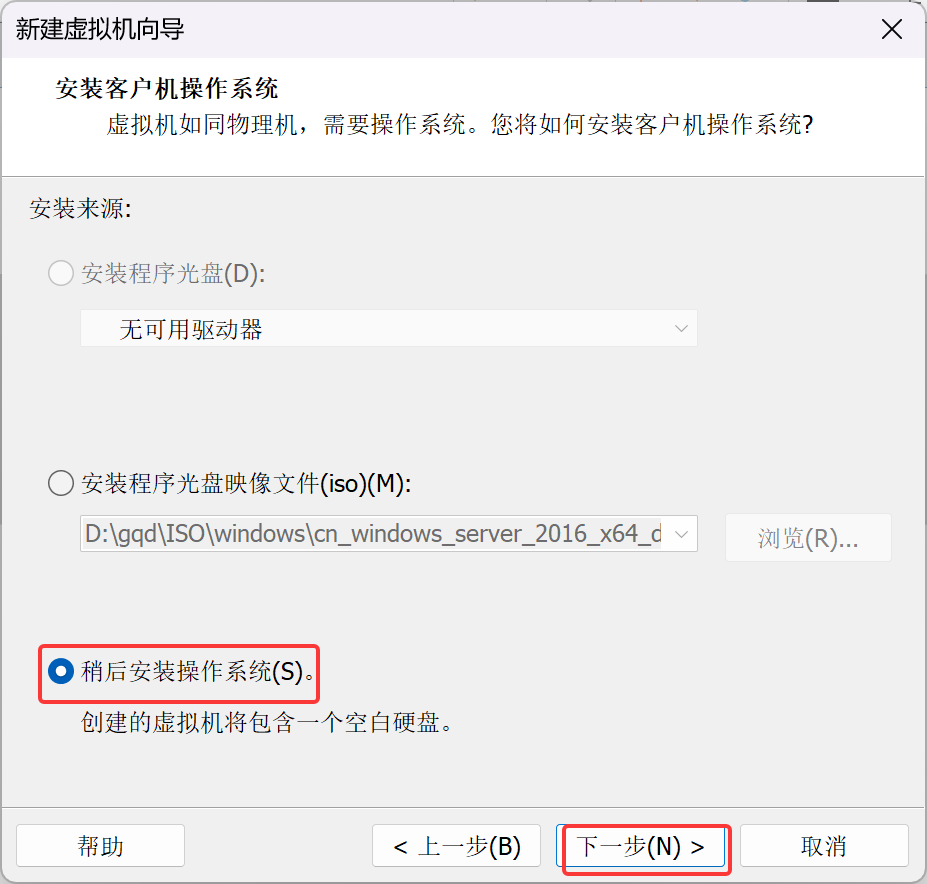
选择稍后安装操作系统
客户机操作系统选择Linux,版本选择CentOS 8 64位
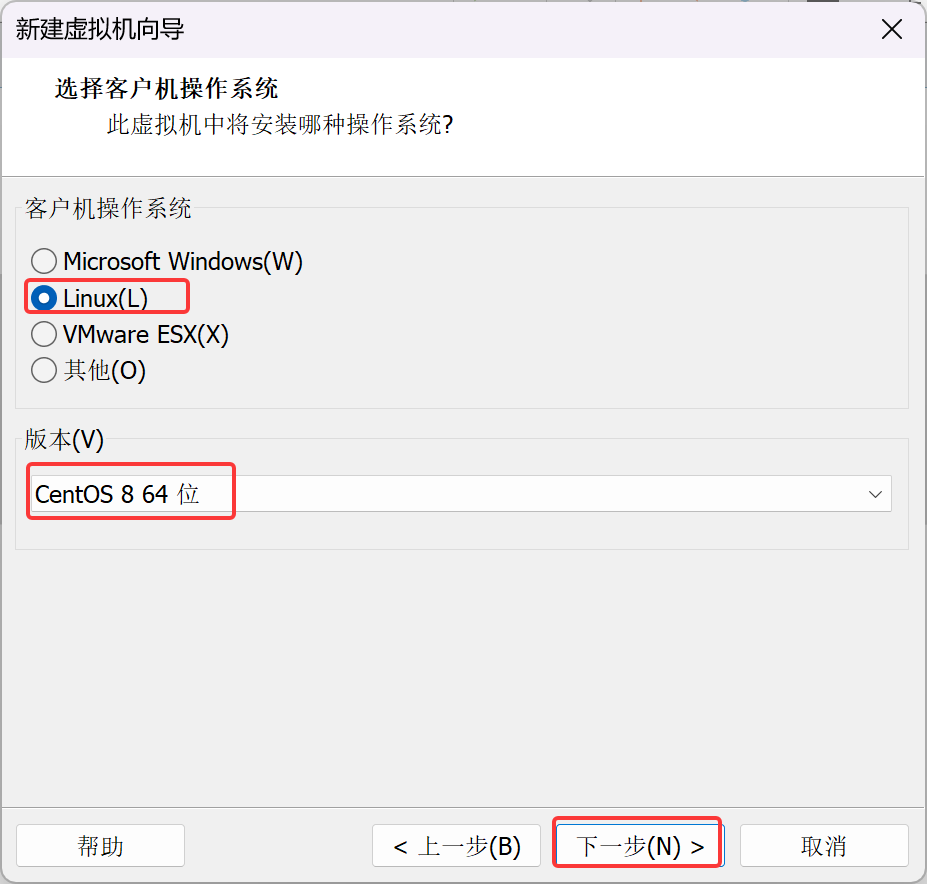
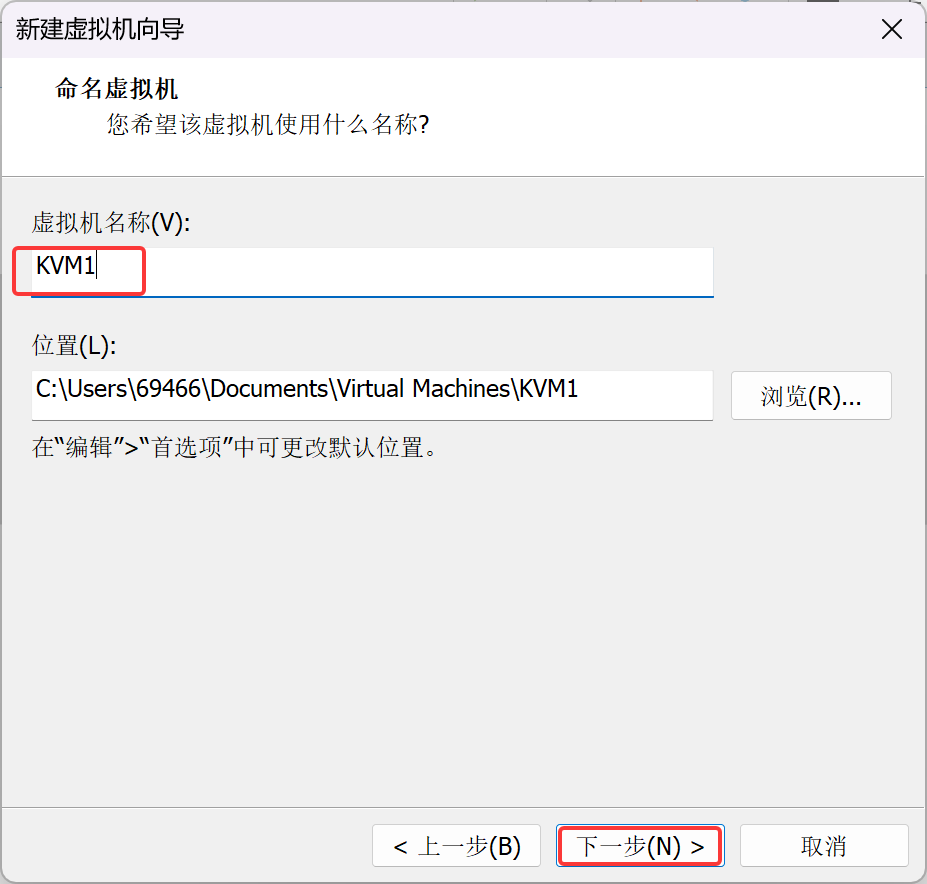
虚拟机名称命名KVM1
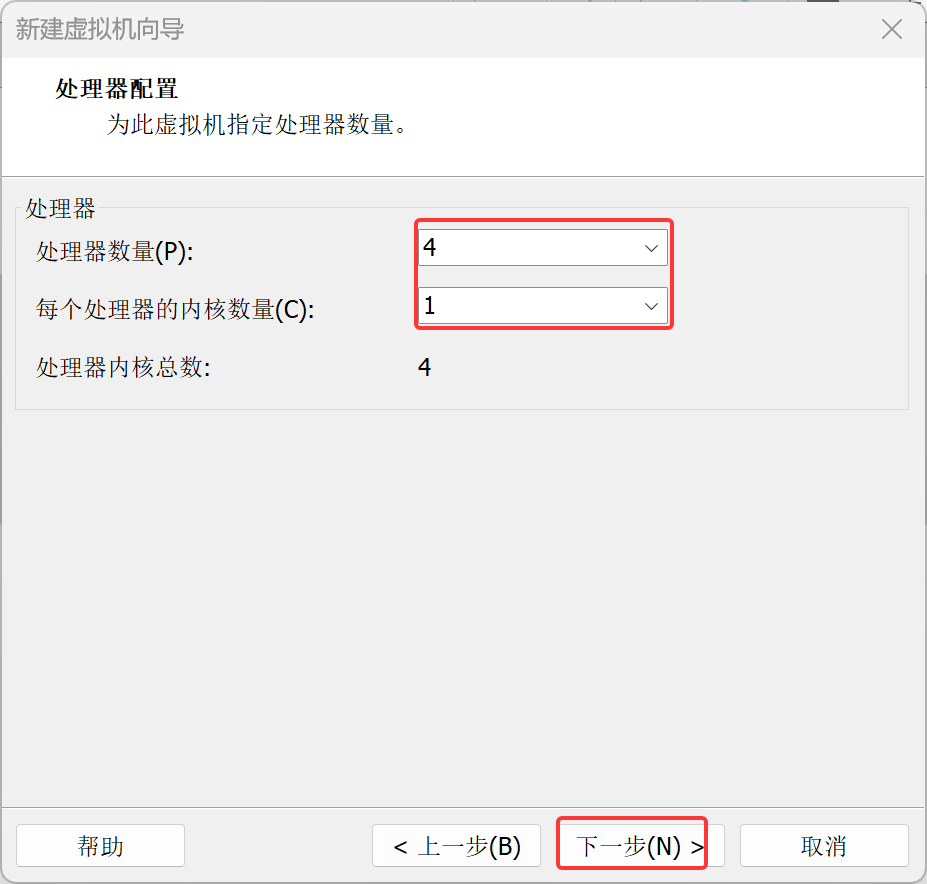
处理器数量选择合适的数量,选择下一步
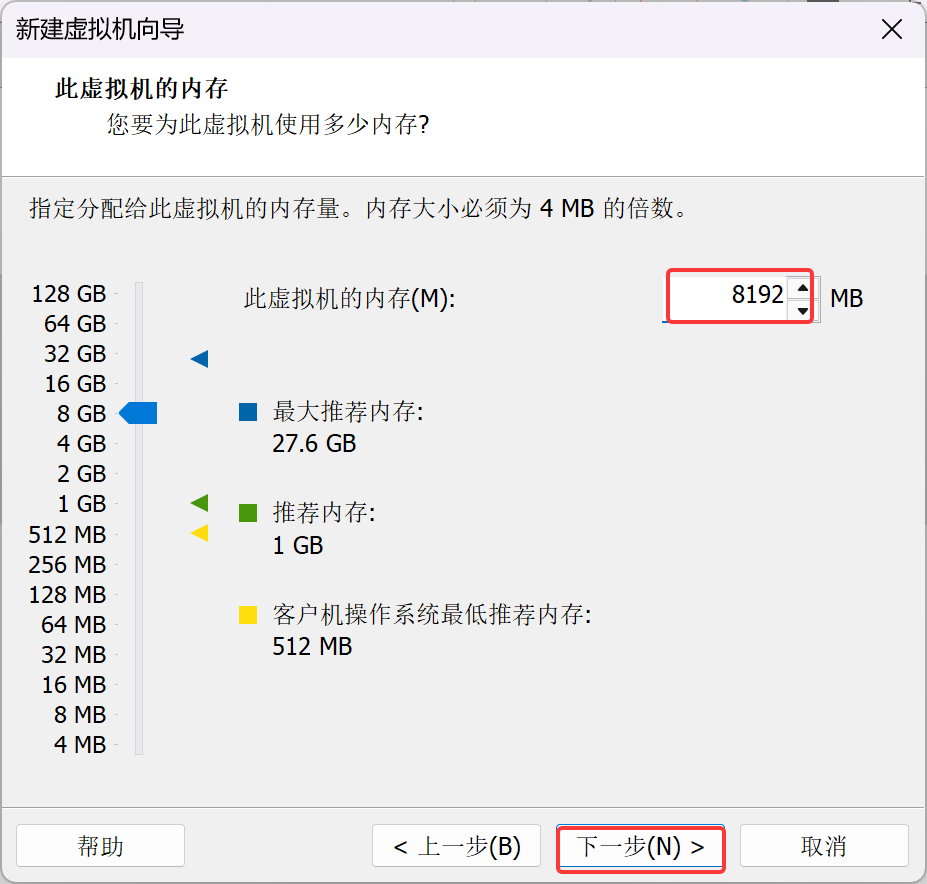
选择合适的内存
网络类型选择NAT
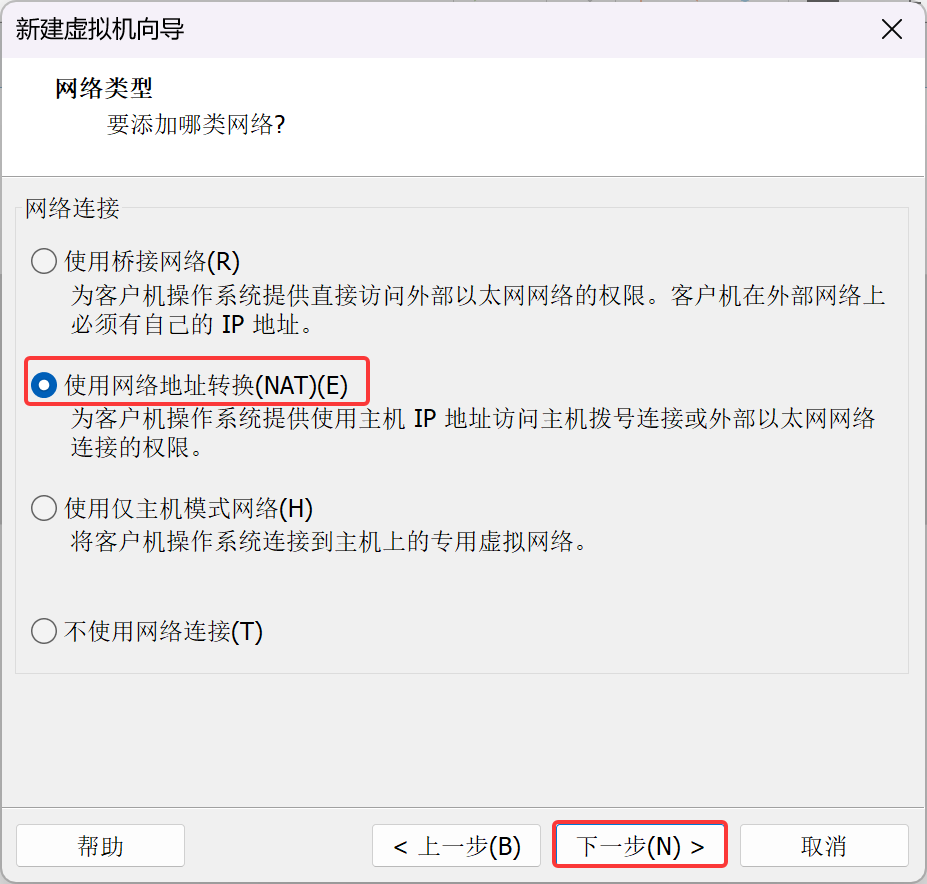
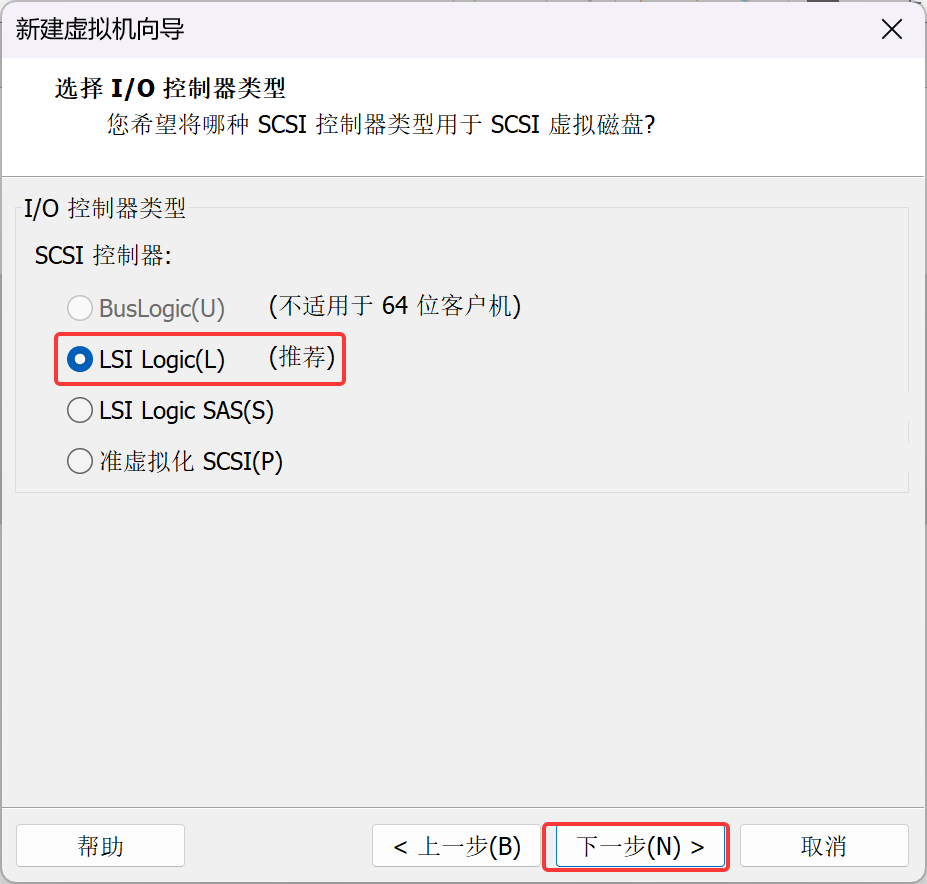
I/O控制器类型选择推荐的
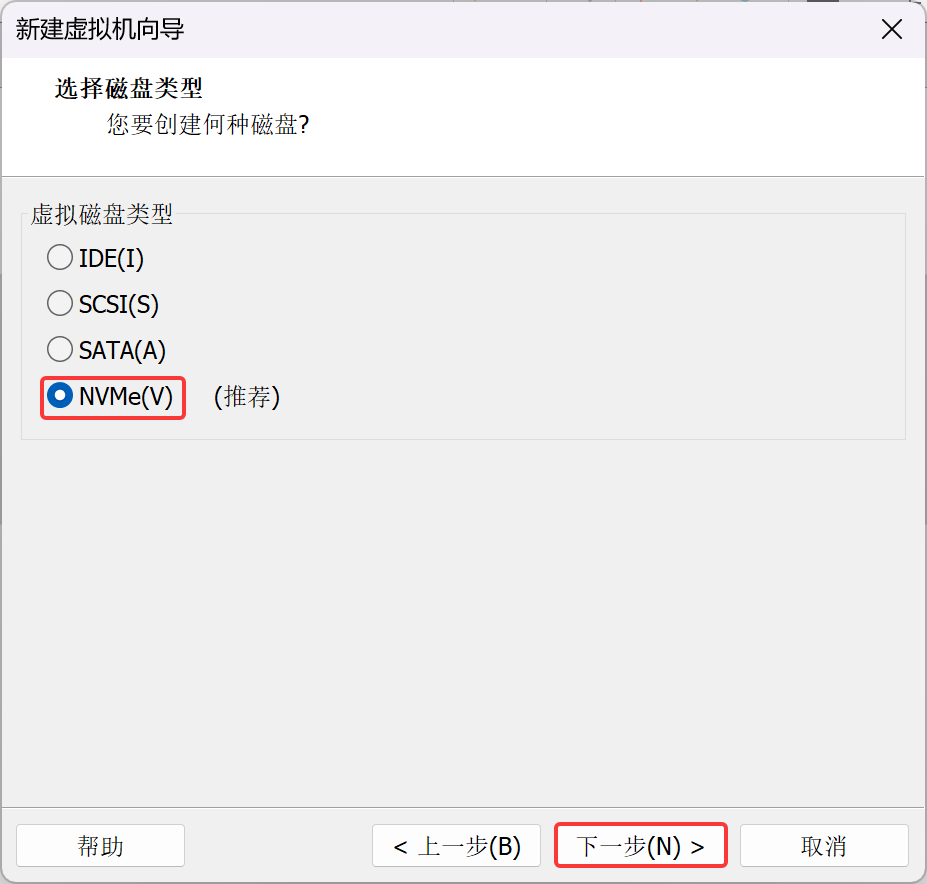
虚拟磁盘类型选择推荐的
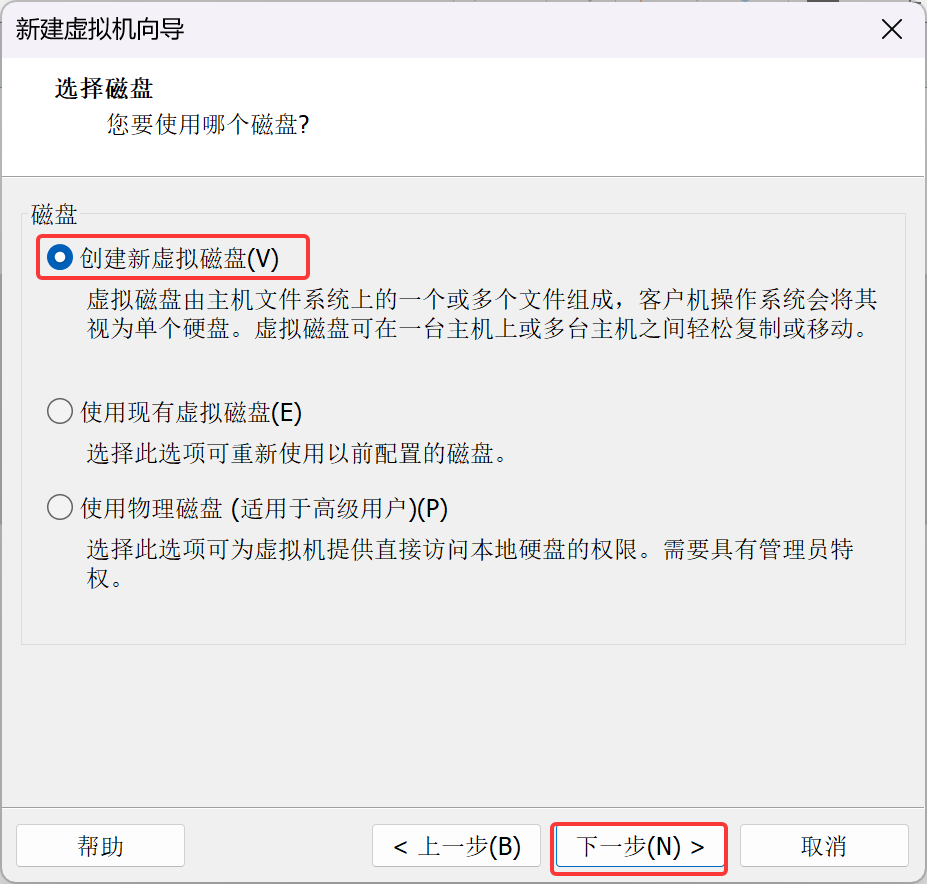
选择创建新的磁盘
填写合适的磁盘容量
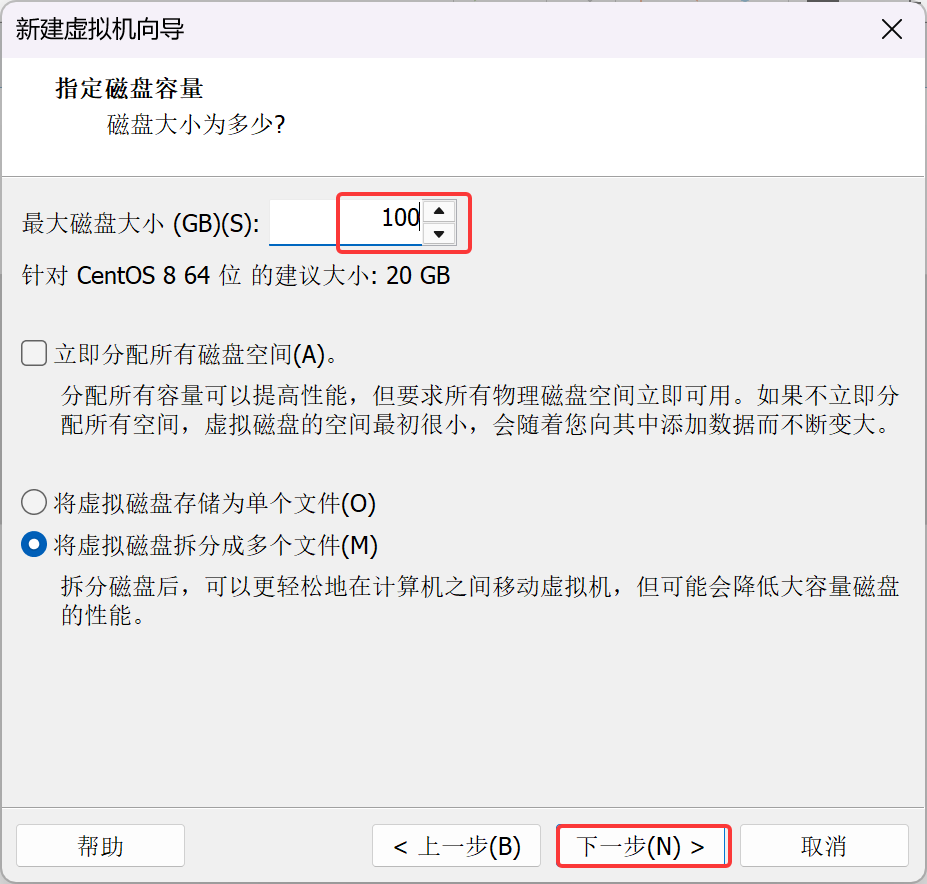
下一步
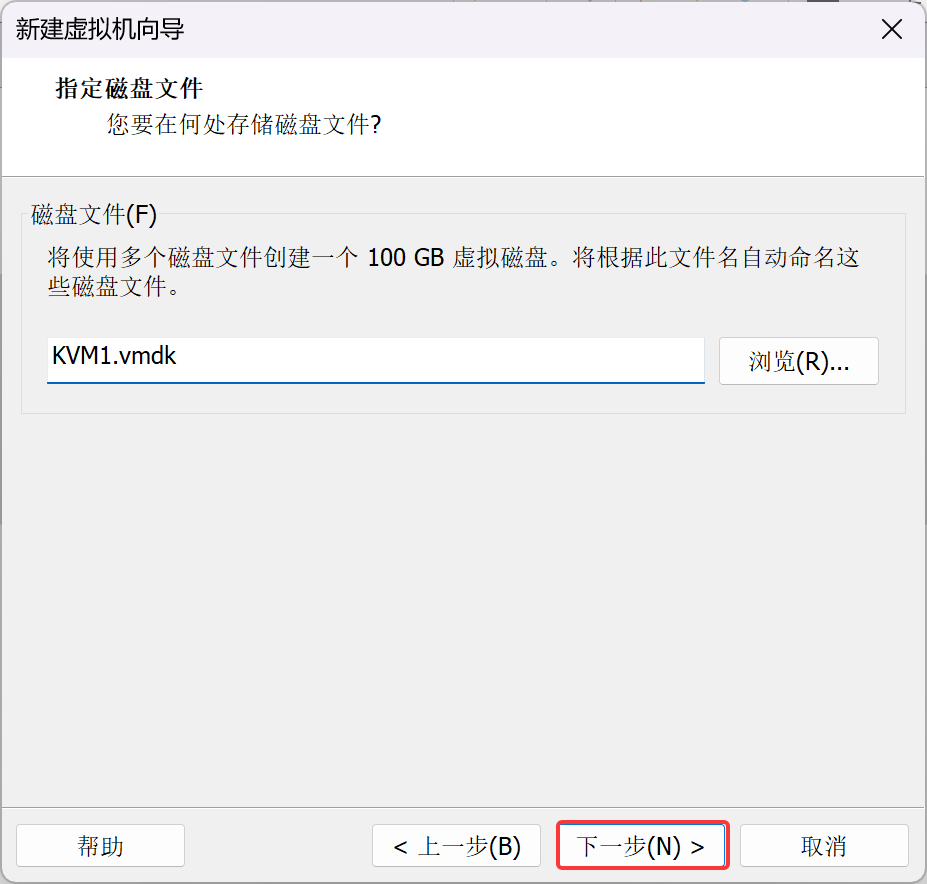
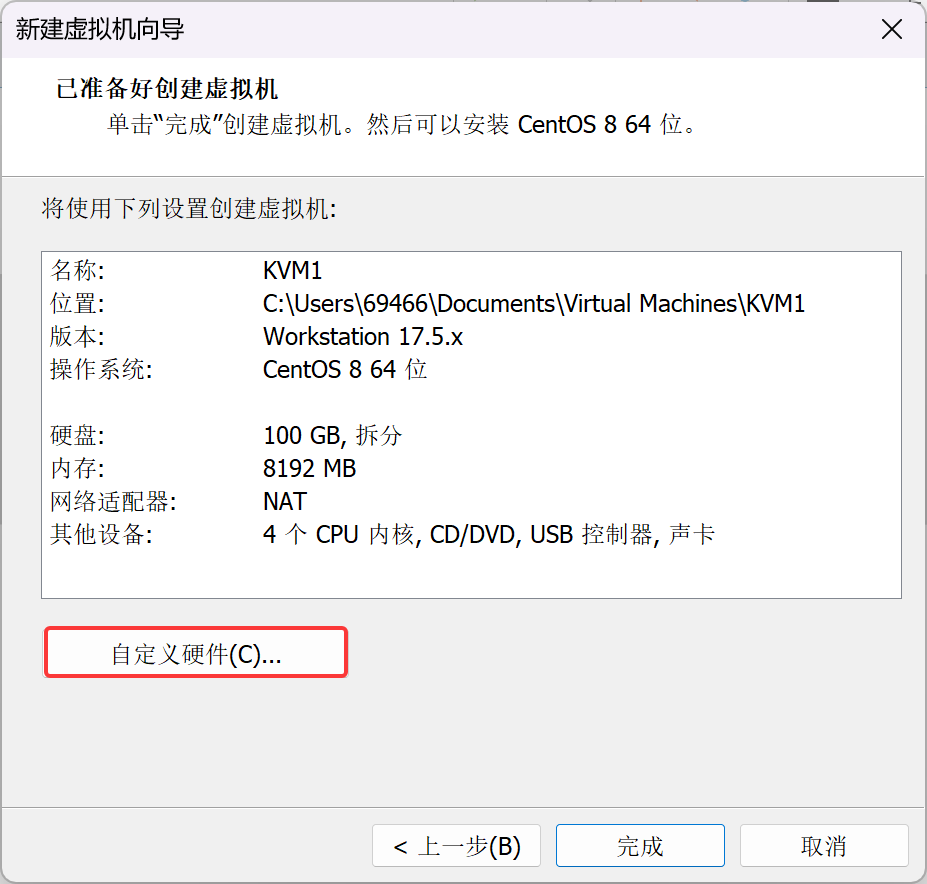
选择自定义硬件
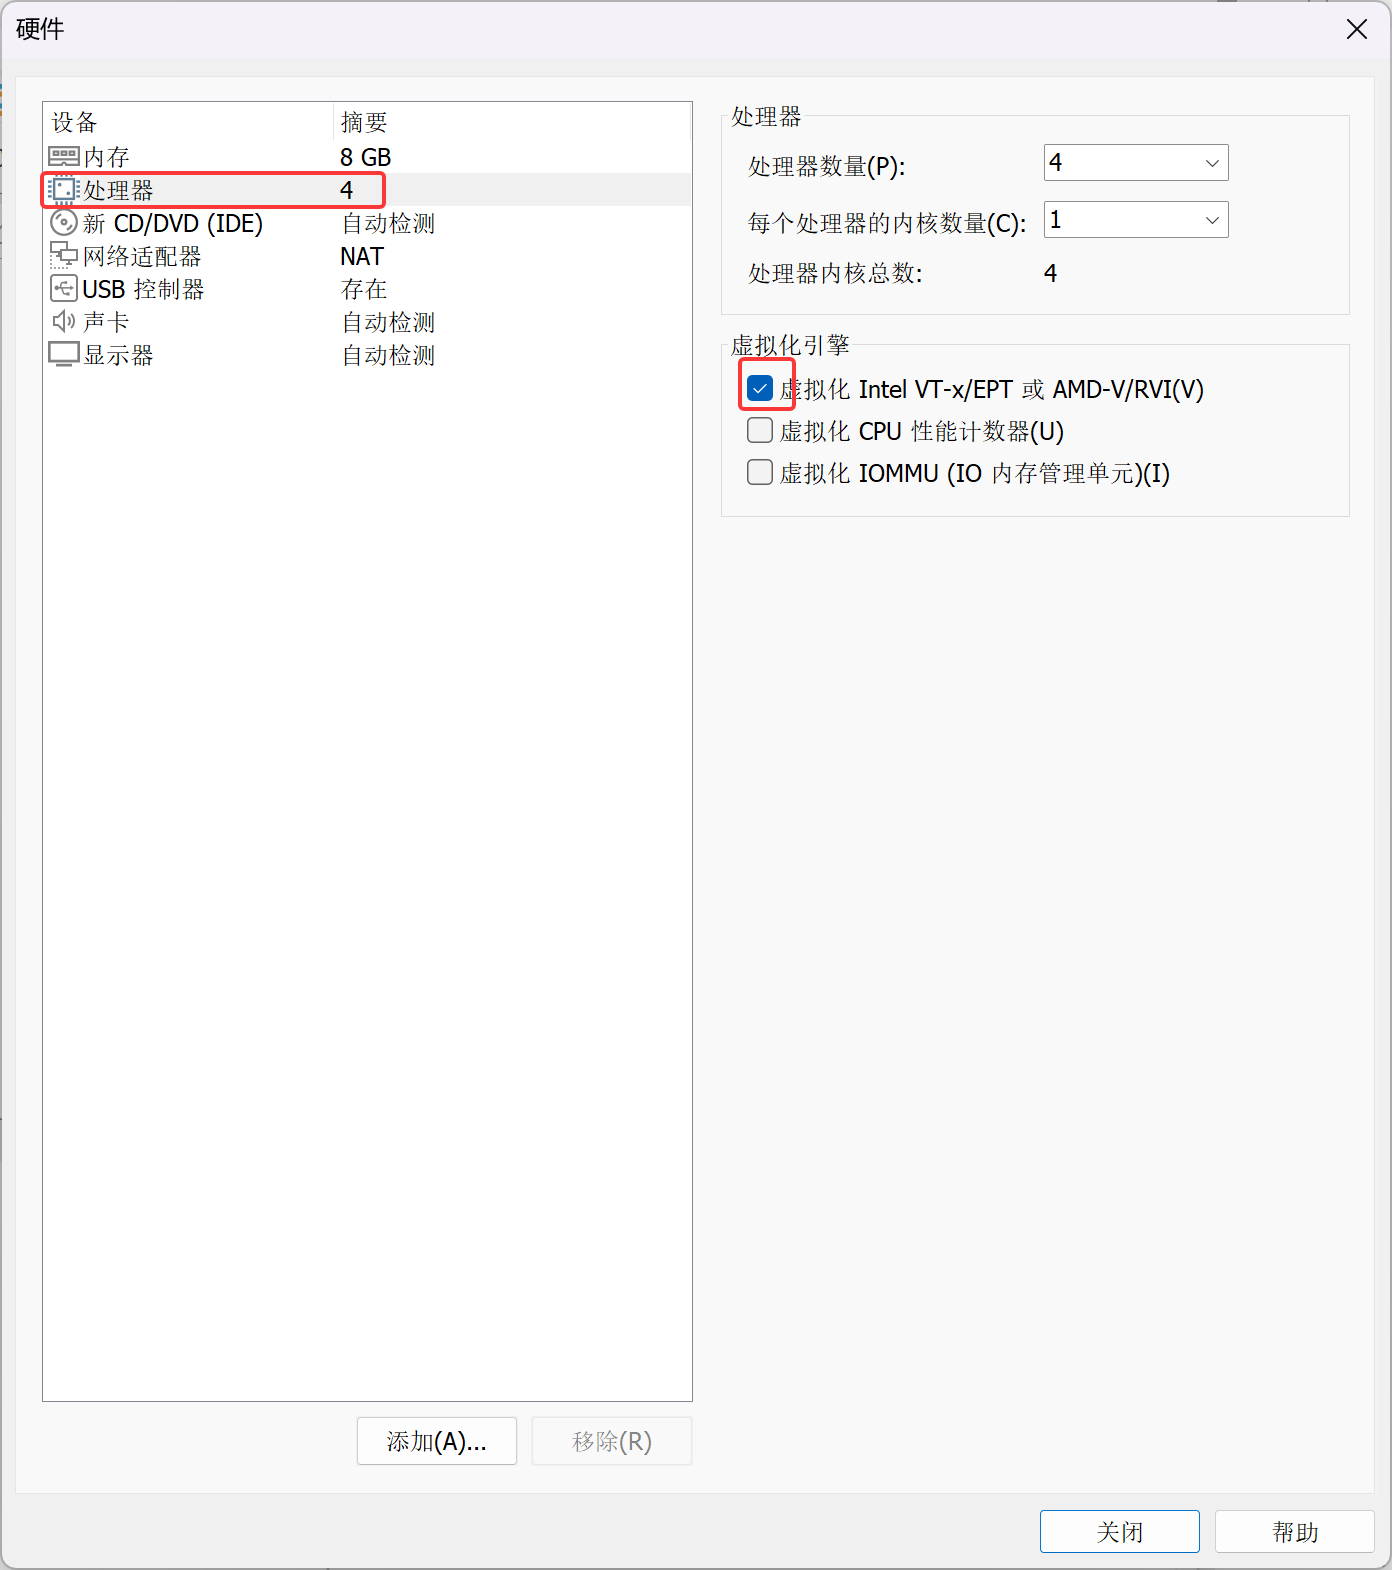
点击处理器,虚拟化引擎中勾选虚拟化Intel VT-x
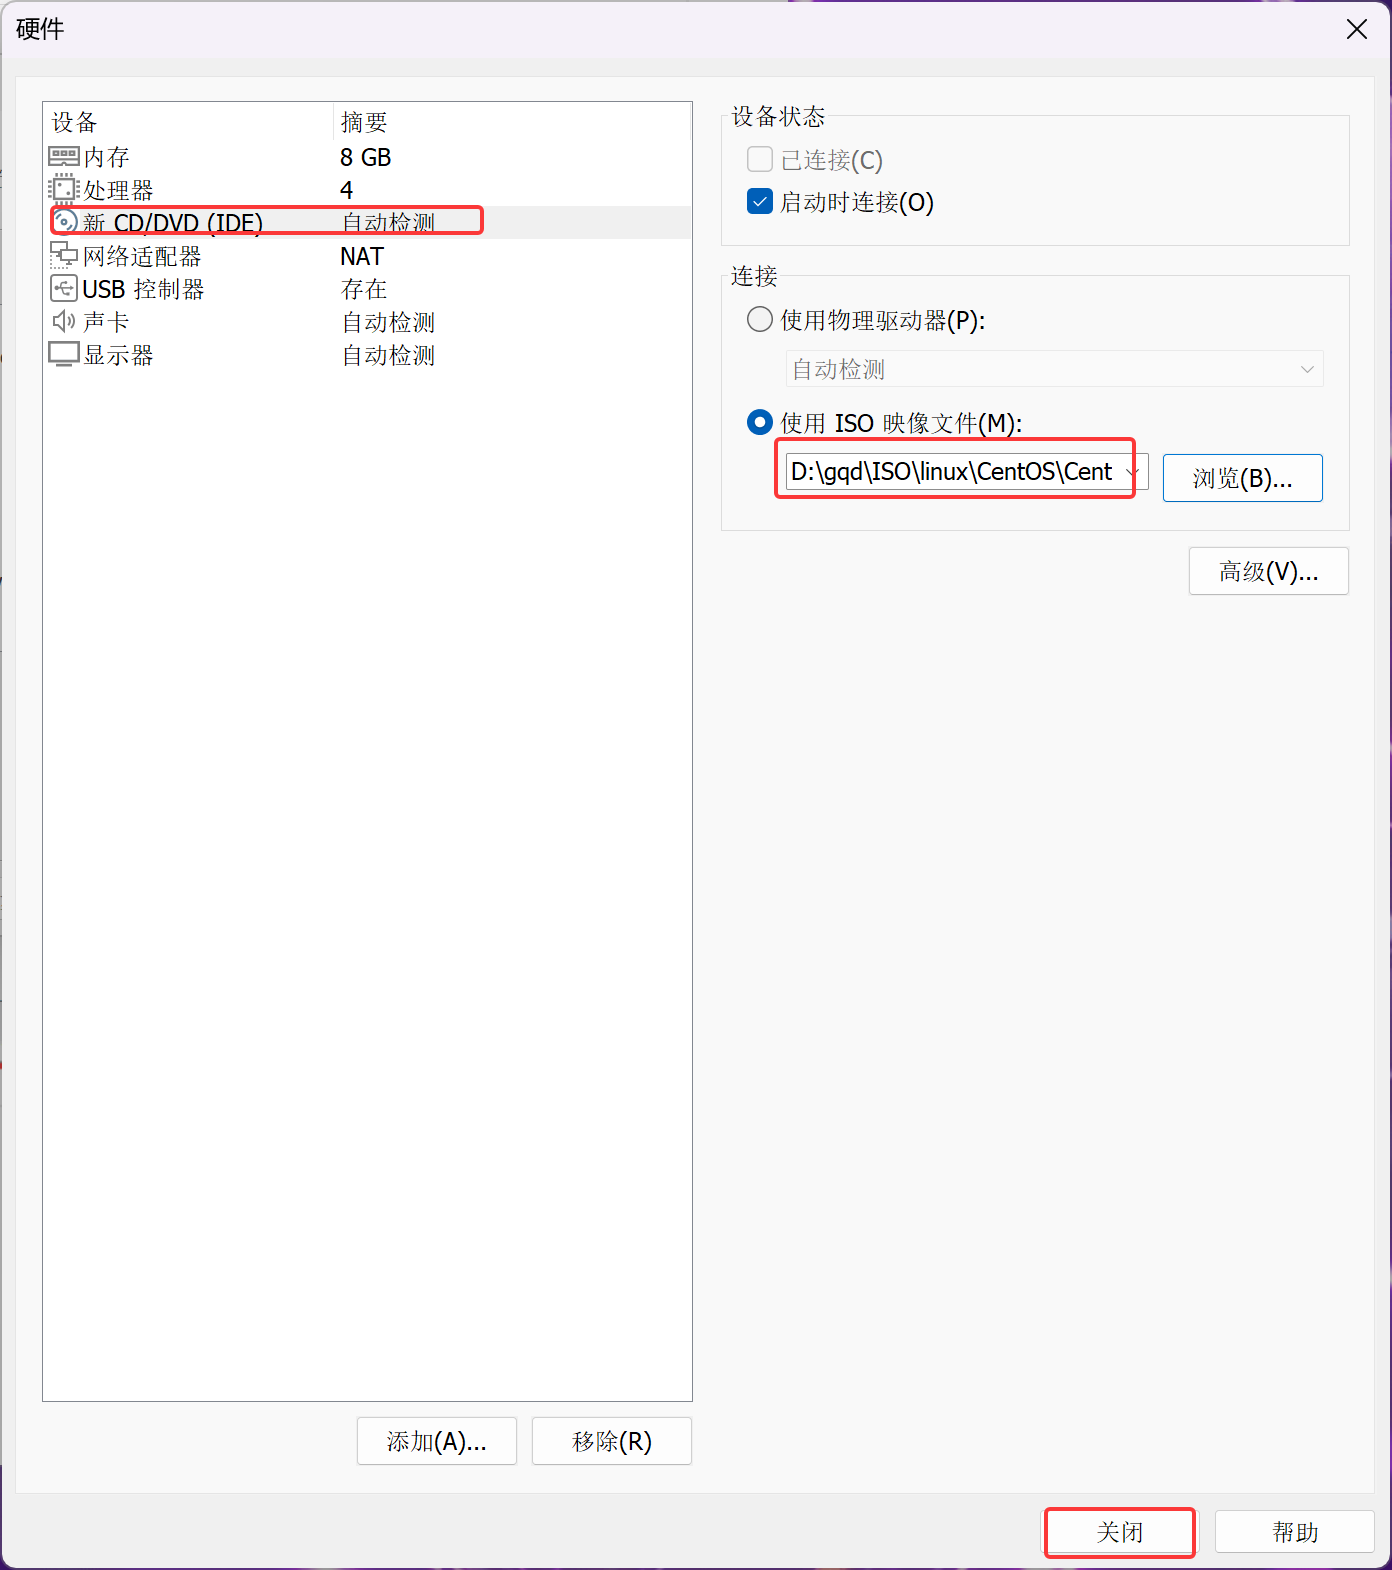
点击新CD/DVD,选择使用ISO映像文件,选择CentOS-Stream8镜像光盘
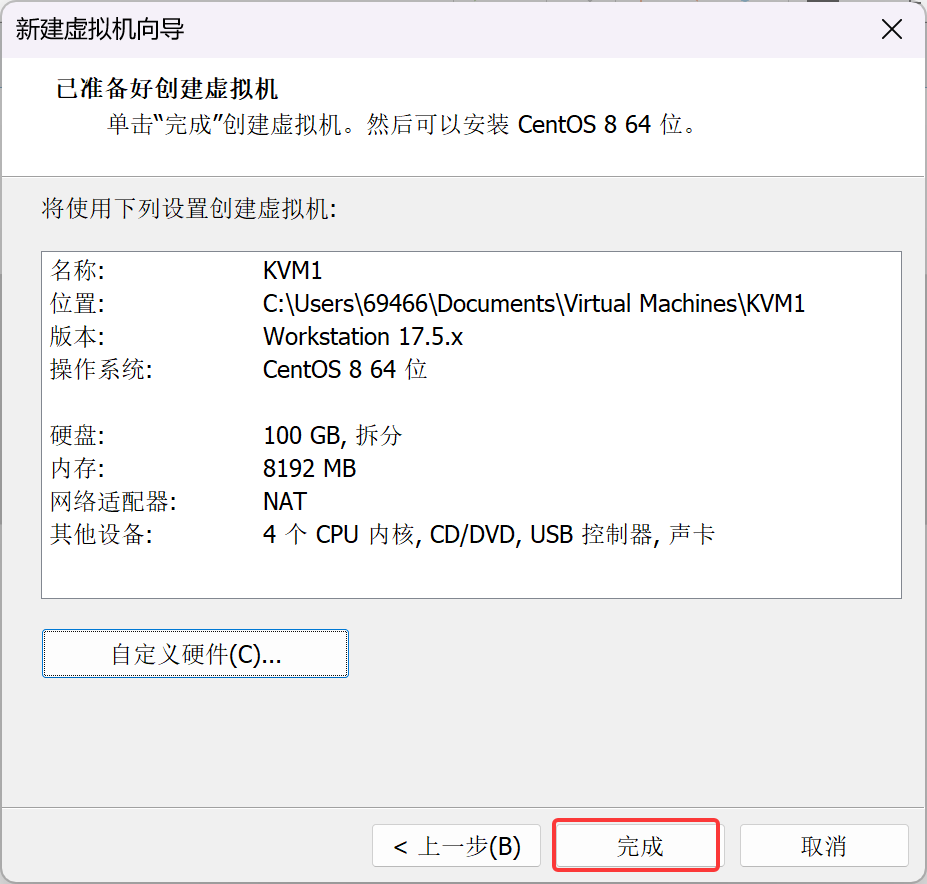
点击完成
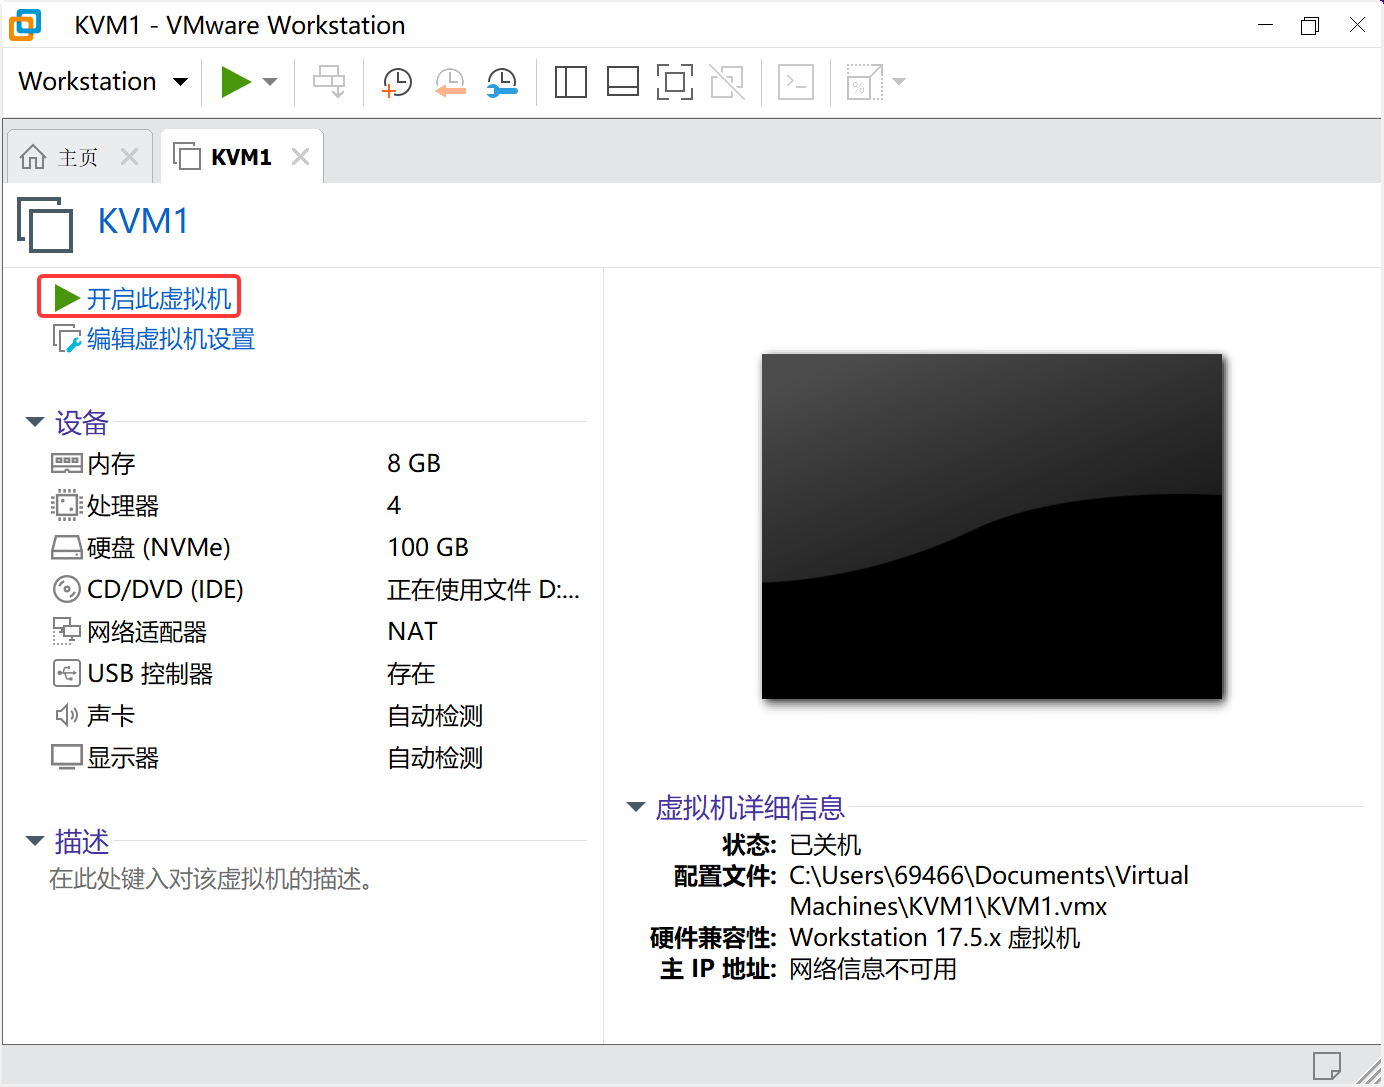
点击开启此虚拟机
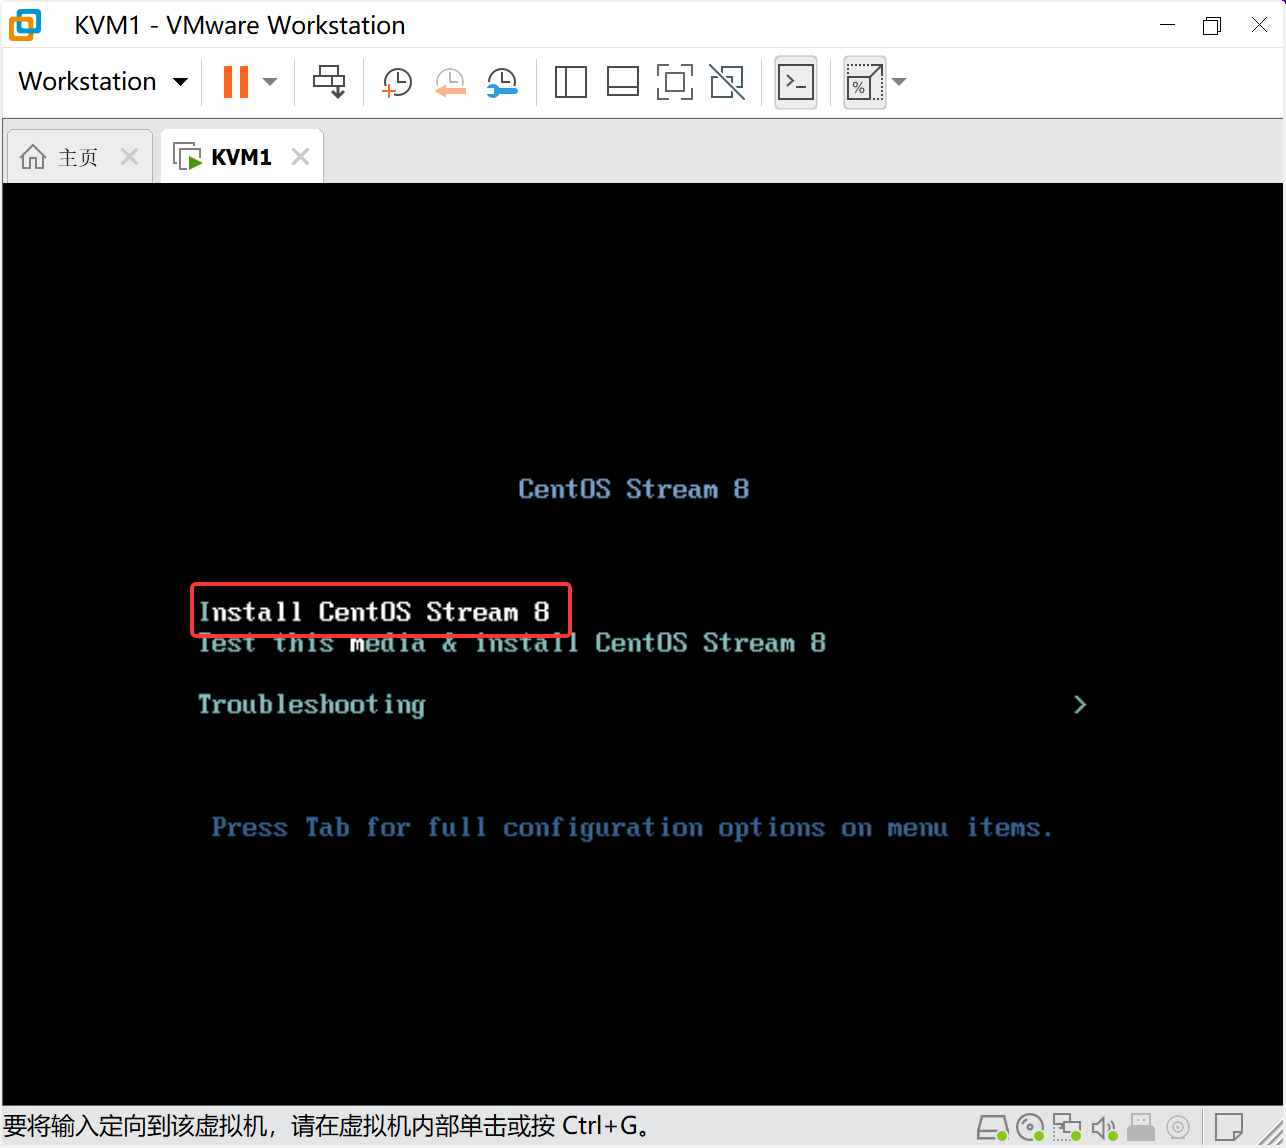
选择Install CentOS Stream 8
选择Continue
选择安装位置
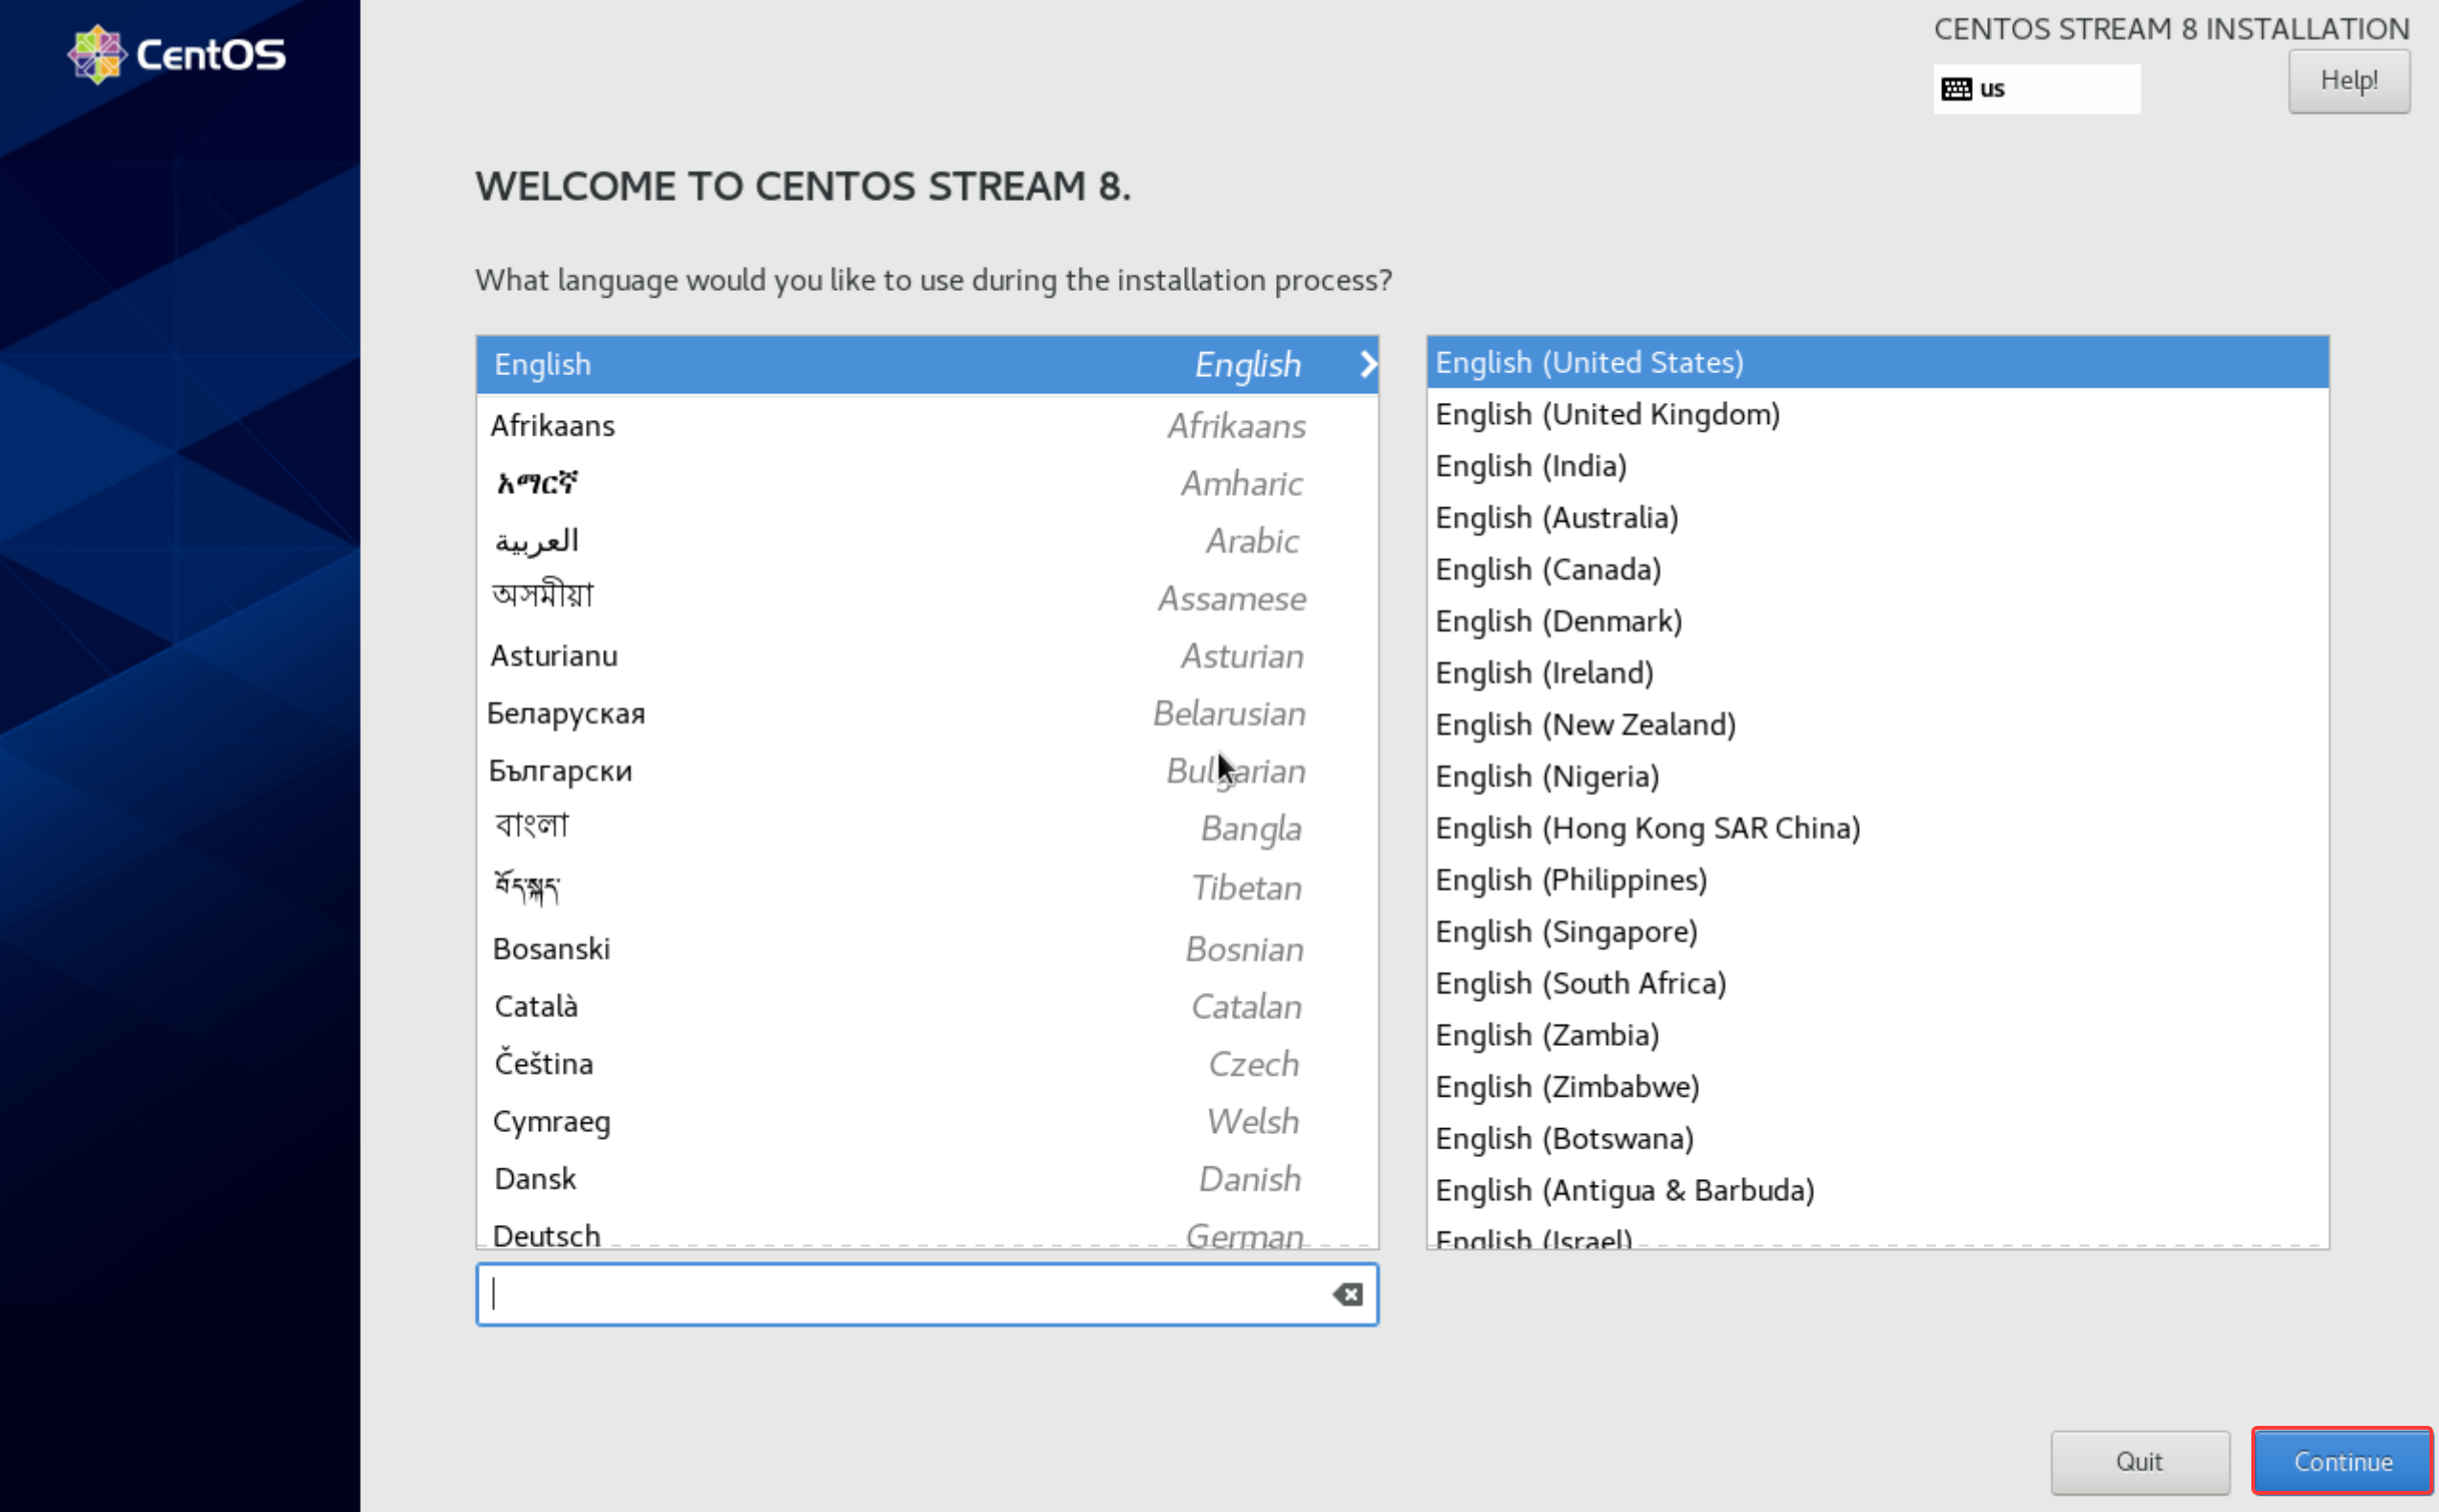
点击Done
选择时区
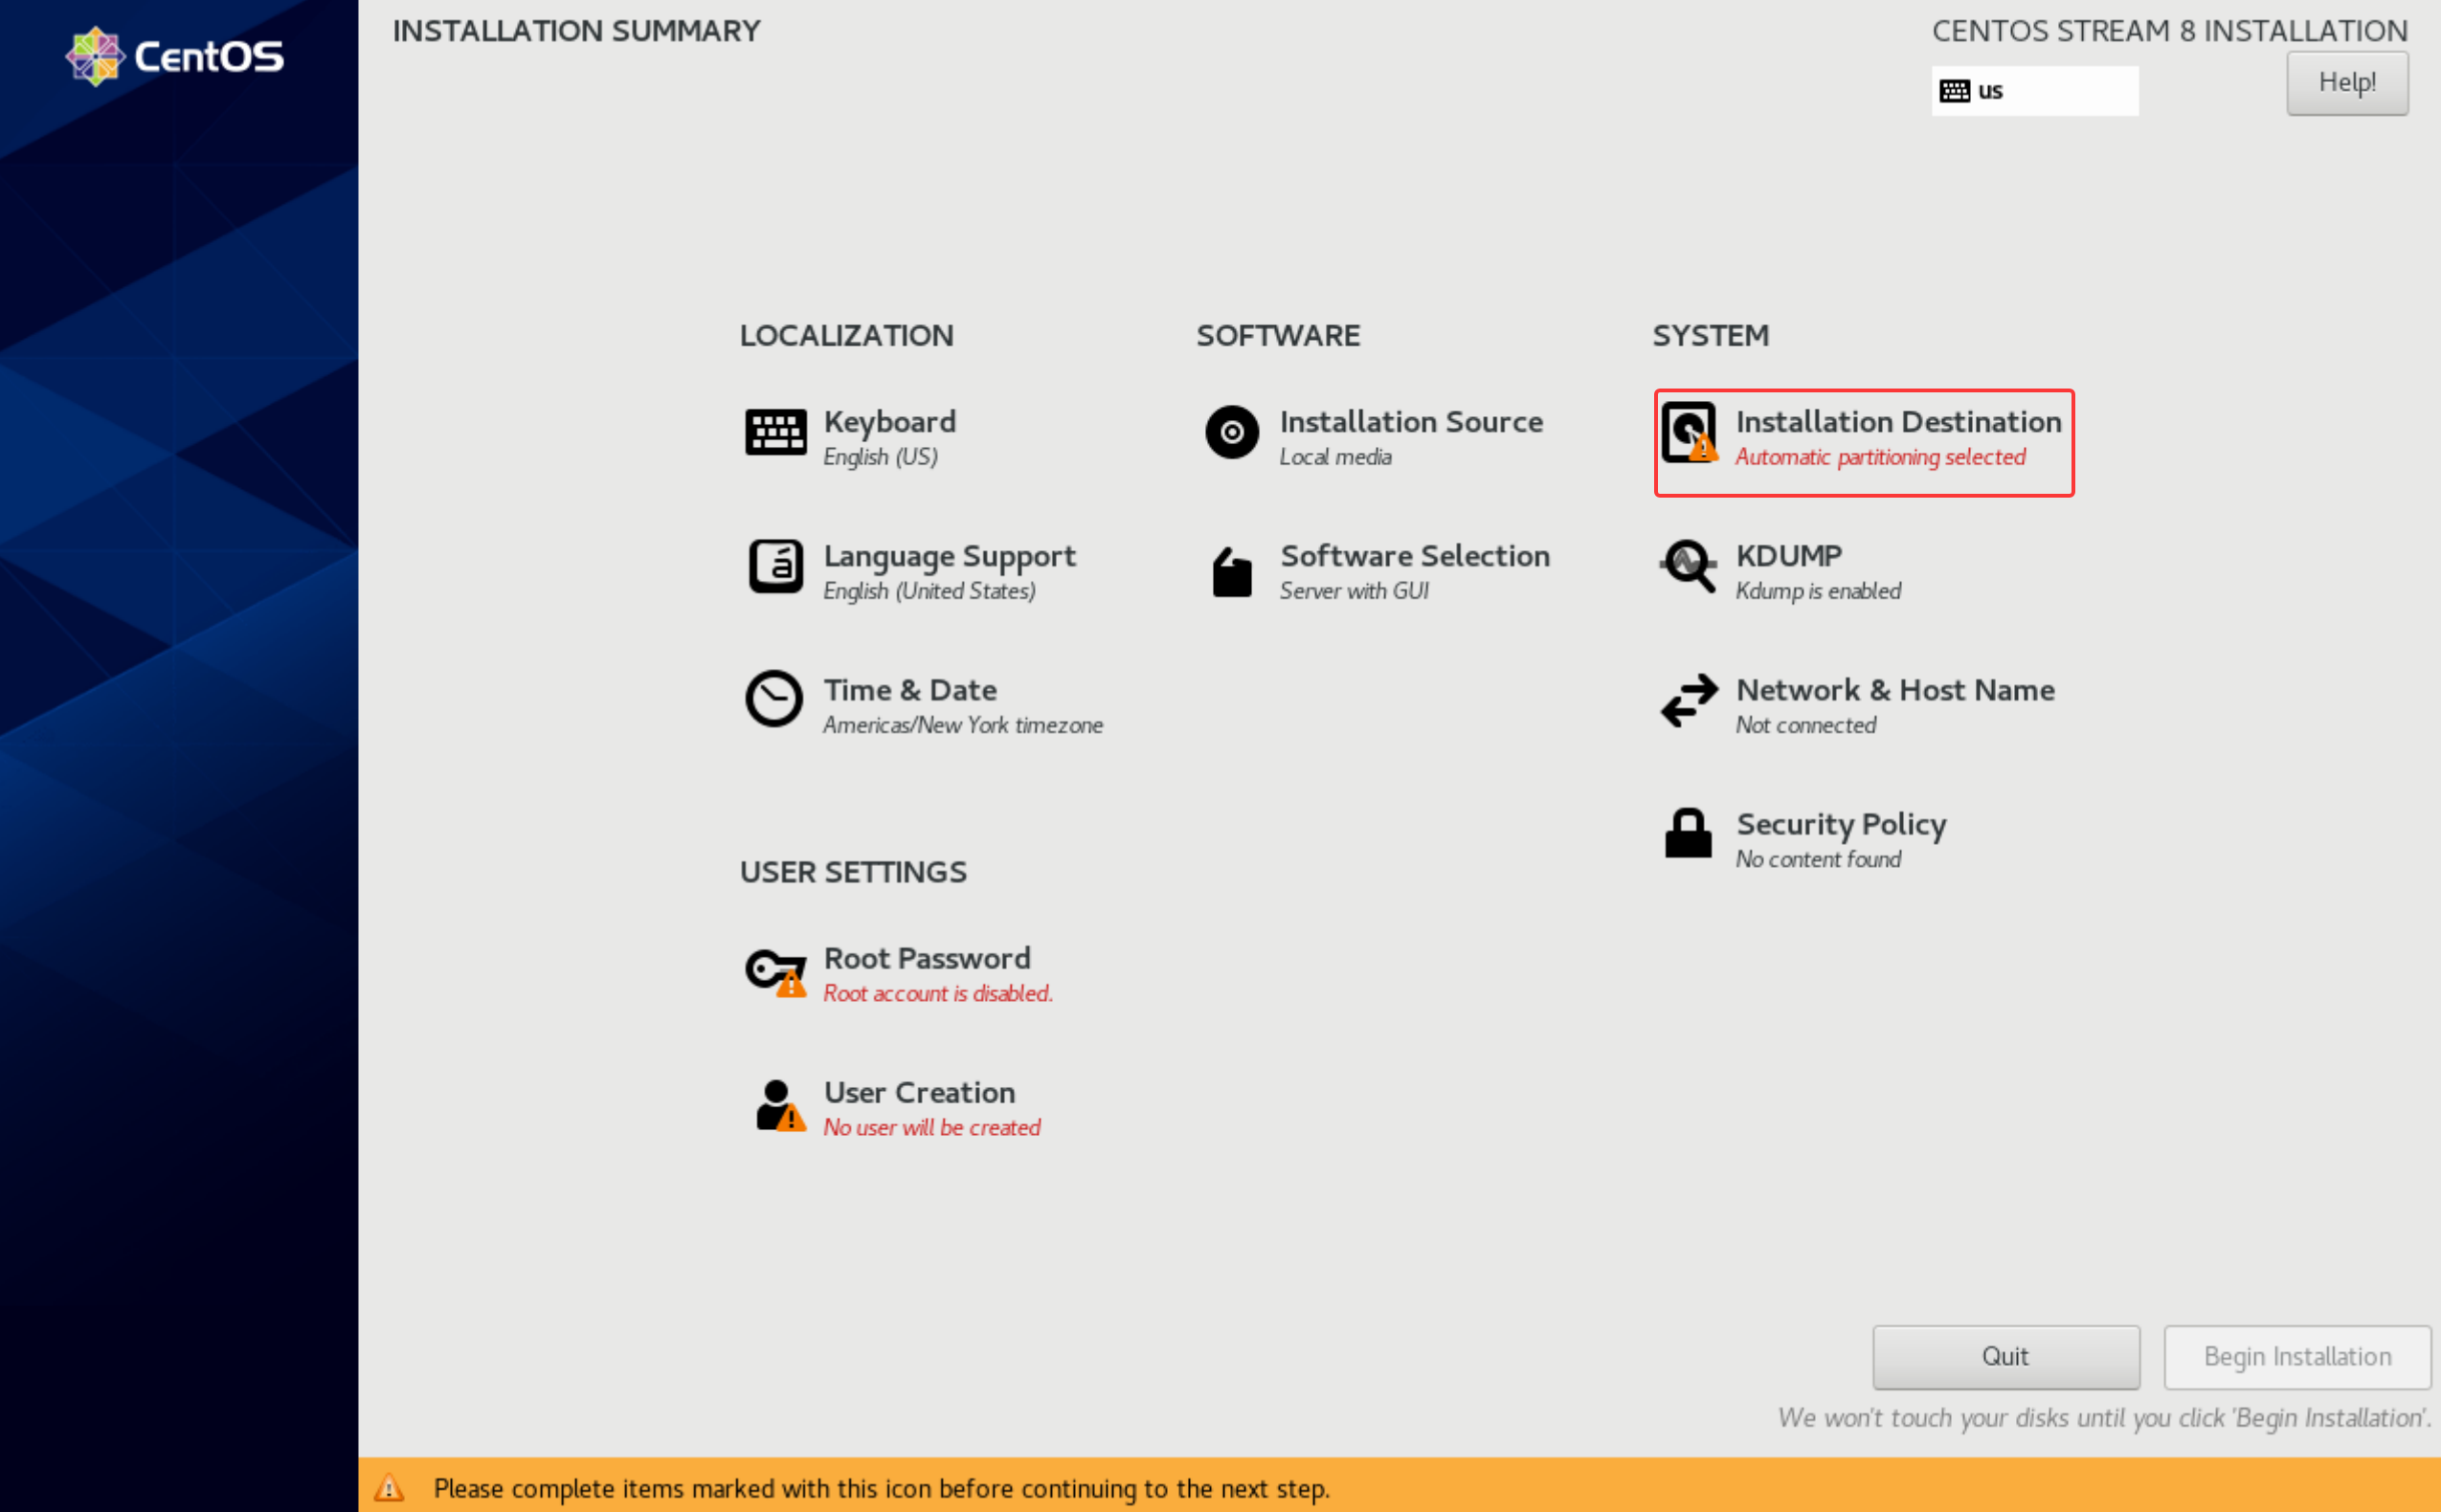
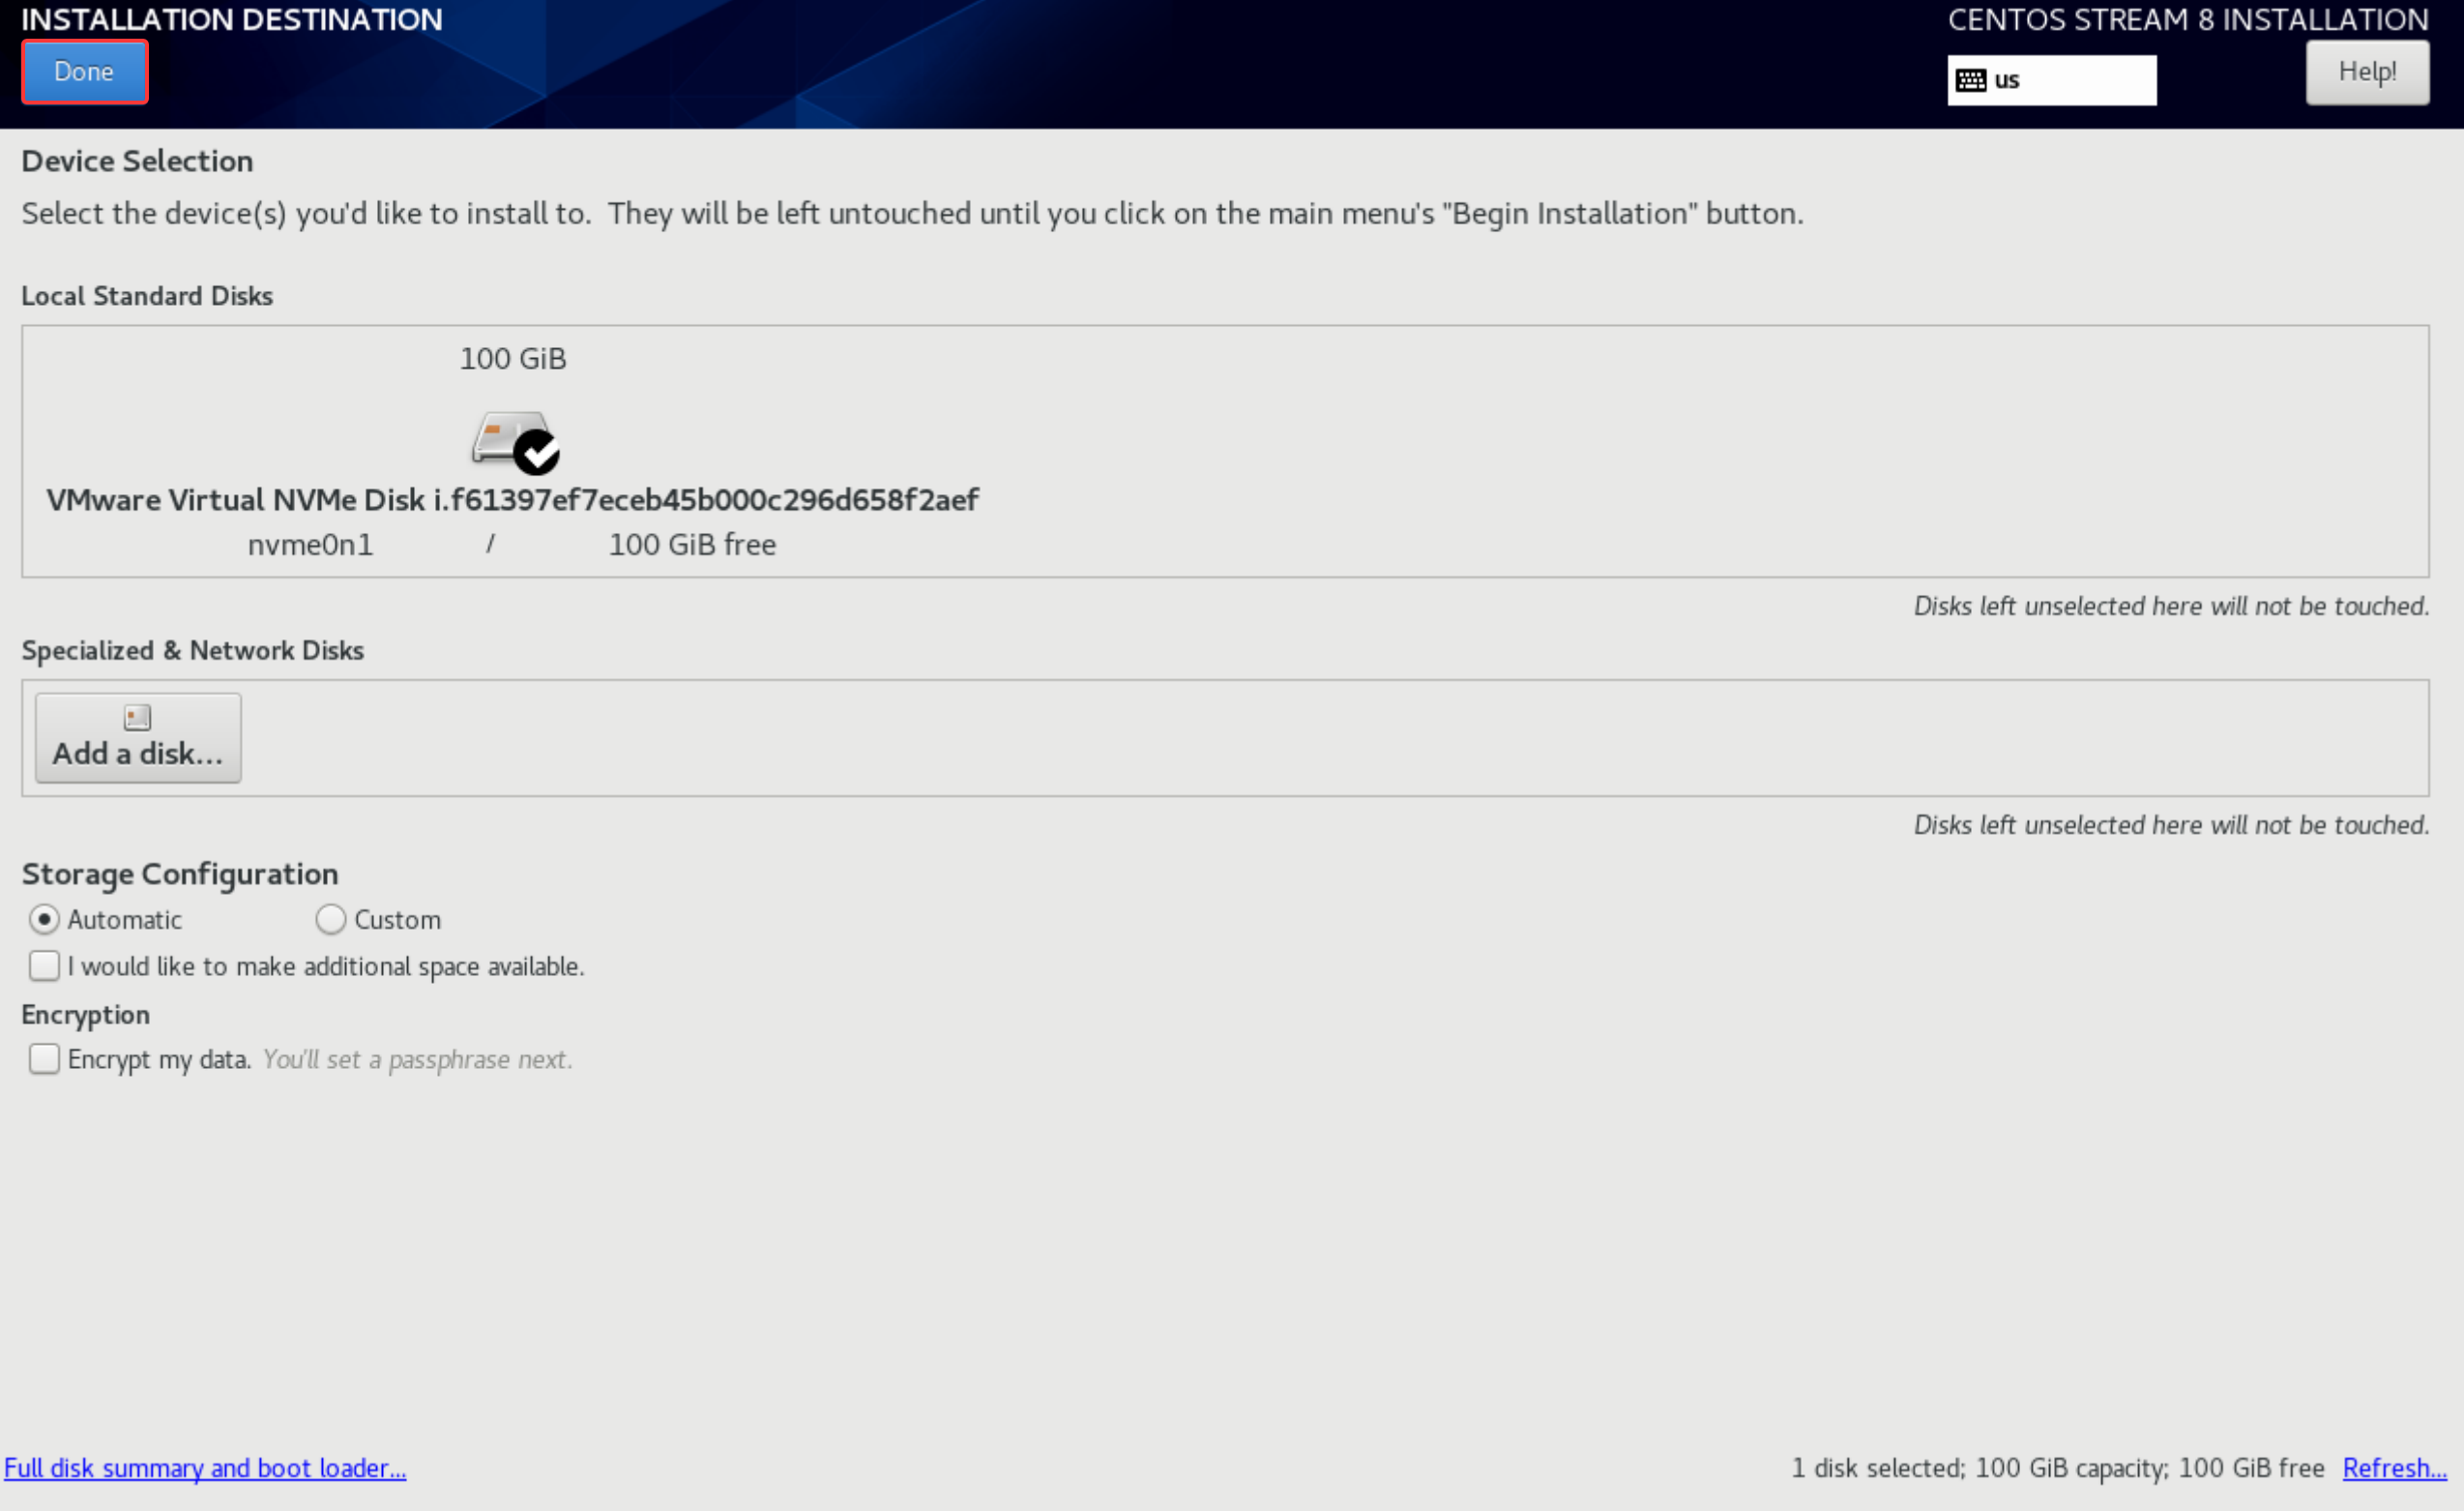
时区设置位上海
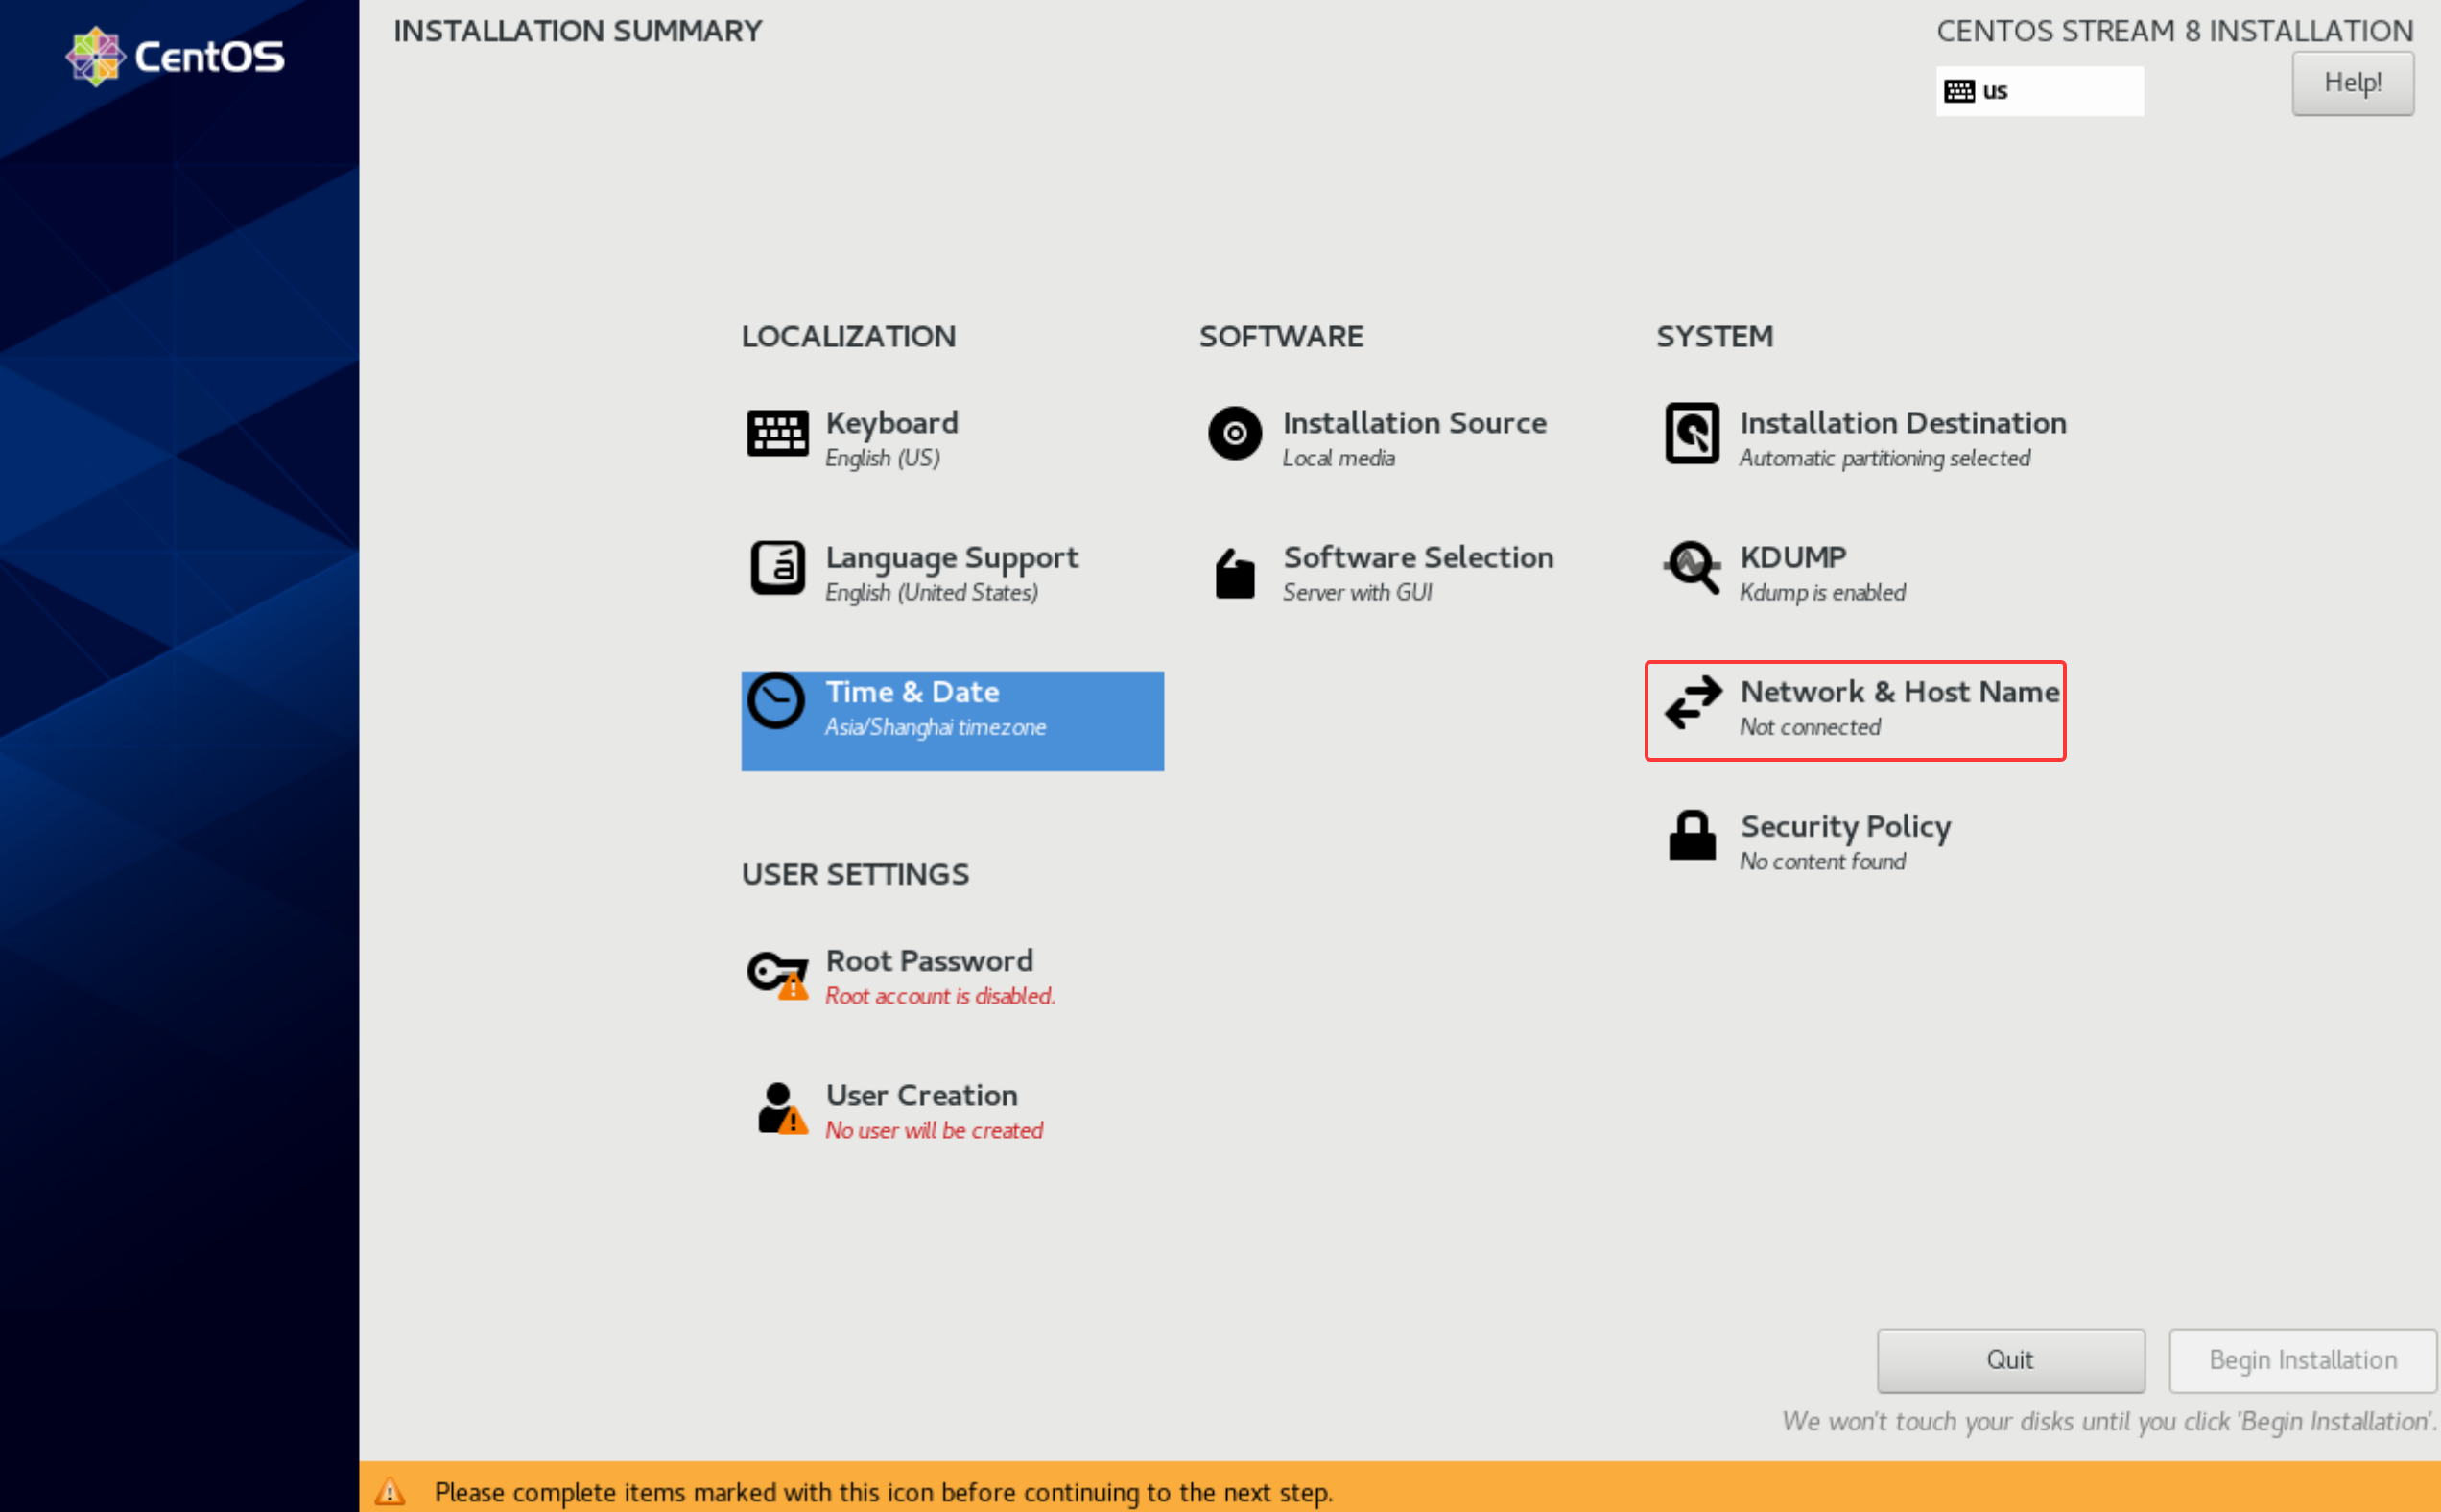
设置网络
启用网卡,自动获取地址
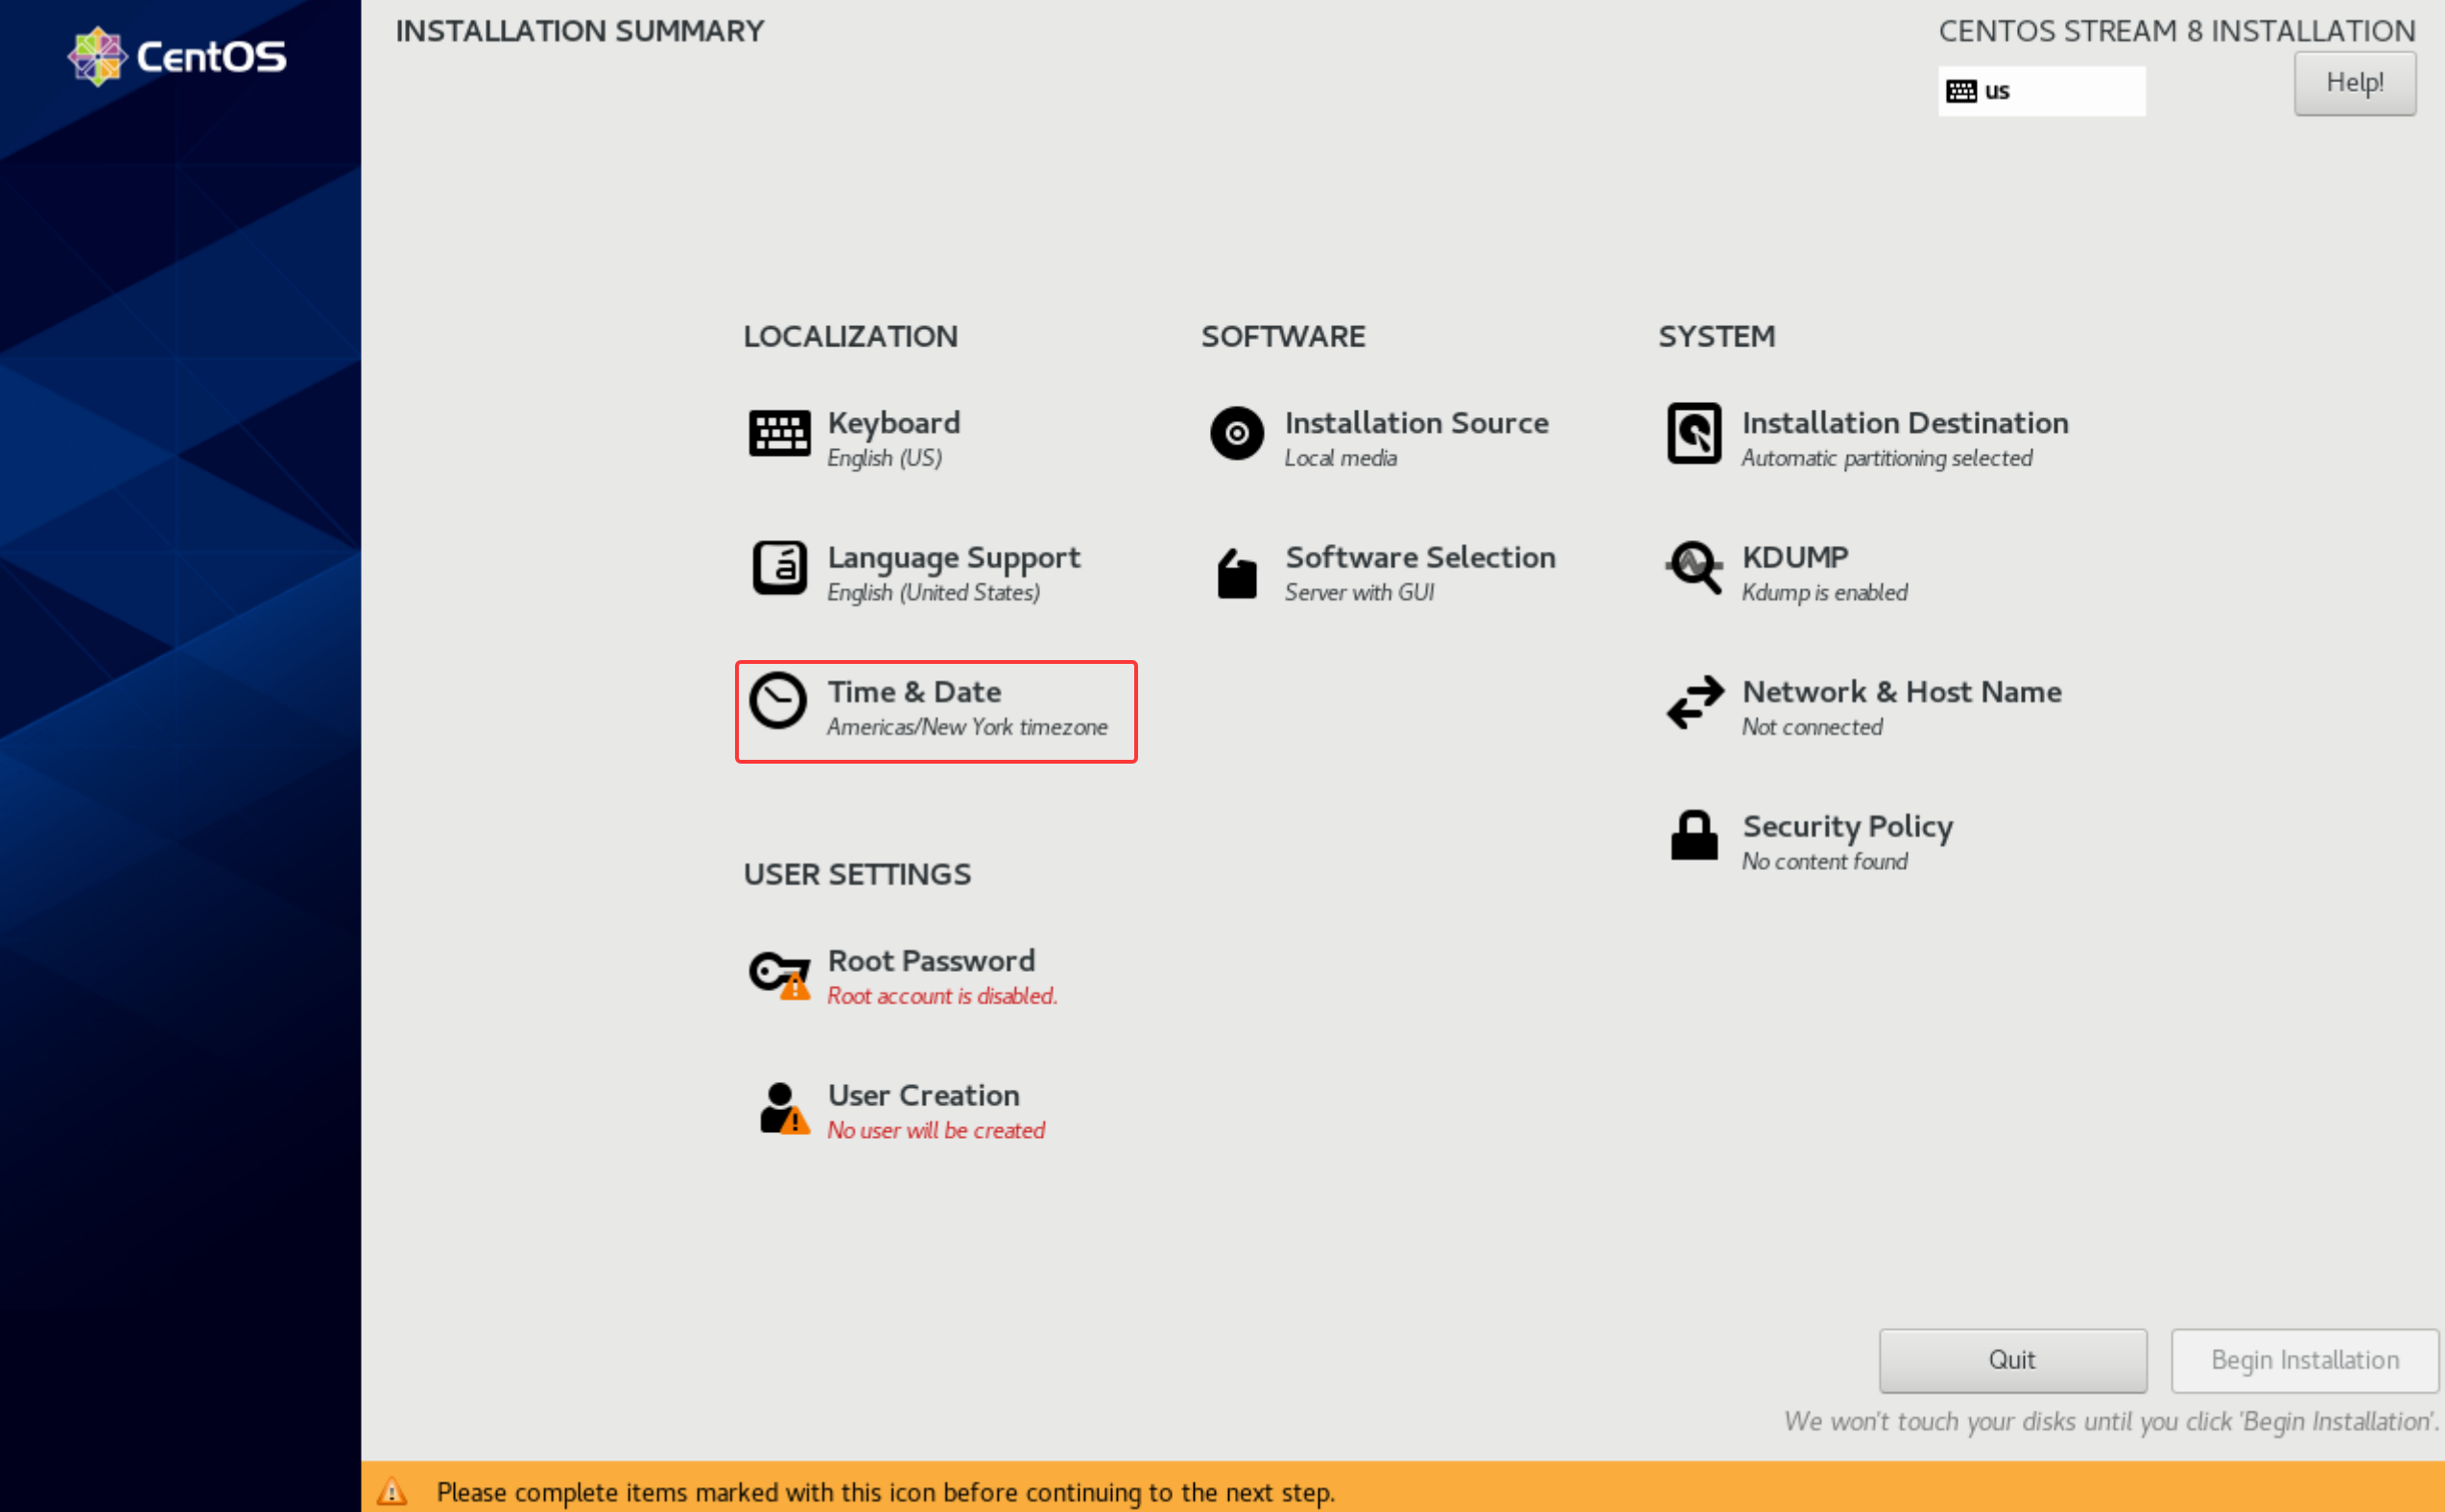
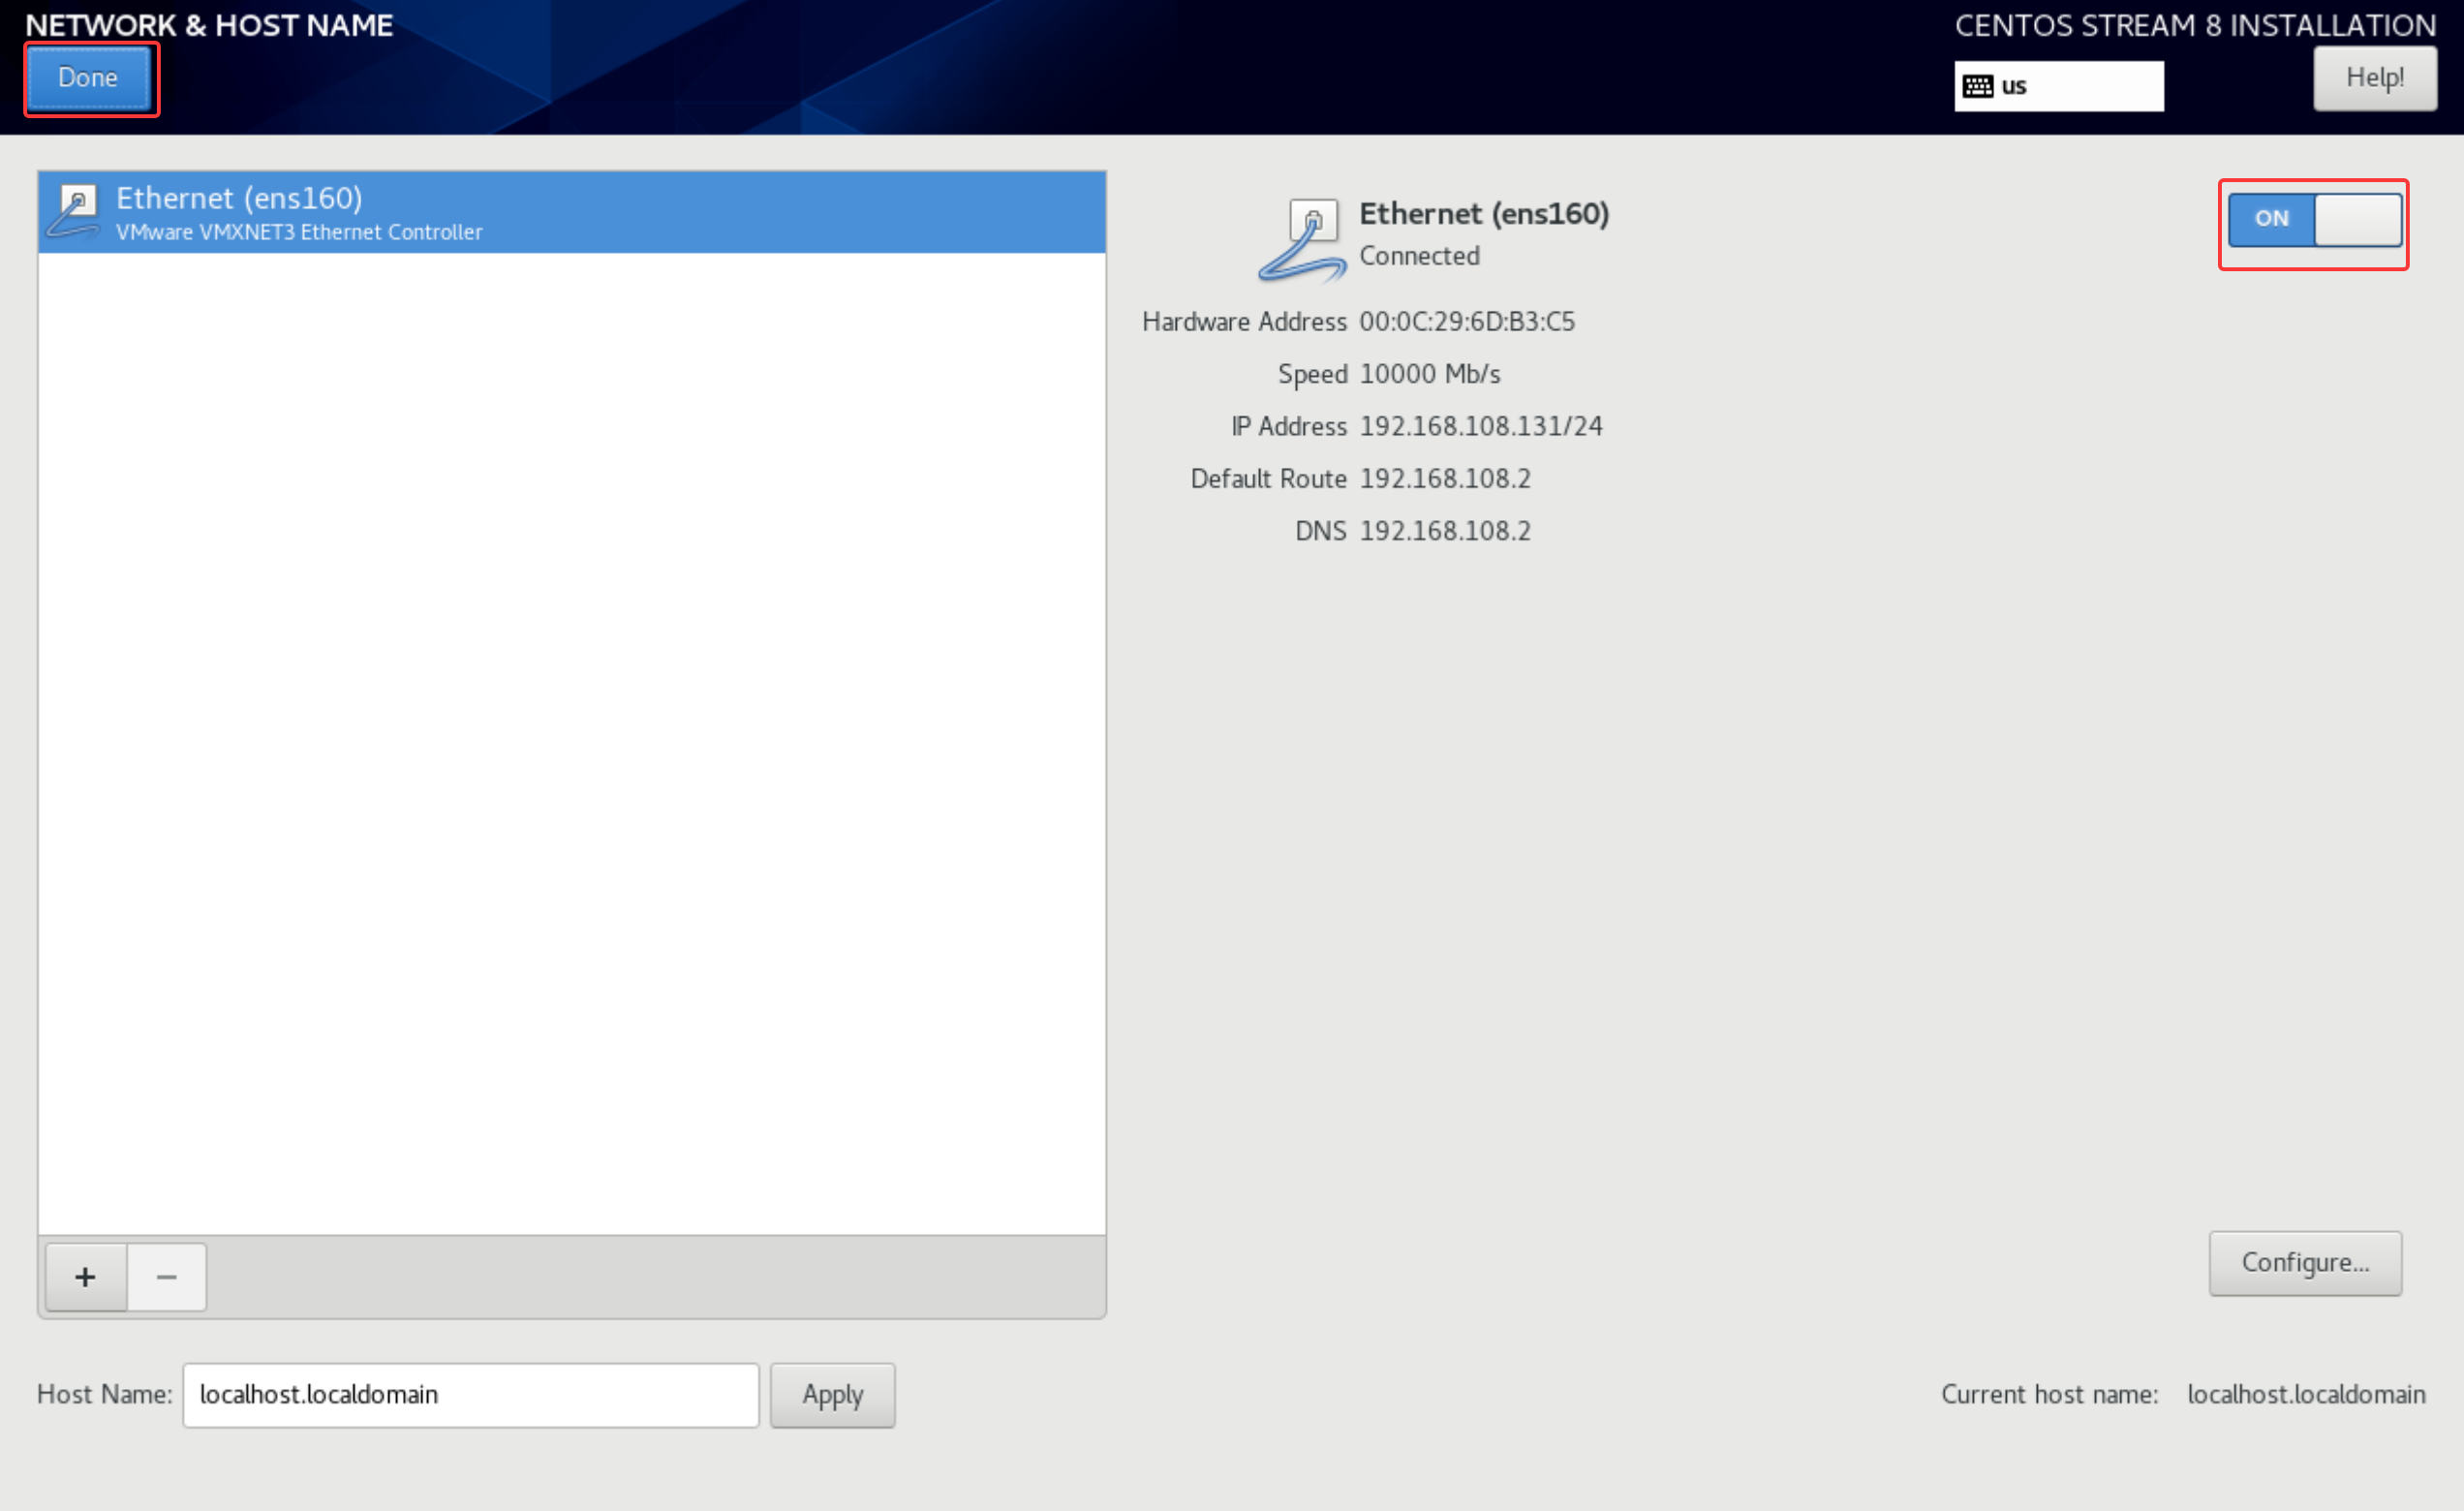
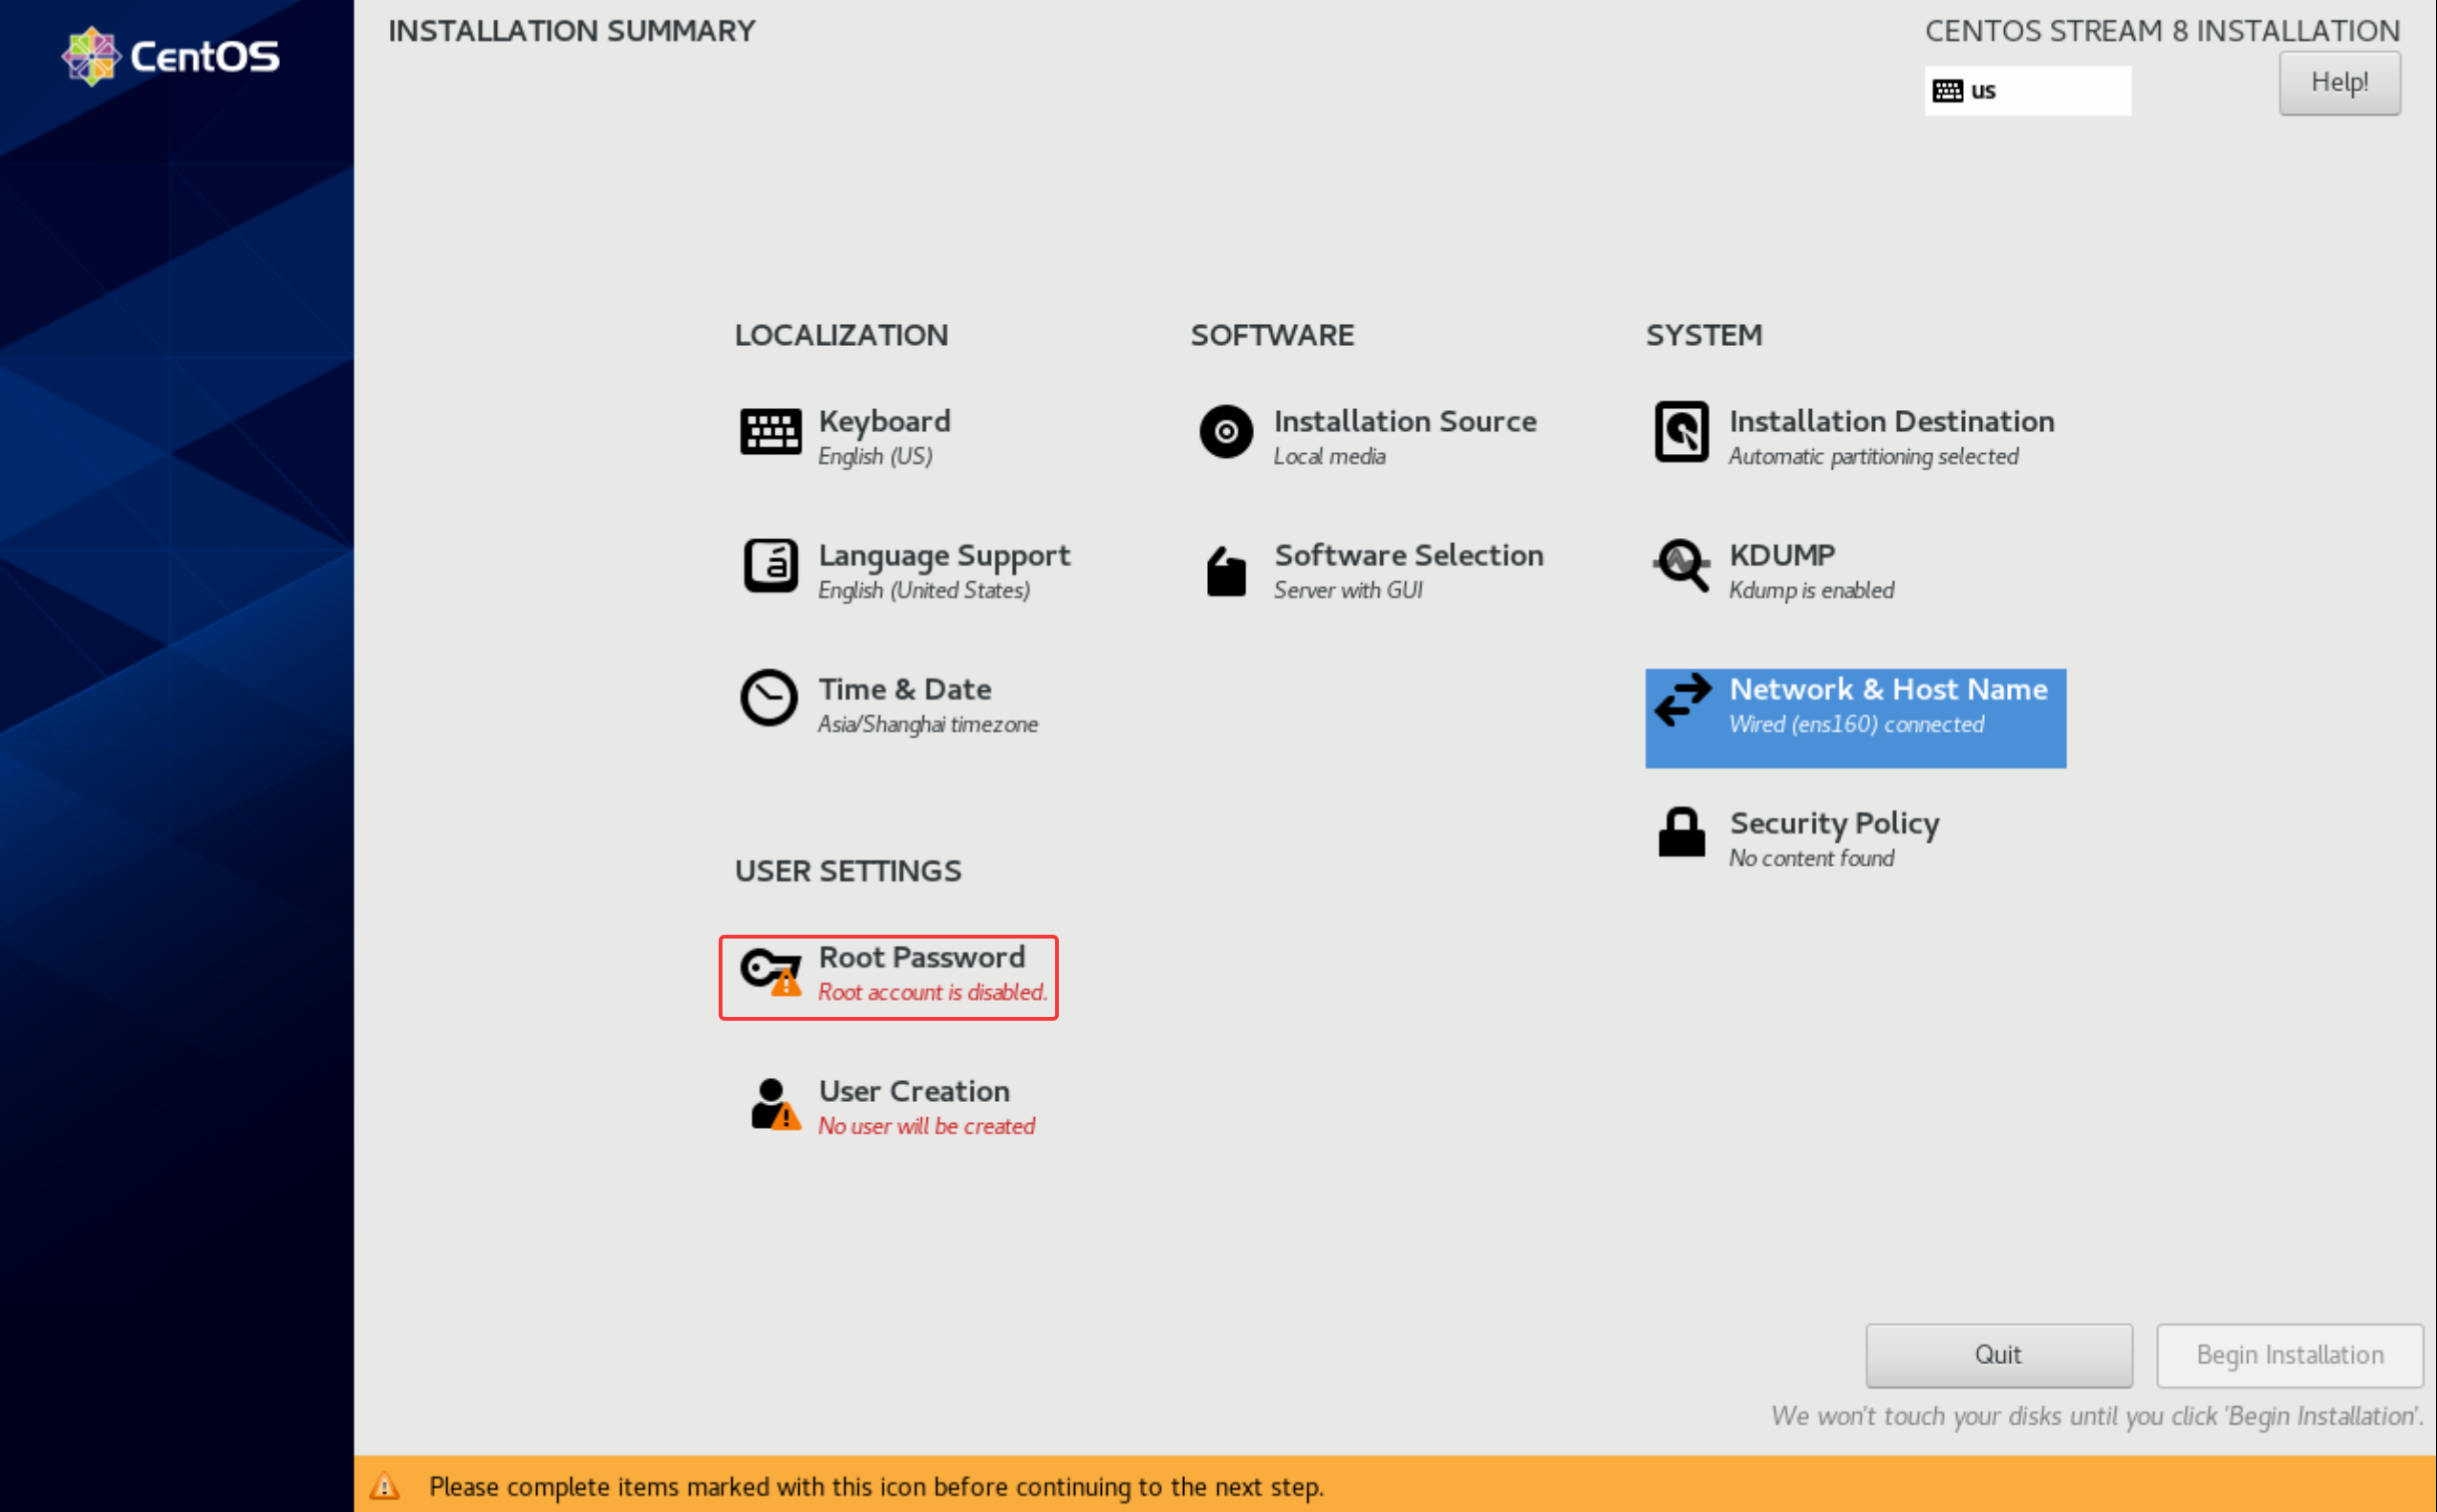
设置Root密码
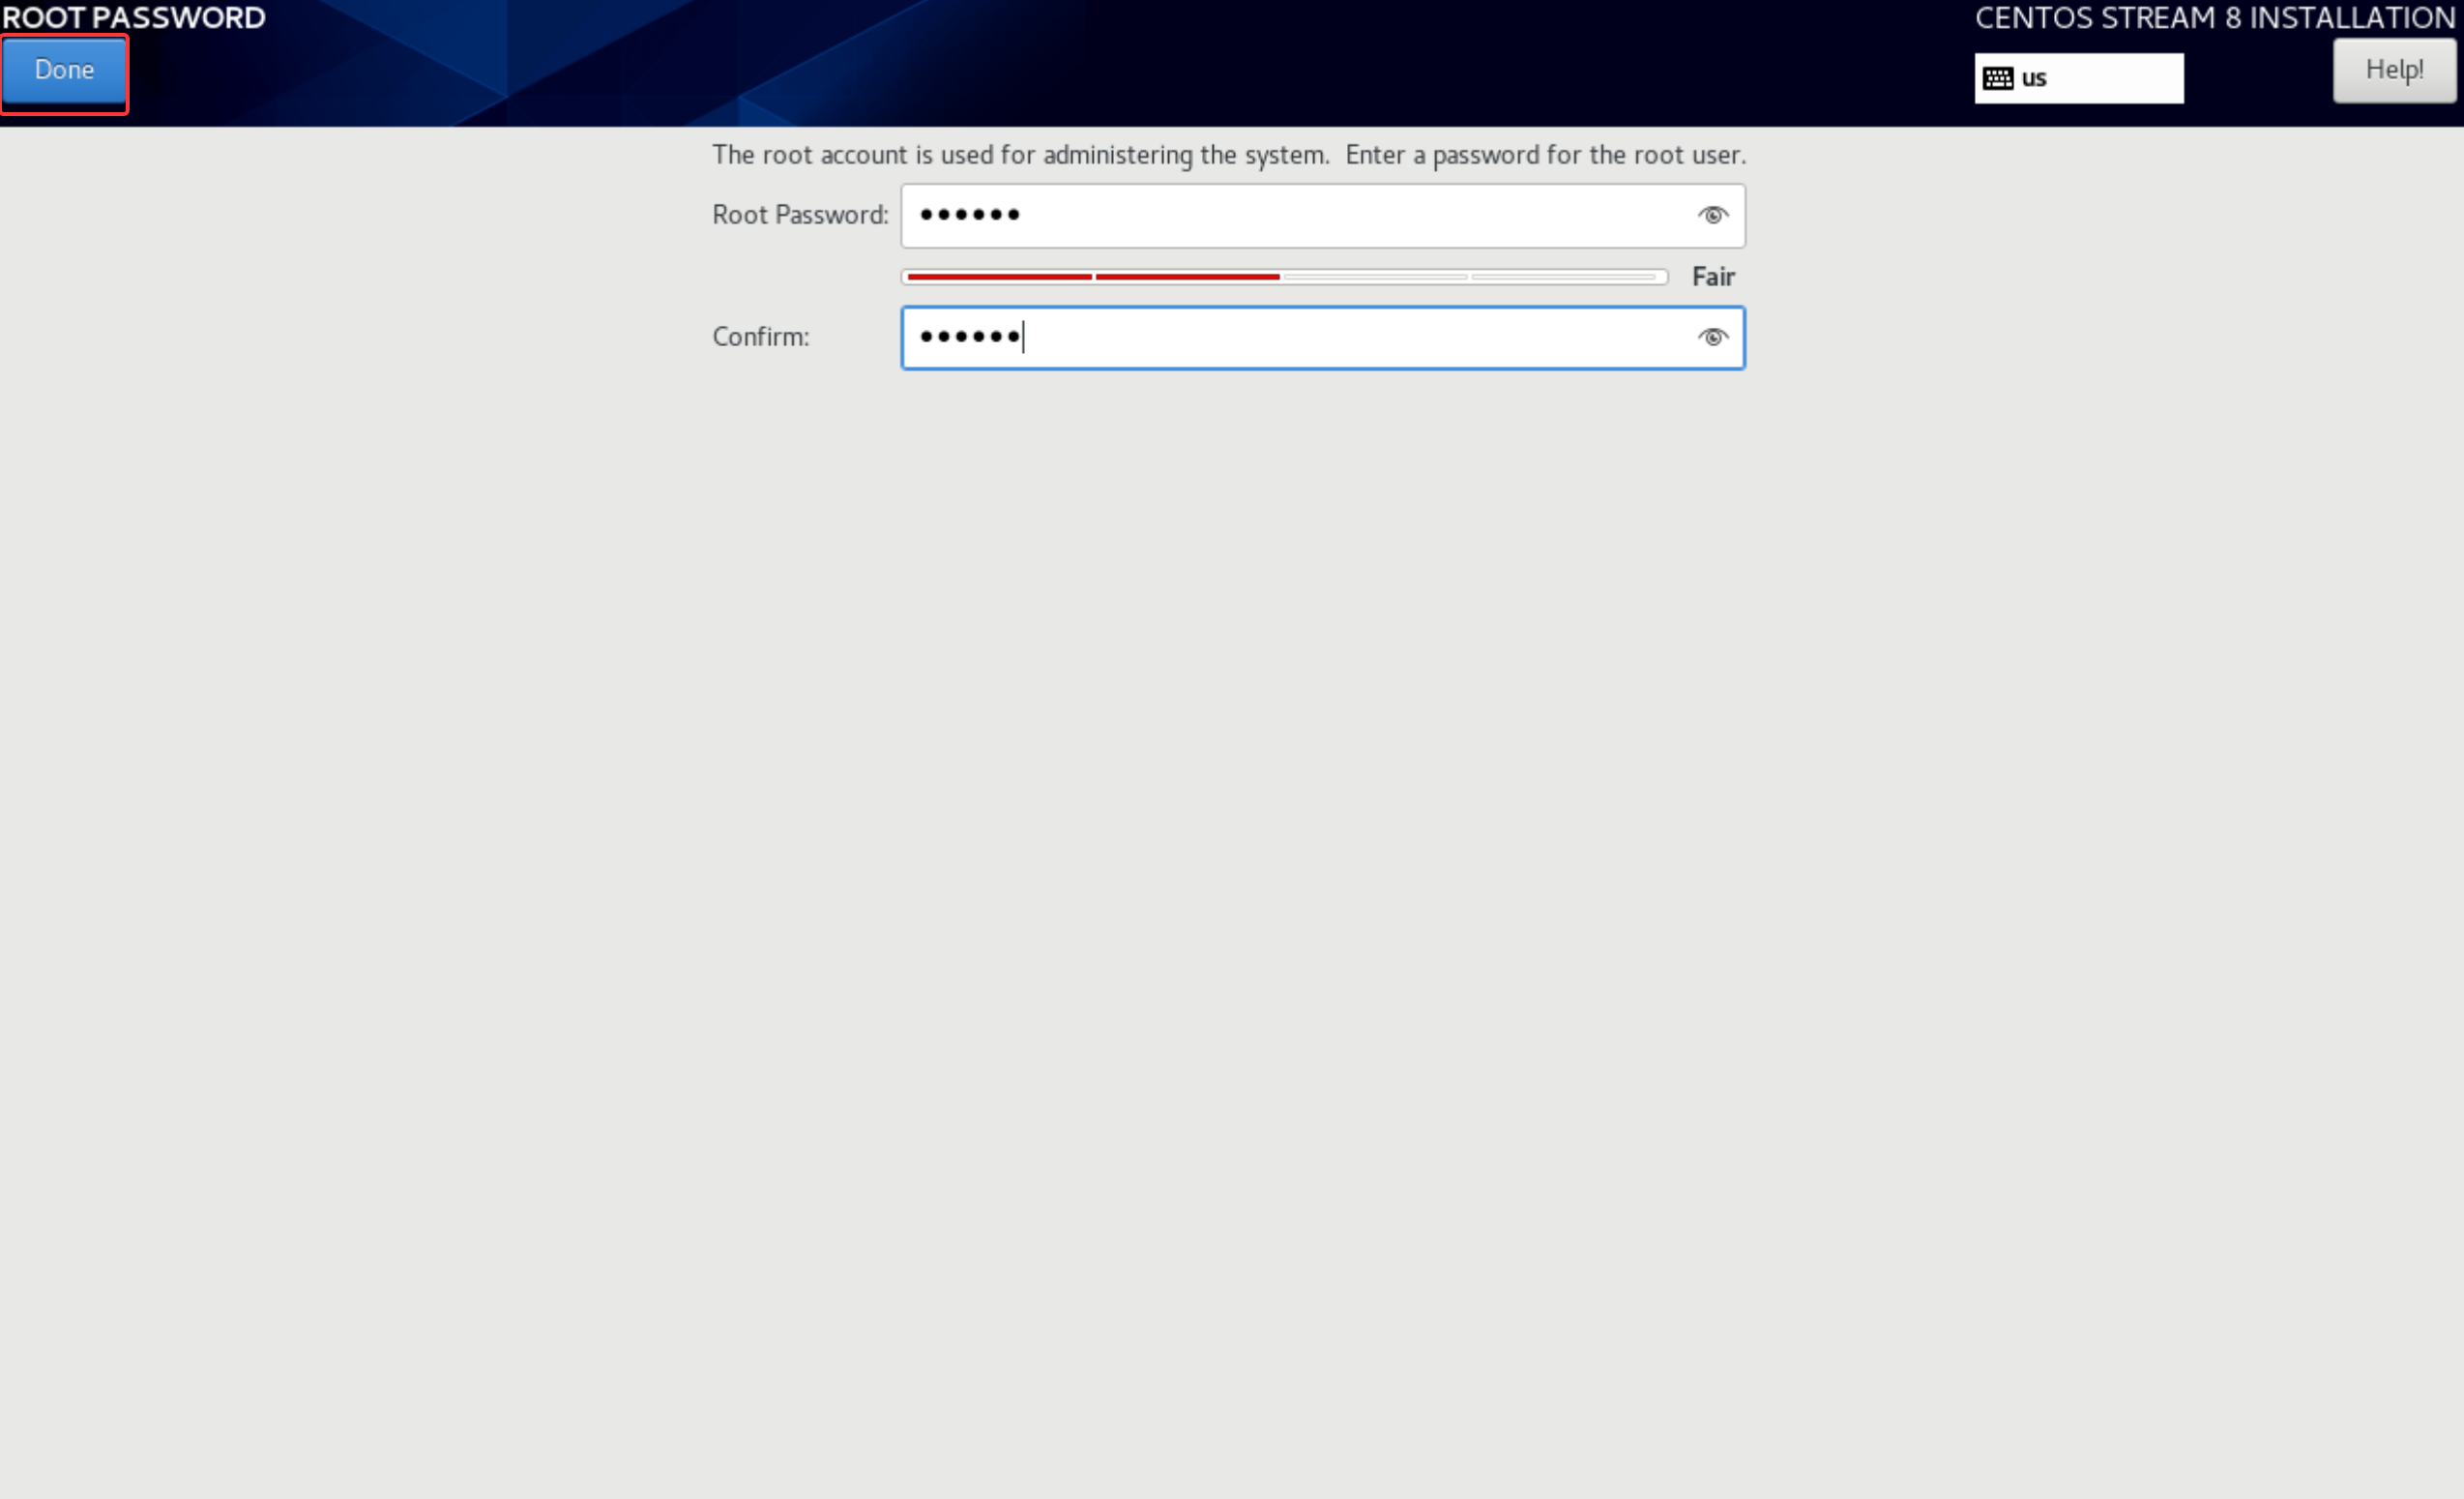
设置密码后,点击Done
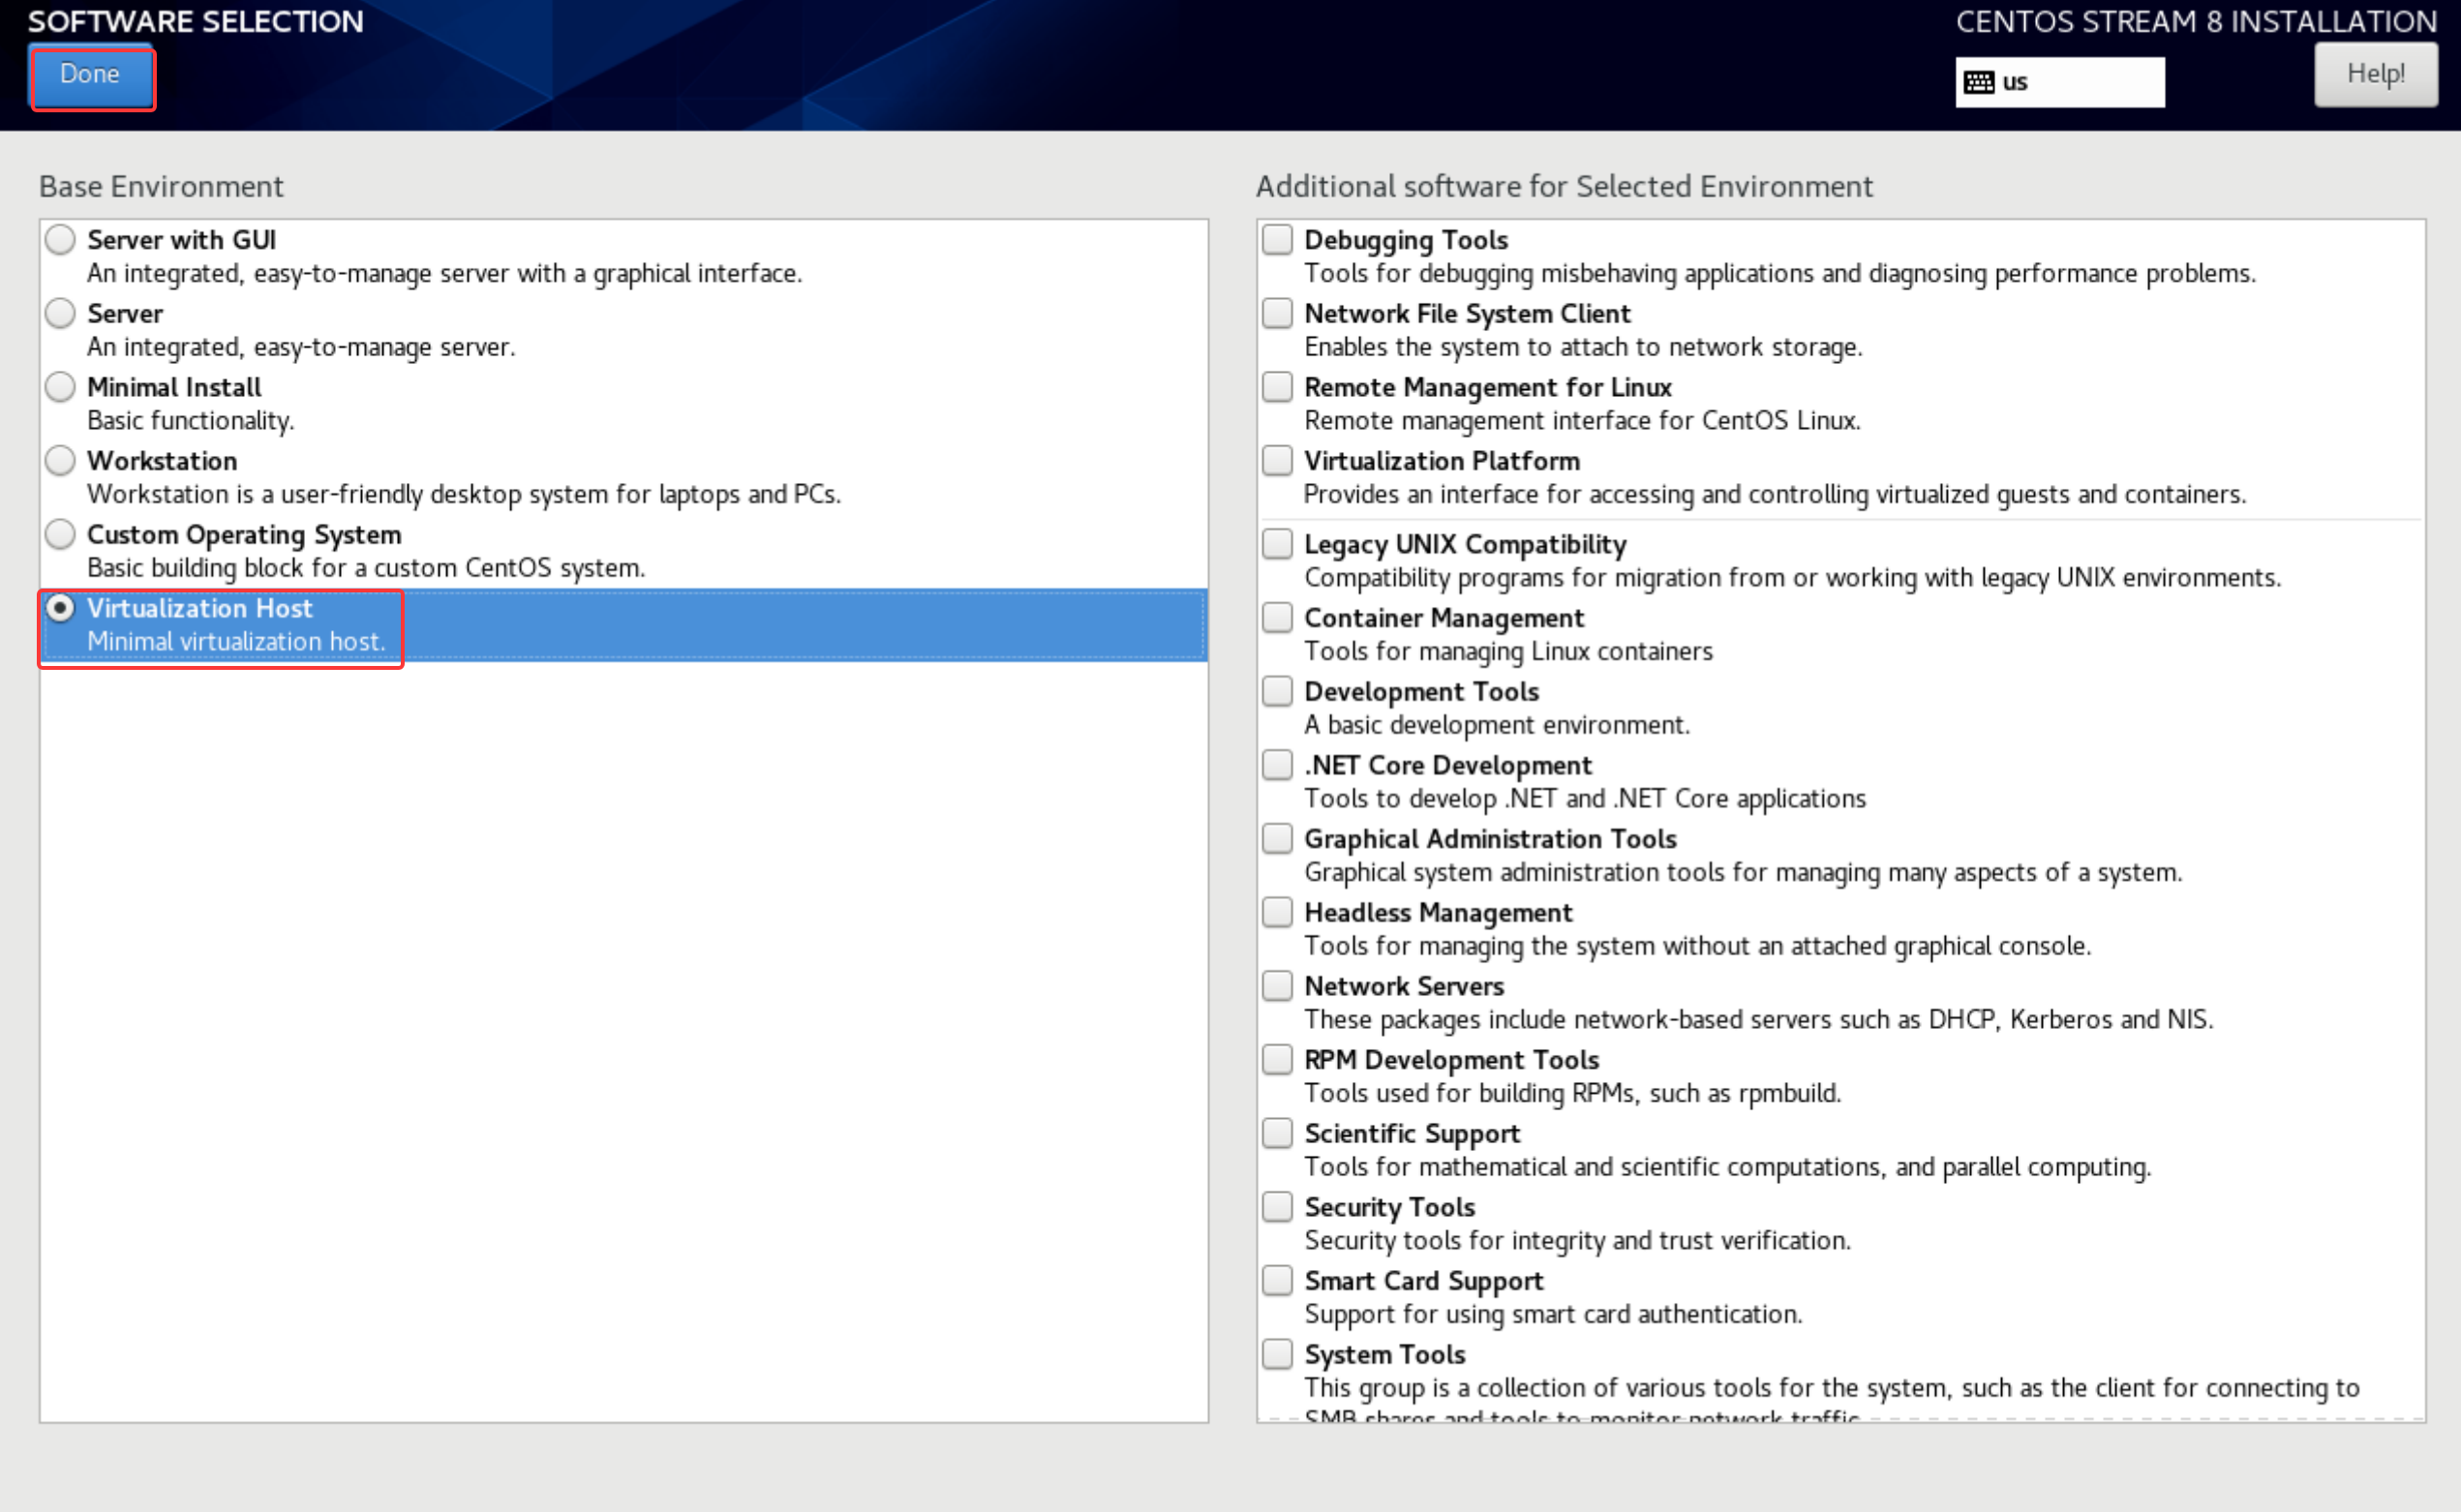
选择要安装的软件
选择Virutallization Host
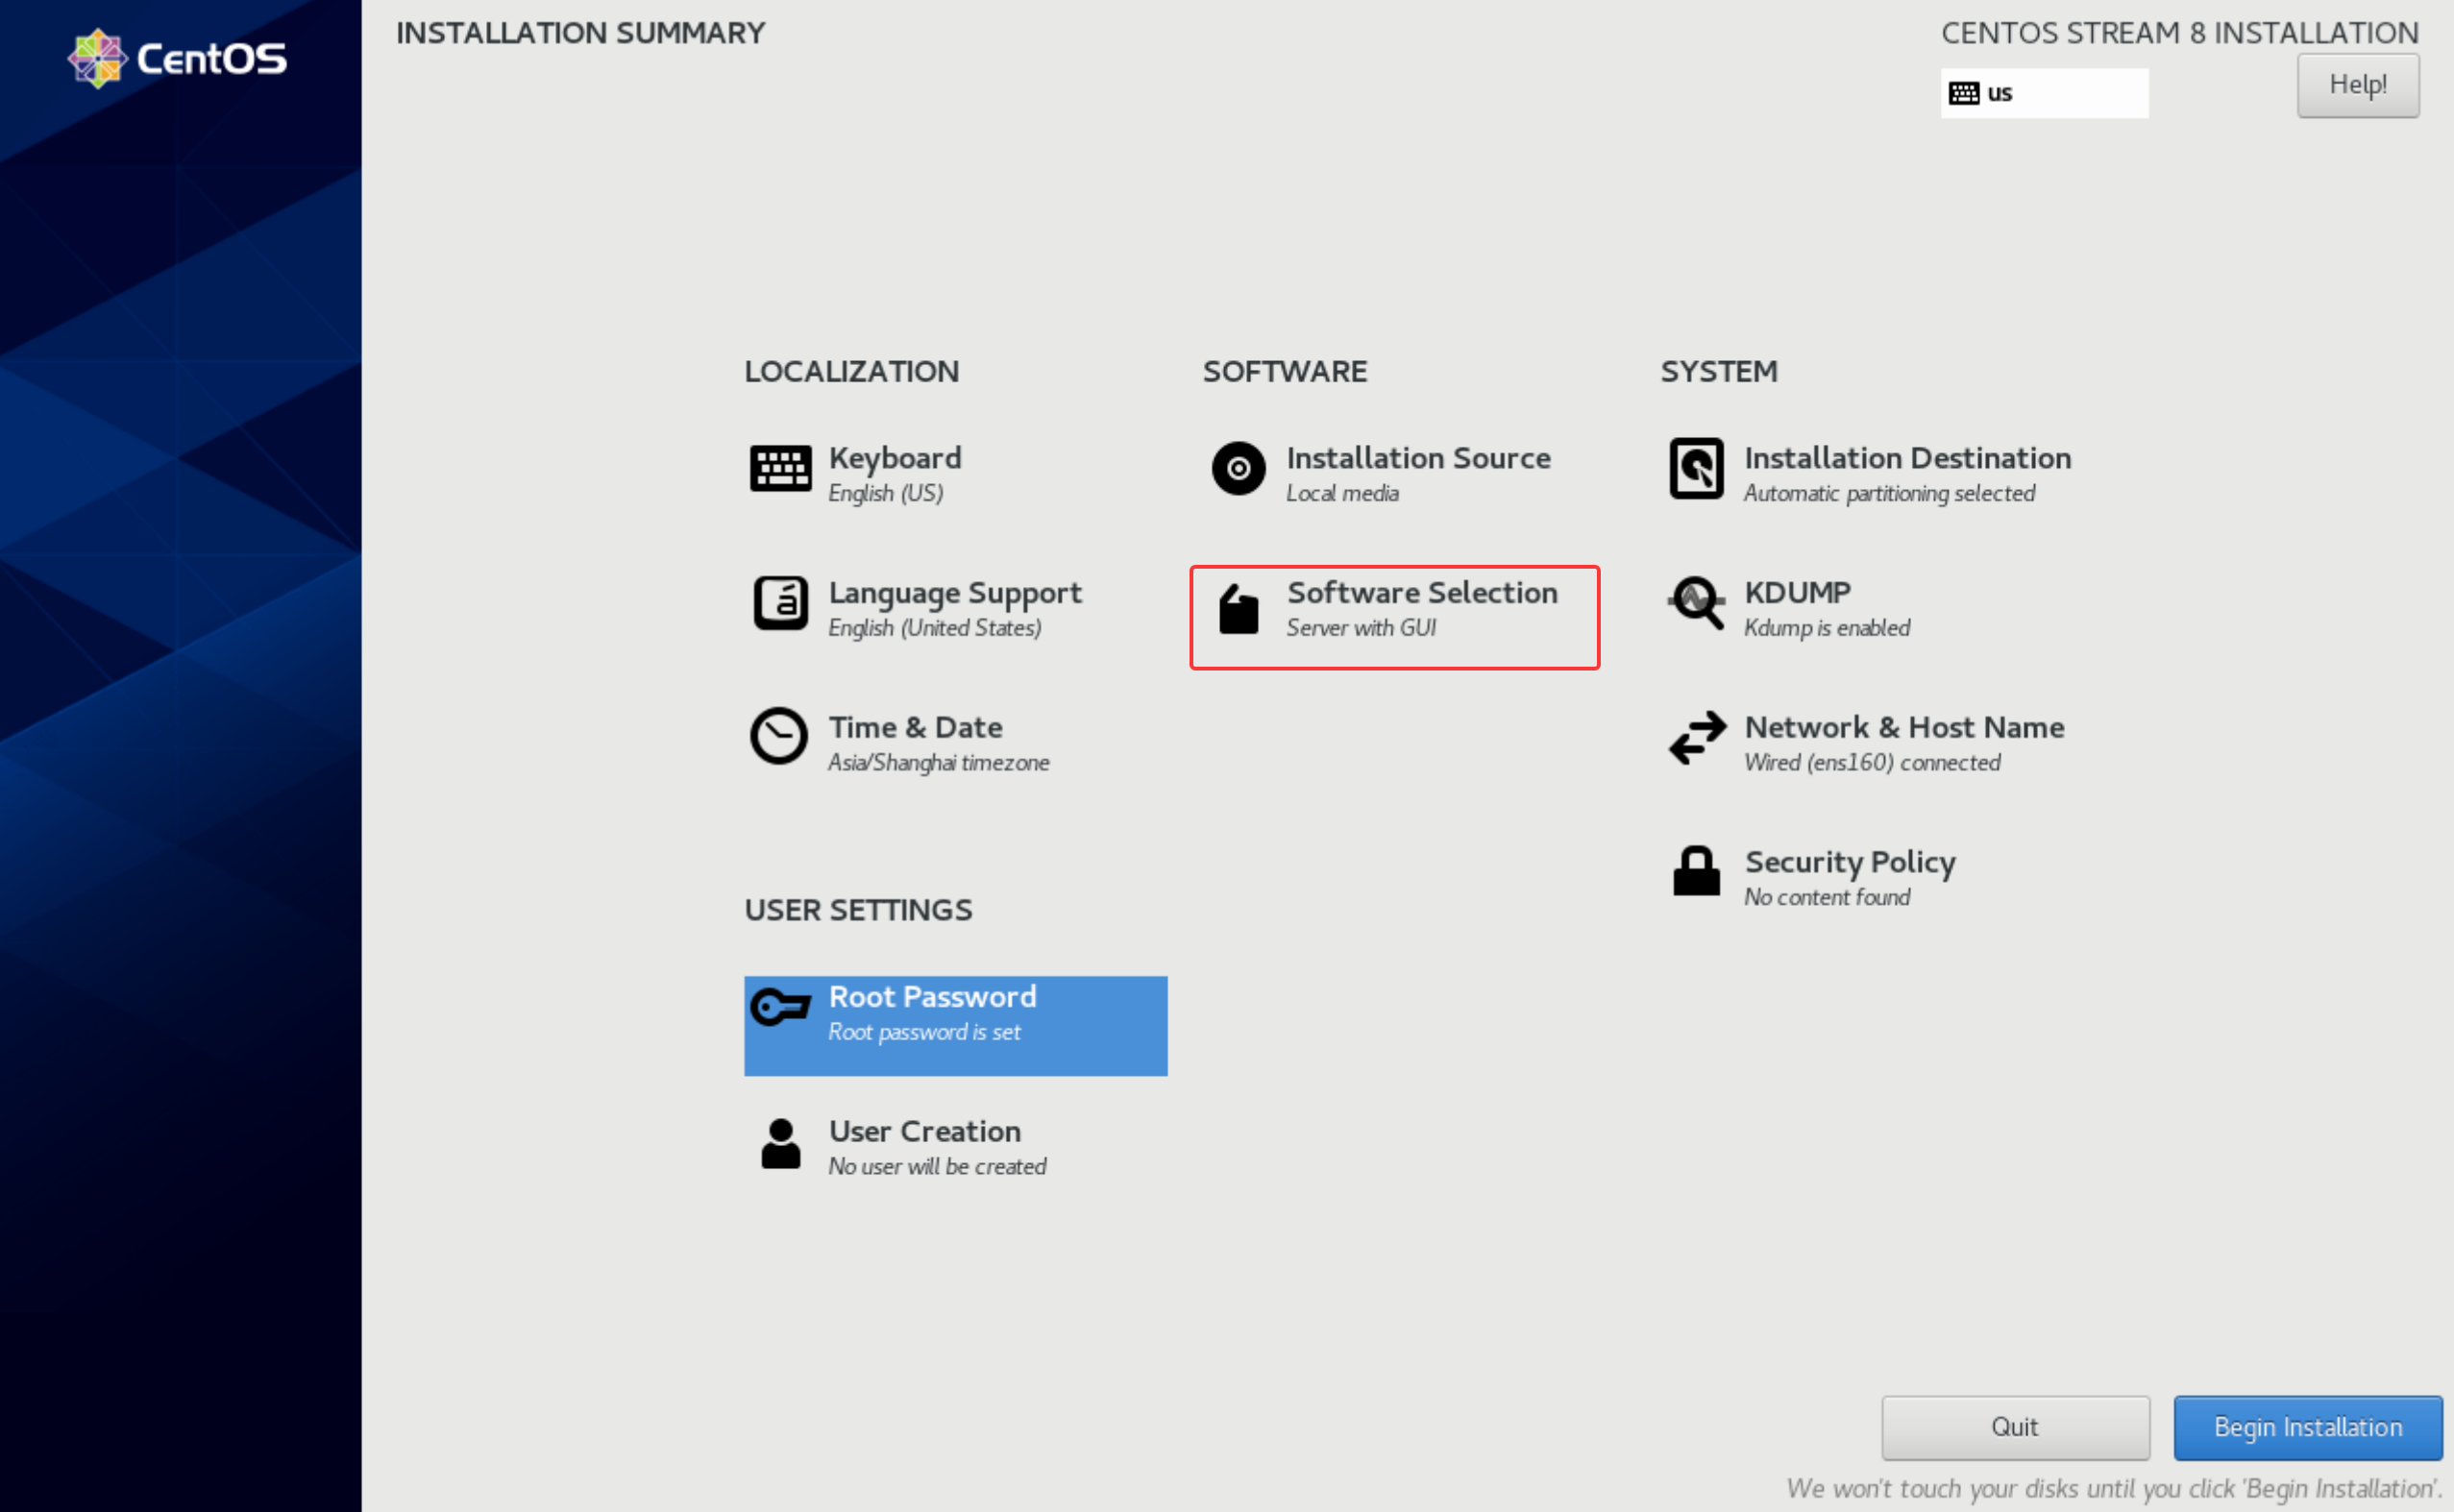
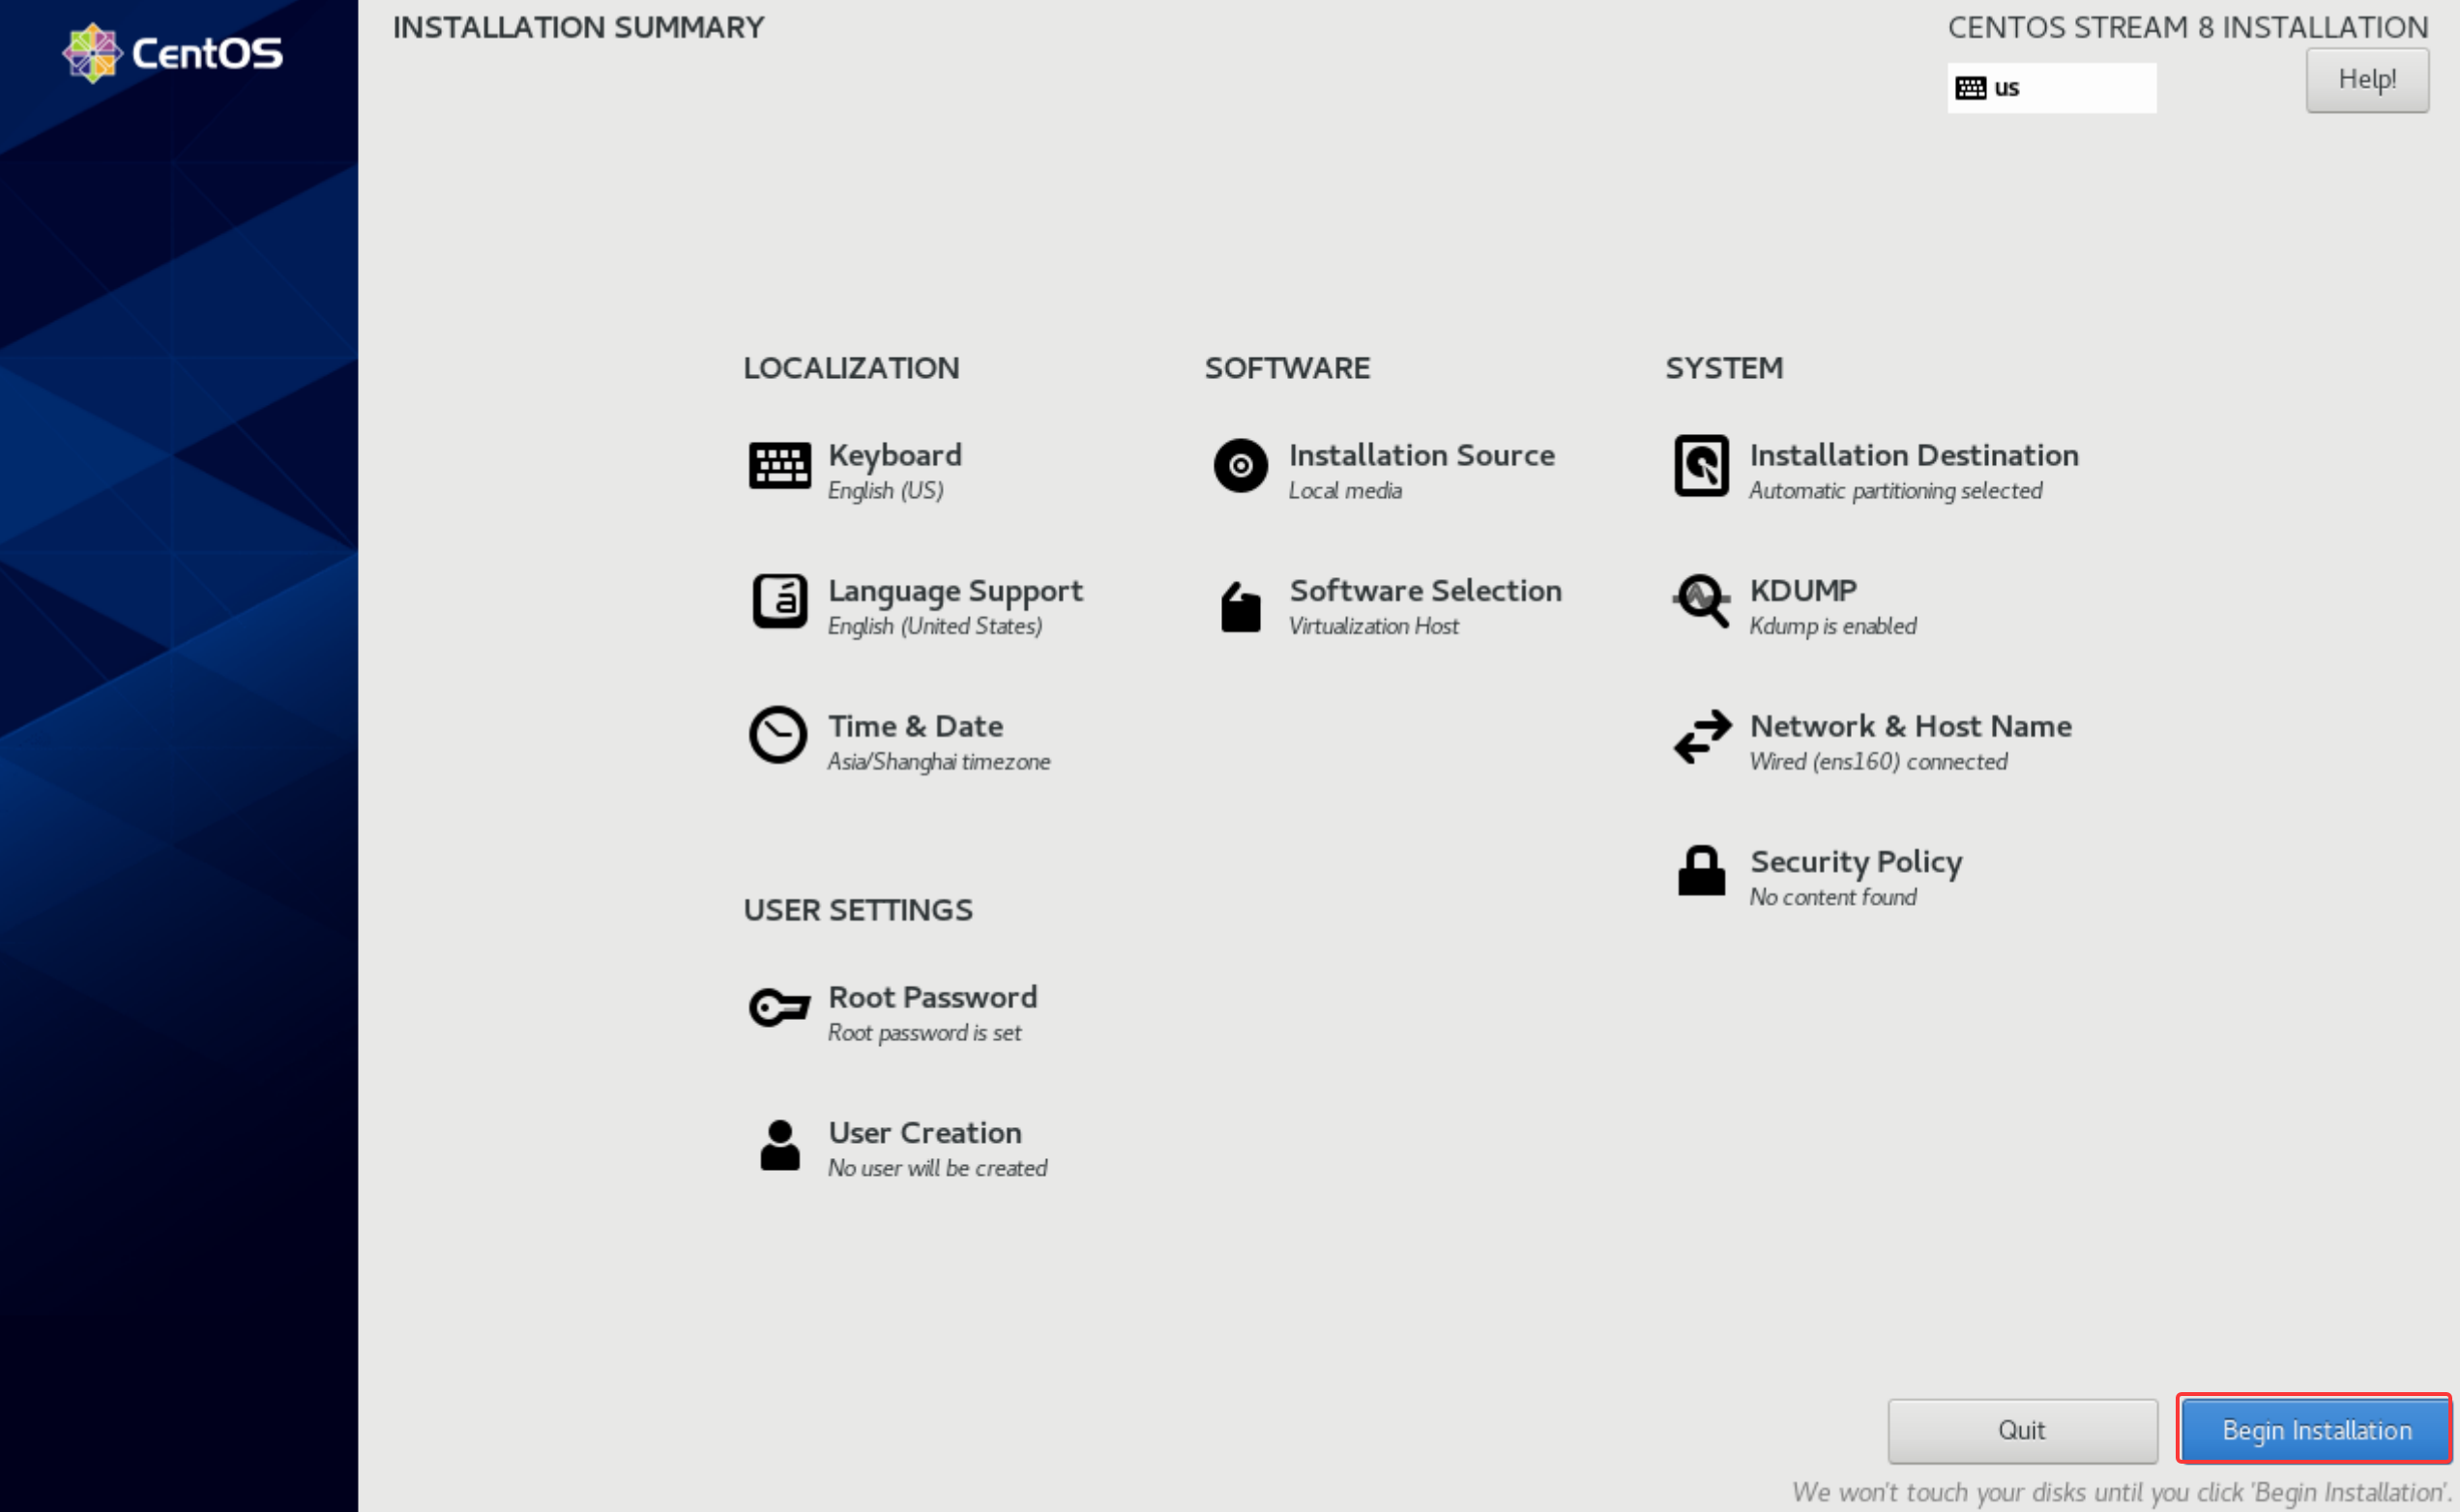
点击Begin Installation开始安装
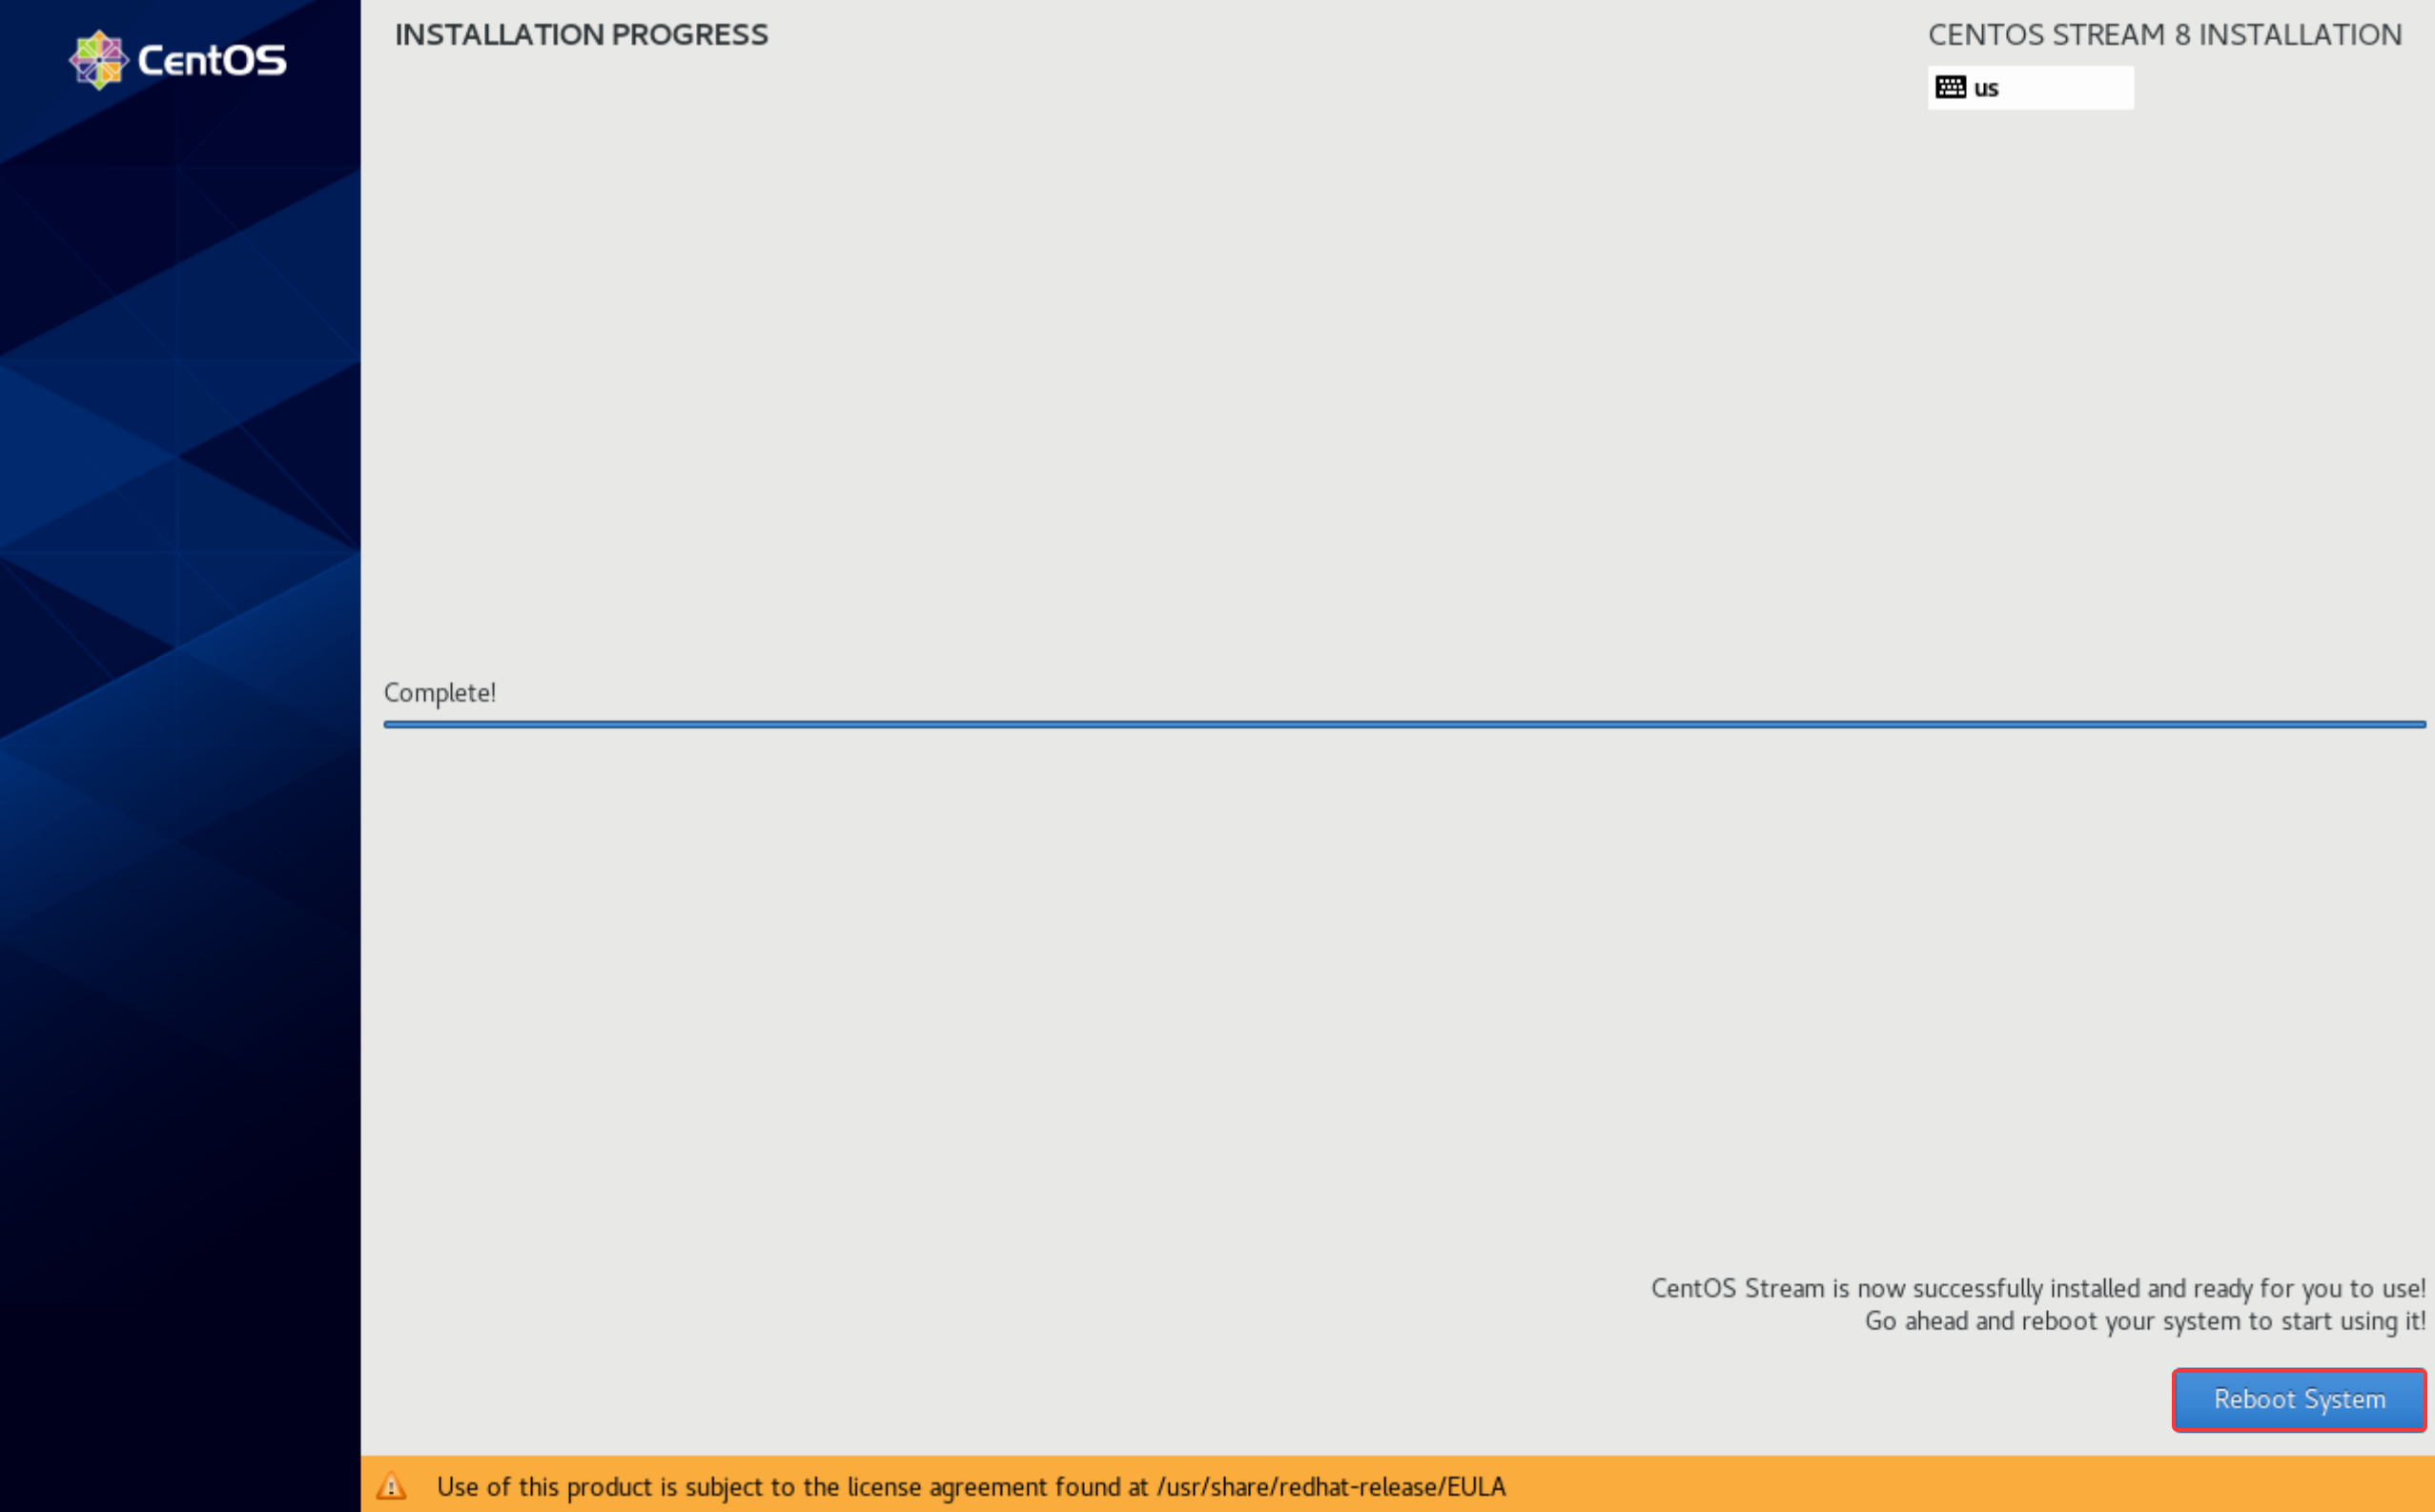
选择Reboot System重启系统
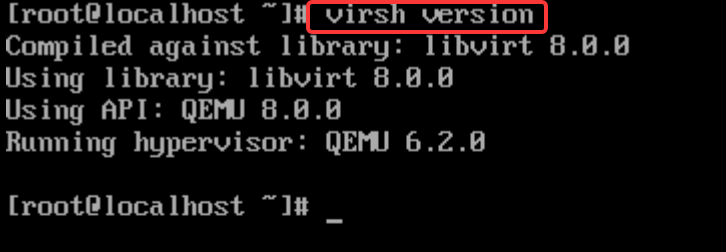
执行virsh version命令,测试KVM是否安装成功
二、安装KVM-方式2-yum
安装KVM-方式2-yum
点击创建新的虚拟机
选择自定义
下一步
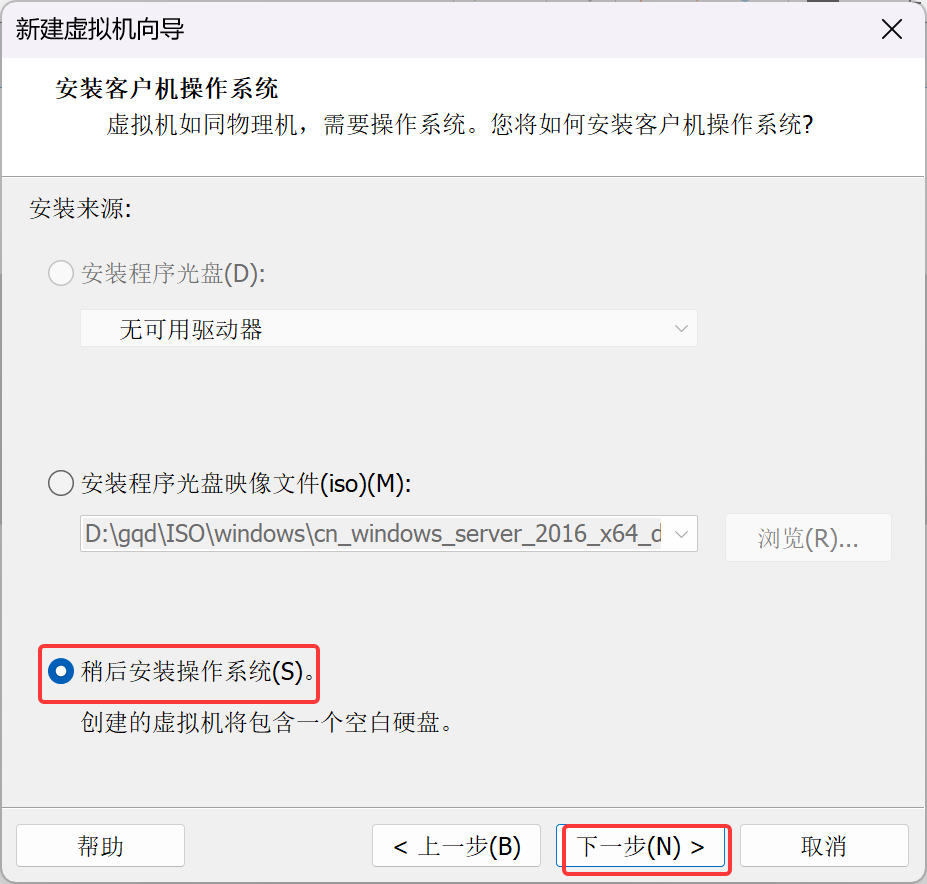
选择稍后安装操作系统
客户机操作系统选择Linux,版本选择CentOS 8 64位
虚拟机名称命名KVM1
处理器数量选择合适的数量,选择下一步
选择合适的内存
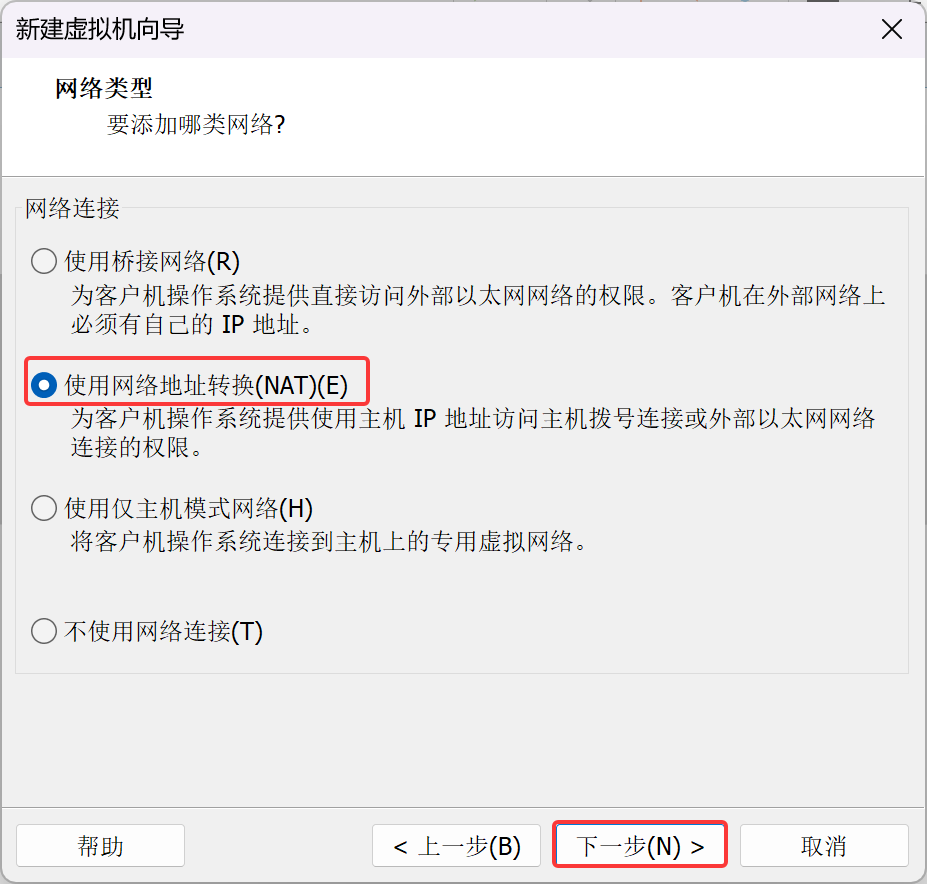
网络类型选择NAT
I/O控制器类型选择推荐的
虚拟磁盘类型选择推荐的
选择创建新的磁盘
填写合适的磁盘容量
下一步
选择自定义硬件
点击处理器,虚拟化引擎中勾选虚拟化Intel VT-x
点击新CD/DVD,选择使用ISO映像文件,选择CentOS-Stream8镜像光盘
点击完成
点击开启此虚拟机
选择Install CentOS Stream 8
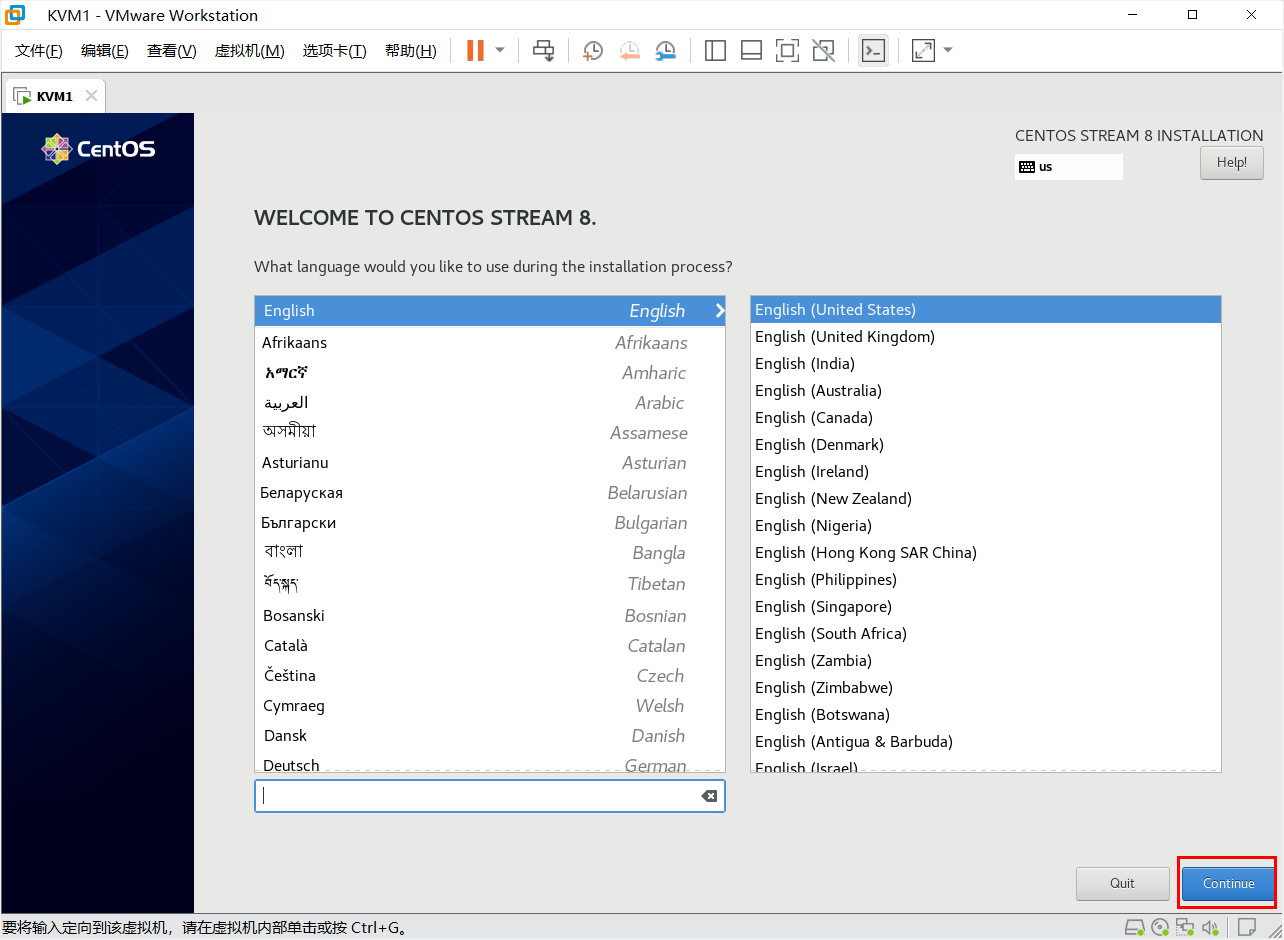
选择Continue
选择安装位置
选择Done
配置root用户密码,创建一个普通用户huawei
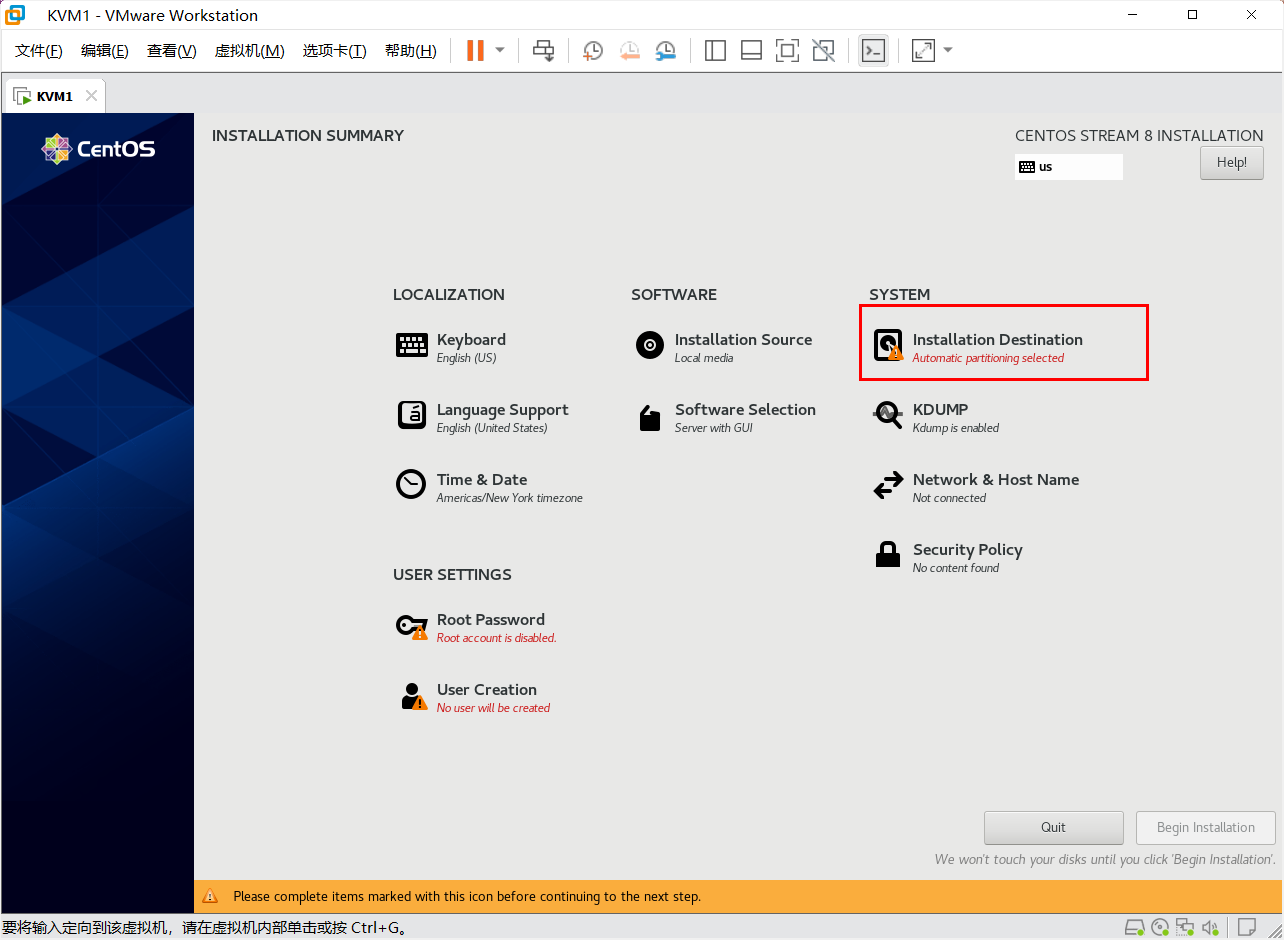
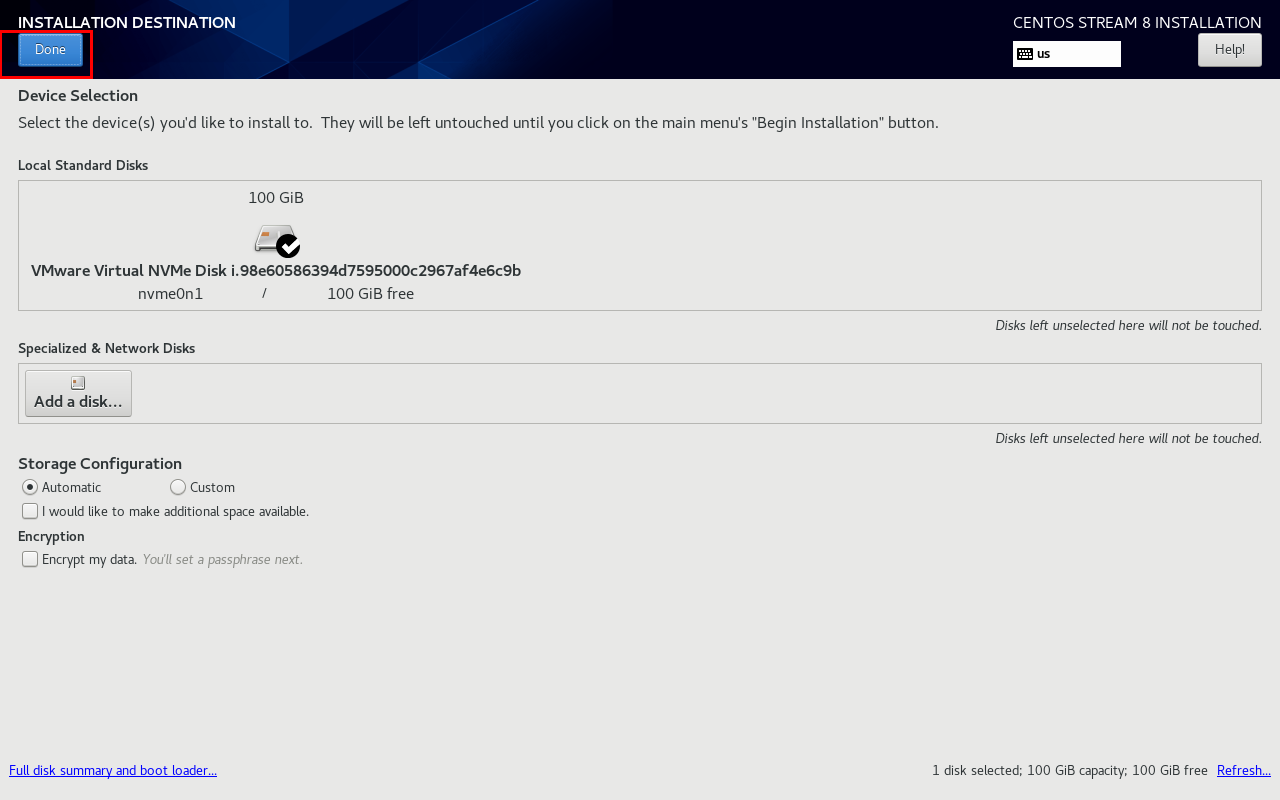
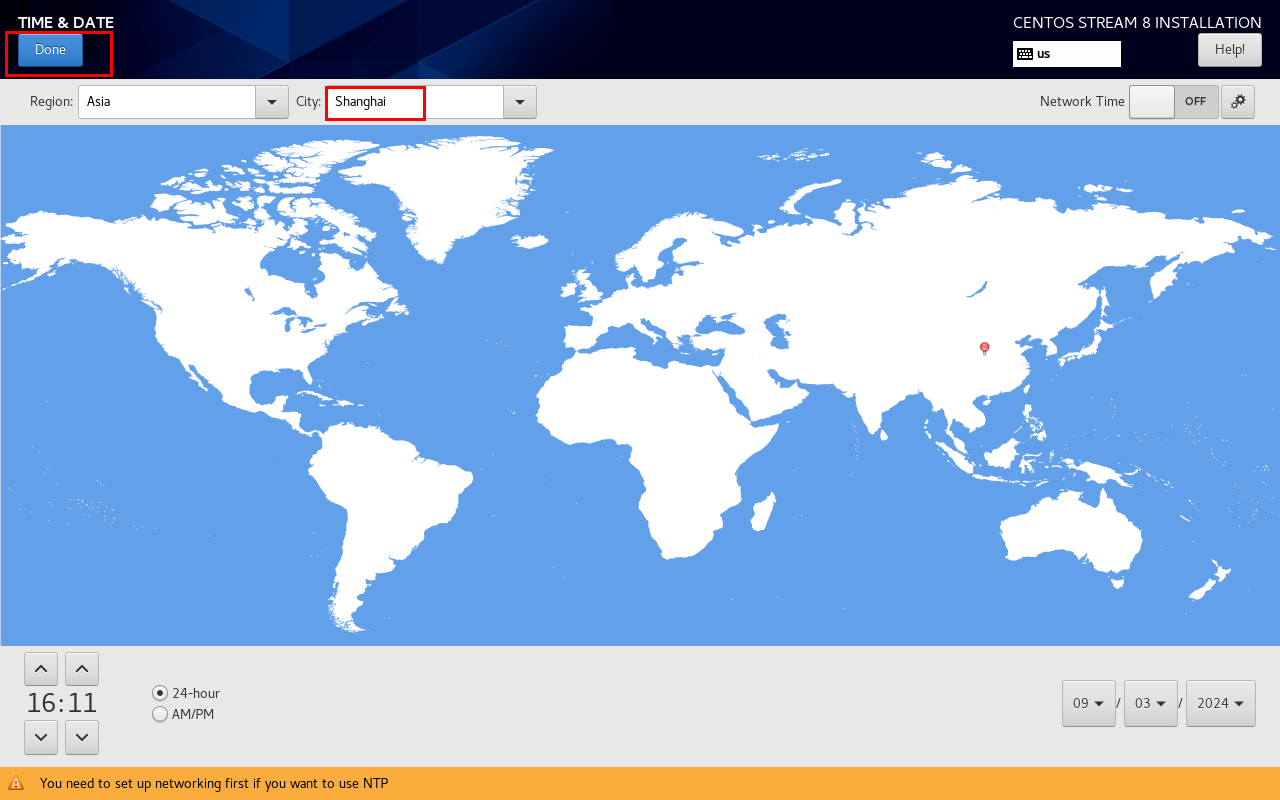
选调整时区与时间
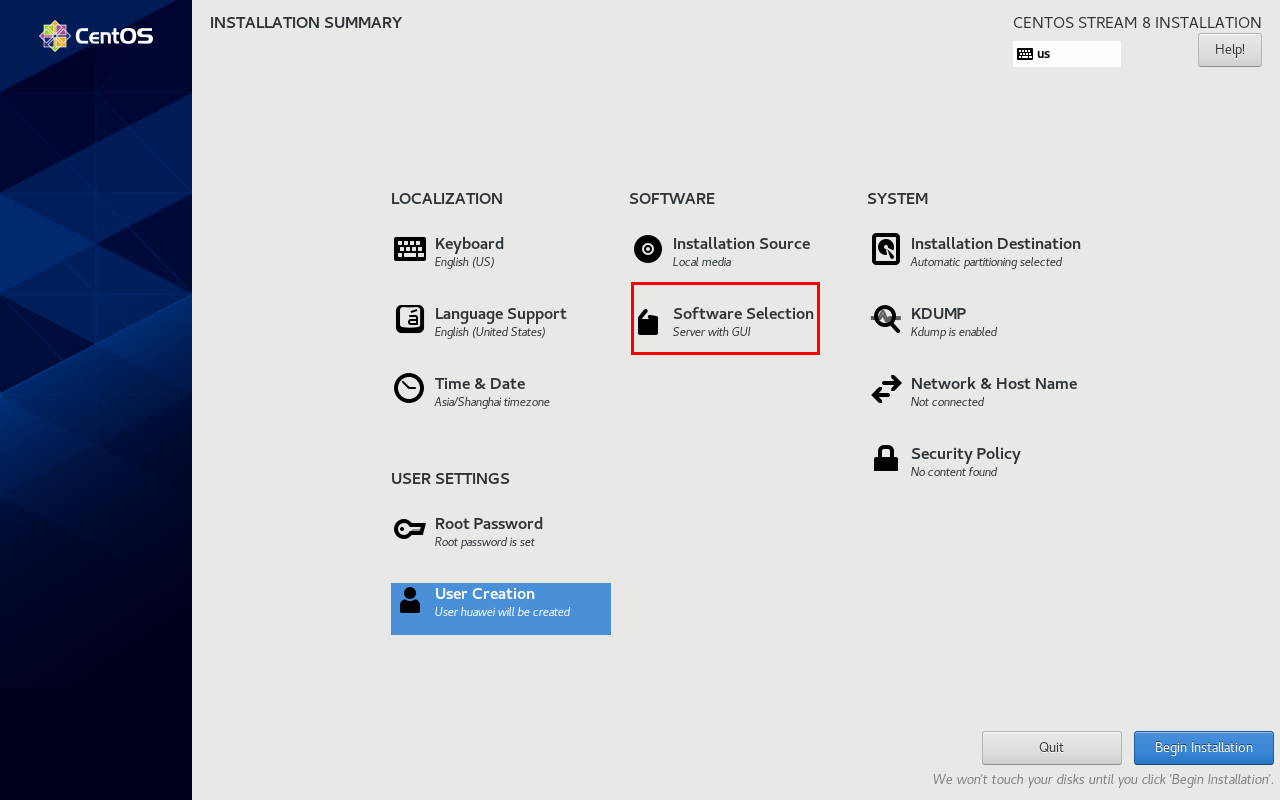
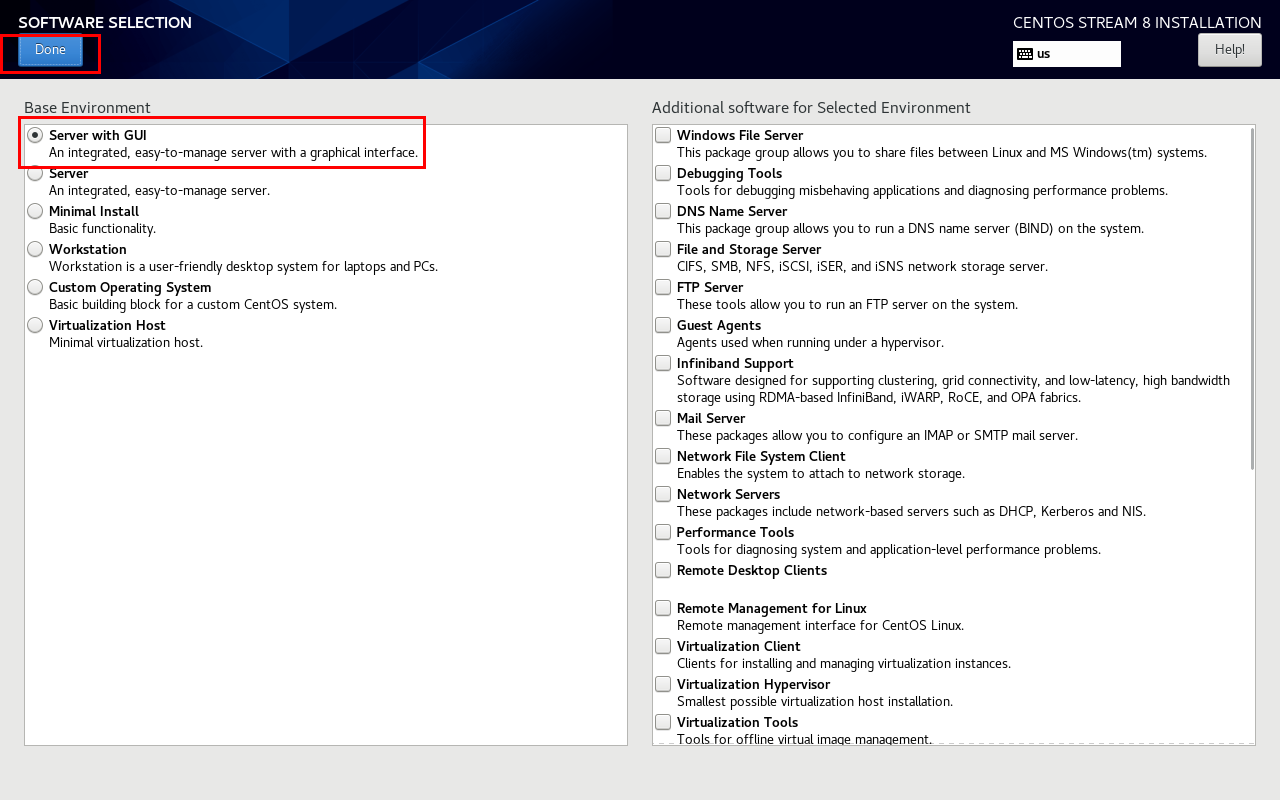
选择安装软件
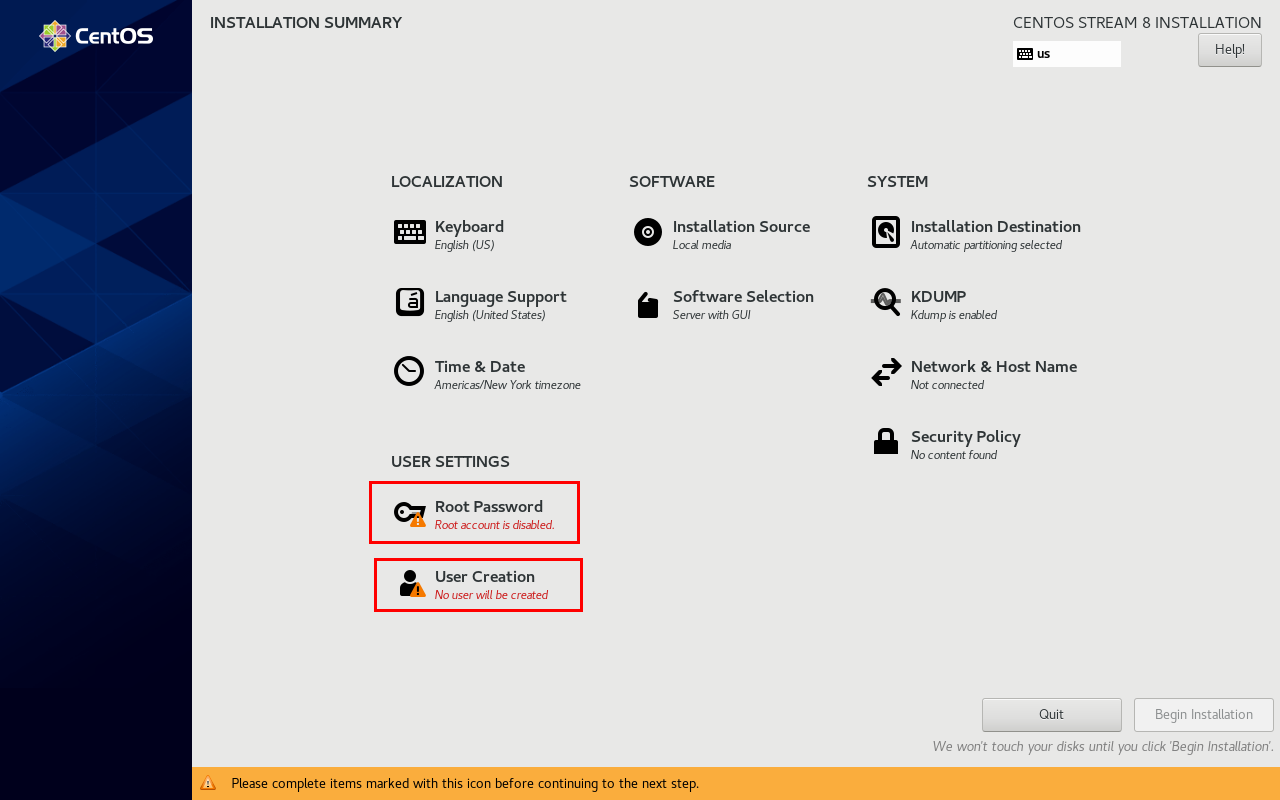
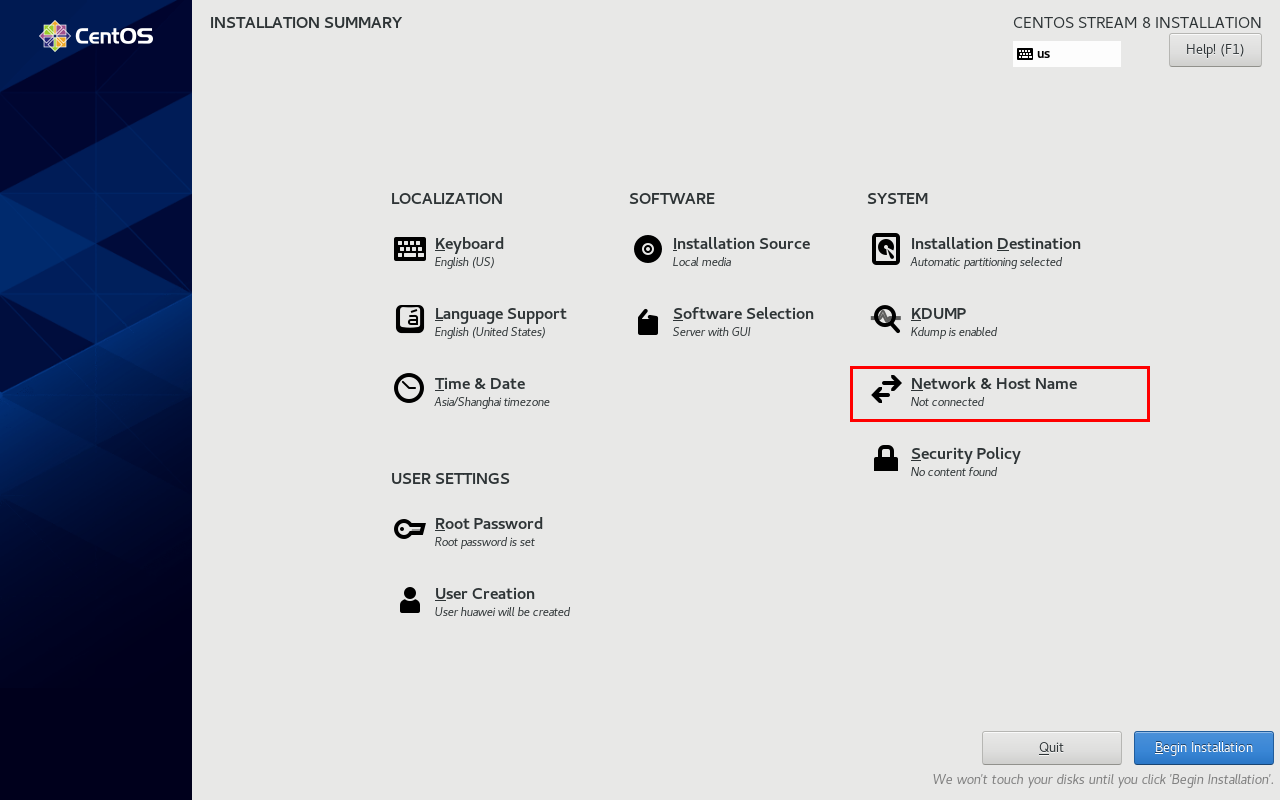
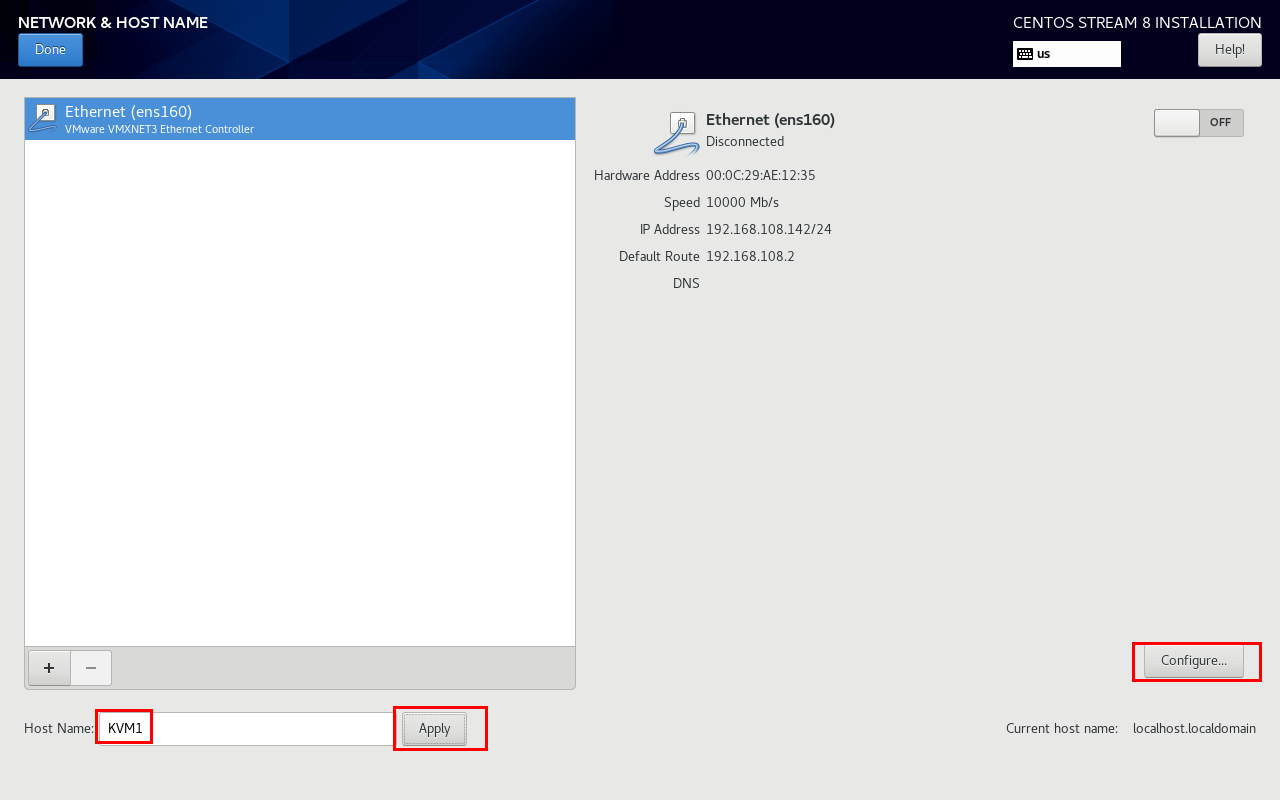
设置网络
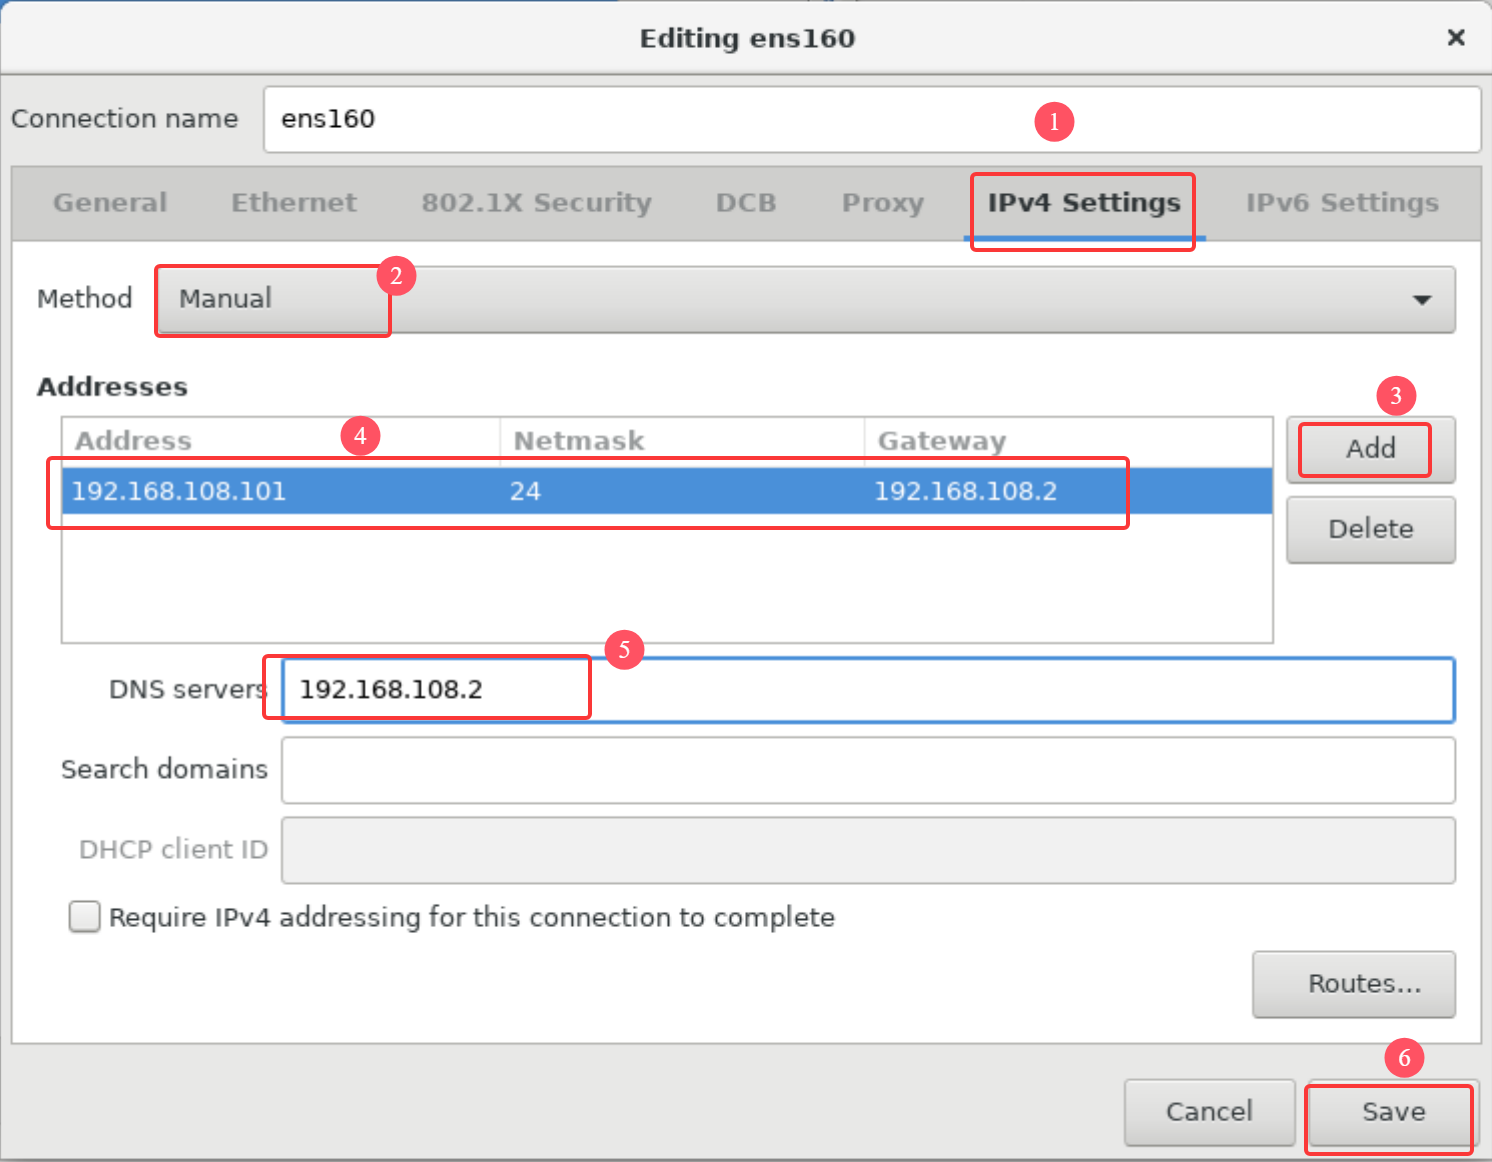
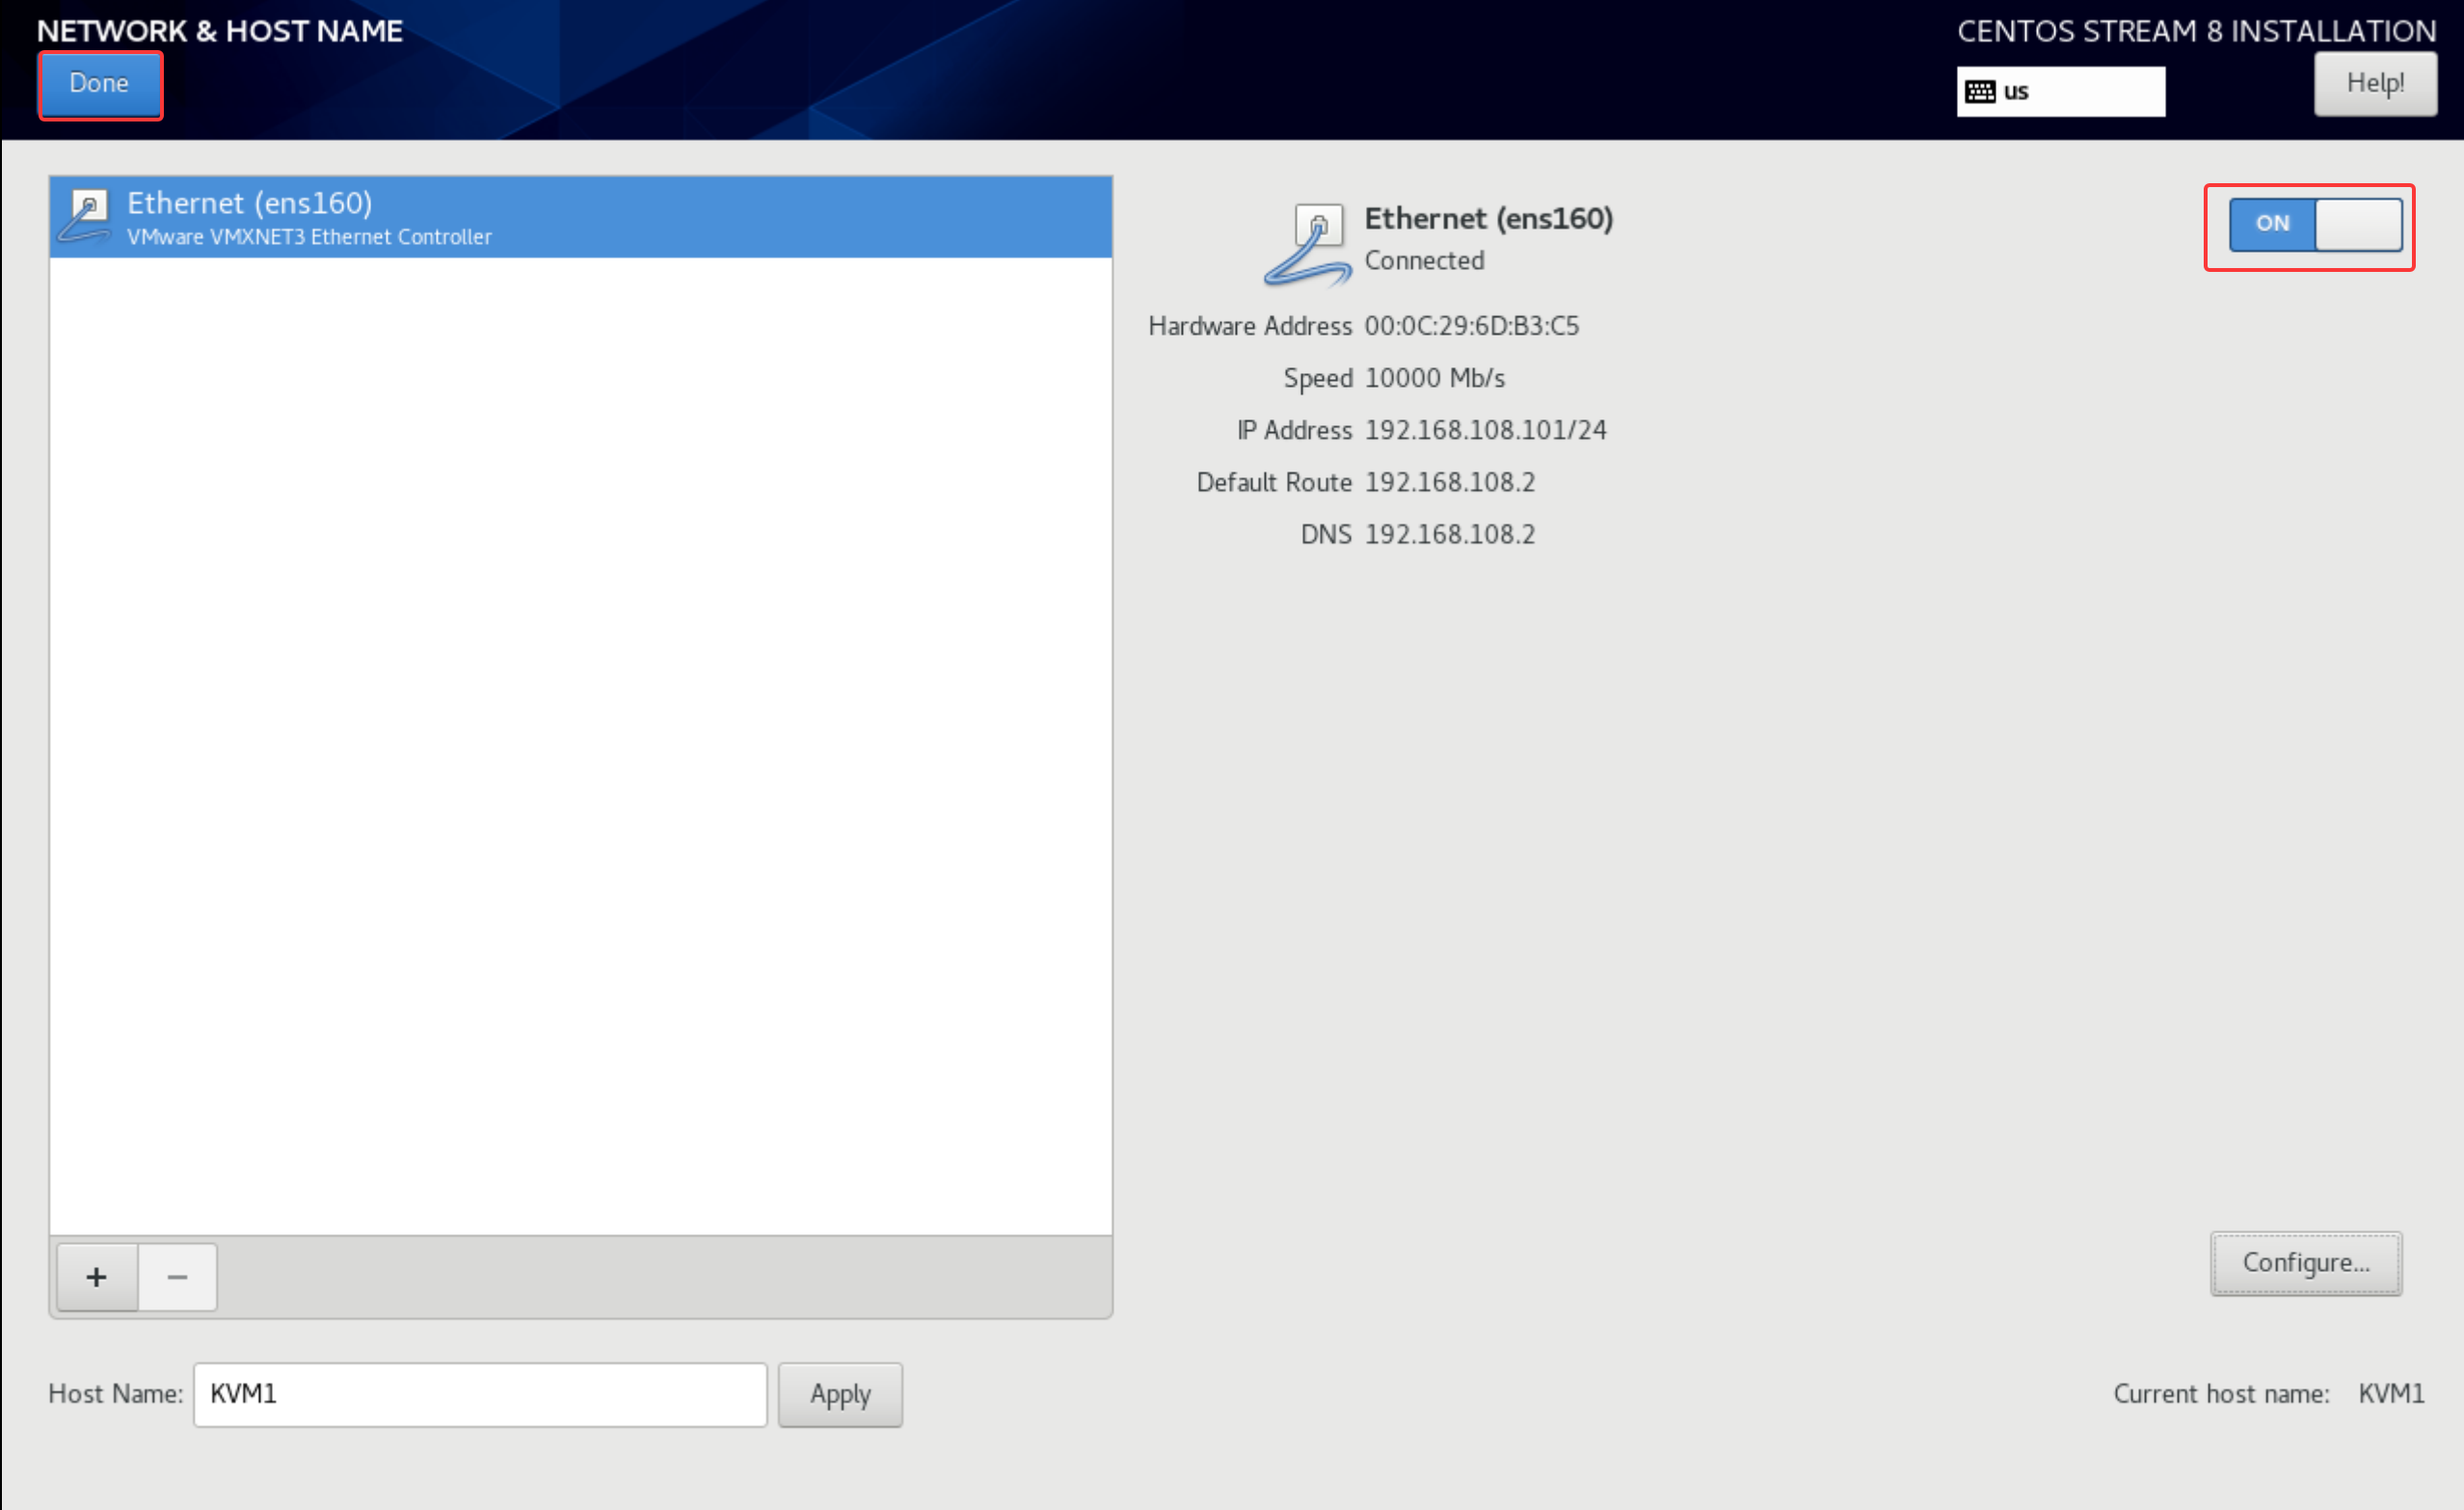
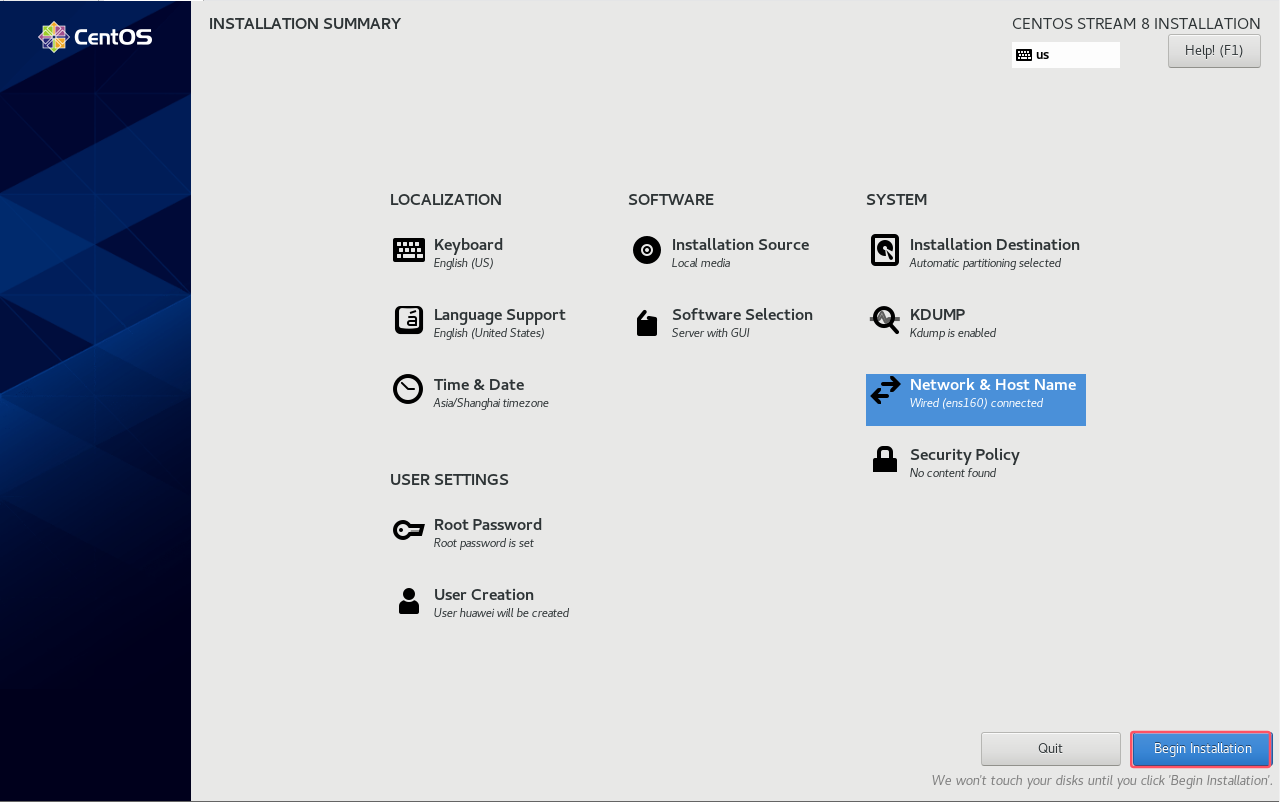
安装完成,重启
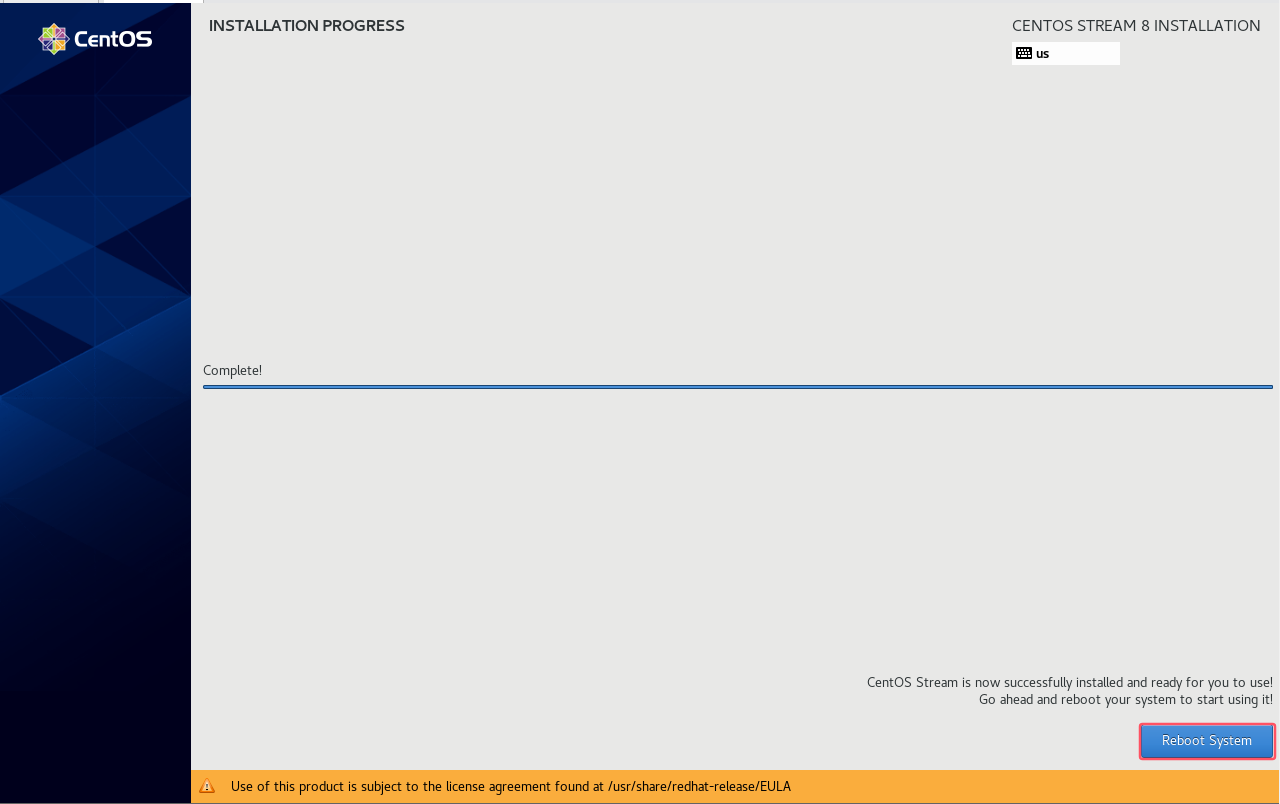
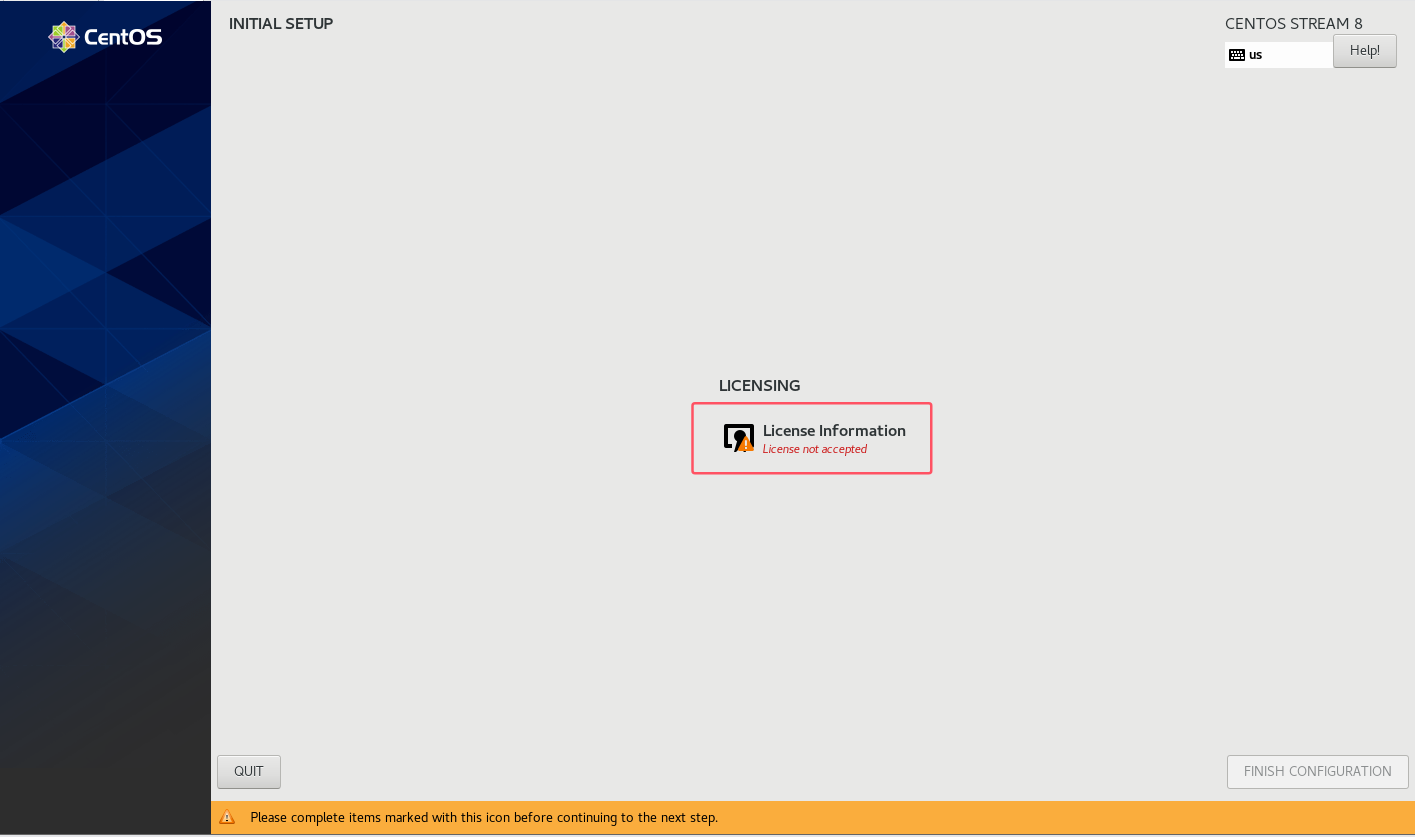
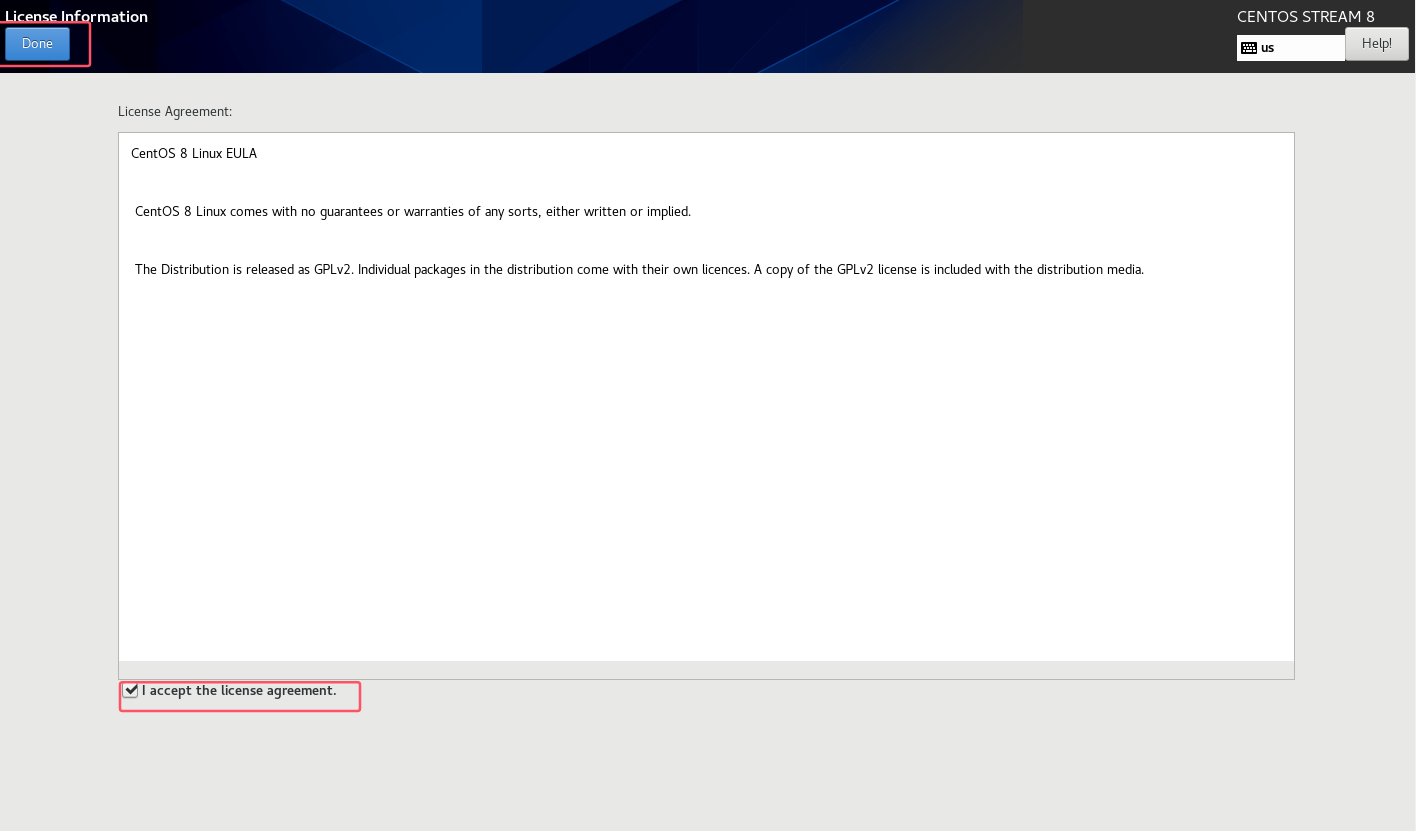
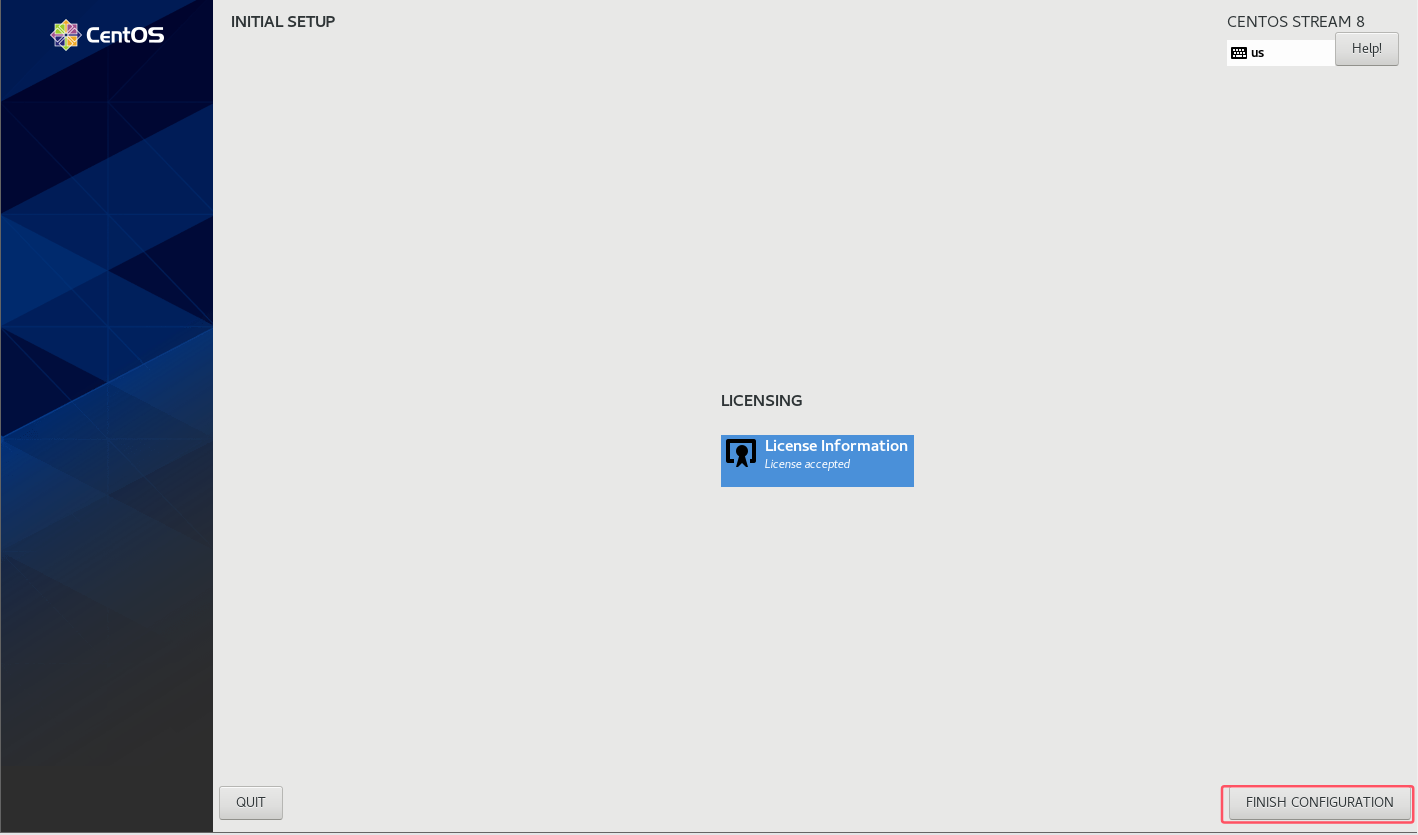
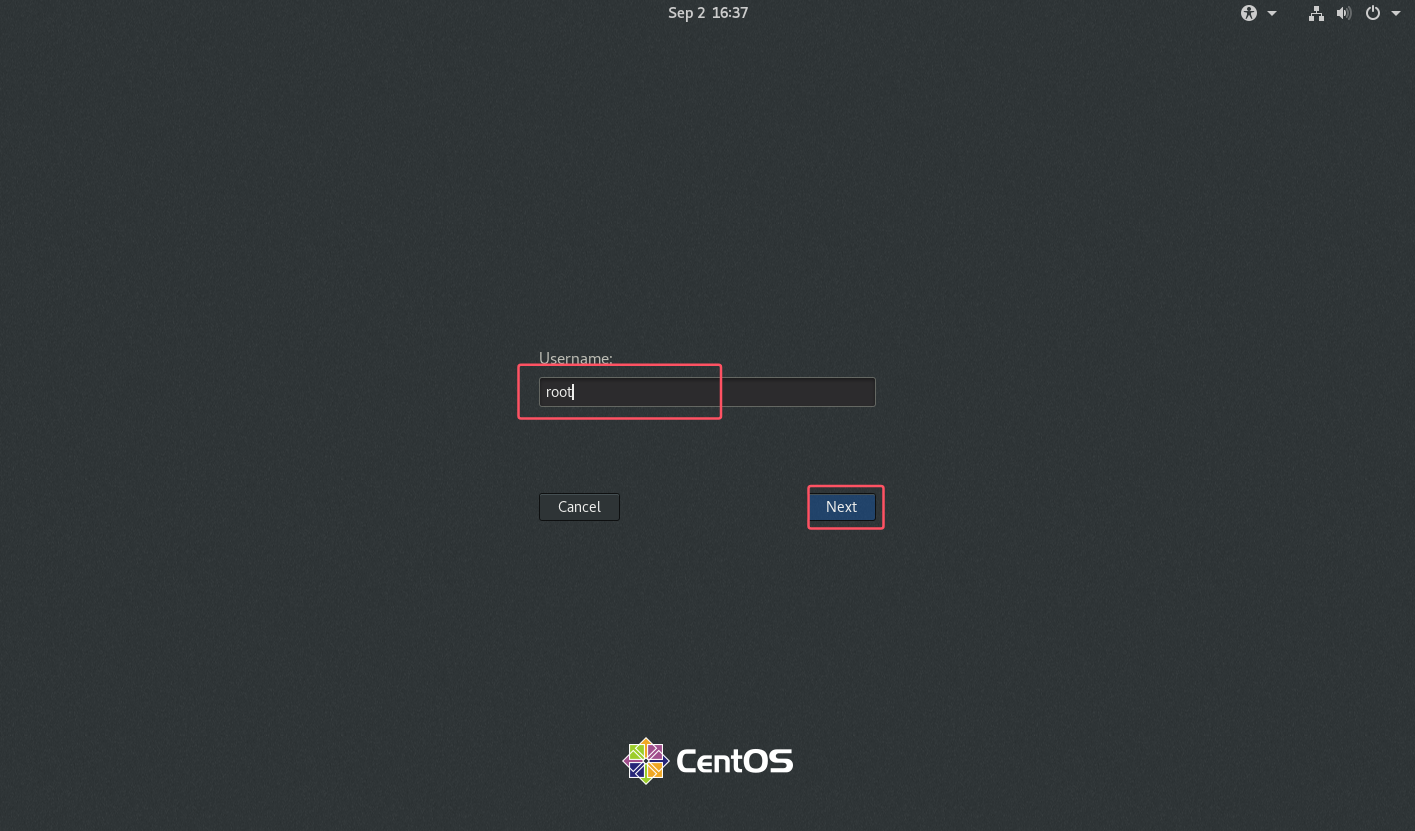
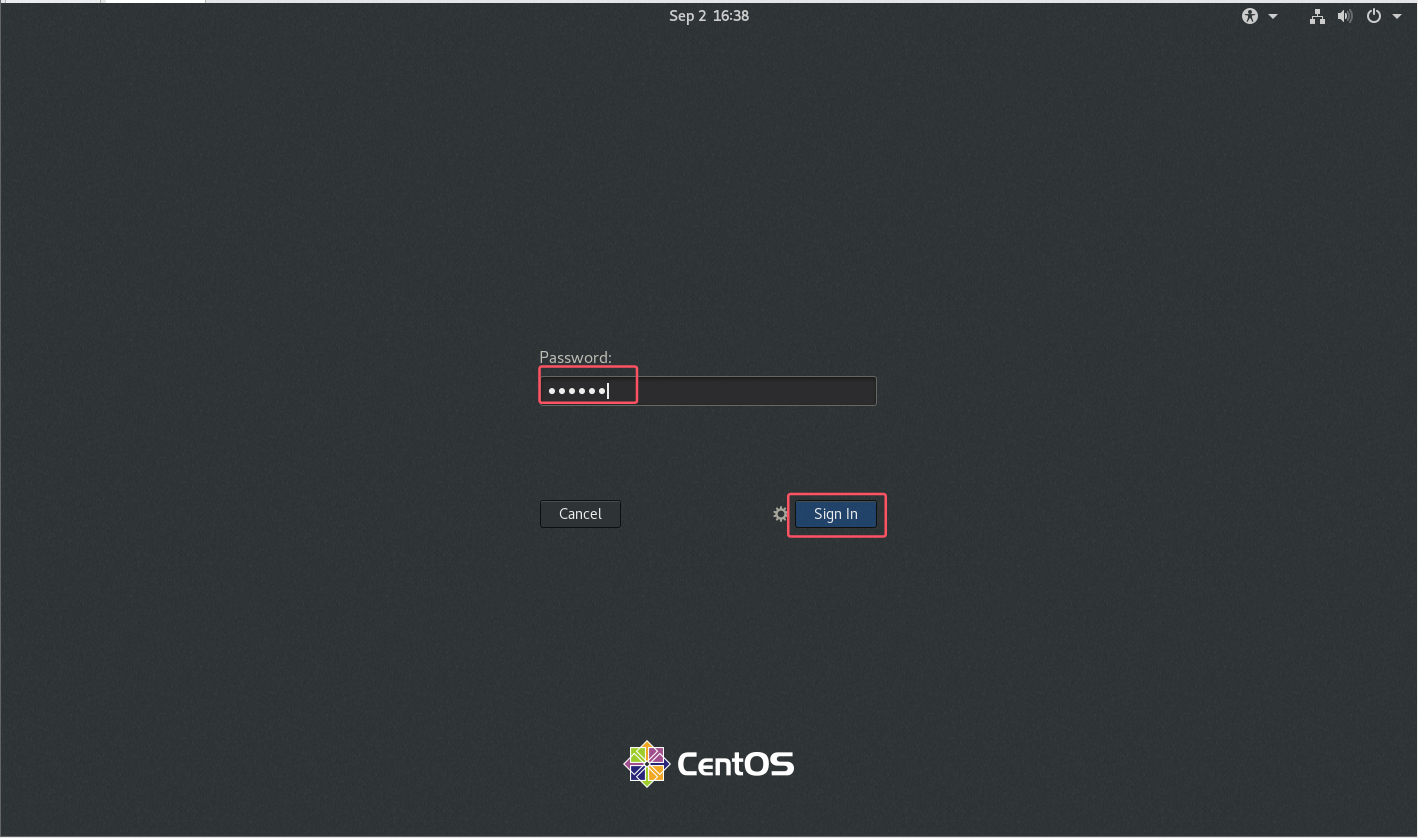
重启后,使用root账号登录
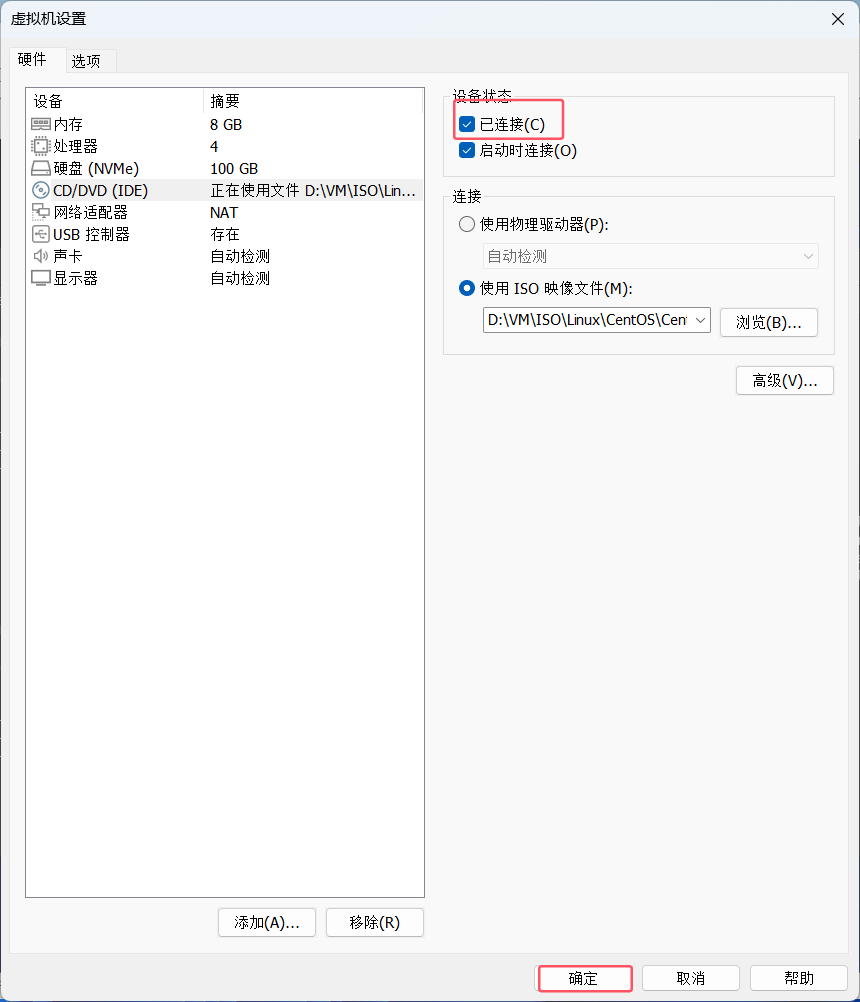
右击虚拟机设置,挂载光盘,设置为yum源
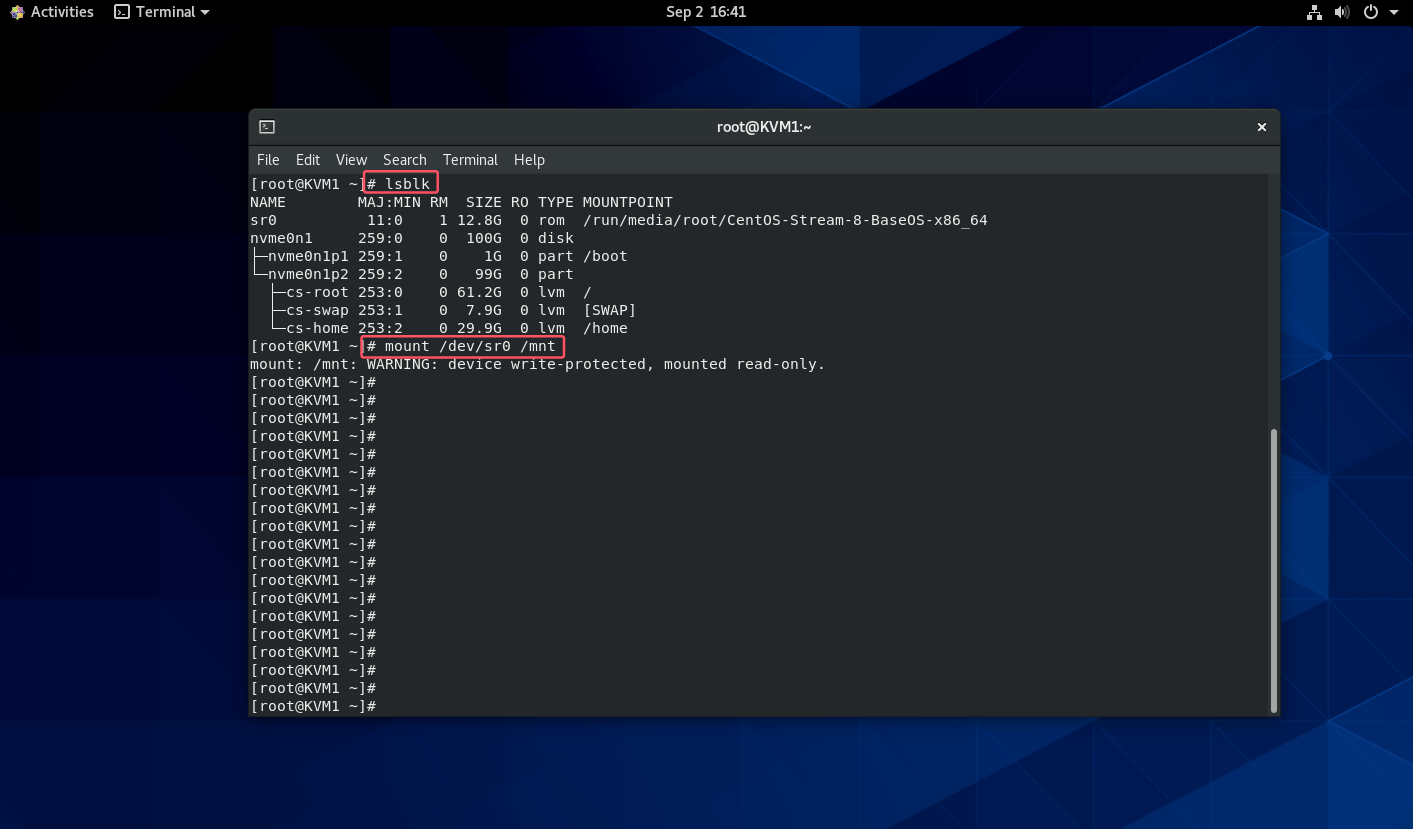
[root@KVM1 ~]# lsblk         #查看多了个sr0光盘
NAME        MAJ:MIN RM  SIZE RO TYPE MOUNTPOINT
sr0          11:0    1 12.8G  0 rom  /run/media/root/CentOS-Stream-8-BaseOS-
x86_64
nvme0n1     259:0    0  100G  0 disk
├─nvme0n1p1 259:1    0    1G  0 part /boot
└─nvme0n1p2 259:2    0   99G  0 part
  ├─cs-root 253:0    0 61.2G  0 lvm  /
  ├─cs-swap 253:1    0  7.9G  0 lvm  [SWAP]
  └─cs-home 253:2    0 29.9G  0 lvm  /home
[root@KVM1 ~]# mount /dev/sr0 /mnt         #将光盘挂载到/mnt目录
mount: /mnt: WARNING: device write-protected, mounted read-only.
[root@KVM1 ~]# cd /etc/yum.repos.d/
[root@KVM1 yum.repos.d]# ls
CentOS-Stream-AppStream.repo  CentOS-Stream-Extras-common.repo     CentOS-Stream-
Media.repo       CentOS-Stream-RealTime.repo
CentOS-Stream-BaseOS.repo     CentOS-Stream-Extras.repo            CentOS-Stream-
NFV.repo         CentOS-Stream-ResilientStorage.repo
CentOS-Stream-Debuginfo.repo  CentOS-Stream-HighAvailability.repo  CentOS-Stream-
PowerTools.repo  CentOS-Stream-Sources.repo
[root@KVM1 yum.repos.d]# rm -rf *
[root@KVM1 yum.repos.d]# vim dvd.repo
# dvd.repo中输入以下内容,然后:wq保存退出
[AppStream]
name=AppStream
baseurl=file:///mnt/AppStream
enabled=1
gpgcheck=0
[BaseOS]
name=BaseOS
baseurl=file:///mnt/BaseOS
enabled=1
gpgcheck=0
[root@KVM1 yum.repos.d]# yum clean all
[root@KVM1 yum.repos.d]# yum makecache
[root@KVM1 yum.repos.d]# yum group install "Virtualization*" -y
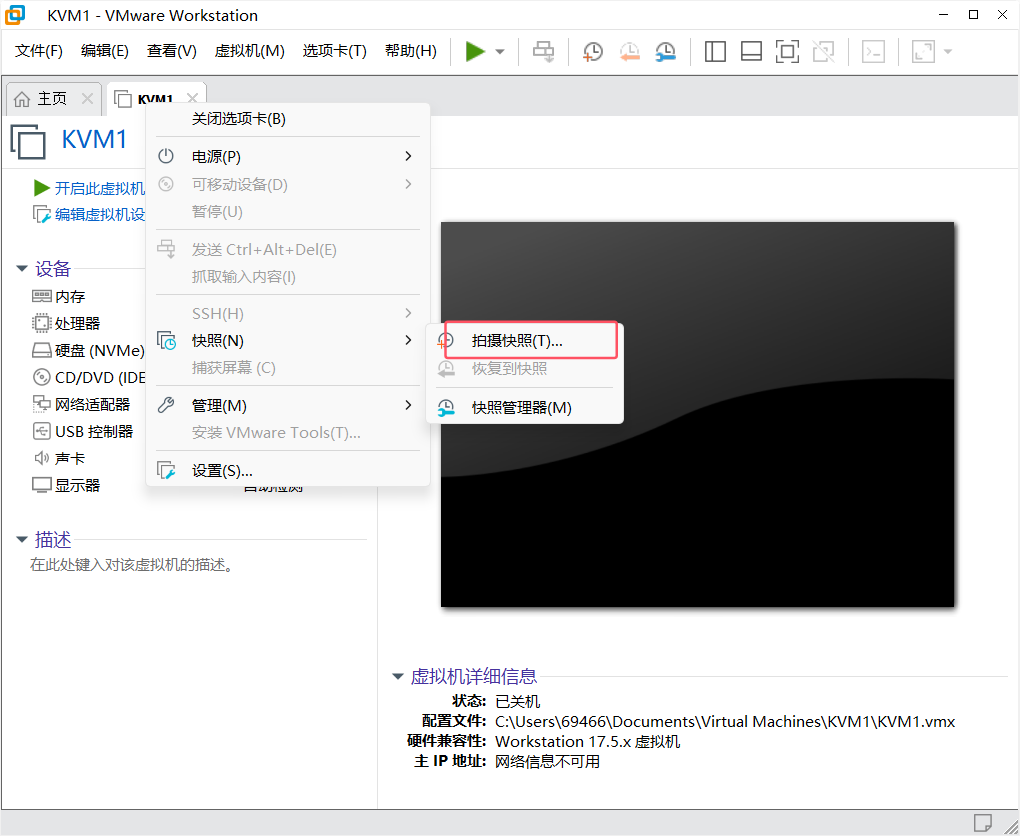
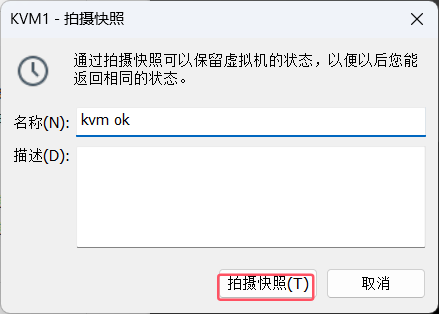
[root@KVM1 yum.repos.d]# poweroff             #关机,拍摄快照
三、KVM基础使用
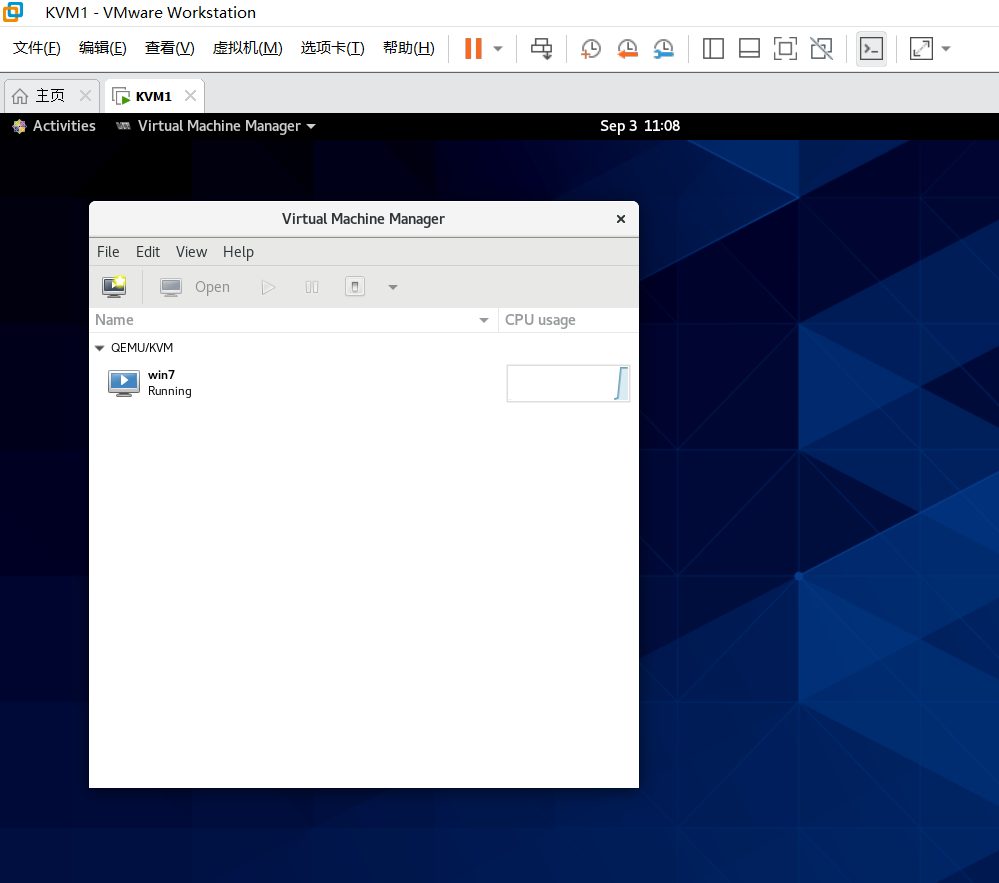
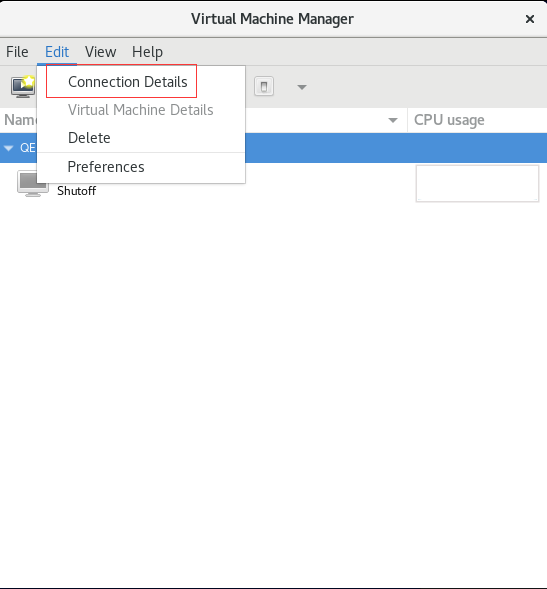
KVM图形界面使用
呼出virt-manager有两种方式
图形界面调出KVM图形界面
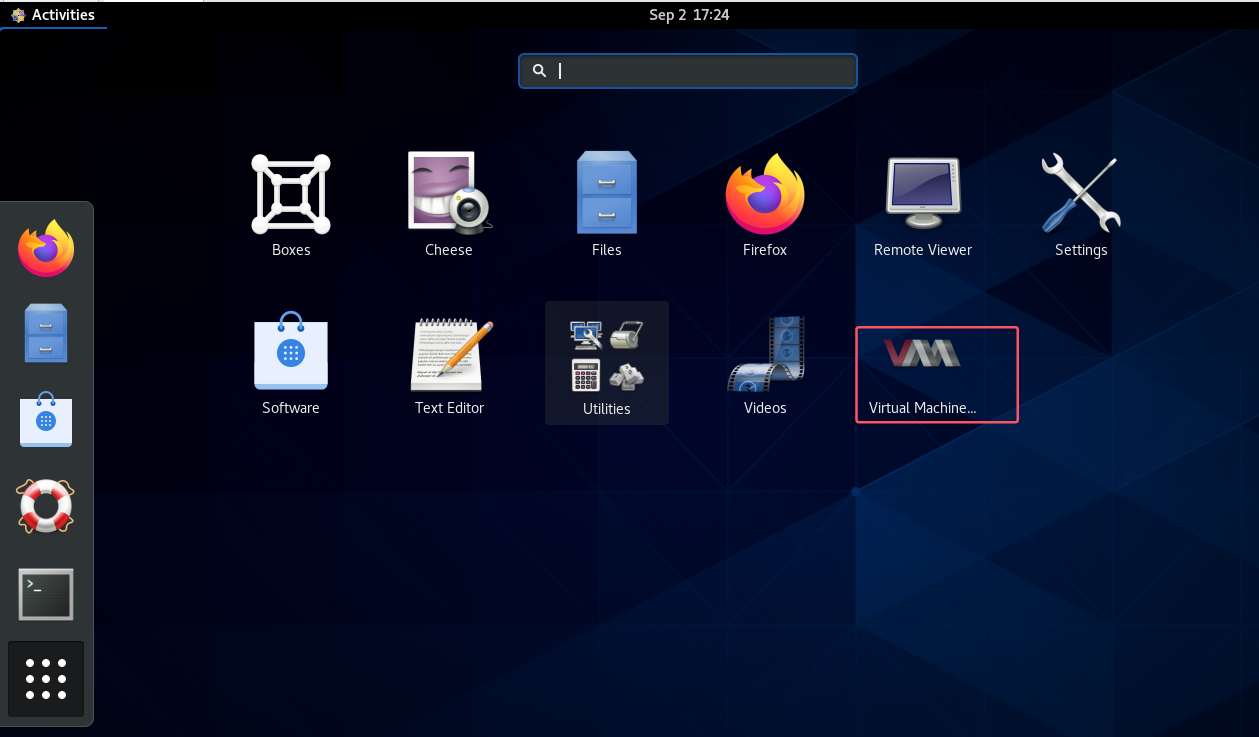
2.命令行调出KVM图形界面
[root@KVM1 ~]# virt-manager
上传一个镜像到KVM主机,用于安装虚拟机
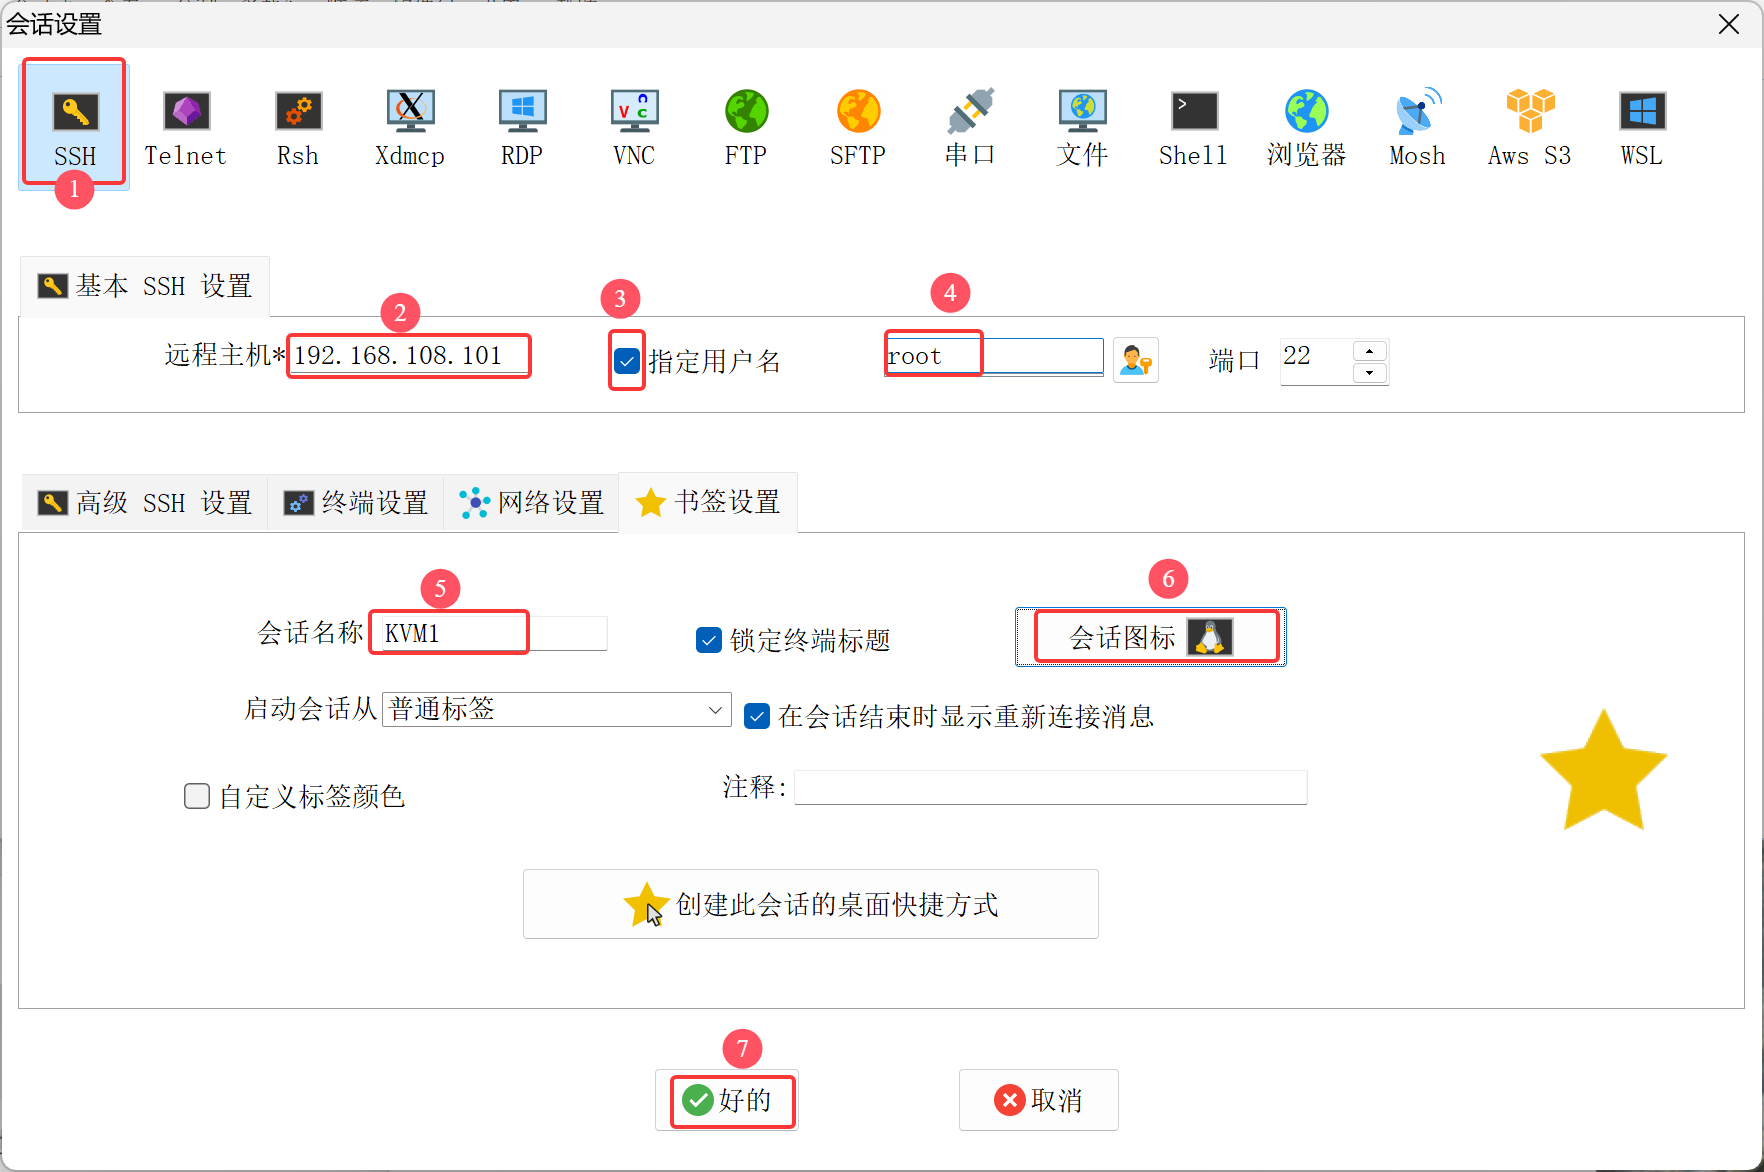
首先使用终端软件连接上KVM1主机

创建一个子目录用于存放镜像
[root@KVM1 ~]# mkdir /iso
从笔记本上传镜像文件到KVM1 /iso目录
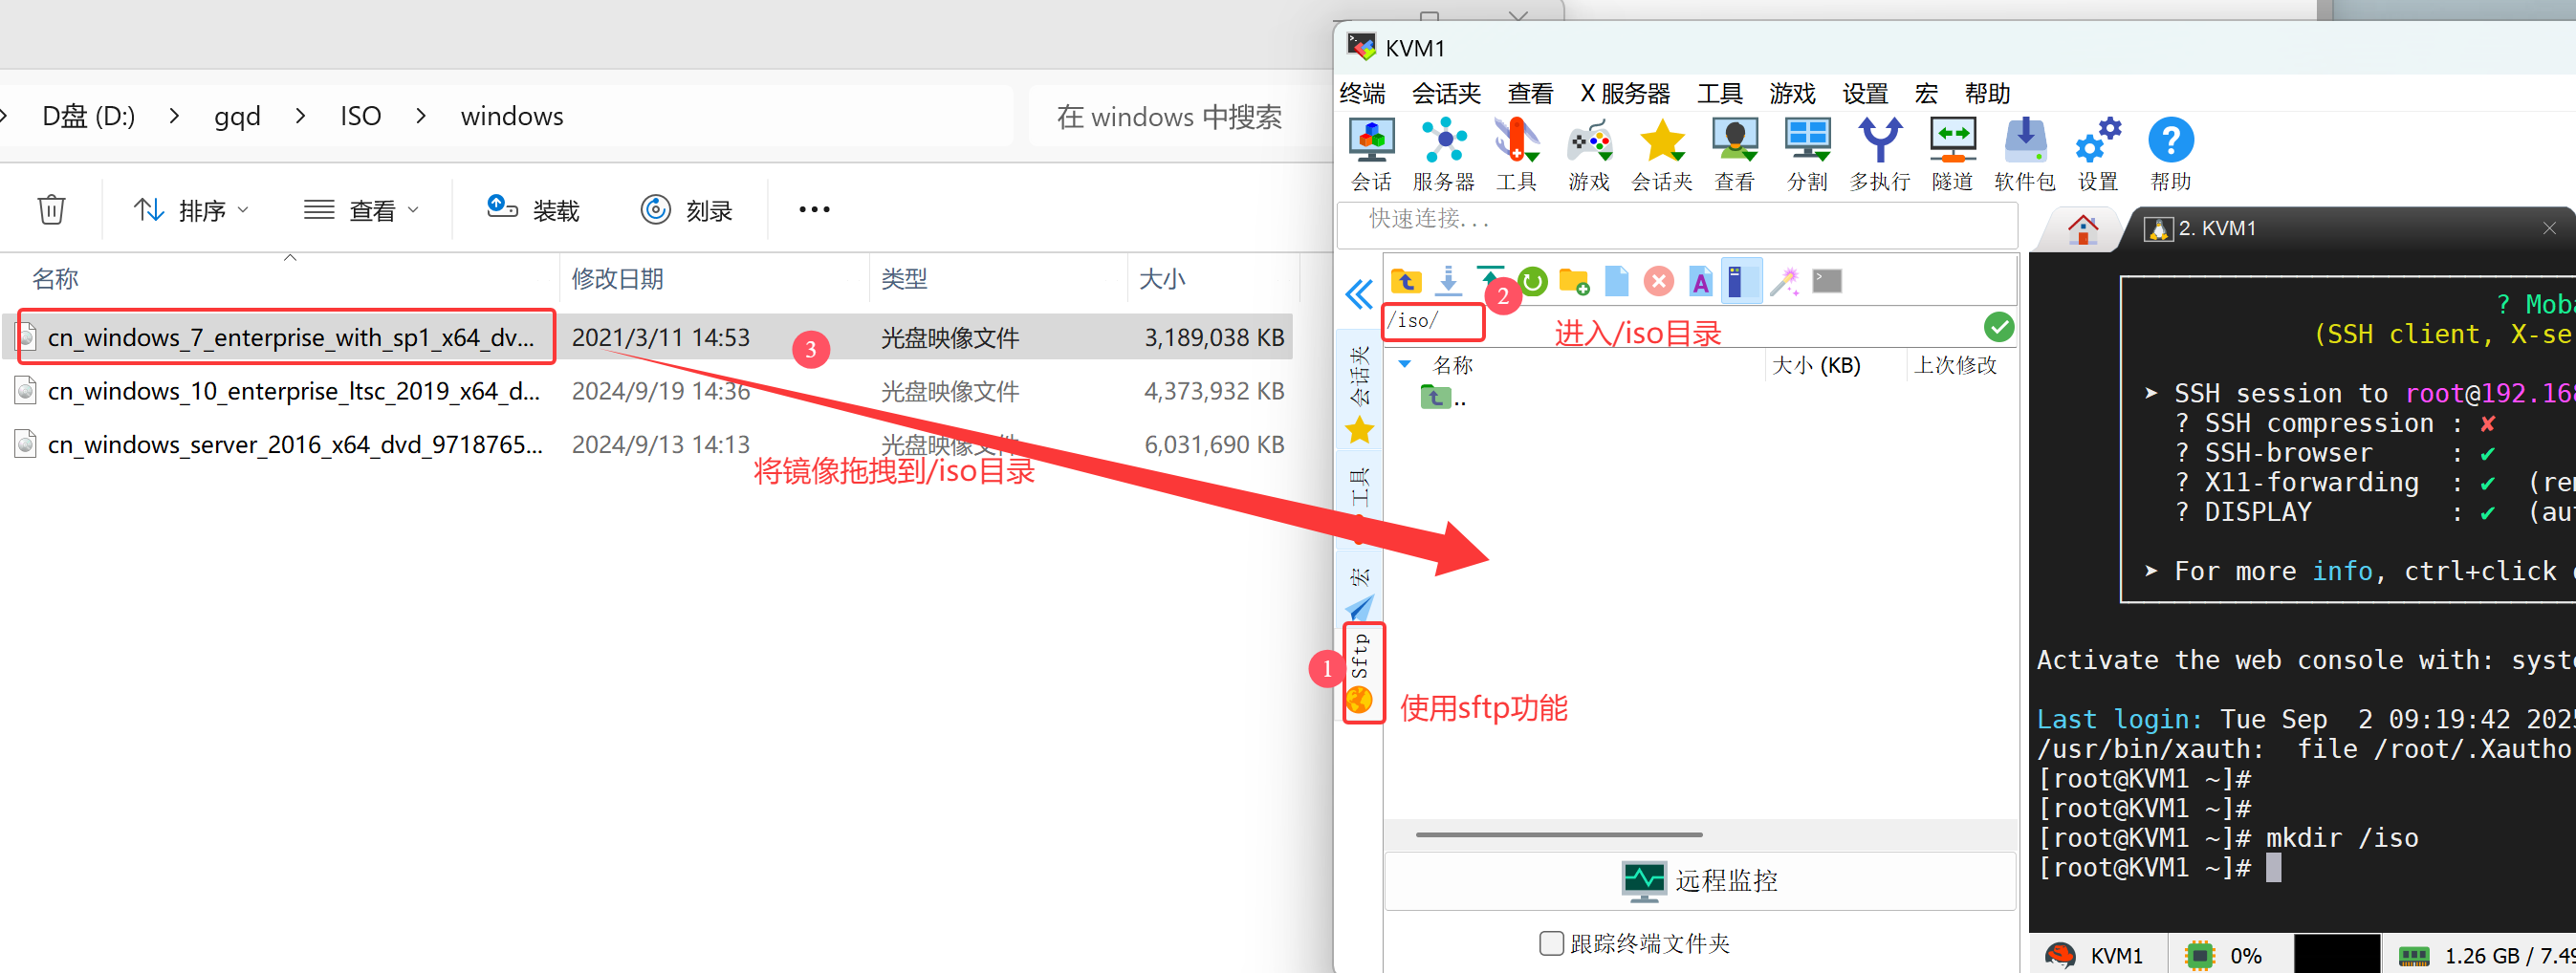
[root@KVM1 ~]# cd /iso
[root@KVM1 iso]# ls                                #验证镜像已经上传
cn_windows_7_enterprise_with_sp1_x64_dvd_u_677685.iso
用该镜像使用KVM创建虚拟机,选择新建虚拟机
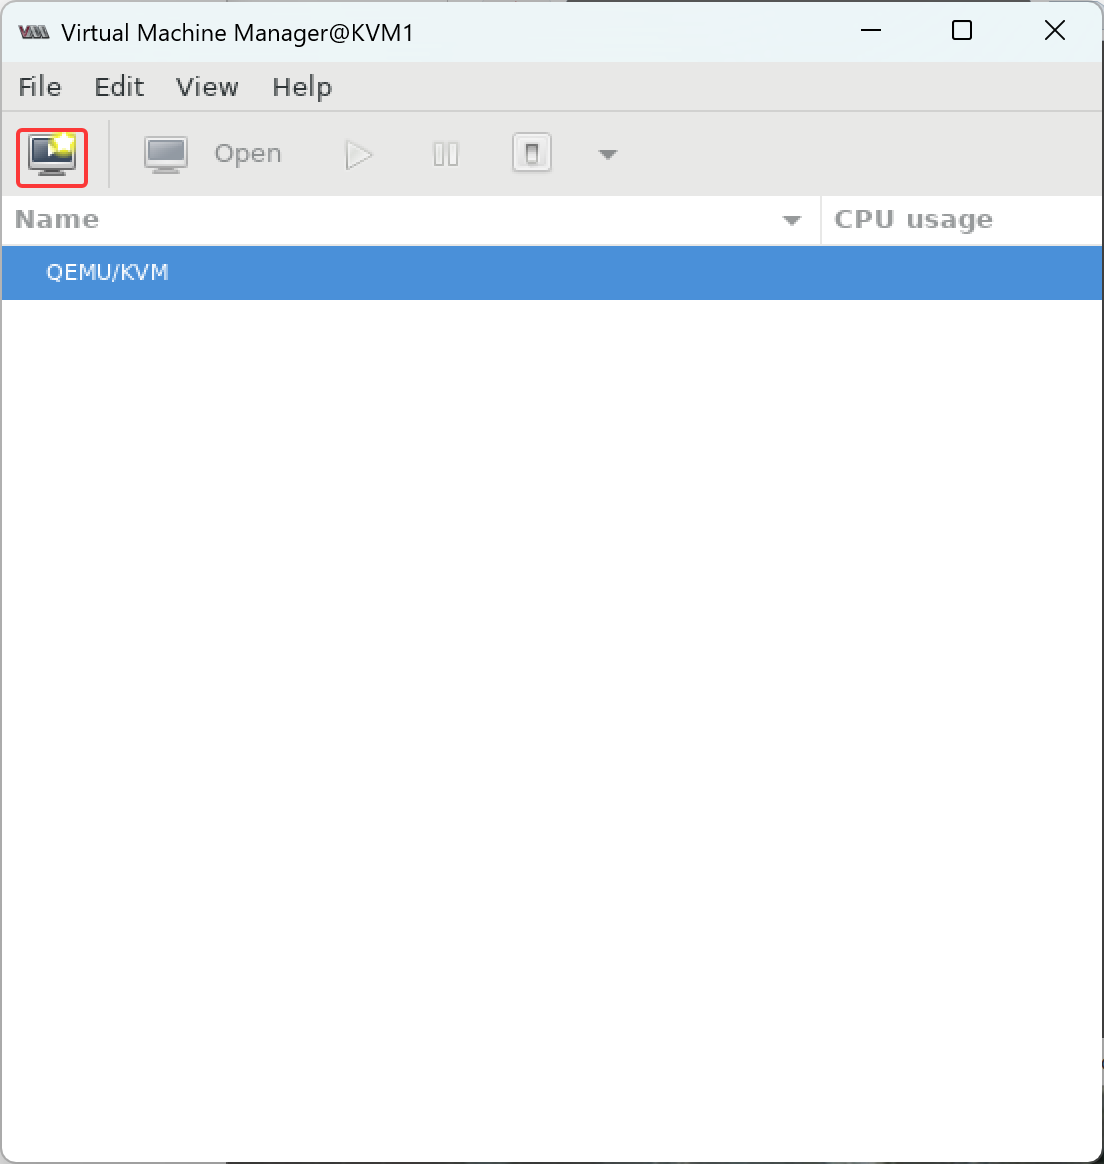
选择本地光盘安装
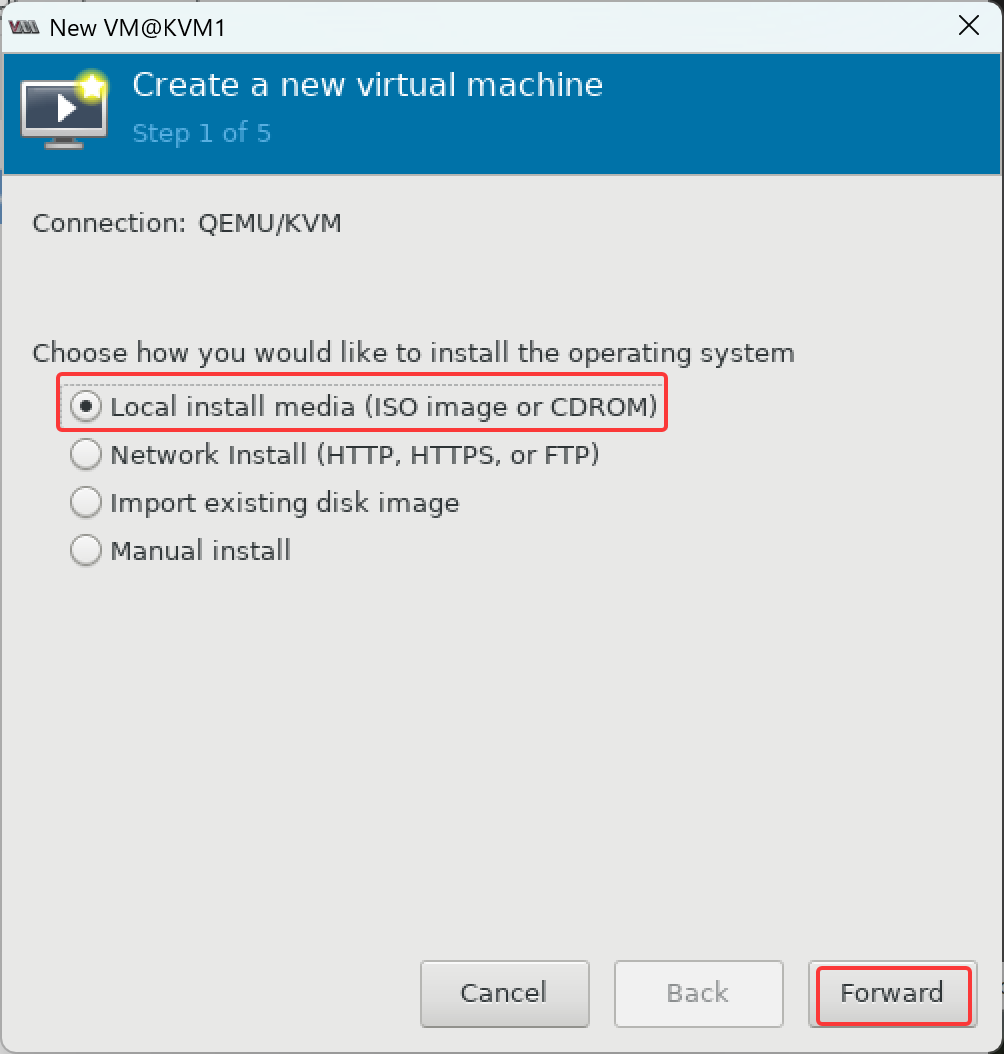
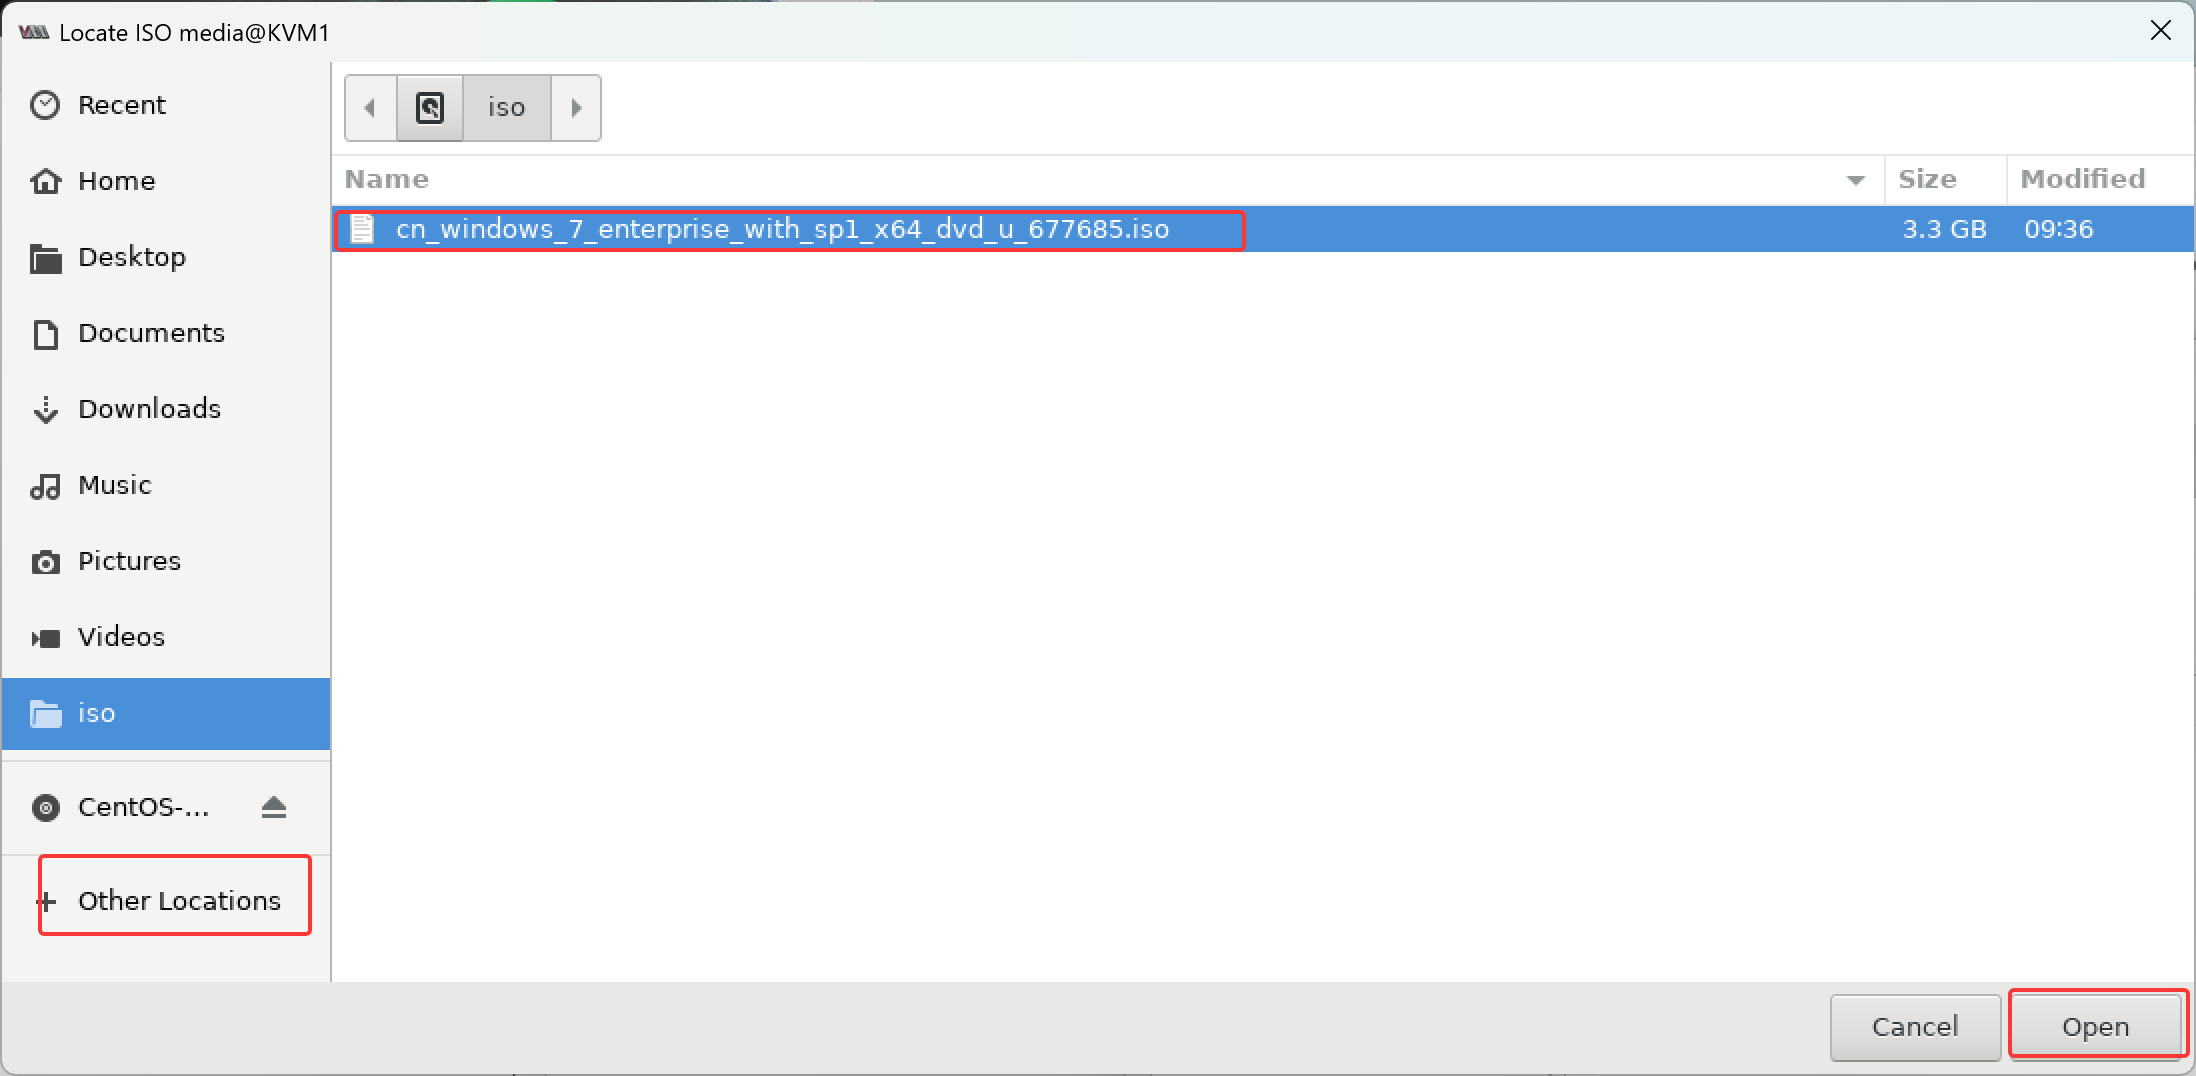
找到镜像上传的位置
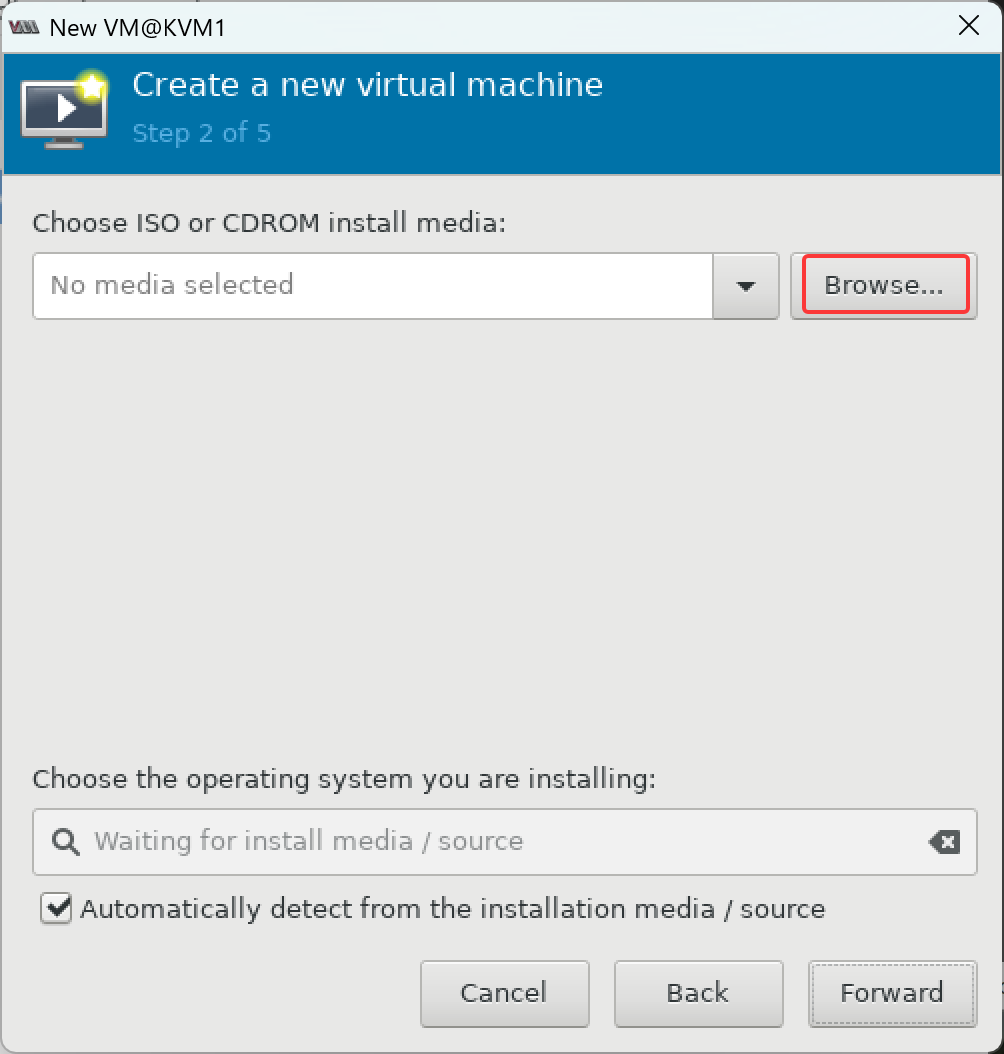
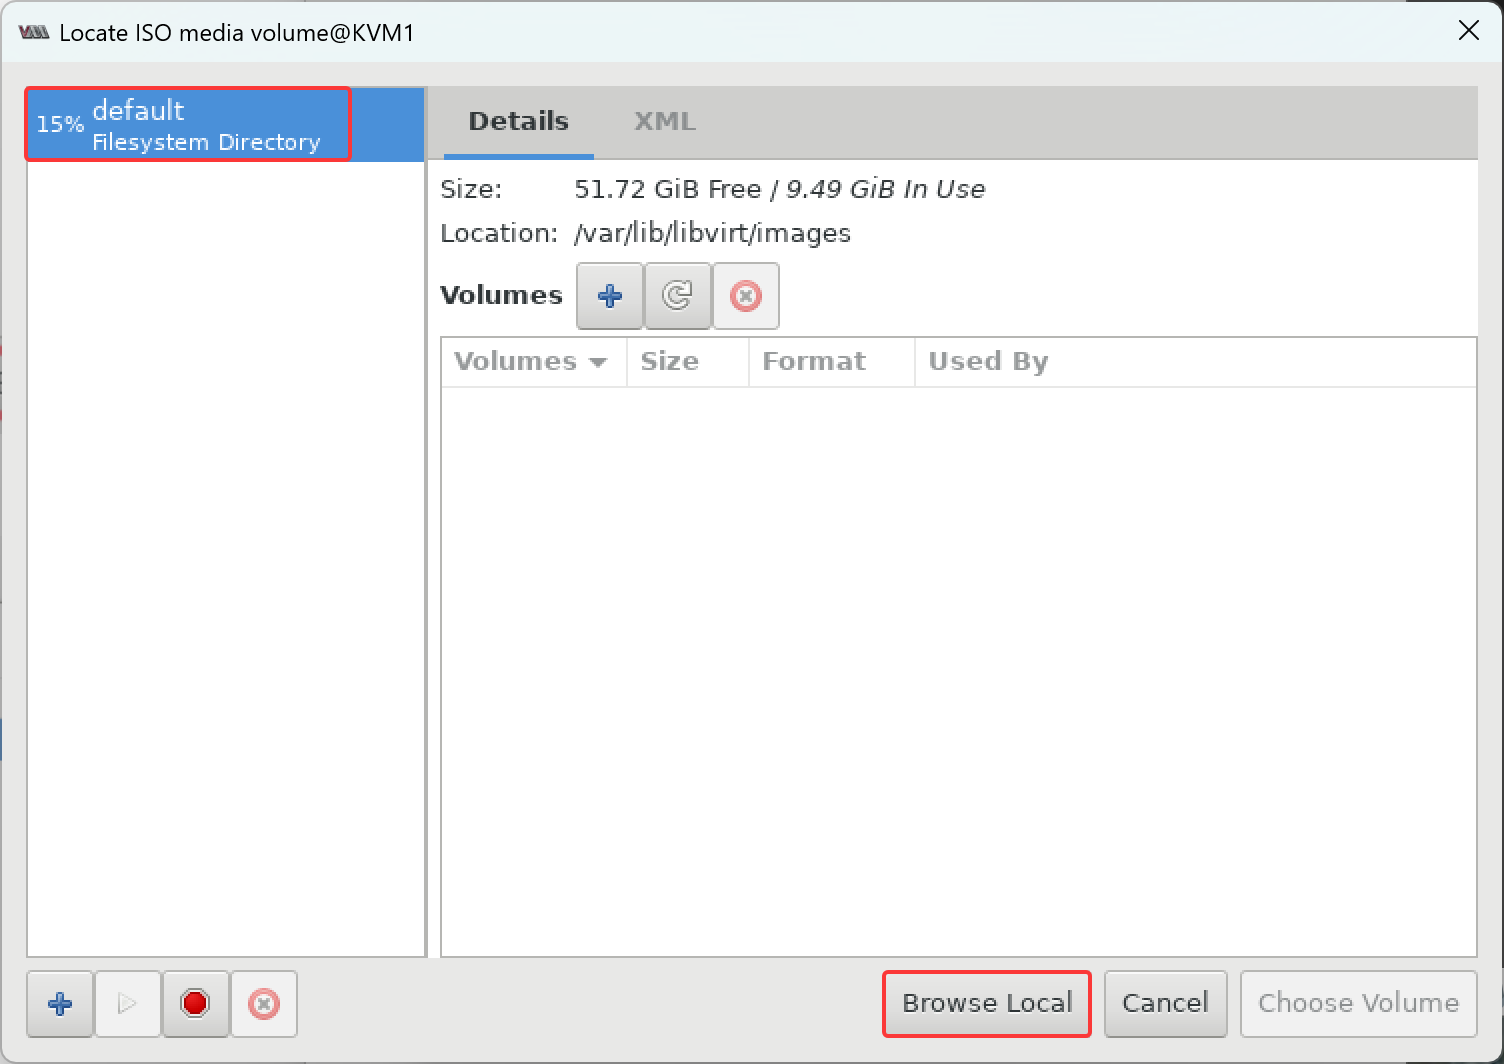
选择Other Locations->Computer->iso->win7镜像
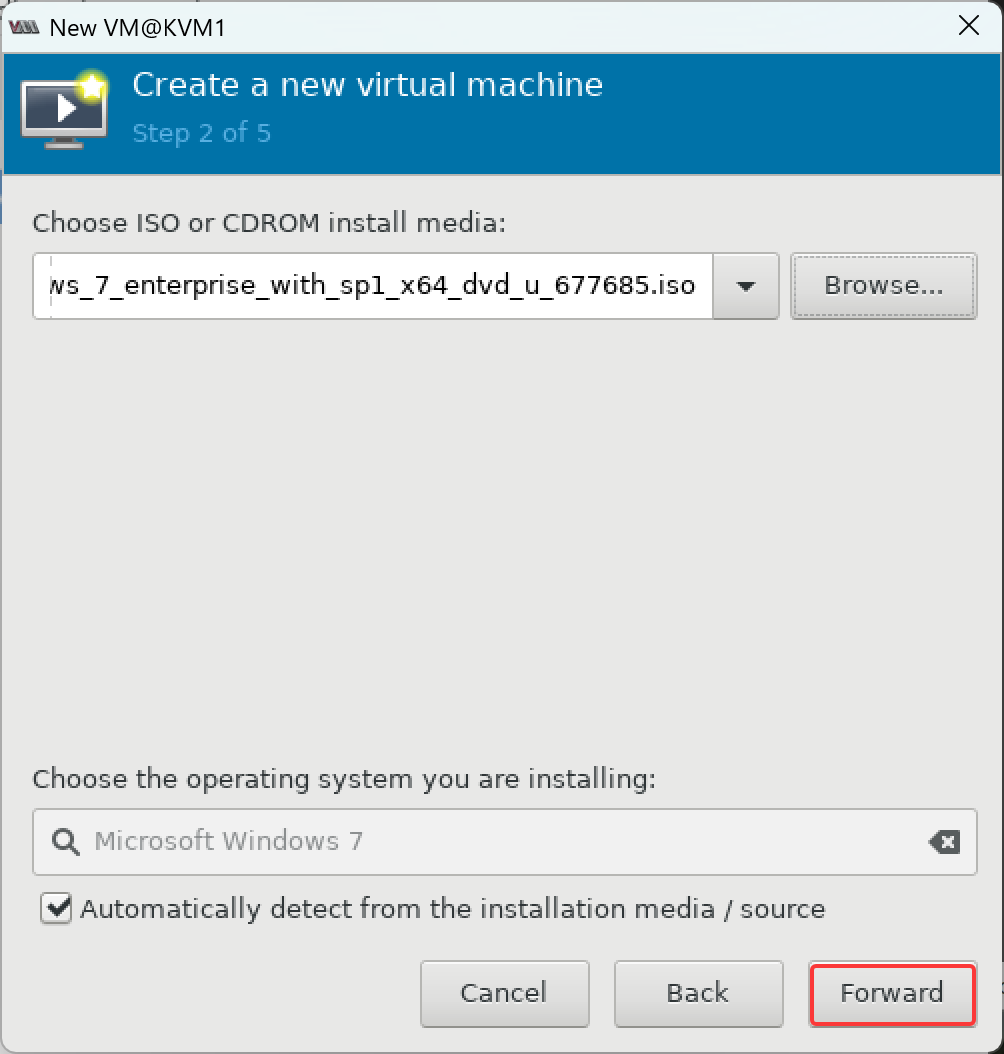
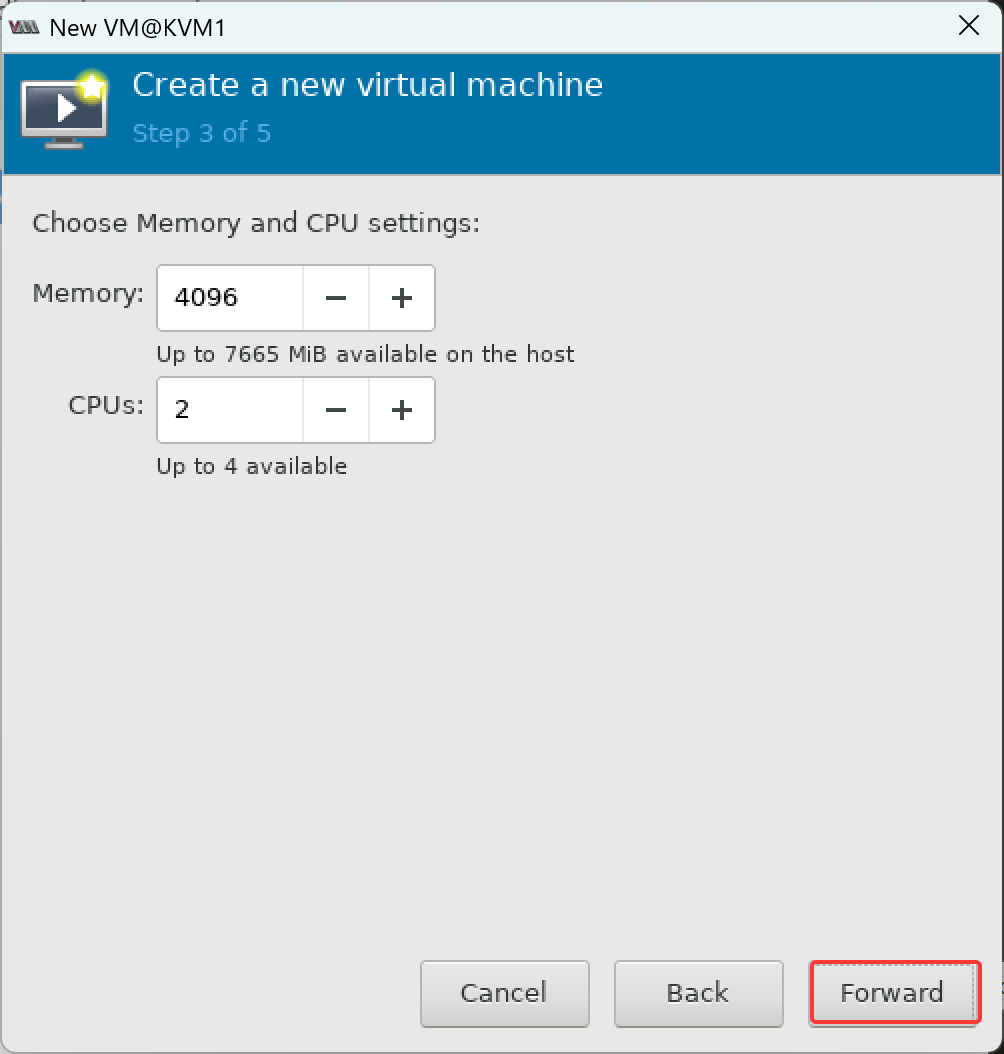
设置合理的内存和CPU资源
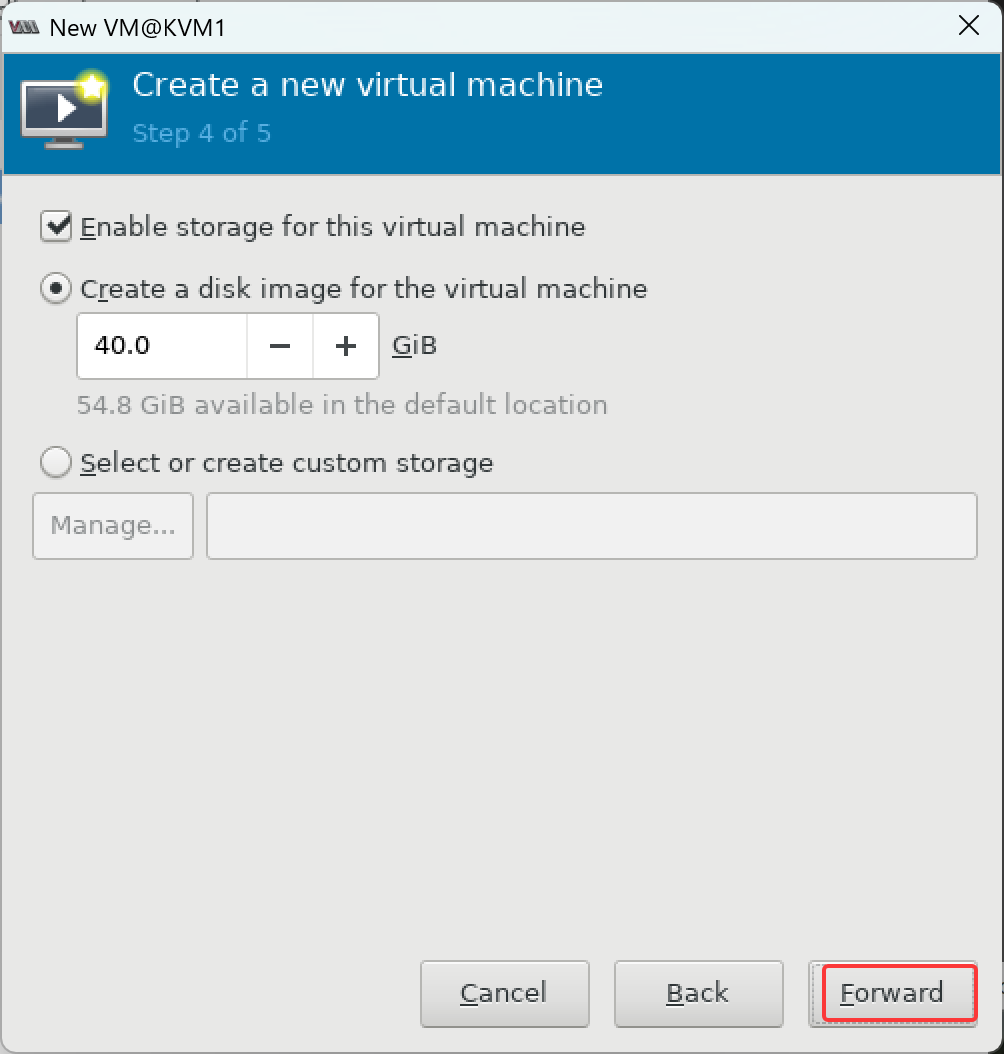
设置磁盘容量
设置虚拟机名win7
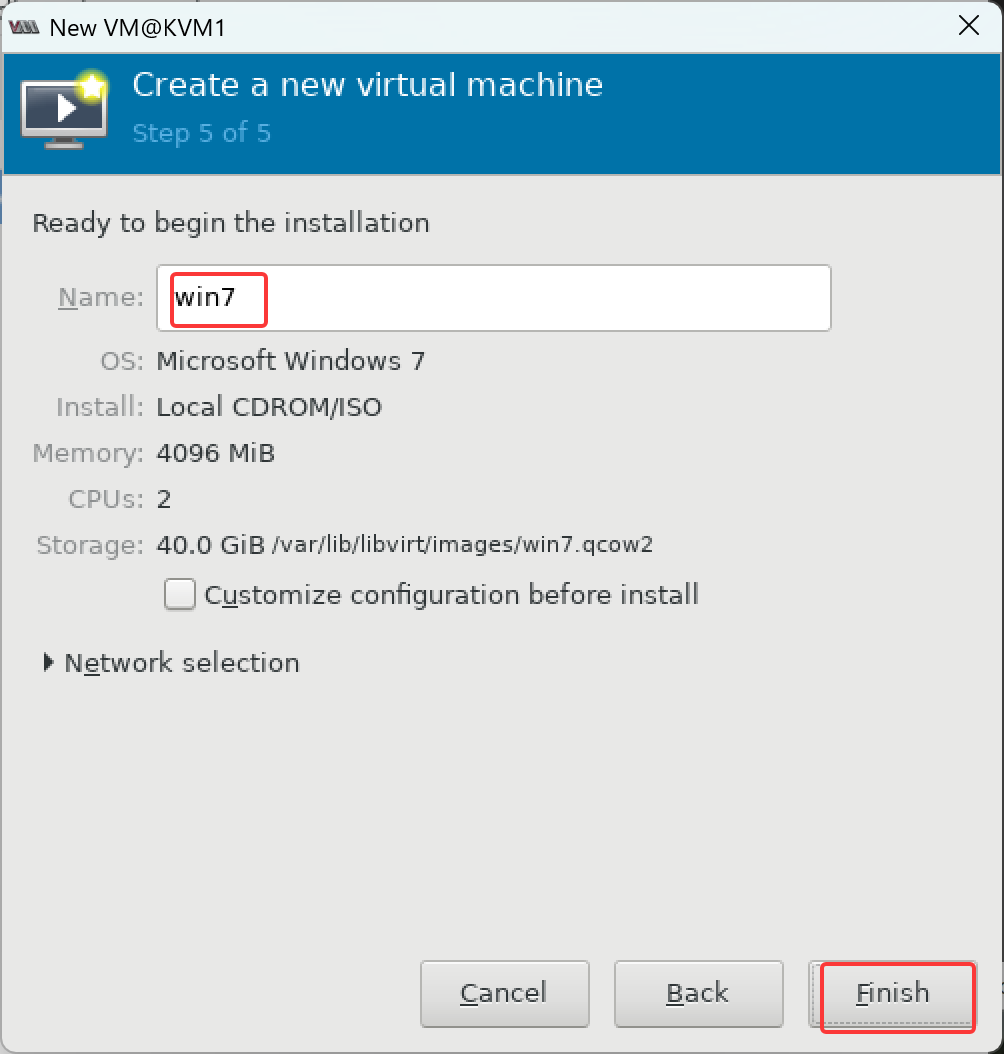
跳出:Virtual Machine Manager wants to inhibit shortcuts(抑制快捷方式) 选择allow
接下来就是与正常的win7安装步骤一样啦
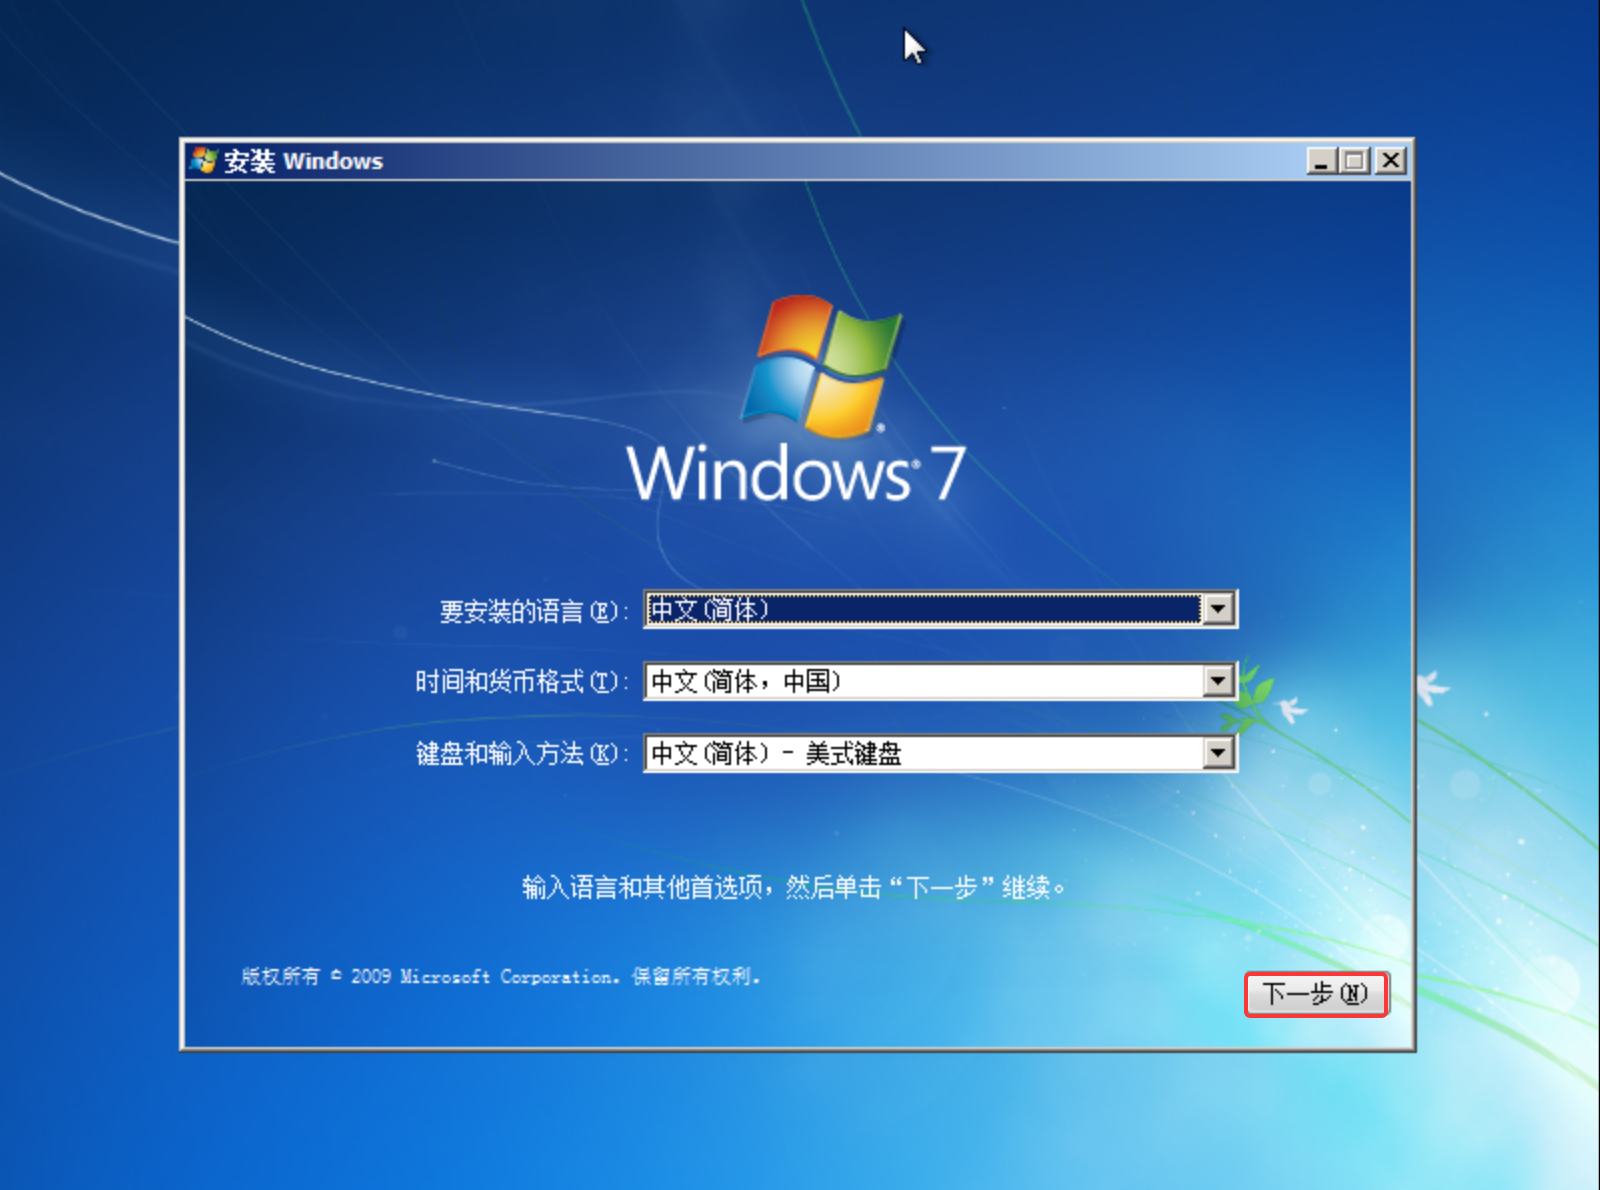
点击 现在安装
点击 我接受许可条款 下一步
点击 自定义(高级)
点击 磁盘 下一步
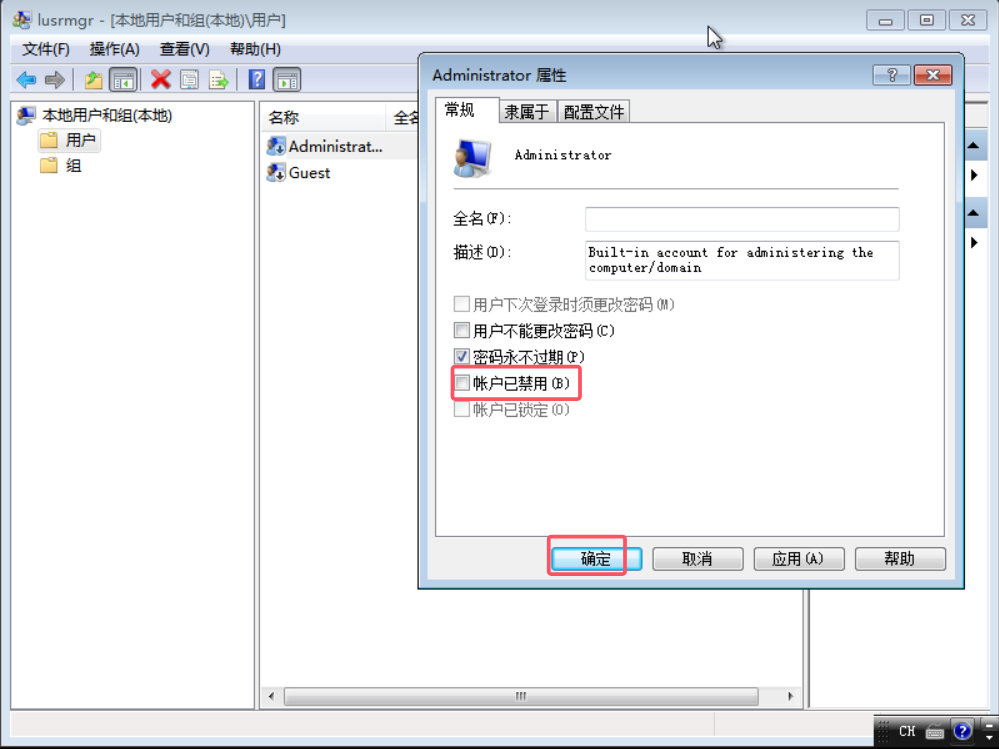
在下面这一步我们跳过普通用户创建,激活系统内置的administrator用户使用
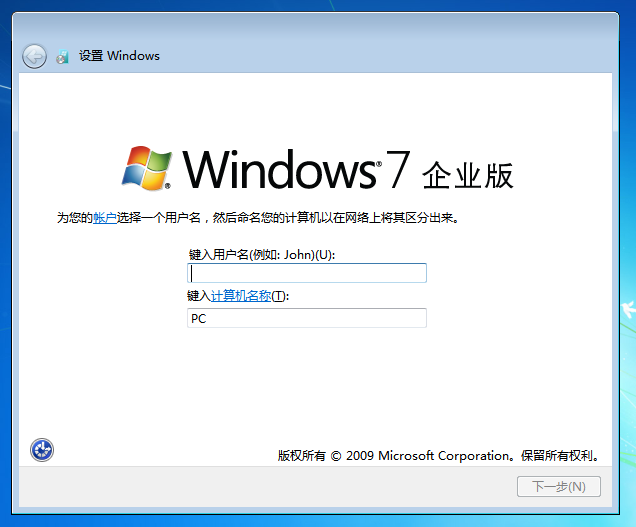
上面这个界面按shift+F10跳出CMD,有些笔记本需要多按Fn
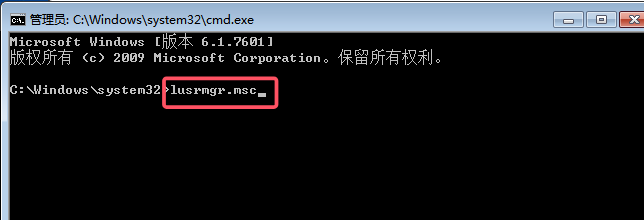
账户已禁用去勾选
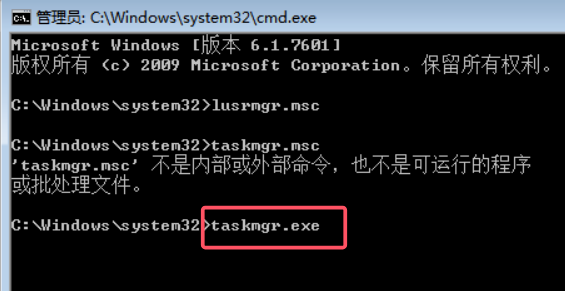
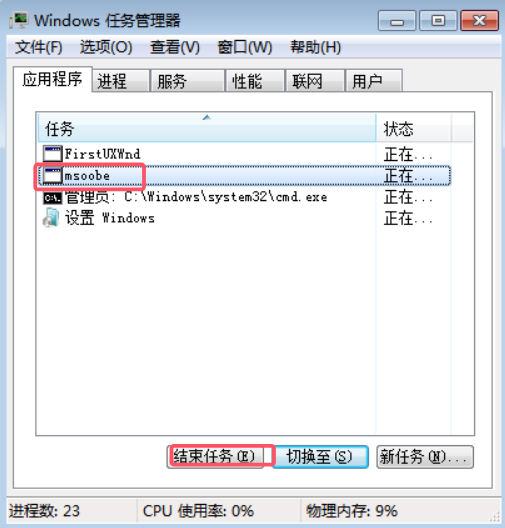
系统安装结束
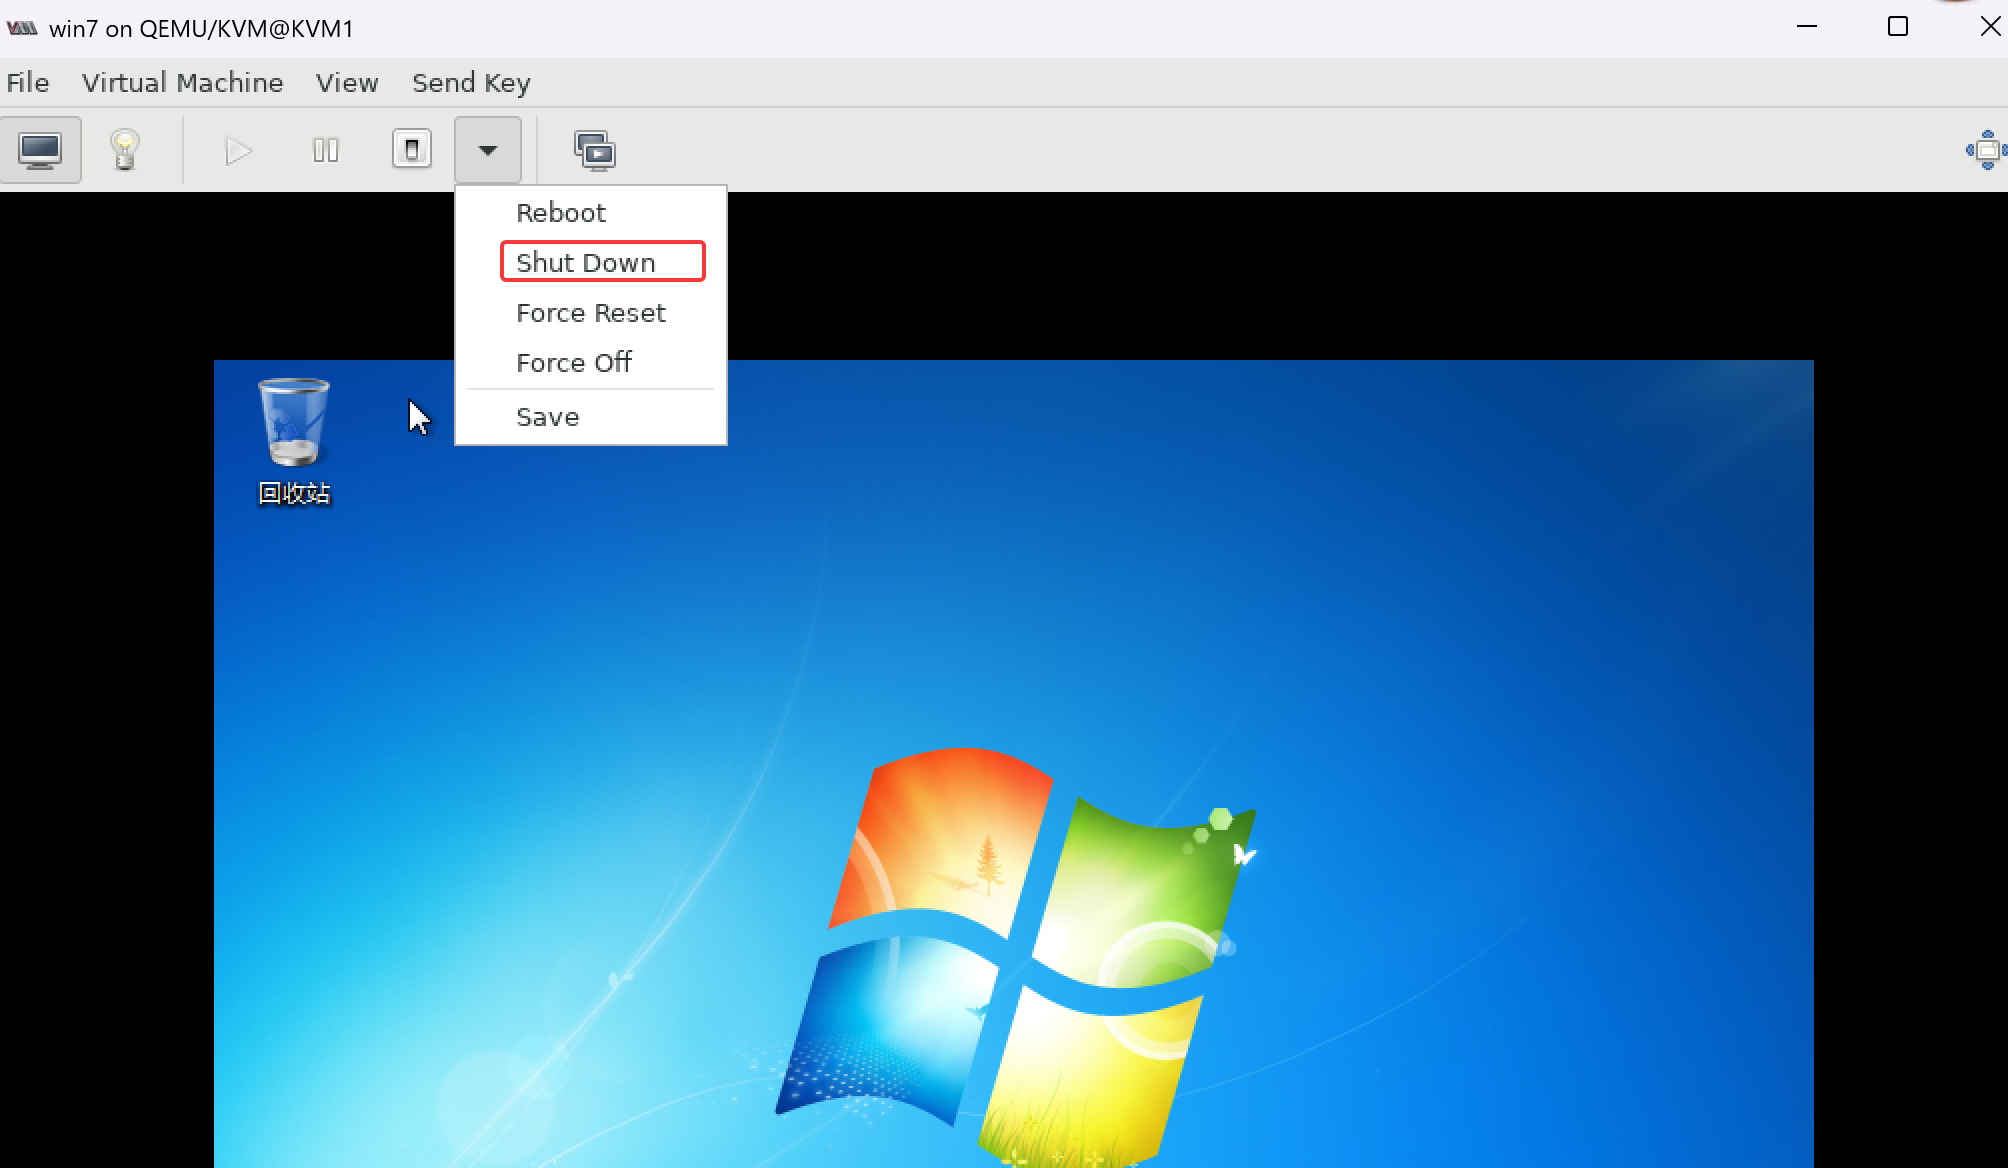
关闭虚拟机
给虚拟机拍快照
双击虚拟机跳出虚拟机配置界面
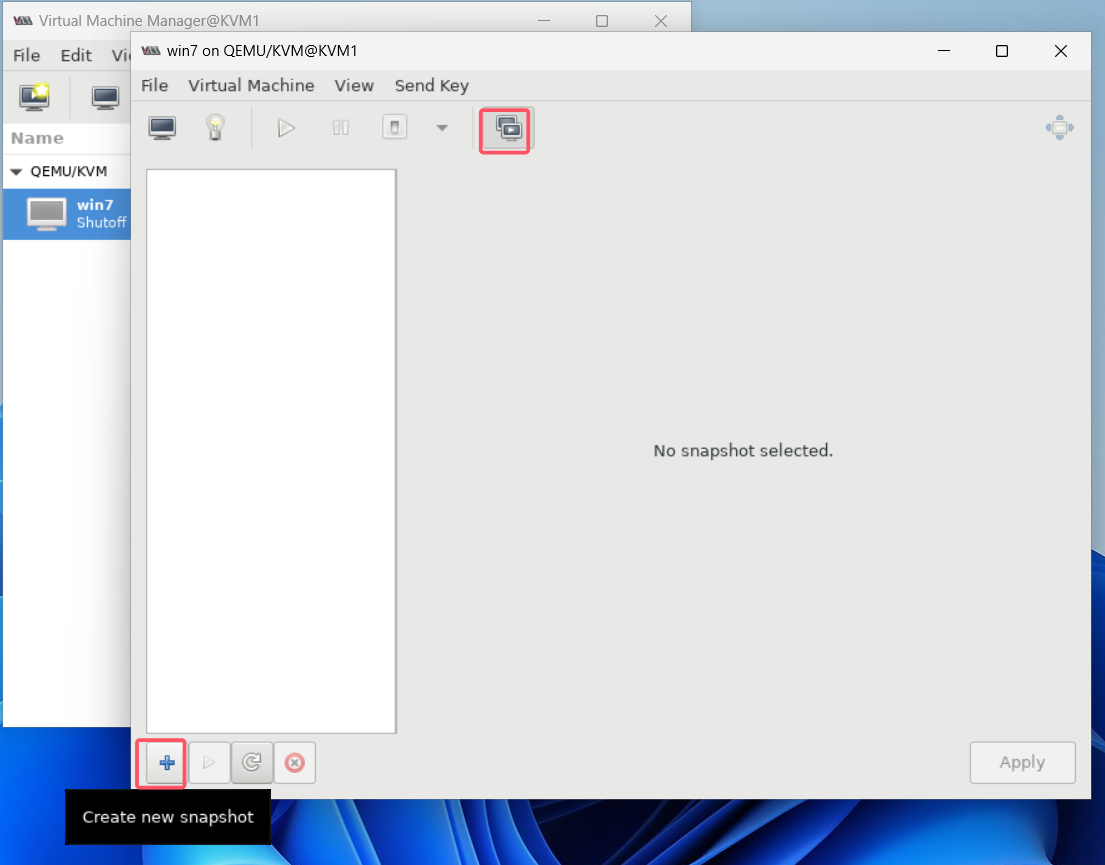
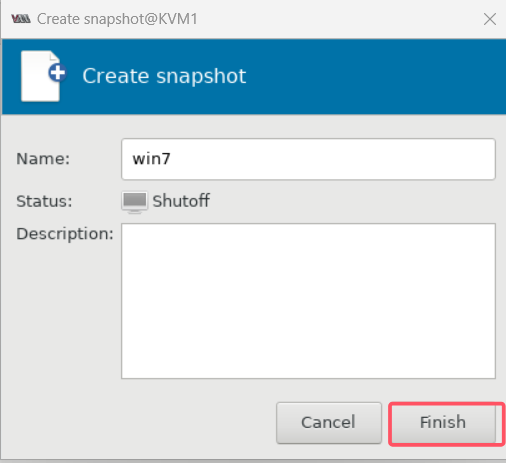
测试: 比如给虛拟机win10,加块硬盘,加块网卡
KVM命令行使用
[root@KVM1 ~]# virsh #进入virsh交互模式
Welcome to virsh, the virtualization interactive terminal.
Type: 'help' for help with commands
'quit' to quit
virsh # quit #退出交互模式
[root@KVM1 ~]# virsh version #查看KVM版本
Compiled against library: libvirt 8.0.0
Using library: libvirt 8.0.0
Using API: QEMU 8.0.0
Running hypervisor: QEMU 6.2.0
[root@KVM1 ~]# virsh --help #virsh命令帮助
virsh [options]... [<command_string>]
virsh [options]... <command> [args...]
options:
-c | --connect=URI hypervisor connection URI
-d | --debug=NUM debug level [0-4]
-e | --escape <char> set escape sequence for console
-h | --help this help
-k | --keepalive-interval=NUM
keepalive interval in seconds, 0 for disable
-K | --keepalive-count=NUM
number of possible missed keepalive messages
-l | --log=FILE output logging to file
-q | --quiet quiet mode
-r | --readonly connect readonly
-t | --timing print timing information
-v short version
-V long version
--version=TYPE version, TYPE is short or long (default short)
commands (non interactive mode):
Domain Management (help keyword 'domain') #这一块帮助是虚拟机命令
attach-device attach device from an XML file
attach-disk attach disk device
attach-interface attach network interface
autostart autostart a domain
blkdeviotune Set or query a block device I/O tuning parameters.
blkiotune Get or set blkio parameters
blockcommit Start a block commit operation.
blockcopy Start a block copy operation.
blockjob Manage active block operations
blockpull Populate a disk from its backing image.
blockresize Resize block device of domain.
change-media Change media of CD or floppy drive
console connect to the guest console
cpu-stats show domain cpu statistics
create create a domain from an XML file
define define (but don't start) a domain from an XML
file
desc show or set domain's description or title
destroy destroy (stop) a domain
detach-device detach device from an XML file
detach-device-alias detach device from an alias
detach-disk detach disk device
detach-interface detach network interface
domdisplay domain display connection URI
domfsfreeze Freeze domain's mounted filesystems.
domfsthaw Thaw domain's mounted filesystems.
domfsinfo Get information of domain's mounted
filesystems.
domfstrim Invoke fstrim on domain's mounted filesystems.
domhostname print the domain's hostname
domid convert a domain name or UUID to domain id
domif-setlink set link state of a virtual interface
domiftune get/set parameters of a virtual interface
domjobabort abort active domain job
domjobinfo domain job information
domlaunchsecinfo Get domain launch security info
domsetlaunchsecstate Set domain launch security state
domname convert a domain id or UUID to domain name
domrename rename a domain
dompmsuspend suspend a domain gracefully using power
management functions
dompmwakeup wakeup a domain from pmsuspended state
domuuid convert a domain name or id to domain UUID
domxml-from-native Convert native config to domain XML
domxml-to-native Convert domain XML to native config
dump dump the core of a domain to a file for
analysis
dumpxml domain information in XML
edit edit XML configuration for a domain
event Domain Events
get-user-sshkeys list authorized SSH keys for given user (via
agent)
inject-nmi Inject NMI to the guest
iothreadinfo view domain IOThreads
iothreadpin control domain IOThread affinity
iothreadadd add an IOThread to the guest domain
iothreadset modifies an existing IOThread of the guest
domain
iothreaddel delete an IOThread from the guest domain
send-key Send keycodes to the guest
send-process-signal Send signals to processes
lxc-enter-namespace LXC Guest Enter Namespace
managedsave managed save of a domain state
managedsave-remove Remove managed save of a domain
managedsave-edit edit XML for a domain's managed save state
file
managedsave-dumpxml Domain information of managed save state file
in XML
managedave-define redefine the XML for a domain's managed save
state
memtune Get or set memory parameters
perf Get or set perf event
metadata show or set domain's custom XML metadata
migrate migrate domain to another host
migrate-setmaxdowntime set maximum tolerable downtime
migrate-getmaxdowntime get maximum tolerable downtime
migrate-setcompression set migration compression cache size
migrate-setspeed set the maximum migration bandwidth
migrate-getspeed Get the maximum migration bandwidth
migrate-postcopy Switch running migration from pre-copy to
post-copy
numatune Get or set numa parameters
qemu-monitor-command QEMU Monitor Command
qemu-monitor-event QEMU Monitor Events
guest-agent-command QEMU Guest Agent Command
guest-agent-timeout Set the guest agent timeout
reboot reboot a domain
reset reset a domain
restore restore a domain from a saved state in a file
resume resume a domain
save save a domain state to a file
save-image-define redefine the XML for a domain's saved state
file
save-image-dumpxml saved state domain information in XML
save-image-edit edit XML for a domain's saved state file
schedinfo show/set scheduler parameters
screenshot take a screenshot of a current domain console
and store it into a file
set-lifecycle-action change lifecycle actions
set-user-sshkeys manipulate authorized SSH keys file for given
user (via agent)
set-user-password set the user password inside the domain
setmaxmem change maximum memory limit
setmem change memory allocation
setvcpus change number of virtual CPUs
shutdown gracefully shutdown a domain
start start a (previously defined) inactive domain
suspend suspend a domain
ttyconsole tty console
undefine undefine a domain
update-device update device from an XML file
update-memory-device update memory device of a domain
vcpucount domain vcpu counts
vcpupin control or query domain vcpu information
emulatorpin control or query domain emulator affinity
vncdisplay vnc display
guestvcpus query or modify state of vcpu in the guest
(via agent)
setvcpu attach/detach vcpu or groups of threads
domblkthreshold set the threshold for block-threshold event
for a given block device or it's backing chain element
guestinfo query information about the guest (via agent)
domdirtyrate-calc Calculate a vm's memory dirty rate
Domain Monitoring (help keyword 'monitor') #查看虚拟机信息的命令
domblkerror Show errors on block devices
domblkinfo domain block device size information
domblklist list all domain blocks
domblkstat get device block stats for a domain
domcontrol domain control interface state
domif-getlink get link state of a virtual interface
domifaddr Get network interfaces' addresses for a
running domain
domiflist list all domain virtual interfaces
domifstat get network interface stats for a domain
dominfo domain information
dommemstat get memory statistics for a domain
domstate domain state
domstats get statistics about one or multiple domains
domtime domain time
list list domains
Host and Hypervisor (help keyword 'host') #kvm的物理机命令
allocpages Manipulate pages pool size
capabilities capabilities
cpu-baseline compute baseline CPU
cpu-compare compare host CPU with a CPU described by an
XML file
cpu-models CPU models
domcapabilities domain capabilities
freecell NUMA free memory
freepages NUMA free pages
hostname print the hypervisor hostname
hypervisor-cpu-baseline compute baseline CPU usable by a specific
hypervisor
hypervisor-cpu-compare compare a CPU with the CPU created by a
hypervisor on the host
maxvcpus connection vcpu maximum
node-memory-tune Get or set node memory parameters
nodecpustats node cpu map
nodeinfo Prints cpu stats of the node.
nodememstats node information #查看kvm节点物理信
息
nodesevinfo Prints memory stats of the node.
nodesuspend node SEV information
sysinfo suspend the host node for a given time
duration
uri print the hypervisor sysinfo
version print the hypervisor canonical URI
show version
Checkpoint (help keyword 'checkpoint')
checkpoint-create Create a checkpoint from XML
checkpoint-create-as Create a checkpoint from a set of args
checkpoint-delete Delete a domain checkpoint
checkpoint-dumpxml Dump XML for a domain checkpoint
checkpoint-edit edit XML for a checkpoint
checkpoint-info checkpoint information
checkpoint-list List checkpoints for a domain
checkpoint-parent Get the name of the parent of a checkpoint
Interface (help keyword 'interface')
iface-begin Create a snapshot of current interfaces
settings, which can be later committed (iface-commit) or restored (iface-
rollback)
iface-bridge create a bridge device and attach an existing
network device to it
iface-commit commit changes made since iface-begin and free
restore point
iface-define define an inactive persistent physical host
interface or modify an existing persistent one
iface-destroy destroy a physical host interface (disable it
/ "if-down")
iface-dumpxml interface information in XML
iface-edit edit XML configuration for a physical host
interface
iface-list list physical host interfaces
iface-mac convert an interface name to interface MAC
address
iface-name convert an interface MAC address to interface
name
iface-rollback rollback to previous saved configuration
created via iface-begin
iface-start start a physical host interface (enable it /
"if-up")
iface-unbridge undefine a bridge device after detaching its
device(s)
iface-undefine undefine a physical host interface (remove it
from configuration)
Network Filter (help keyword 'filter')
nwfilter-define define or update a network filter from an XML
file
nwfilter-dumpxml network filter information in XML
nwfilter-edit edit XML configuration for a network filter
nwfilter-list list network filters
nwfilter-undefine undefine a network filter
nwfilter-binding-create create a network filter binding from an XML
file
nwfilter-binding-delete delete a network filter binding
nwfilter-binding-dumpxml network filter binding information in XML
nwfilter-binding-list list network filter bindings
Networking (help keyword 'network')
net-autostart autostart a network
net-create create a network from an XML file
net-define define an inactive persistent virtual network
or modify an existing persistent one from an XML file
net-destroy destroy (stop) a network
net-dhcp-leases print lease info for a given network
net-dumpxml network information in XML
net-edit edit XML configuration for a network
net-event network Events
net-info network information
net-list list networks
net-name convert a network UUID to network name
net-undefine undefine a persistent network
net-start start a (previously defined) inactive network
net-update update parts of an existing network's
configuration
net-uuid convert a network name to network UUID
net-port-list list network ports
net-port-create create a network port from an XML file
net-port-dumpxml network port information in XML
net-port-delete delete the specified network port
Node Device (help keyword 'nodedev')
nodedev-create create a device defined by an XML file on the
node
nodedev-destroy destroy (stop) a device on the node
nodedev-detach detach node device from its device driver
nodedev-dumpxml node device details in XML
nodedev-list enumerate devices on this host
nodedev-reattach reattach node device to its device driver
nodedev-reset reset node device
nodedev-event Node Device Events
nodedev-define Define a device by an xml file on a node
nodedev-undefine Undefine an inactive node device
nodedev-start Start an inactive defined node device
nodedev-autostart autostart a node device
nodedev-info node device information
Secret (help keyword 'secret')
secret-define define or modify a secret from an XML file
secret-dumpxml secret attributes in XML
secret-edit edit XML configuration for a secret
secret-get-value Output a secret value
secret-list list secrets
secret-set-value set a secret value
secret-undefine undefine a secret
Snapshot (help keyword 'snapshot') #这一块是快照相关的配置
snapshot-create Create a snapshot from XML
snapshot-create-as Create a snapshot from a set of args
snapshot-current Get or set the current snapshot
snapshot-delete Delete a domain snapshot
snapshot-dumpxml Dump XML for a domain snapshot
snapshot-edit edit XML for a snapshot
snapshot-info snapshot information
snapshot-list List snapshots for a domain
snapshot-parent Get the name of the parent of a snapshot
snapshot-revert Revert a domain to a snapshot
Backup (help keyword 'backup')
backup-begin Start a disk backup of a domain
backup-dumpxml Dump XML for an ongoing domain block backup
job
Storage Pool (help keyword 'pool')
find-storage-pool-sources find potential storage pool sources
find-storage-pool-sources-as discover potential storage pool sources
pool-autostart autostart a pool
pool-build build a pool
pool-create create a pool from an XML file
pool-create-as create a pool from a set of args
pool-define define a pool from an XML file
pool-define-as define a pool from a set of args
pool-delete delete a pool, its volumes and all data
pool-destroy destroy (stop) a pool
pool-dumpxml pool information in XML
pool-edit edit XML configuration for a storage pool
pool-info storage pool information
pool-list list pools
pool-refresh refresh a pool
pool-name convert a pool UUID to pool name
pool-start start a (previously defined) inactive pool
pool-undefine undefine an inactive pool
pool-uuid convert a pool name to pool UUID
pool-capabilities Storage Pool Capabilities
Storage Volume (help keyword 'volume')
vol-clone clone a volume.
vol-create create a volume from an XML file
vol-create-as create a volume from a set of args
vol-create-from create a volume, using another volume as input
vol-delete delete a vol
vol-dumpxml volume information in XML
vol-download download volume contents to a file
vol-upload upload file contents to a volume
vol-info storage volume information
vol-list list vols
vol-key returns the volume key for a given volume name
or path
vol-name returns the volume name for a given volume key
or path
vol-path returns the volume path for a given volume name
or key
vol-pool returns the storage pool for a given volume
key/path
vol-resize resize a volume
vol-wipe wipe a vol
virsh itself (help keyword 'virsh')
cd change the current directory
echo echo arguments used for internal testing.
exit quit this interactive terminal
help print this help
pwd print the current directory
connect (re)connect to hypervisor
(specify help <group> for details about the commands in the group)
(specify help <command> for details about the command)
[root@kvm1 ~]# virsh shutdown win7 #关机
Domain 'win7' is being shutdown
[root@kvm1 ~]# virsh list #列出正在运行中的虚拟机
Id Name State
----------------------------------------------------
[root@KVM1 ~]# virt-manager #调出图形界面
[root@KVM1 ~]# virsh list --all #列出所有状态的虚拟机
Id Name State
---------------------
- win7 shut off
[root@KVM1 ~]# virsh start win7 #开启虚拟机win7
Domain 'win7' started
[root@KVM1 ~]# virsh list #查看虚拟机win7的开机状态
Id Name State
--------------------
1 win7 running #后续操作该虚拟机可以用Name"win7"操作,也可以用该虚拟机的ID"1"操作
[root@KVM1 ~]# virsh reboot win7 #重启虚拟机win7
Domain 'win7' is being rebooted
[root@KVM1 ~]# virsh shutdown win7 #正常关机,一般都是正常关机
Domain 'win7' is being shutdown
[root@KVM1 ~]# virsh start win7 #开启虚拟机win7
Domain 'win7' started
[root@KVM1 ~]# virsh destroy win7 #强制关闭虚拟机(拔电源),系统无法响应,实在没办法再强制关机
Domain 'win7' destroyed
[root@KVM1 ~]# virsh start win7 #开启虚拟机win7
Domain 'win7' started
[root@KVM1 ~]# virsh suspend win7 #挂起虚拟机,将虚拟机的内存数据保存到硬盘,然后CPU、内存释放,比如我去吃个午饭
Domain 'win7' suspended
[root@KVM1 ~]# virsh list #查看虚拟机状态
Id Name State
--------------------
2 win7 paused #显示虚拟机状态为paused挂起
[root@KVM1 ~]# virsh resume win7 #恢复虚拟机状态
Domain 'win7' resumed
[root@KVM1 ~]# virsh list #查看虚拟机状态
Id Name State
--------------------
2 win7 running #显示虚拟机状态为running
右击host os KVM1关闭客户机
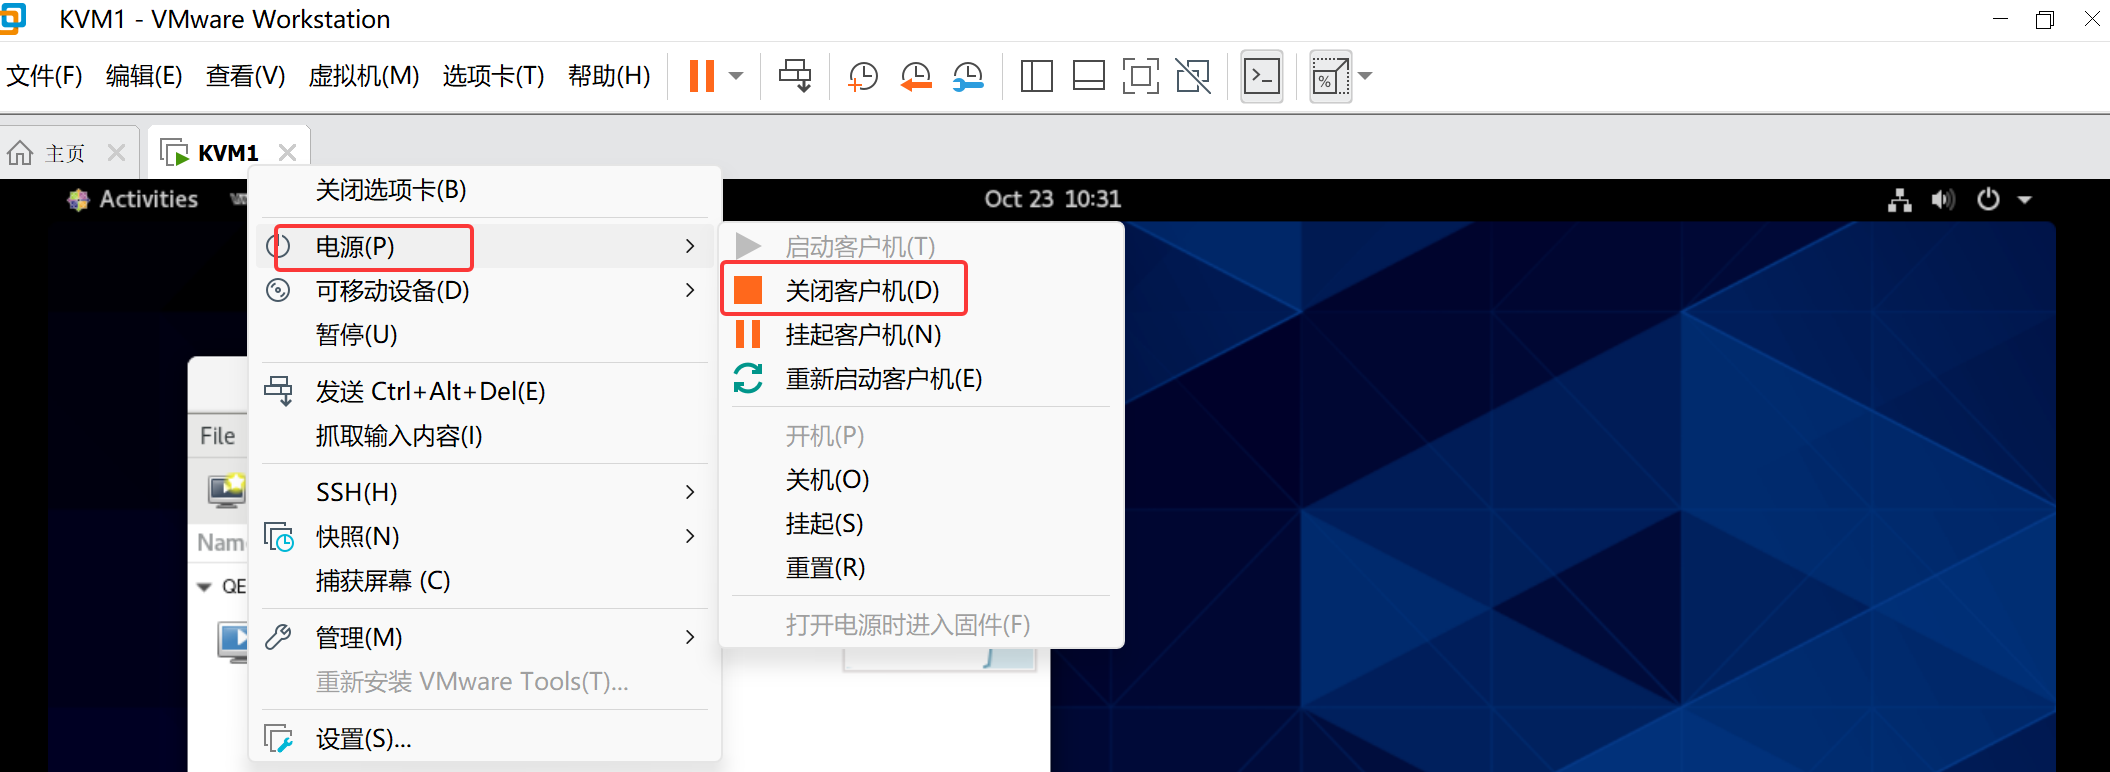
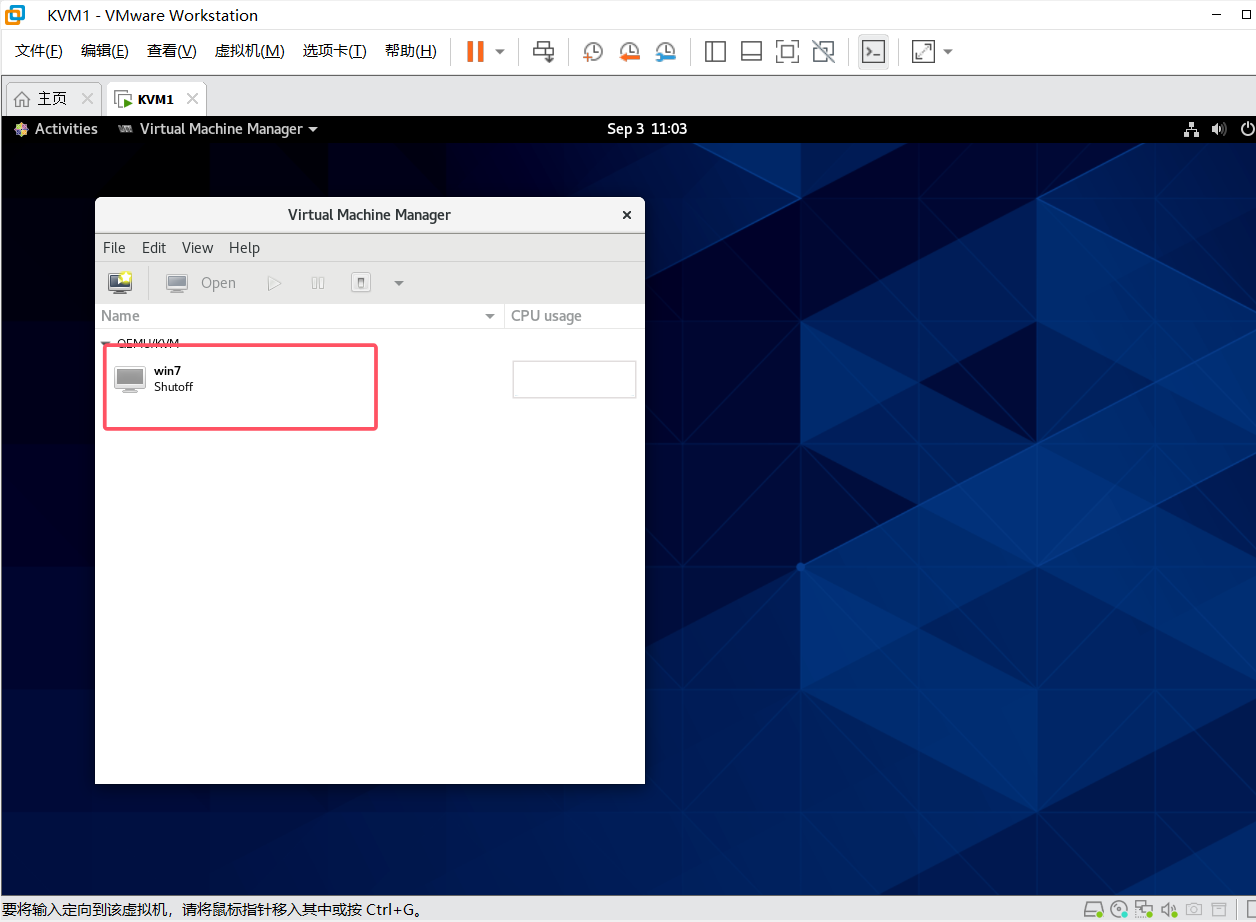
再开机,观察虚guest os虚拟机win7是否随着host os宿主机KVM1一起开机
发现默认情况下,guest os不随着host os一起开机
[root@KVM1 ~]# virsh start win7                        #虚拟机win7开机
Domain 'win7' started

[root@KVM1 ~]# virsh autostart win7                     #设置虚拟机随着KVM一起开机
Domain 'win7' marked as autostarted

[root@KVM1 ~]# virsh list --autostart					 #列出随着宿主机一起开机的虚拟机有哪些
Id Name State
----------------------
1 win7 running
右击宿主机KVM1 关机,再次观察现象
再开机,观察虚guest os虚拟机win7是否随着host os宿主机KVM1一起开机
发现这次随着KVM一起开机了
[root@KVM1 ~]# virsh autostart --disable win7 		#关闭win7随KVM一起启动
Domain 'win7' unmarked as autostarted

[root@KVM1 ~]# virsh list --autostart				 #观察现象,win7从自启动列表中移除
Id Name State
--------------------

[root@KVM1 ~]#
[root@KVM1 ~]# virsh dumpxml win7             #查看虚拟机win7配置文件
<domain type='kvm' id='1'>
  <name>win7</name>
  <uuid>bc5c3fb5-6cc6-4e3f-820c-0fef20ce38c5</uuid>
  <metadata>
    <libosinfo:libosinfo
xmlns:libosinfo="http://libosinfo.org/xmlns/libvirt/domain/1.0">
      <libosinfo:os id="http://microsoft.com/win/7"/>
    </libosinfo:libosinfo>
  </metadata>
  <memory unit='KiB'>4194304</memory>
  <currentMemory unit='KiB'>4194304</currentMemory>
  <vcpu placement='static'>2</vcpu>
  <resource>
    <partition>/machine</partition>
  </resource>
  <os>
    <type arch='x86_64' machine='pc-q35-rhel8.6.0'>hvm</type>
    <boot dev='hd'/>
  </os>
  <features>
    <acpi/>
    <apic/>
    <hyperv mode='custom'>
      <relaxed state='on'/>
      <vapic state='on'/>
      <spinlocks state='on' retries='8191'/>
    </hyperv>
    <vmport state='off'/>
  </features>
  <cpu mode='custom' match='exact' check='full'>
    <model fallback='forbid'>Skylake-Client-IBRS</model>
    <vendor>Intel</vendor>
    <feature policy='require' name='ss'/>
    <feature policy='require' name='hypervisor'/>
    <feature policy='require' name='tsc_adjust'/>
    <feature policy='require' name='clflushopt'/>
    <feature policy='require' name='umip'/>
    <feature policy='require' name='pku'/>
    <feature policy='require' name='md-clear'/>
    <feature policy='require' name='stibp'/>
    <feature policy='require' name='arch-capabilities'/>
    <feature policy='require' name='ssbd'/>
    <feature policy='require' name='xsaves'/>
    <feature policy='require' name='pdpe1gb'/>
    <feature policy='require' name='ibpb'/>
    <feature policy='require' name='ibrs'/>
    <feature policy='require' name='amd-stibp'/>
    <feature policy='require' name='amd-ssbd'/>
    <feature policy='require' name='rdctl-no'/>
    <feature policy='require' name='ibrs-all'/>
    <feature policy='require' name='skip-l1dfl-vmentry'/>
    <feature policy='require' name='mds-no'/>
<feature policy='require' name='pschange-mc-no'/>
    <feature policy='disable' name='hle'/>
    <feature policy='disable' name='erms'/>
    <feature policy='disable' name='rtm'/>
    <feature policy='disable' name='mpx'/>
  </cpu>
  <clock offset='localtime'>
    <timer name='rtc' tickpolicy='catchup'/>
    <timer name='pit' tickpolicy='delay'/>
    <timer name='hpet' present='no'/>
    <timer name='hypervclock' present='yes'/>
  </clock>
  <on_poweroff>destroy</on_poweroff>
  <on_reboot>restart</on_reboot>
  <on_crash>destroy</on_crash>
  <pm>
    <suspend-to-mem enabled='no'/>
    <suspend-to-disk enabled='no'/>
  </pm>
  <devices>
    <emulator>/usr/libexec/qemu-kvm</emulator>
    <disk type='file' device='disk'>
      <driver name='qemu' type='qcow2'/>
      <source file='/var/lib/libvirt/images/win7.qcow2' index='2'/>
      <backingStore/>
      <target dev='sda' bus='sata'/>
      <alias name='sata0-0-0'/>
      <address type='drive' controller='0' bus='0' target='0' unit='0'/>
    </disk>
    <disk type='file' device='cdrom'>
      <driver name='qemu' type='raw'/>
      <source file='/iso/cn_windows_7_enterprise_with_sp1_x64_dvd_u_677685.iso'
index='1'/>
      <backingStore/>
      <target dev='sdb' bus='sata'/>
      <readonly/>
      <alias name='sata0-0-1'/>
      <address type='drive' controller='0' bus='0' target='0' unit='1'/>
    </disk>
    <controller type='usb' index='0' model='ich9-ehci1'>
      <alias name='usb'/>
      <address type='pci' domain='0x0000' bus='0x00' slot='0x1d' function='0x7'/>
    </controller>
    <controller type='usb' index='0' model='ich9-uhci1'>
      <alias name='usb'/>
      <master startport='0'/>
      <address type='pci' domain='0x0000' bus='0x00' slot='0x1d' function='0x0'
multifunction='on'/>
    </controller>
    <controller type='usb' index='0' model='ich9-uhci2'>
      <alias name='usb'/>
      <master startport='2'/>
      <address type='pci' domain='0x0000' bus='0x00' slot='0x1d' function='0x1'/>
    </controller>
    <controller type='usb' index='0' model='ich9-uhci3'>
      <alias name='usb'/>
<master startport='4'/>
      <address type='pci' domain='0x0000' bus='0x00' slot='0x1d' function='0x2'/>
    </controller>
    <controller type='sata' index='0'>
      <alias name='ide'/>
      <address type='pci' domain='0x0000' bus='0x00' slot='0x1f' function='0x2'/>
    </controller>
    <controller type='pci' index='0' model='pcie-root'>
      <alias name='pcie.0'/>
    </controller>
    <controller type='pci' index='1' model='pcie-root-port'>
      <model name='pcie-root-port'/>
      <target chassis='1' port='0x10'/>
      <alias name='pci.1'/>
      <address type='pci' domain='0x0000' bus='0x00' slot='0x02' function='0x0'
multifunction='on'/>
    </controller>
    <controller type='pci' index='2' model='pcie-root-port'>
      <model name='pcie-root-port'/>
      <target chassis='2' port='0x11'/>
      <alias name='pci.2'/>
      <address type='pci' domain='0x0000' bus='0x00' slot='0x02' function='0x1'/>
    </controller>
    <controller type='pci' index='3' model='pcie-root-port'>
      <model name='pcie-root-port'/>
      <target chassis='3' port='0x12'/>
      <alias name='pci.3'/>
      <address type='pci' domain='0x0000' bus='0x00' slot='0x02' function='0x2'/>
    </controller>
    <controller type='pci' index='4' model='pcie-root-port'>
      <model name='pcie-root-port'/>
      <target chassis='4' port='0x13'/>
      <alias name='pci.4'/>
      <address type='pci' domain='0x0000' bus='0x00' slot='0x02' function='0x3'/>
    </controller>
    <controller type='virtio-serial' index='0'>
      <alias name='virtio-serial0'/>
      <address type='pci' domain='0x0000' bus='0x02' slot='0x00' function='0x0'/>
    </controller>
    <interface type='network'>
      <mac address='52:54:00:46:6e:e4'/>
      <source network='default' portid='c33bfddd-c621-429c-ad95-3c6a3fbf7de0'
bridge='virbr0'/>
      <target dev='vnet0'/>
      <model type='e1000e'/>
      <alias name='net0'/>
      <address type='pci' domain='0x0000' bus='0x01' slot='0x00' function='0x0'/>
    </interface>
    <serial type='pty'>
      <source path='/dev/pts/1'/>
      <target type='isa-serial' port='0'>
        <model name='isa-serial'/>
      </target>
      <alias name='serial0'/>
    </serial>
    <console type='pty' tty='/dev/pts/1'>
<source path='/dev/pts/1'/>
      <target type='serial' port='0'/>
      <alias name='serial0'/>
    </console>
    <channel type='spicevmc'>
      <target type='virtio' name='com.redhat.spice.0' state='disconnected'/>
      <alias name='channel0'/>
      <address type='virtio-serial' controller='0' bus='0' port='1'/>
    </channel>
    <input type='tablet' bus='usb'>
      <alias name='input0'/>
      <address type='usb' bus='0' port='1'/>
    </input>
    <input type='mouse' bus='ps2'>
      <alias name='input1'/>
    </input>
    <input type='keyboard' bus='ps2'>
      <alias name='input2'/>
    </input>
    <graphics type='spice' port='5900' autoport='yes' listen='127.0.0.1'>
      <listen type='address' address='127.0.0.1'/>
      <image compression='off'/>
    </graphics>
    <sound model='ich9'>
      <alias name='sound0'/>
      <address type='pci' domain='0x0000' bus='0x00' slot='0x1b' function='0x0'/>
    </sound>
    <audio id='1' type='spice'/>
    <video>
      <model type='qxl' ram='65536' vram='65536' vgamem='16384' heads='1'
primary='yes'/>
      <alias name='video0'/>
      <address type='pci' domain='0x0000' bus='0x00' slot='0x01' function='0x0'/>
    </video>
    <redirdev bus='usb' type='spicevmc'>
      <alias name='redir0'/>
      <address type='usb' bus='0' port='2'/>
    </redirdev>
    <redirdev bus='usb' type='spicevmc'>
      <alias name='redir1'/>
      <address type='usb' bus='0' port='3'/>
    </redirdev>
    <memballoon model='virtio'>
      <alias name='balloon0'/>
      <address type='pci' domain='0x0000' bus='0x03' slot='0x00' function='0x0'/>
    </memballoon>
  </devices>
  <seclabel type='dynamic' model='selinux' relabel='yes'>
    <label>system_u:system_r:svirt_t:s0:c138,c232</label>
    <imagelabel>system_u:object_r:svirt_image_t:s0:c138,c232</imagelabel>
  </seclabel>
  <seclabel type='dynamic' model='dac' relabel='yes'>
    <label>+107:+107</label>
    <imagelabel>+107:+107</imagelabel>
  </seclabel>
</domain>
[root@KVM1 images]# virsh edit win7        #修改虚拟机win7配置文件

[root@KVM1 images]# virsh vcpucount --active win7     #查看win7虚拟机配置的cpu数量
2
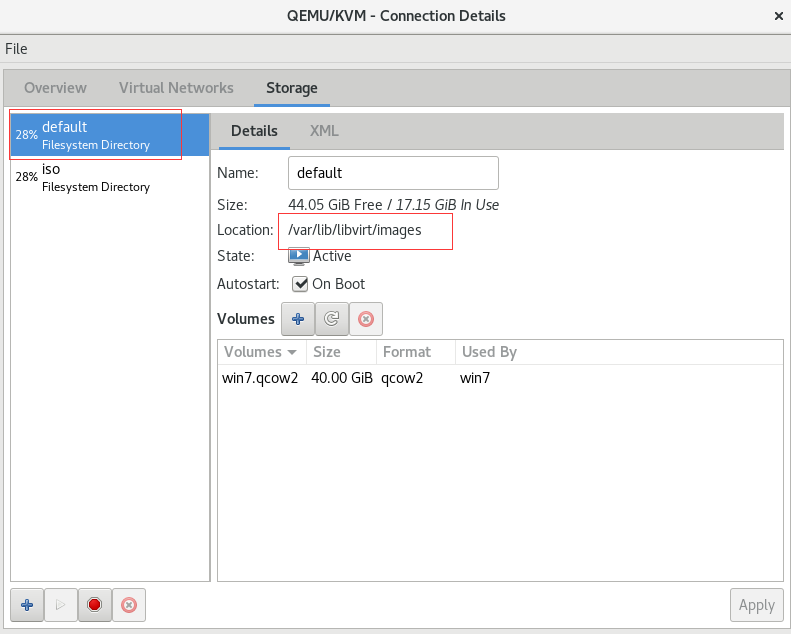
创建的虚拟机磁盘文件,默认存放目录
点击Storage,看到default,这就是默认存储磁盘位置,默认位置在/var/lib/libvirt/images
[root@KVM1 ~]# cd /var/lib/libvirt/images/                 #默认磁盘存放目录
[root@KVM1 images]# ls
win7.qcow2                                                 #win7虚拟机硬盘
[root@KVM1 images]# ls -h                                  #查看win7虚拟机磁盘长列表信息
total 7.7G
-rw-r--r--. 1 qemu qemu 41G Sep  3 12:00 win7.qcow2

[root@KVM1 images]# qemu-img --help                        #操作qemu硬盘的命令
qemu-img version 6.2.0
Copyright (c) 2003-2021 Fabrice Bellard and the QEMU Project developers
usage: qemu-img [standard options] command [command options]
QEMU disk image utility

  '-h', '--help'           display this help and exit
  '-V', '--version'        output version information and exit
  '-T', '--trace'          enable tracing [pattern][,events=<file>][,file=<file>]
                           specify tracing options

[root@KVM1 images]# qemu-img info win7.qcow2              #查看win7虚拟机硬盘简要信息,虚拟机关机状态下看
image: win7.qcow2
file format: qcow2                                        #硬盘格式
virtual size: 40G (42949672960 bytes)
disk size: 7.66 GiB                                        #占用磁盘大小
cluster_size: 65536
Snapshot list:                                             #快照信息
ID        TAG                     VM SIZE                DATE       VM CLOCK
1         win7                      0 B 2024-09-03 09:54:06 00:00:00.000
Format specific information:
    compat: 1.1
    compression type: zlib
    lazy refcounts: true
    refcount bits: 16
    corrupt: false
    extended l2: false
[root@KVM1 images]#
命令行创建虚拟机
[root@KVM1 ~]# cd /var/lib/libvirt/images/
[root@KVM1 images]# qemu-img create -f qcow2 vm2.qcow2 20G    #给虚拟机VM2创建硬盘
Formatting 'vm2.qcow2', fmt=qcow2 cluster_size=65536 extended_l2=off compression_type=zlib size=21474836480 lazy_refcounts=off refcount_bits=16
[root@KVM1 images]# ls
vm2.qcow2  win7.qcow2
[root@KVM1 images]# qemu-img info vm2.qcow2                   #显示创建出来的新的虚拟机硬盘vm2.qcow2属性
image: vm2.qcow2
file format: qcow2
virtual size: 20G (21474836480 bytes)
disk size: 196 KiB
cluster_size: 65536
Format specific information:
    compat: 1.1
    compression type: zlib
    lazy refcounts: false
    refcount bits: 16
    corrupt: false
    extended l2: false

[root@KVM1 images]# virt-install --help                       #命令行创建虚拟机命令virt-install
usage: virt-install --name NAME --memory MB STORAGE INSTALL [options]
Create a new virtual machine from specified install media.

optional arguments:
  -h, --help            show this help message and exit
  --version             show program's version number and exit
  --connect URI         Connect to hypervisor with libvirt URI

General Options:
  -n NAME, --name NAME  Name of the guest instance
  --memory MEMORY       Configure guest memory allocation. Ex:
                        --memory 1024 (in MiB)
                        --memory memory=1024,currentMemory=512
  --vcpus VCPUS         Number of vCPUs to configure for your guest. Ex:
                        --vcpus 5
                        --vcpus 5,maxvcpus=10,cpuset=1-4,6,8
                        --vcpus sockets=2,cores=4,threads=2
  --cpu CPU             CPU model and features. Ex:
                        --cpu coreduo,+x2apic
                        --cpu host-passthrough
  --metadata METADATA   Configure guest metadata. Ex:
                        --metadata name=foo,title="My pretty title",uuid=...
                        --metadata description="My nice long description"
  --xml XML             Perform raw XML XPath options on the final XML. Example:
                        --xml ./devices/disk[2]/serial=new-serial
                        --xml xpath.delete=./clock

Installation Method Options:
  --cdrom CDROM         CD-ROM installation media
  -l LOCATION, --location LOCATION
                        Distro install URL, eg. https://host/path. See man
                        page for specific distro examples.
  --pxe                 Boot from the network using the PXE protocol
  --import              Build guest around an existing disk image
  -x EXTRA_ARGS, --extra-args EXTRA_ARGS
                        Additional arguments to pass to the install kernel
                        booted from --location
  --initrd-inject INITRD_INJECT
                        Add given file to root of initrd from --location
  --unattended [UNATTENDED]
                        Perform an unattended installation
  --install INSTALL     Specify fine grained install options
  --reinstall DOMAIN    Reinstall existing VM. Only install options are
                        applied, all other VM configuration options are
                        ignored.
  --cloud-init [CLOUD_INIT]
                        Perform a cloud image installation, configuring cloud-init
  --boot BOOT           Configure guest boot settings. Ex:
                        --boot hd,cdrom,menu=on
  --idmap IDMAP         Enable user namespace for LXC containers. Ex:
                        --idmap uid.start=0,uid.target=1000,uid.count=10

OS options:
  --os-variant OS_VARIANT
                        The OS being installed in the guest.
                        This is used for deciding optimal defaults like virtio.
                        Example values: fedora29, rhel7.0, win10, ...
                        See 'osinfo-query os' for a full list.

Device Options:
  --disk DISK           Specify storage with various options. Ex.
                        --disk size=10 (new 10GiB image in default location)
                        --disk /my/existing/disk,cache=none
                        --disk device=cdrom,bus=scsi
  -w NETWORK, --network NETWORK
                        Configure a guest network interface. Ex:
                        --network bridge=mybr0
                        --network network=my_libvirt_virtual_net
                        --network network=mynet,model=virtio,mac=00:11:...
  --graphics GRAPHICS   Configure guest display settings. Ex:
                        --graphics spice
                        --graphics vnc,port=5901,listen=0.0.0.0
                        --graphics none
  --controller CONTROLLER
                        Configure a guest controller device. Ex:
                        --controller type=usb,model=qemu-xhci
                        --controller virtio-scsi
  --input INPUT         Configure a guest input device. Ex:
                        --input keyboard,bus=usb
  --serial SERIAL       Configure a guest serial device
  --parallel PARALLEL   Configure a guest parallel device
  --channel CHANNEL     Configure a guest communication channel
  --console CONSOLE     Configure a text console connection between the guest
                        and host
  --hostdev HOSTDEV     Configure physical USB/PCI/etc host devices to be
                        shared with the guest
  --filesystem FILESYSTEM
                        Pass host directory to the guest. Ex:
                        --filesystem /my/source/dir,/dir/in/guest
                        --filesystem template,name=,mount=
  --sound [SOUND]       Configure guest sound emulation
  --watchdog WATCHDOG   Configure a guest watchdog device
  --smartcard SMARTCARD
                        Configure a guest smartcard device. Ex:
                        --smartcard mode=passthrough
  --redirdev REDIRDEV   Configure a guest redirection device. Ex:
                        --redirdev usb,type=tcp,server=192.168.1.1:4000
  --memballoon MEMBALLOON
                        Configure a guest memballoon device. Ex:
                        --memballoon model=virtio
  --tpm TPM             Configure a guest TPM device. Ex:
                        --tpm /dev/tpm
  --rng RNG             Configure a guest RNG device. Ex:
                        --rng /dev/urandom
  --panic PANIC         Configure a guest panic device. Ex:
                        --panic default
  --memdev MEMDEV       Configure a guest memory device. Ex:
                        --memdev dimm,target.size=1024
  --vsock VSOCK         Configure guest vsock sockets.
                        --vsock cid=auto,yes
                        --vsock cid.address=7
--iommu IOMMU         Configure guest IOMMU device. Ex:
                        --iommu model=intel,driver=aw,bus=48

Guest Configuration Options:
  --iothreads IOTHREADS
                        Set domain <iothreads> and <iothreadids>
  --seclabel SECLABEL, --security SECLABEL
                        Configure domain seclabel configuration
  --keywrap KEYWRAP     Set guest operators for the domain cryptographic key
                        management parameters.
  --cputune CPUTUNE     Tune CPU parameters for the domain process.
  --numatune NUMATUNE   Tune NUMA policy for the domain process.
  --blkiotune BLKIOTUNE
                        Set blkio policy for the domain process.
  --memorybacking MEMORYBACKING
                        Set memory backing policy for the domain process. Ex:
                        --memorybacking hugepages=on
  --features FEATURES   Set domain <features> XML. Ex:
                        --features acpi=off,apic=on
  --clock CLOCK         Set domain <clock> XML. Ex:
                        --clock offset=localtime,rtc_tickpolicy=catchup
  --pm PM               Configure VM power management features
  --events EVENTS       Configure VM lifecycle management policy
  --reserve RESERVE     Configure SMBIOS system information. Ex:
                        --sysinfo host
                        --sysinfo bios,vendor=My vendor,bios.version=1.2.3,...
  --qemu-commandline QEMU_COMMANDLINE
                        Pass arguments directly to the QEMU emulator. Ex:
                        --qemu-commandline='-display gtk,gl=on'
                        --qemu-commandline=-smbios type=1,manufacturer=test
  --launchsecurity LAUNCHSECURITY
                        Configure VM launch security (e.g.SEV memory
                        encryption). Ex:
                        --launchsecurity
                        type=sev,cbitpos=47,reduced-phys-bits=1,policy=0x0001,dhcert=BASE64CERT

Virtualization Platform Options:
  -v, --hvm             This guest should be a fully virtualized guest
  -p, --paravirt        This guest should be a paravirtualized guest
  --container CONTAINER
                        Hypervisor container type (kvm, qemu, xen, ...)
  --machine MACHINE     The machine type to emulate

Miscellaneous Options:
  --autostart           Have domain autostart on host boot up.
  --transient           Create a transient domain.
  --wait WAIT           Minutes to wait for install to complete. Example:
                        --wait 10
  --noautoconsole       Don't automatically try to connect to the guest
                        console
  --noreboot            Don't boot guest after completing install.
  --print-xml [XMLONLY]
                        Print the generated domain XML rather than create the
                        VM.
  --dry-run             Run through the install process, but do not create
                        devices
  --check CHECK         Enable or disable validation checks. Example:
                        --check path_in_use=off
                        --check all=off
  -q, --quiet           Suppress non-error output
  -d, --debug           Print debugging information

Use '--option?' or '--option help' to see available suboptions
See man page for examples and full option syntax.

#参考前面的步骤,上传一个CentOS-7-x86_64-Minimal-1810.iso到/iso目录
#前面已经给VM2创建过磁盘,但是我不用,我想试下不在默认目录创建磁盘
[root@KVM1 iso]# mkdir /disk
[root@KVM1 iso]# qemu-img create -f qcow2 /disk/vm2.qcow2 20G    #创建vm2.qcow2磁盘
[root@KVM1 iso]# virt-install --name vm2 --memory 4096 --vcpus 2 --disk path=/disk/vm2.qcow2 --cdrom /iso/CentOS-7-x86_64-Minimal-1810.iso --noautoconsole
Starting install...
Retrieving file .treeinfo... |  50 MB 00:00:00
Retrieving file vmlinuz... |  50 MB 00:00:00
Retrieving file initrd.img...
Domain is still running the installation process.
Installation may be in progress.

#--name 指定虚拟机名字
#--memory 指定虚拟机内存大小
#--vcpus 指定虚拟机的CPU数量
#--disk path 指定虚拟机的磁盘位置
#--cdrom 指定光盘,KVM默认有个网络名为default的NAT网络
#--noautoconsole 不自动打开控制台

[root@KVM1 iso]# virsh list                                   #查看创建的vm2
 Id    Name                           State
----------------------------------------------------
 1     win7                           running
 2     vm2                            running                #命令行创建出来的虚拟机,怎么用呢?
命令行创建出来的虚拟机如何管理?
1.通过图形界面管理
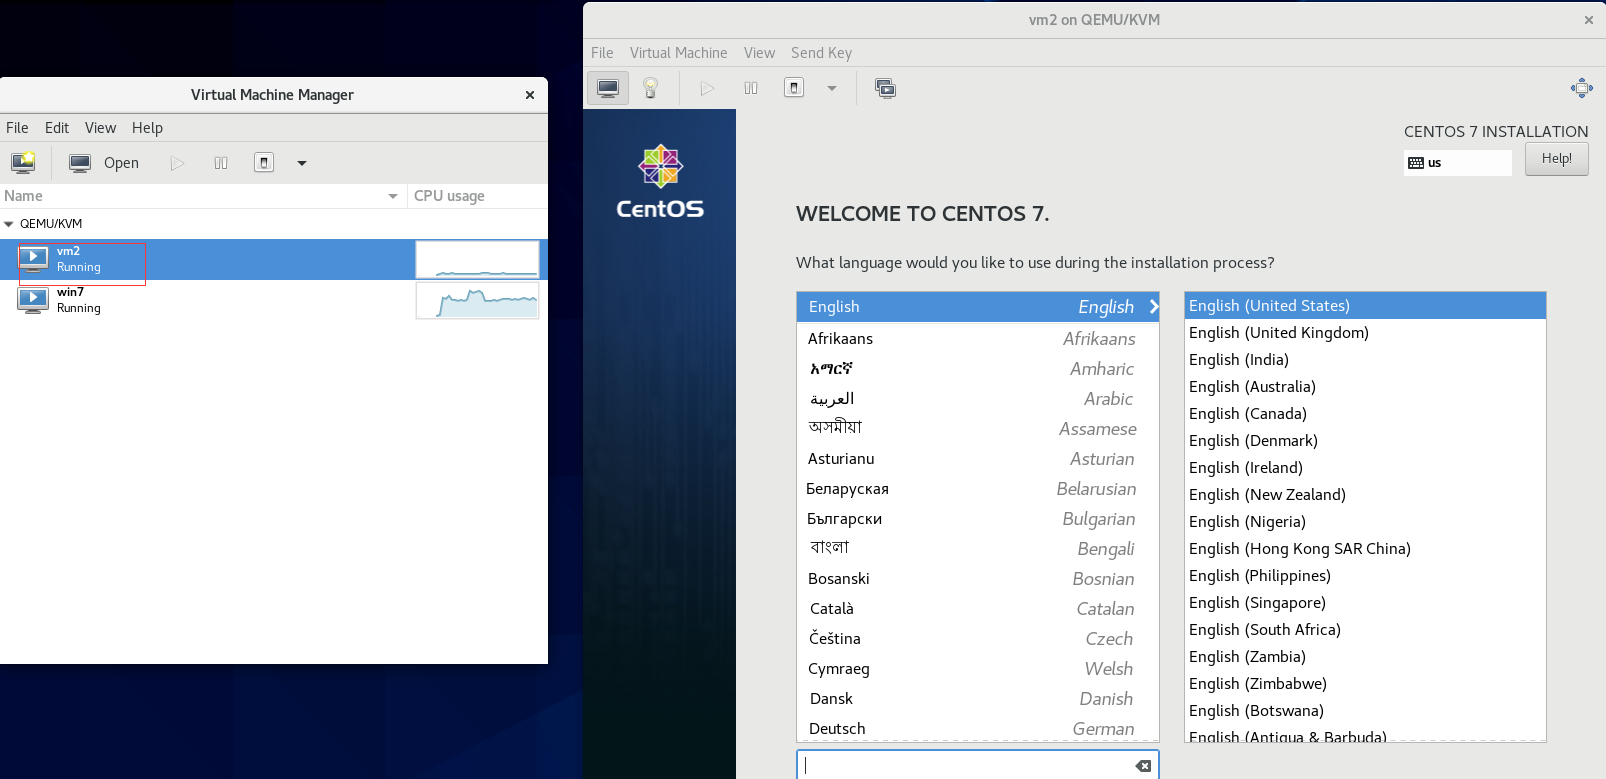
里面安装步骤省略,直到安装完成
这种方式有可能环境中没有virt-manager功能,没办法管理
2.通过VNC连到虚拟机去
再创建个vm3虚拟机,通过VNC管理
[root@KVM1 ~]# qemu-img create -f qcow2 /disk/vm3.qcow2 20G

[root@KVM1 ~]# virt-install --name vm3 --memory 2048 --vcpus 1 --disk
path=/disk/vm3.qcow2 --location /iso/CentOS-7-x86_64-Minimal-1810.iso --network
network=default --noautoconsole --vnclisten=0.0.0.0 --vncport=5903 --vnc

#--vnclisten 设置VNC监听地址所有地址
#--vncport=5903 宿主机监听到5093的VNC请求,转到vm3虚拟机上
[root@KVM1 ~]# systemctl stop firewalld.service
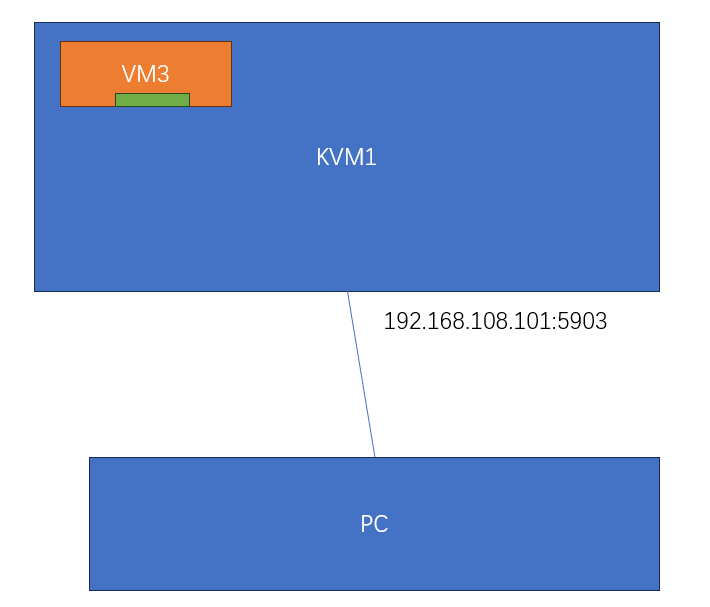
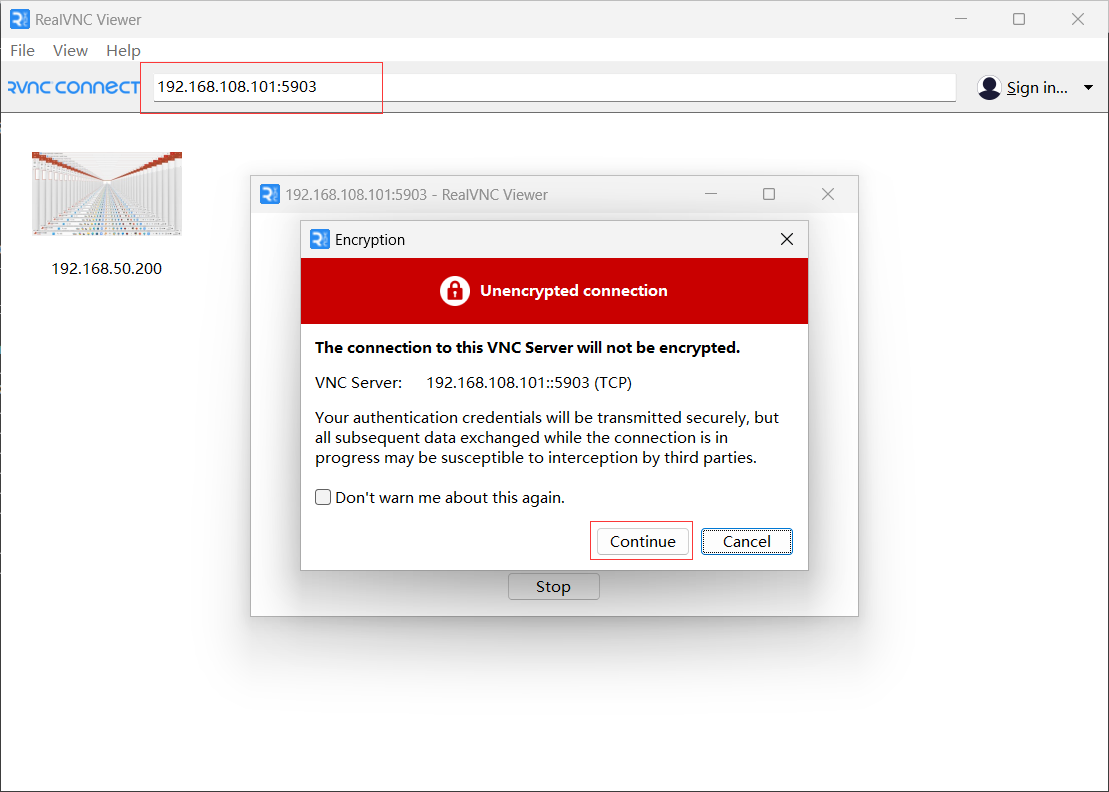
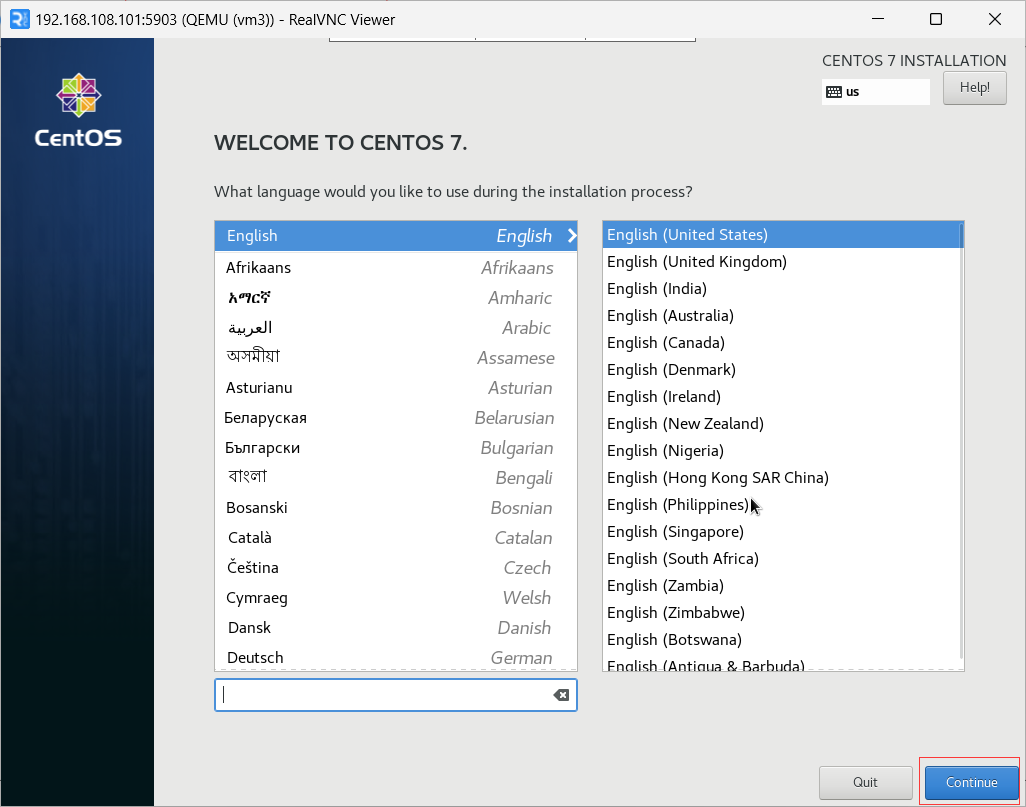
整个过程,没有用到virt-manager,纯文本完成了安装
四、KVM热迁移实验
原理
用于可容忍短时间中断,但必须要快速恢复业务。比如轻量级数据库业务,桌面云业务
核心前提条件
磁盘共享存储:NFS/Ceph/RBD/iSCSI,源和目标宿主机同时能访问同一份虚拟机磁盘,磁盘不迁移,只
迁移内存 + CPU 设备状态。
1.在自的虚拟机创建一个规格与源虚拟机相同的空虚拟机
2.通过迭代迁移技术将源虚拟机内存迁移至目的主机迁移的过程中变化的数据再迁移过来,经过几次迁
移,数据很小时,暂停源虚拟机,迁过来
3.将源虚拟机删除
4.目的主机拉起新虚拟机
使用场景:
- 在进行服务器操作维护前,系统维护人员将该服务器上的虚拟机迁移到其他服务器,降低操作维护过程
中业务中断的风险。 - 在进行服务器升级操作前,系统维护人员将该服务器上的虚拟机迁移到其他服务器,升级完成后将所有
虚拟机迁回,降低服务器升级过程中业务中断的风险。 - 将空闲服务器上的虚拟机迁移到其他服务器,将没有负载的服务器关闭,降低业务运行成本。
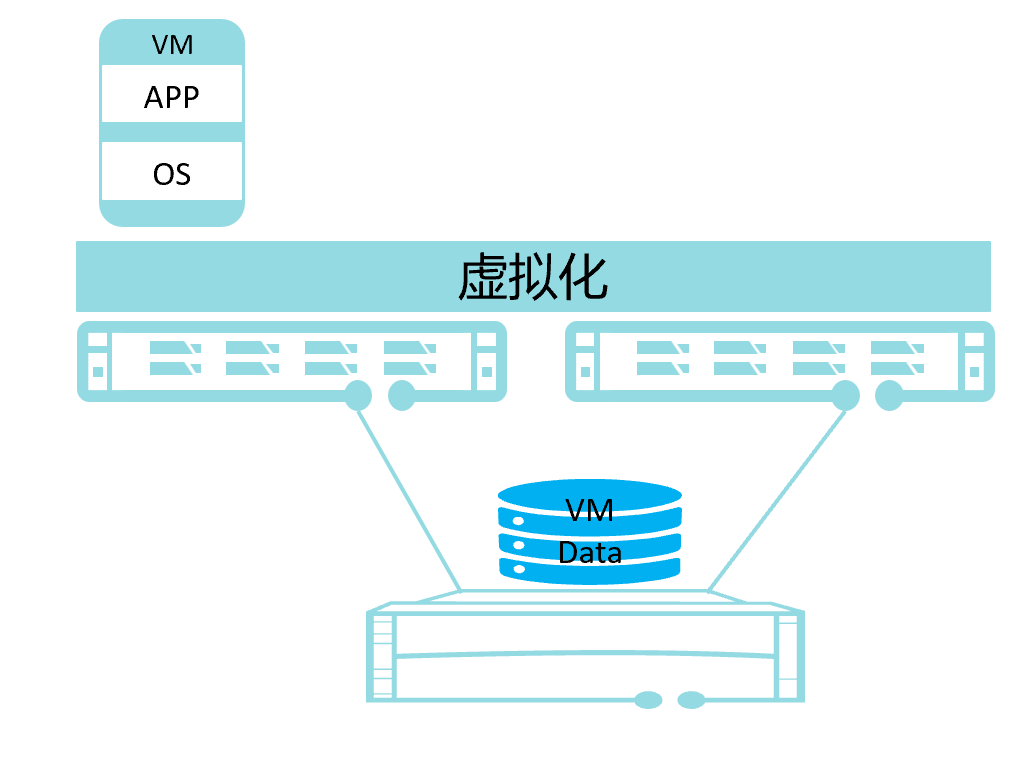
拓扑图
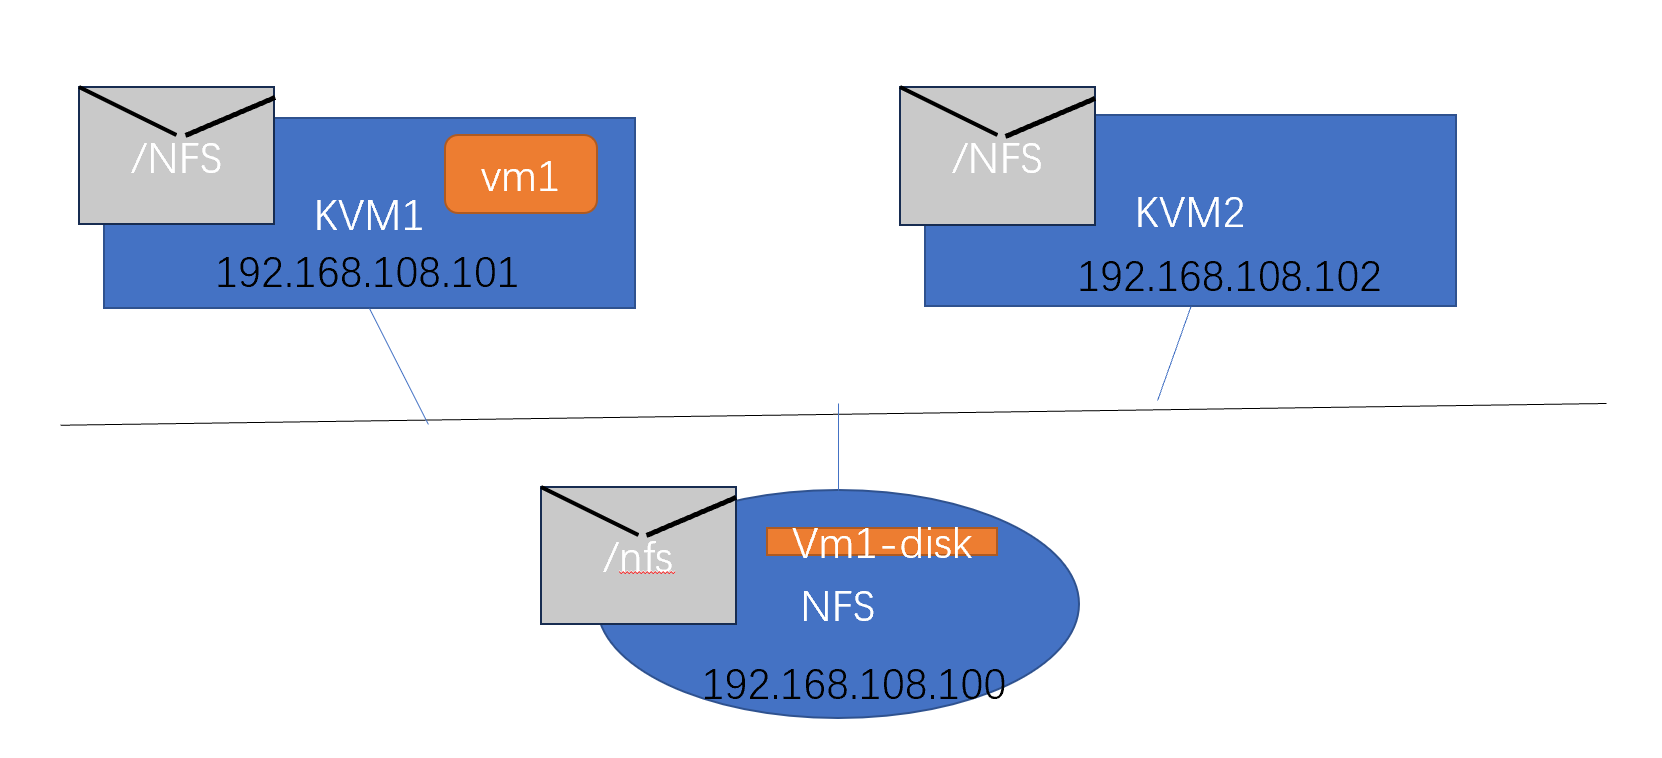
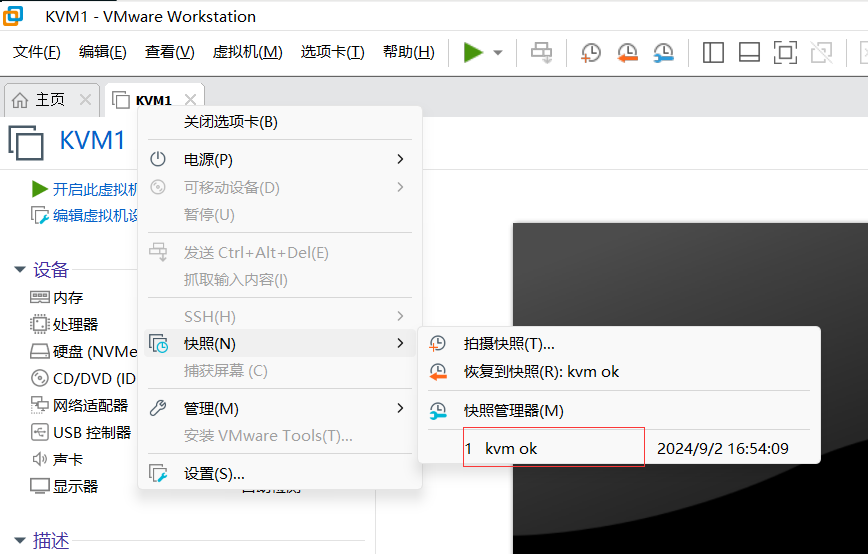
KVM1做完KVM单机实验后,还原快照,然后通过KVM1克隆出KVM2,NFS
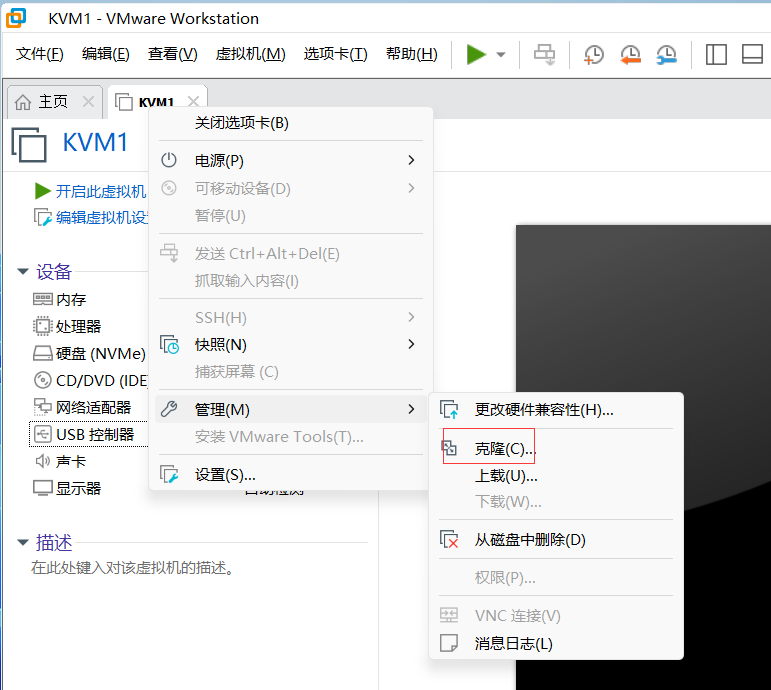
通过KVM1克隆KVM2
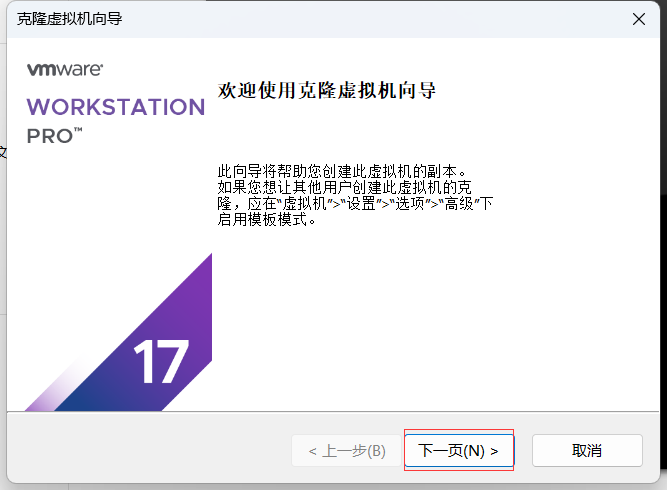
选择完整克隆
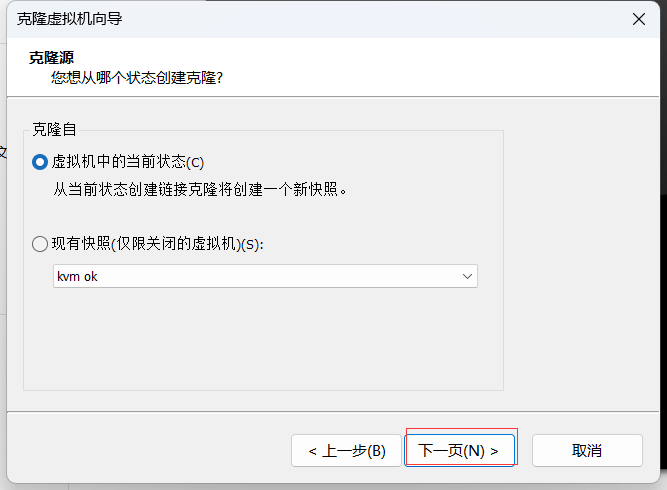
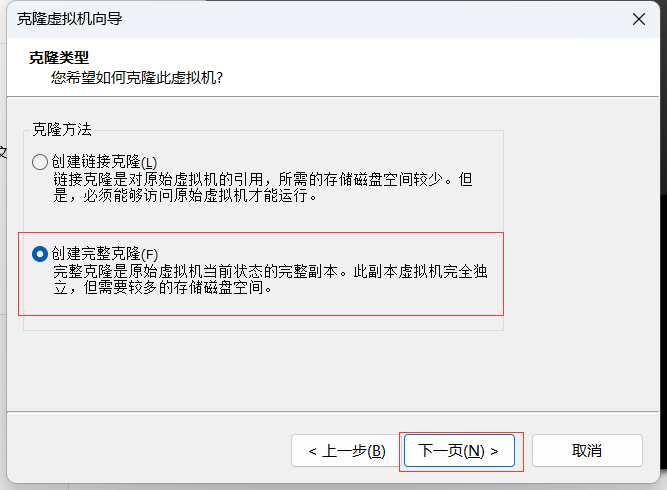
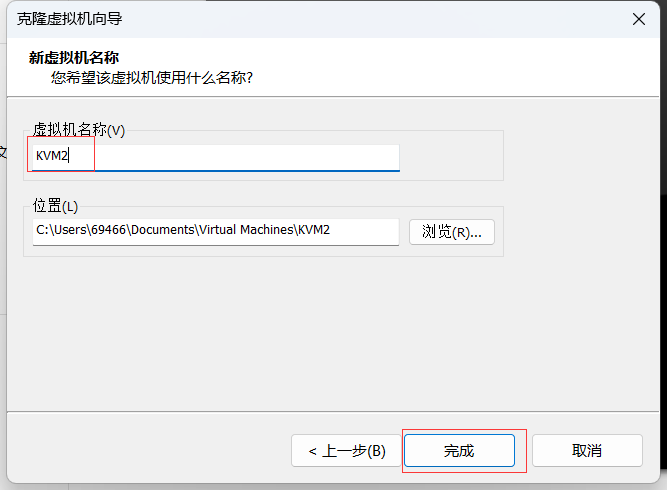
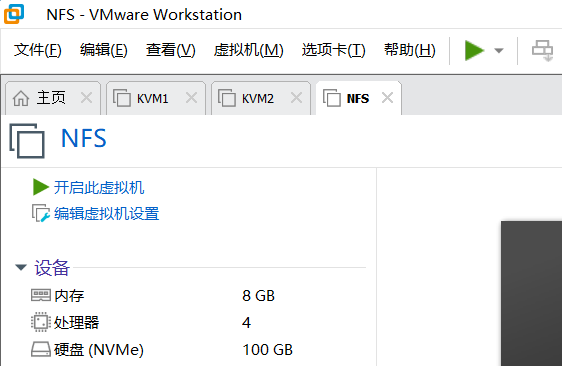
同理完整克隆一台NFS
将三台虚拟机开机,先开KVM1,然后依次开机
KVM2修改主机名
[root@KVM1 ~]# hostnamectl set-hostname KVM2
[root@KVM1 ~]# bash
[root@KVM2 ~]#
KVM2修改IP地址为192.168.108.102
[root@KVM2 ~]# vim /etc/sysconfig/network-scripts/ifcfg-ens160
TYPE=Ethernet
PROXY_METHOD=none
BROWSER_ONLY=no
BOOTPROTO=none
DEFROUTE=yes
IPV4_FAILURE_FATAL=no
IPV6INIT=yes
IPV6_AUTOCONF=yes
IPV6_DEFROUTE=yes
IPV6_FAILURE_FATAL=no
IPV6_ADDR_GEN_MODE=eui64
NAME=ens160
#UUID=3b58adc4-7bfb-4ce7-bdc5-7893a708ebb3 #UUID这行删掉
DEVICE=ens160
ONBOOT=yes
IPADDR=192.168.108.102 #修改IP地址为192.168.108.102
PREFIX=24
GATEWAY=192.168.108.2
[root@KVM2 ~]# nmcli connection reload ens160
[root@KVM2 ~]# ifconfig ens160 #验证IP地址修改为了192.168.108.102
ens160: flags=4163<UP,BROADCAST,RUNNING,MULTICAST> mtu 1500
		inet 192.168.108.102 netmask 255.255.255.0 broadcast 192.168.108.255
		inet6 fe80::20c:29ff:fe65:cdbe prefixlen 64 scopeid 0x20<link>
		ether 00:0c:29:65:cd:be txqueuelen 1000 (Ethernet)
		RX packets 145 bytes 29672 (28.9 KiB)
		RX errors 0 dropped 0 overruns 0 frame 0
		TX packets 154 bytes 15502 (15.1 KiB)
		TX errors 0 dropped 0 overruns 0 carrier 0 collisions 0
NFS修改主机名
[root@KVM1 ~]# hostnamectl set-hostname NFS
[root@KVM1 ~]# bash
[root@NFS ~]#
NFS修改IP地址为192.168.108.100
[root@NFS ~]# vim /etc/sysconfig/network-scripts/ifcfg-ens160
TYPE=Ethernet
PROXY_METHOD=none
BROWSER_ONLY=no
BOOTPROTO=none
DEFROUTE=yes
IPV4_FAILURE_FATAL=no
IPV6INIT=yes
IPV6_AUTOCONF=yes
IPV6_DEFROUTE=yes
IPV6_FAILURE_FATAL=no
IPV6_ADDR_GEN_MODE=eui64
NAME=ens160
#UUID=3b58adc4-7bfb-4ce7-bdc5-7893a708ebb3                             #删除这行
DEVICE=ens160
ONBOOT=yes
IPADDR=192.168.108.100                                 #IP改为100
PREFIX=24
GATEWAY=192.168.108.2
[root@NFS network-scripts]# nmcli connection reload ens160
[root@NFS network-scripts]# ifconfig ens160
ens160: flags=4163<UP,BROADCAST,RUNNING,MULTICAST> mtu 1500
		inet 192.168.108.100 netmask 255.255.255.0 broadcast 192.168.108.255
		inet6 fe80::20c:29ff:fe95:ee3f prefixlen 64 scopeid 0x20<link>
		ether 00:0c:29:95:ee:3f txqueuelen 1000 (Ethernet)
		RX packets 332 bytes 89769 (87.6 KiB)
		RX errors 0 dropped 0 overruns 0 frame 0
		TX packets 275 bytes 46318 (45.2 KiB)
		TX errors 0 dropped 0 overruns 0 carrier 0 collisions 0
KVM1,KVM2,NFS三节点都配置相同的hosts文件
# KVM1操作:
[root@KVM1 ~]# cat >> /etc/hosts << EOF
192.168.108.100 NFS
192.168.108.101 KVM1
192.168.108.102 KVM2
EOF

[root@KVM1 ~]# scp /etc/hosts root@KVM2:/etc/hosts        #将KVM1改好的hosts文件复制到KVM2节点
[root@KVM1 ~]# scp /etc/hosts root@NFS:/etc/hosts            #将KVM1改好的hosts文件复制到NFS节点
创建共享存储NFS:
# NFS操作:
[root@NFS ~]# mkdir /nfs                #用于共享的目录
[root@NFS ~]# vim /etc/exports
/nfs *(rw,no_root_squash,no_subtree_check)

#第一列:/nfs共享出去的目录
#第二列:*代表允许所有网段访问
#rw: 挂载此目录的客户端对该共享目录具有读写权限
#sync:资料同步写入内存和磁盘
#no_root_squash:客户机用root访问该共享文件夹时,不映射root用户,root_squash:客户机用root访问该共享文件夹时,将root用户映射成匿名用户
#no_subtree_check:不检查父目录权限

[root@NFS ~]# systemctl restart nfs-server.service            #重启NFS服务
[root@NFS ~]#
[root@NFS ~]# showmount -e localhost                      #本地测试NFS共享成功了没
Export list for localhost:
/nfs *

[root@NFS ~]# systemctl stop firewalld.service               #停止防火墙服务

# 在KVM1、KVM2分别测试下能否访问NFS的共享目录
[root@KVM1 ~]# showmount -e 192.168.108.100
Export list for 192.168.108.100:
/nfs *
KVM1,KVM2分别创建/NFS目录用于挂载NFS的/nfs目录
[root@KVM1 ~]# mkdir /NFS
[root@KVM2 ~]# mkdir /NFS
操作KVM1,将KVM2添加进来
kvm上操作:
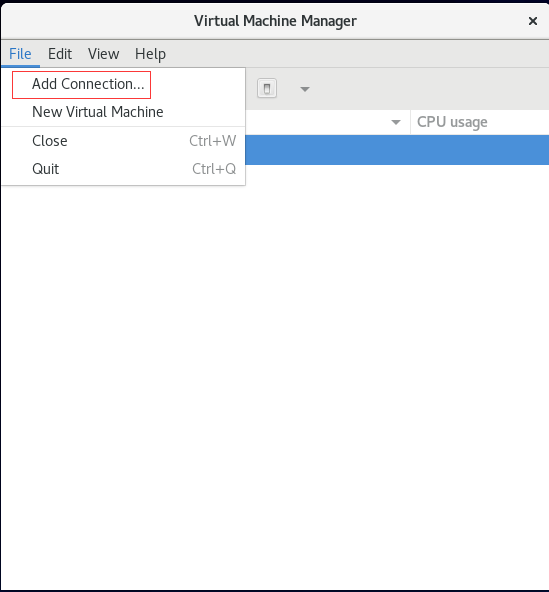
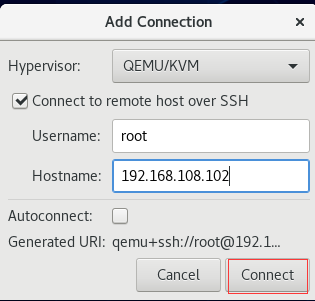
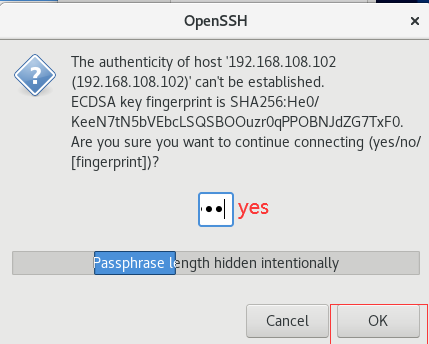
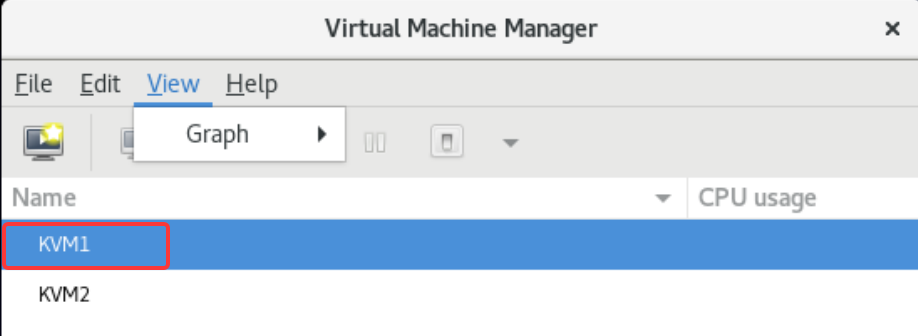
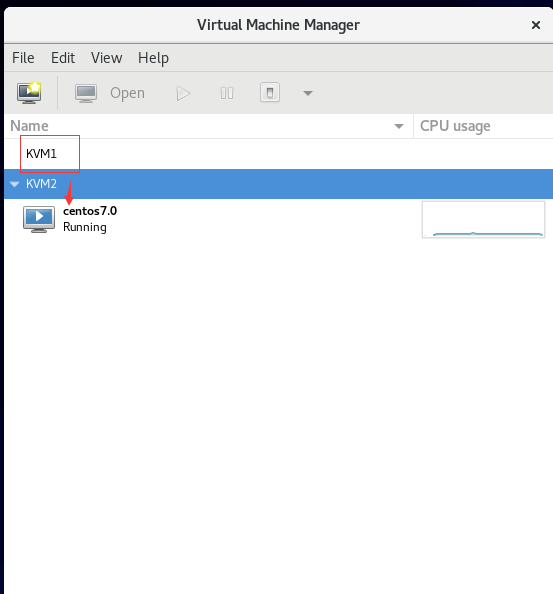
右击Details两个KVM改名字
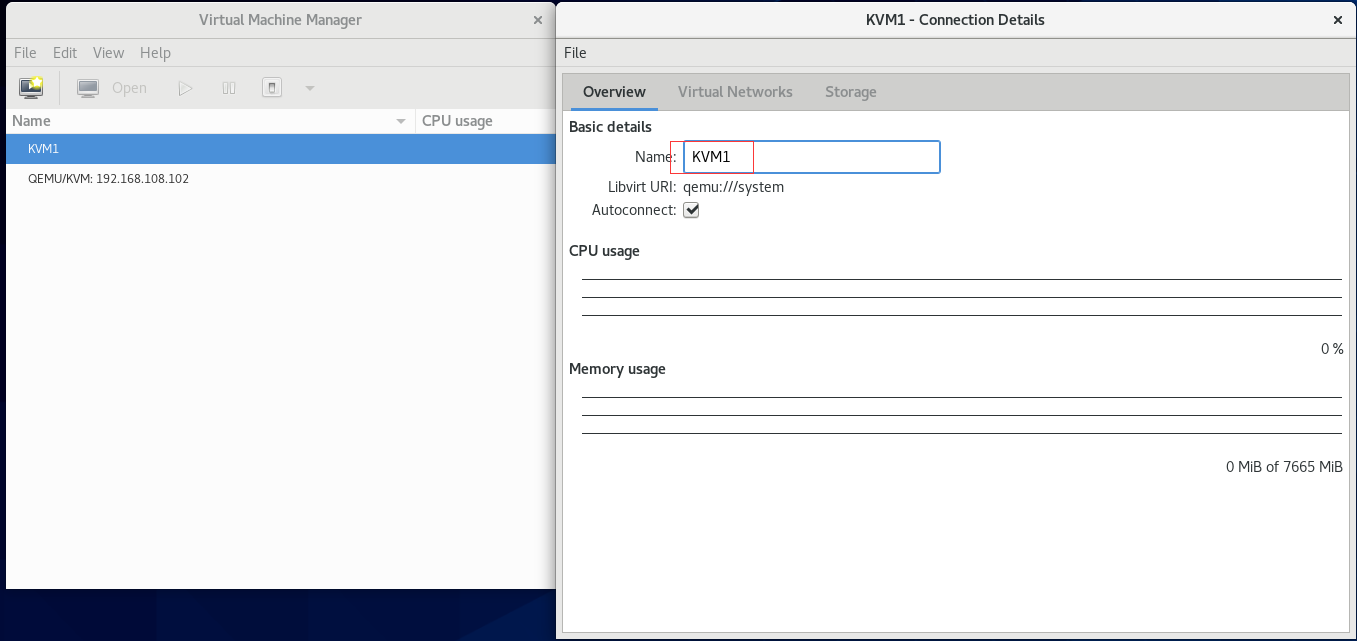
最终修改结果如下
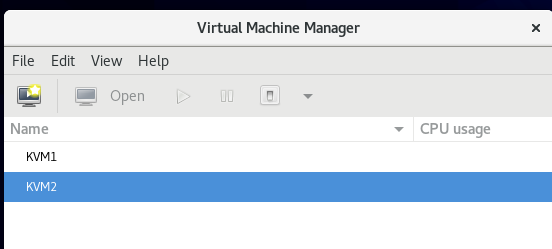
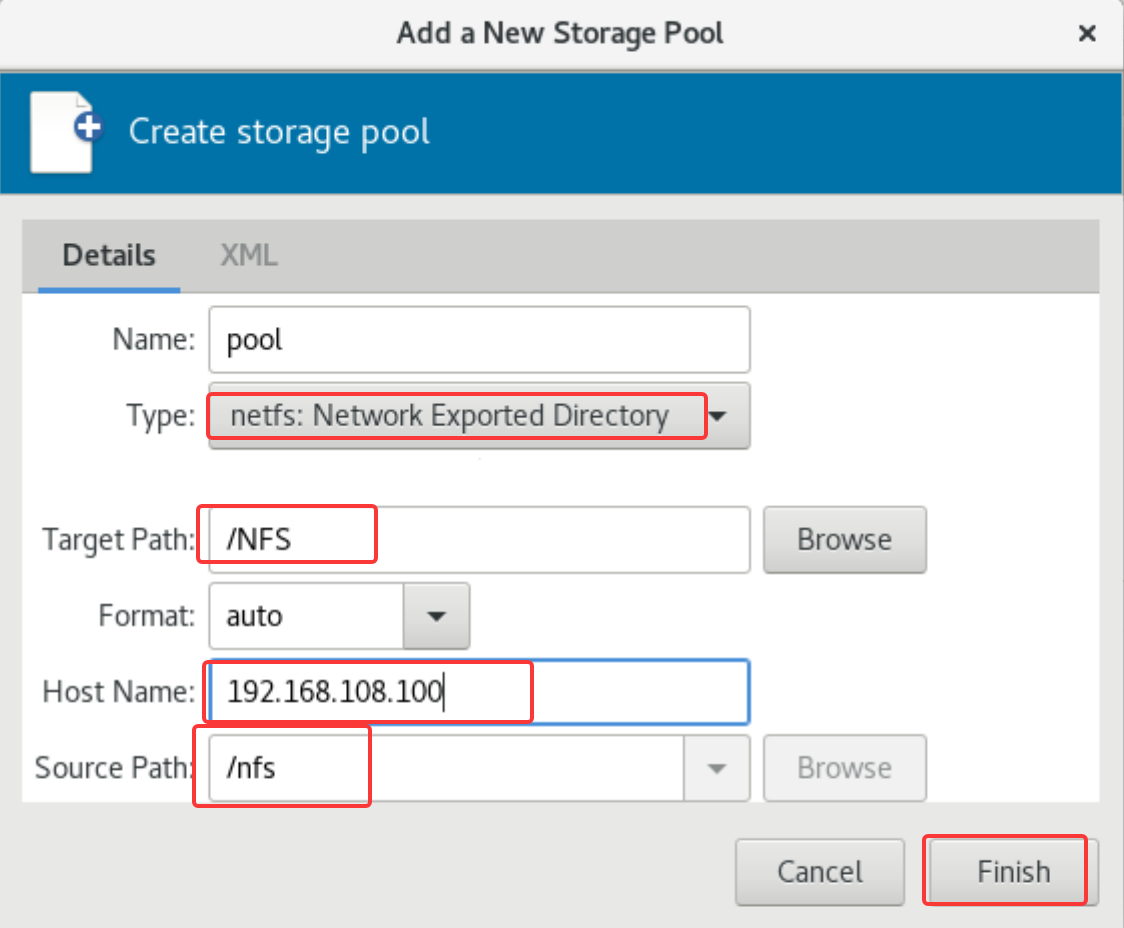
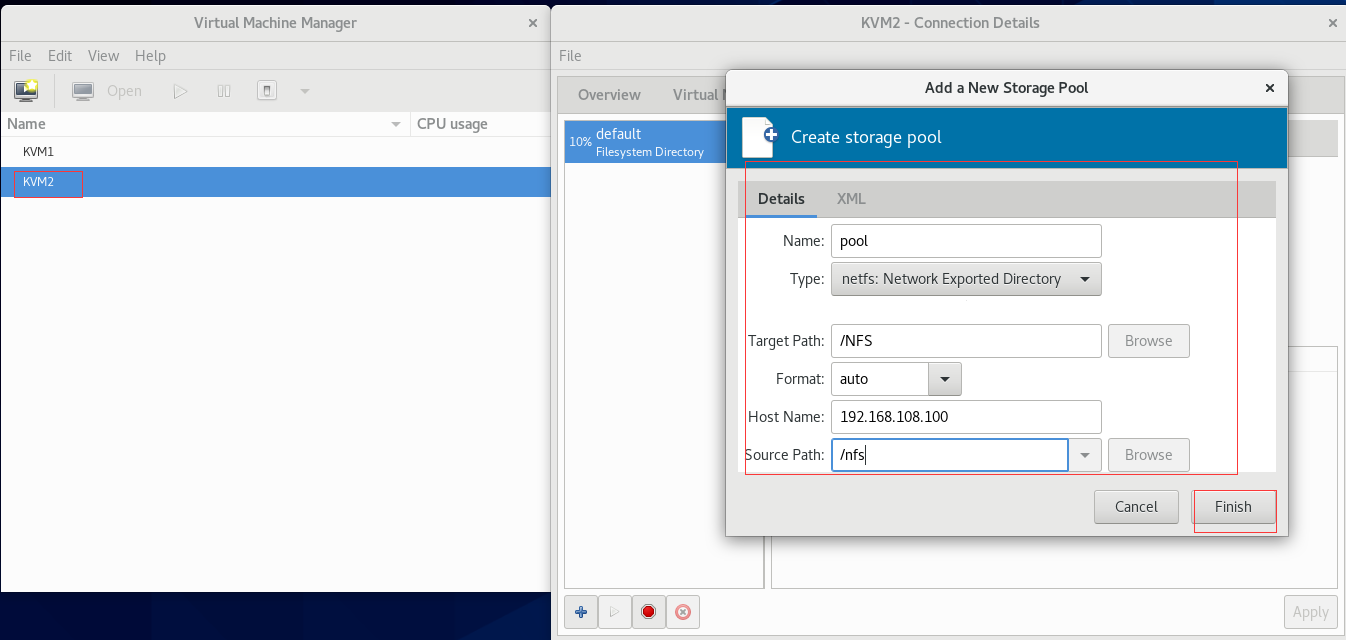
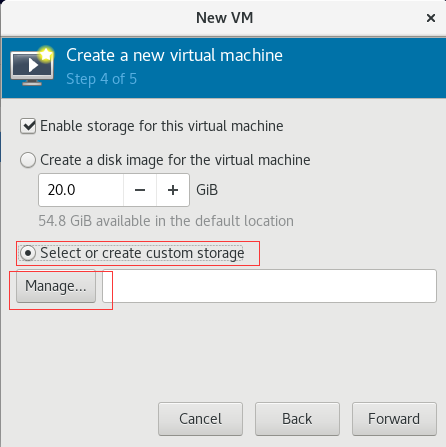
KVM1,KVM2添加共享存储NFS, 先点KVM1 操作
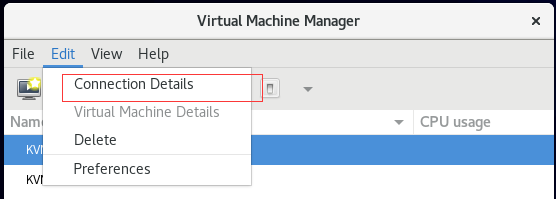
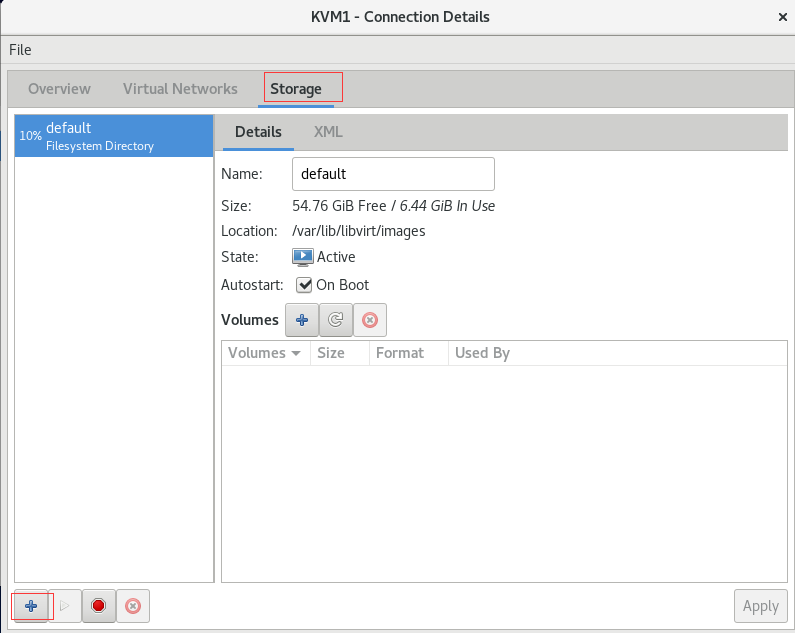
TYpe: ntefs
Target Path: /NFS KVM1 KVM2挂载目录
Host Name: NFS服务器地址
Source Path: /nfs NFS共享目录
上传CentOS镜像,到KVM1,KVM1使用共享存储创建虚拟机
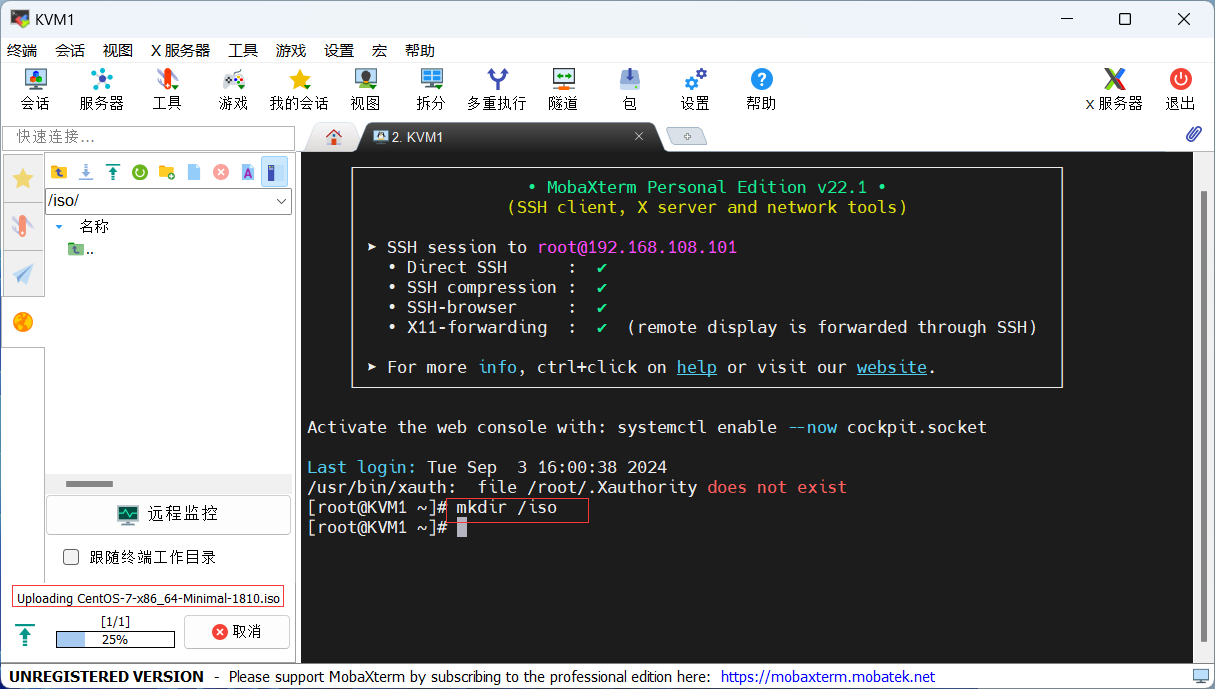
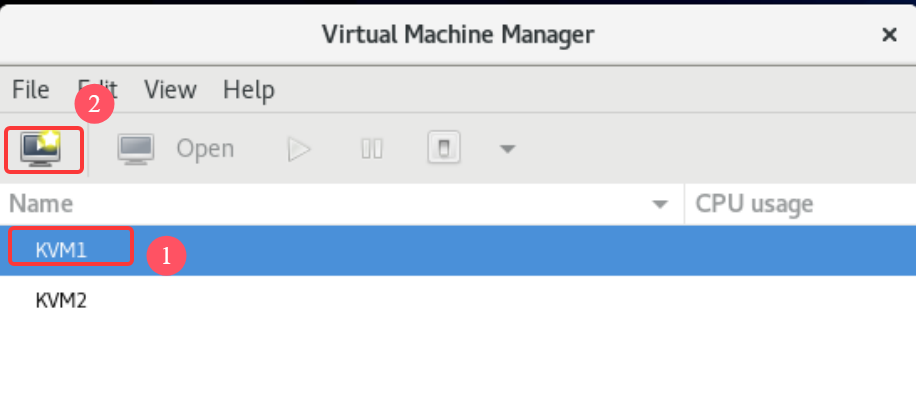
镜像上传好后,点击KVM1,创建虚拟机
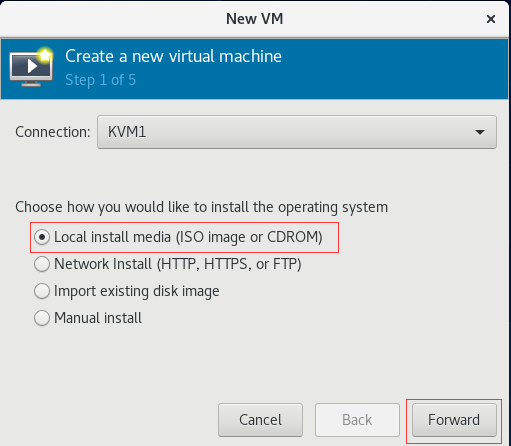
选择刚才上传的镜像
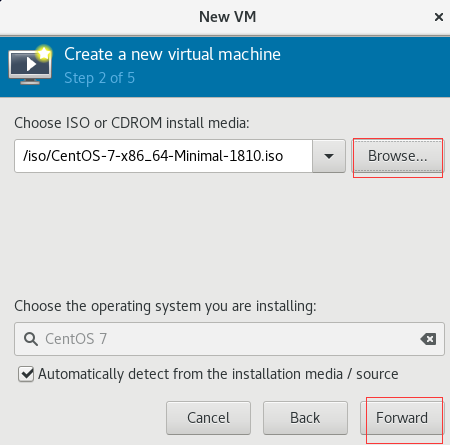
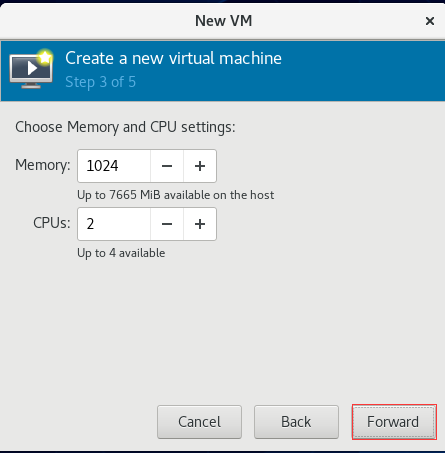
选择安装到共享存储NFS
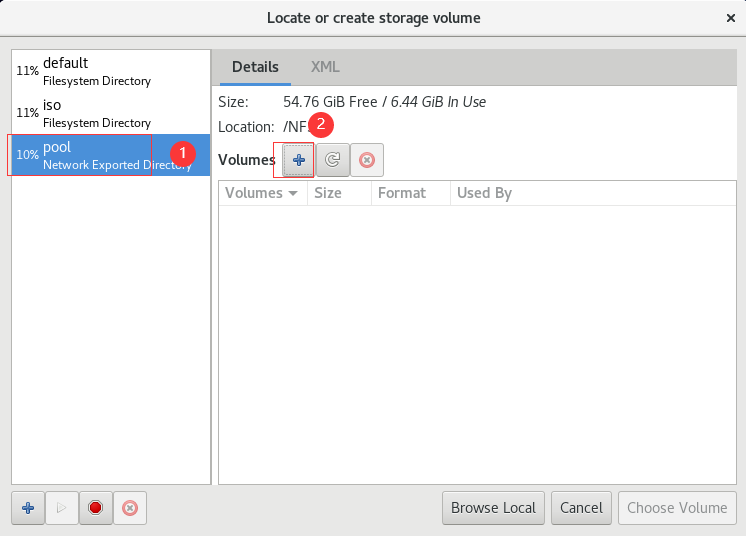
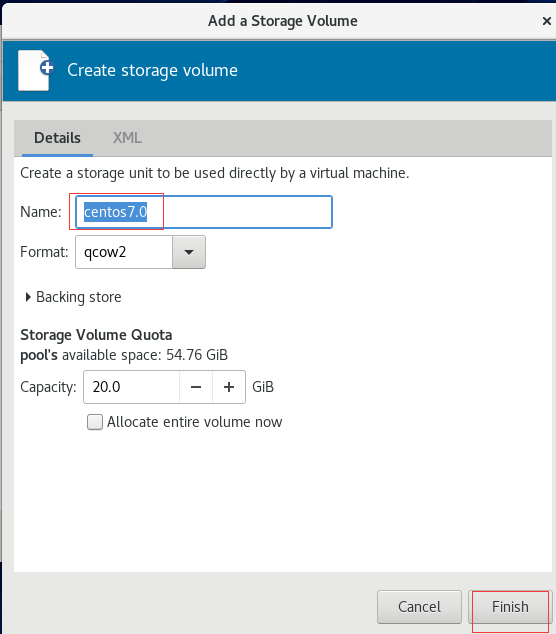
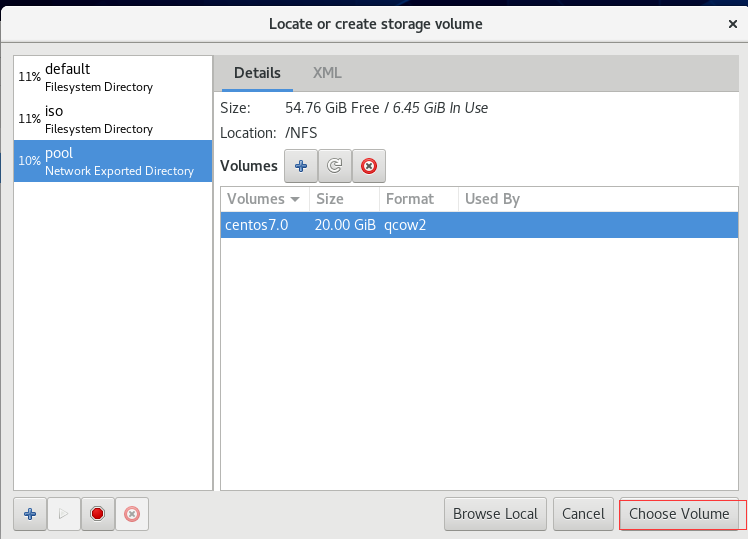
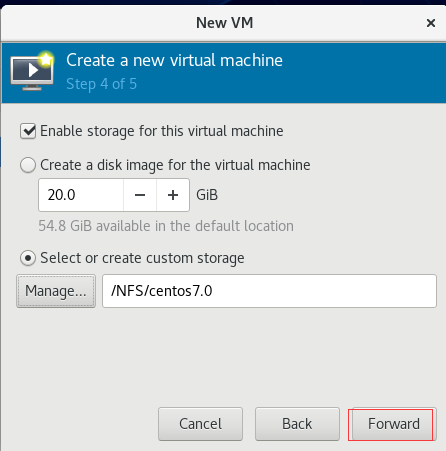
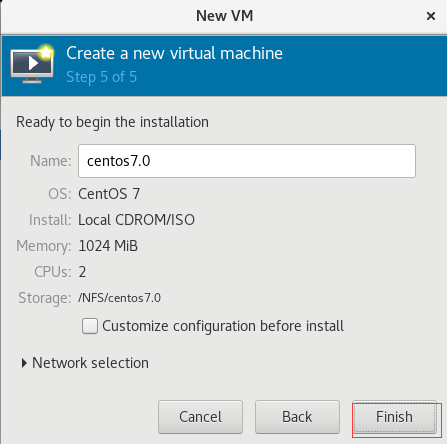
正常安装虚拟机,虚拟机正常装完,重启时会自动弹出光盘
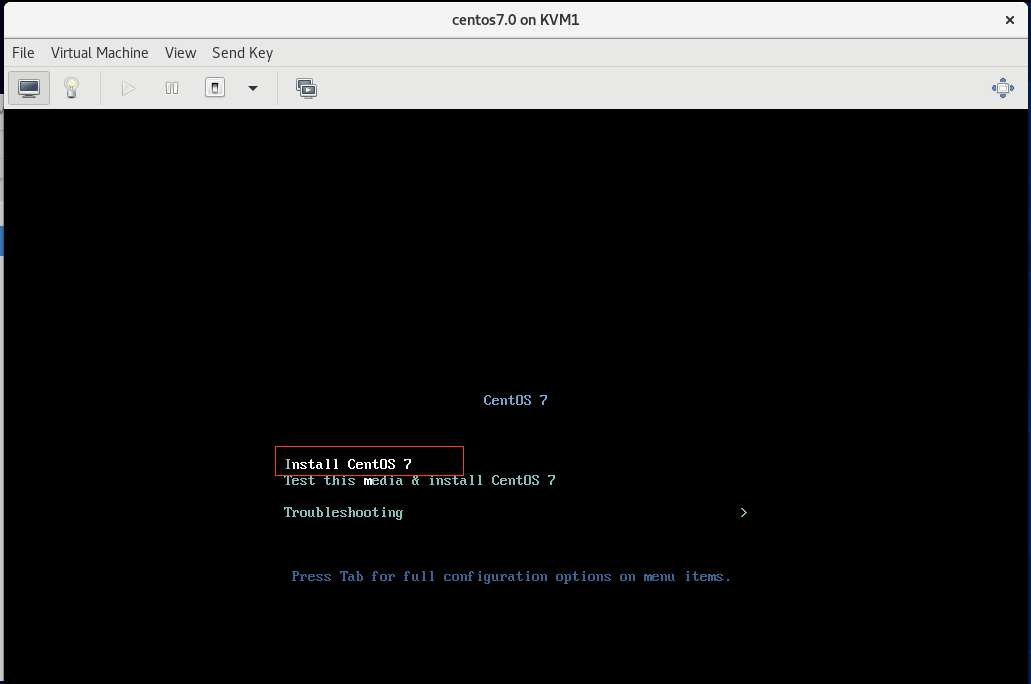
接下来先正常安装虚拟机,直到安装完成
开始迁移
KVM1和KVM2关闭防火墙
KVM1:
[root@KVM1 ~]# systemctl stop firewalld.service

KVM2:
[root@KVM2 ~]# systemctl stop firewalld.service
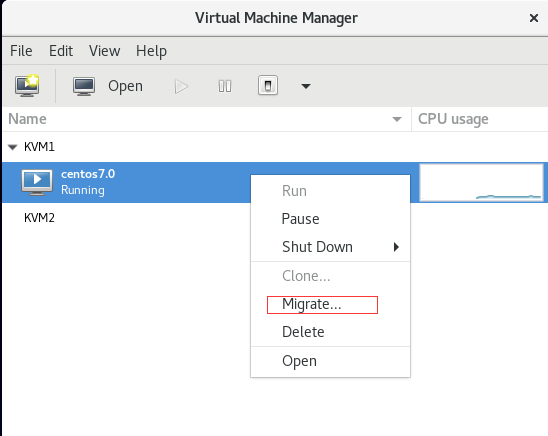
虚拟机从KVM1跑到KVM2
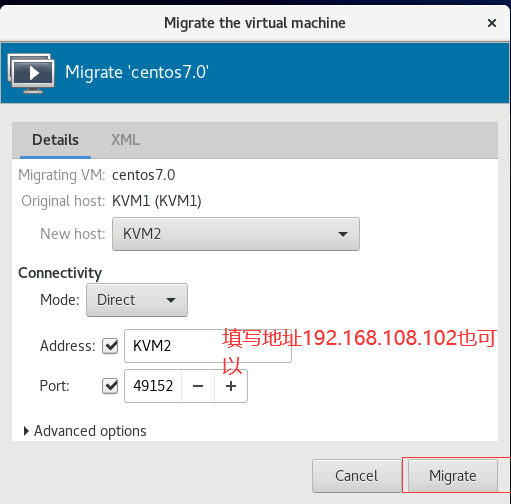
虚拟机kvm1跑到kvm2上

openEuler 是由开放原子开源基金会孵化的全场景开源操作系统项目,面向数字基础设施四大核心场景(服务器、云计算、边缘计算、嵌入式),全面支持 ARM、x86、RISC-V、loongArch、PowerPC、SW-64 等多样性计算架构
更多推荐
 1
1 0
0- 0


 已为社区贡献4条内容

所有评论(0)