Java 程序员第 15 阶段:SSE 流式响应开发:实现前端打字机实时对话效果
你的问题是:" + userMessage + "\n\n让我思考一下...\n\n关于这个话题,我认为这是一个非常有意义的话题,涉及到多个层面的知识和技术。但对于SSE这种需要实时推送的场景,proxy_buffering会导致严重的延迟问题——服务器发送的数据会被Nginx"截留",只有当缓冲区满了或者响应完成后,客户端才能收到数据。无论是基于Spring Boot的后端实现,还是Vue3前端
引言
在人工智能对话应用飞速发展的今天,用户对实时交互体验的期待已经达到前所未有的高度。想象一下,当你向AI助手提出一个问题时,传统的等待方式是一次性获取完整回复,这种体验在信息量较大的场景下往往让用户感到焦虑不安。而现代AI应用普遍采用的"打字机效果"——即回复内容逐字逐句地流式呈现——不仅大幅提升了用户体验,更让交互过程变得自然流畅、充满期待感。
本文将深入探讨实现这种流式交互效果的核心技术——Server-Sent Events(SSE)。我们将从前端到后端,从原理到实践,全面剖析SSE技术的每一个细节,帮助你掌握构建生产级流式对话应用的核心能力。无论是基于Spring Boot的后端实现,还是Vue3前端框架的巧妙运用,抑或是生产环境中Nginx配置的关键注意事项,本文都将提供详尽的技术解读和最佳实践建议。
────────────────────────────────────────────────────────────
为什么选择SSE而不是WebSocket:适用场景深度分析
图4:SSE与WebSocket/长轮询对比图

技术选型的重要性
在构建实时交互应用时,技术选型往往决定了项目的成功与否。许多开发者在初次接触流式交互需求时,会本能地想到WebSocket这个"全能选手"。诚然,WebSocket以其双向全双工通信的能力,几乎可以应对所有实时通信场景,但这种"万能钥匙"思维有时候反而会增加不必要的复杂度。让我们通过一个具体的对比分析,理解为何在AI对话场景下SSE是更明智的选择。
SSE的核心优势
单向通信的极致简洁是SSE最大的魅力所在。在AI对话场景中,数据的流动模式其实非常清晰:客户端发送一次请求,服务器端持续推送数据流。这种一对多的数据流动模式与SSE的设计哲学完美契合。使用SSE,你只需要维护一条HTTP长连接,服务器端通过这条连接持续不断地向客户端发送事件,而客户端只需要专注于接收和解析这些事件即可。
HTTP协议的天然亲和力是SSE的另一个显著优势。由于SSE本质上还是基于HTTP协议,它天然地继承了HTTP在互联网基础设施中的所有优势——不需要特殊的端口配置,不会被企业防火墙阻断,可以无缝穿越各种代理服务器。在当今复杂的网络环境中,这一点的重要性怎么强调都不为过。我曾经见过许多项目因为WebSocket在某些企业网络环境中无法正常工作而不得不返工重造,而基于SSE的应用从未遇到这类问题。
内置的自动重连机制让SSE的使用更加安心。当连接意外中断时,EventSource API会自动尝试重新建立连接,并且会带上上一次收到的最后一个事件ID(Last-Event-ID),确保不会丢失任何数据。这对于长时间运行的流式对话来说至关重要。
WebSocket的适用场景
当然,这并不是说WebSocket一无是处。恰恰相反,在以下场景中WebSocket仍然是首选:在线游戏需要实时双向交互,每个毫秒都至关重要;协作编辑工具如Google Docs需要多用户同时操作,双向通信不可或缺;金融交易平台需要毫秒级的行情推送和下单确认。只有在这些真正需要客户端和服务器实时双向沟通的场景中,WebSocket的优势才能充分发挥。
AI对话场景的最终判断
在AI大语言模型对话场景中,我们追求的是服务器向客户端推送流式文本数据,客户端需要做的是优雅地接收、解析并呈现这些数据。整个过程中,客户端不需要也几乎不会向服务器发送新的请求(除了建立连接时的初始请求)。这种单向数据流场景,正是SSE的拿手好戏。更何况,SSE的实现复杂度远低于WebSocket,调试和维护也更加方便,配套的浏览器开发者工具支持也更加完善。
|
对比维度 |
SSE |
WebSocket |
长轮询 |
|
通信方向 |
单向(服务器→客户端) |
双向全双工 |
伪实时(轮询) |
|
协议基础 |
HTTP/1.1 |
ws:// wss:// |
HTTP/1.1 |
|
实现复杂度 |
低 |
中等 |
中等 |
|
自动重连 |
内置支持 |
需手动实现 |
内置机制 |
|
二进制数据 |
不支持 |
支持 |
支持(Base64) |
|
企业防火墙 |
友好 |
可能有障碍 |
完全兼容 |
|
代理服务器 |
需配置 |
需配置 |
完全兼容 |
|
AI对话场景 |
**最佳选择** |
可用但复杂 |
不推荐 |
────────────────────────────────────────────────────────────
SSE技术原理深度解析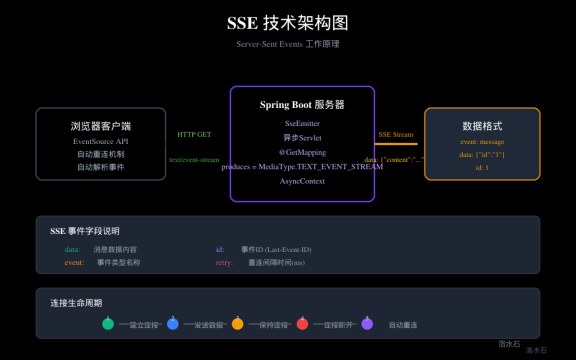
图1:SSE技术架构图
HTTP协议与SSE的关系
要深入理解SSE的工作原理,我们必须首先理解它与HTTP协议之间的密切关系。SSE并非全新的协议,而是一种基于HTTP协议的服务器推送技术实现。它巧妙地利用了HTTP/1.1的持久连接(Keep-Alive)特性,通过一种特殊的MIME类型text/event-stream来标识这是一个SSE连接。
当浏览器发起一个SSE请求时,它实际上发起的是一个带有特殊Accept头的HTTP请求:
GET /api/stream HTTP/1.1
Host: example.com
Accept: text/event-stream
服务器收到这个请求后,不会像普通HTTP响应那样立即返回完整数据然后关闭连接,而是会保持这个连接处于打开状态,并通过这个连接持续发送数据。当服务器发送完一组数据后,连接仍然保持,服务器可以在任何时候继续向这个连接写入新数据。
SSE数据格式详解
SSE的数据格式设计得极为简洁却功能强大。每一条消息由多个字段组成,字段之间以换行符分隔。以下是SSE消息的标准格式:
event: message
id: 1
data: {"content": "Hello", "type": "text"}
data: {"content": " World", "type": "text"}
event字段用于指定事件的类型,客户端可以根据这个字段为不同类型的事件设置不同的处理器。如果不指定event字段,默认为message类型。
id字段是实现可靠重连的关键。每次发送消息时,服务器会递增这个ID。当连接断开后自动重连时,浏览器会自动在请求头中带上Last-Event-ID,服务器可以根据这个ID从断点继续发送数据,避免数据重复或丢失。
data字段是实际的消息内容,可以是多行的。SSE会自动将多行data字段的内容用换行符连接起来,形成完整的消息体。这种设计使得SSE可以传输任意长度的文本数据。
retry字段用于指定连接断开后的重连间隔时间(毫秒)。如果不指定,浏览器会使用默认值(通常为3秒),但你可以通过发送retry: 10000来将重连间隔调整为10秒。
与短轮询的对比
短轮询是最简单也最原始的实时通信实现方式。其原理非常简单:客户端每隔一段时间就向服务器发送一个HTTP请求,询问"有没有新数据"。服务器立即返回当前状态,不管有没有新数据,客户端收到响应后稍作停顿,再次发送请求,如此循环往复。
短轮询的最大问题是效率低下和延迟不确定。即使服务器数据没有任何变化,客户端仍然需要不断地发送请求,这不仅浪费带宽,还给服务器带来无谓的计算压力。而且,如果数据的更新频率低于轮询频率,用户就会看到明显的数据更新延迟;反之,如果轮询过于频繁,即使数据没有更新也会造成资源浪费。短轮询的实时性完全取决于轮询间隔的设置,无法做到真正的实时。
与长轮询的对比
长轮询是对短轮询的一种改进,试图在实时性和资源消耗之间取得平衡。长轮询的工作流程是:客户端发送请求后,服务器不立即返回响应,而是保持这个连接打开,直到有数据更新时才返回数据。当客户端收到响应后,会立即再次发送一个新的请求,建立下一个长轮询连接。
长轮询相比短轮询确实大幅减少了无效请求的数量,实时性也有所提升。但它仍然存在根本性的缺陷:每次数据更新都需要建立一个新的HTTP连接,这个过程包括TCP握手、TLS协商(如果是HTTPS)、HTTP请求和响应的完整交互。这种开销在高频率更新的场景下会变得非常显著。
更重要的是,长轮询的延迟是不确定的。在最理想的情况下(数据刚好在有客户端等待时到达),延迟可以接近零;但在最糟糕的情况下(数据刚更新完,下一个轮询请求还没发出),延迟可能接近整个轮询周期。
SSE的革命性优势
SSE彻底解决了这些问题。由于使用的是持久化的HTTP长连接,服务器可以在数据产生的第一时间就将数据推送到客户端,真正的零延迟。而且,由于复用了同一个HTTP连接,不需要为每次数据推送都重新建立连接,资源消耗极低。
SSE还支持单个TCP连接上的多路复用(在HTTP/2环境下),这意味着即使是多个SSE连接,也可以共享同一个TCP连接,进一步减少了网络资源的使用。这种高效性是轮询系列技术无法企及的。
────────────────────────────────────────────────────────────
Spring Boot SSE后端实现
SseEmitter核心API
Spring Boot为SSE提供了原生支持,主要通过SseEmitter类来实现。SseEmitter是Spring Web模块中用于处理Server-Sent Events的核心类,它封装了异步HTTP响应的所有复杂性,让开发者可以专注于业务逻辑的实现。
SseEmitter的基本用法非常直观。首先创建一个SseEmitter实例,然后将这个emitter作为异步处理的载体,在适当的时机发送数据,最后在连接完成或出错时通知emitter。以下是一个最简单的SSE端点实现:
@GetMapping(value = "/stream", produces = MediaType.TEXT_EVENT_STREAM_VALUE)
public SseEmitter stream() {
SseEmitter emitter = new SseEmitter(3600000L); // 超时时间1小时
CompletableFuture.runAsync(() -> {
try {
for (int i = 0; i < 10; i++) {
emitter.send("data: 第" + i + "条消息\n\n");
Thread.sleep(1000);
}
emitter.complete();
} catch (Exception e) {
emitter.completeWithError(e);
}
});
return emitter;
}
这个例子展示了SSE最基本的工作流程:创建emitter,异步发送数据,完成或出错时通知emitter。但在生产环境中,我们需要考虑更多的细节和最佳实践。
异步线程池配置
在上面的简单例子中,我们使用了CompletableFuture.runAsync(),它默认使用ForkJoinPool.common()作为执行器。在生产环境中,这种默认配置往往不是最佳选择,因为SSE连接可能会长时间保持,占用公共线程池的资源会影响其他业务操作。
更好的做法是为SSE业务配置专门的线程池。以下是一个推荐的线程池配置:
@Configuration
public class AsyncConfig implements AsyncConfigurer {
private static final int CORE_POOL_SIZE = 10;
private static final int MAX_POOL_SIZE = 50;
private static final int QUEUE_CAPACITY = 100;
private static final String THREAD_NAME_PREFIX = "sse-executor-";
@Bean(name = "sseExecutor")
public Executor sseExecutor() {
ThreadPoolTaskExecutor executor = new ThreadPoolTaskExecutor();
executor.setCorePoolSize(CORE_POOL_SIZE);
executor.setMaxPoolSize(MAX_POOL_SIZE);
executor.setQueueCapacity(QUEUE_CAPACITY);
executor.setThreadNamePrefix(THREAD_NAME_PREFIX);
executor.setRejectedExecutionHandler(new ThreadPoolExecutor.CallerRunsPolicy());
executor.setWaitForTasksToCompleteOnShutdown(true);
executor.setAwaitTerminationSeconds(60);
executor.initialize();
return executor;
}
@Override
public Executor getAsyncExecutor() {
return sseExecutor();
}
}
有了这个专门的线程池,我们就可以在SSE控制器中注入并使用它:
@Autowired
@Qualifier("sseExecutor")
private Executor sseExecutor;
@GetMapping(value = "/stream", produces = MediaType.TEXT_EVENT_STREAM_VALUE)
public SseEmitter stream() {
SseEmitter emitter = new SseEmitter(Long.MAX_VALUE); // 不设置超时
sseExecutor.execute(() -> {
try {
for (int i = 0; i < 10; i++) {
emitter.send(SseEmitter.event()
.name("message")
.data("第" + i + "条消息")
.id(String.valueOf(i));
Thread.sleep(1000);
}
emitter.complete();
} catch (Exception e) {
emitter.completeWithError(e);
}
});
return emitter;
}
完整的企业级SSE服务实现
现在让我们来看一个更加完善的企业级SSE实现。这个实现包含了超时管理、错误处理、资源清理、连接状态追踪等生产环境必需的要素:
@Service
public class SSEStreamService {
private final Map<String, SseEmitter> activeEmitters = new ConcurrentHashMap<>();
private final ScheduledExecutorService scheduler = Executors.newScheduledThreadPool(2);
@Autowired
private LLMService llmService;
public SseEmitter createStream(String sessionId, String userMessage) {
SseEmitter emitter = new SseEmitter(Long.MAX_VALUE);
emitter.onCompletion(() -> {
activeEmitters.remove(sessionId);
log.info("SSE连接完成: sessionId={}", sessionId);
});
emitter.onTimeout(() -> {
activeEmitters.remove(sessionId);
log.warn("SSE连接超时: sessionId={}", sessionId);
});
emitter.onError(e -> {
activeEmitters.remove(sessionId);
log.error("SSE连接错误: sessionId={}", sessionId, e);
});
activeEmitters.put(sessionId, emitter);
// 启动超时检查任务
scheduleTimeoutCheck(sessionId, emitter);
// 启动异步数据处理
processStream(sessionId, userMessage, emitter);
return emitter;
}
private void scheduleTimeoutCheck(String sessionId, SseEmitter emitter) {
scheduler.schedule(() -> {
if (activeEmitters.containsKey(sessionId)) {
try {
emitter.send(SseEmitter.event()
.name("timeout")
.data("{\"error\": \"连接超时,请重试\"}"));
emitter.complete();
} catch (Exception e) {
log.error("发送超时消息失败: sessionId={}", sessionId, e);
}
}
}, 30, TimeUnit.MINUTES);
}
private void processStream(String sessionId, String userMessage, SseEmitter emitter) {
sseExecutor.execute(() -> {
try {
// 调用LLM服务获取流式响应
llmService.streamGenerate(userMessage, new StreamCallback() {
private int eventId = 0;
@Override
public void onChunk(String chunk) {
try {
emitter.send(SseEmitter.event()
.name("message")
.id(String.valueOf(++eventId))
.data("{\"content\": \"" + escapeJson(chunk) + "\"}"));
} catch (IOException e) {
log.error("发送SSE数据失败: sessionId={}", sessionId, e);
}
}
@Override
public void onComplete() {
try {
emitter.send(SseEmitter.event()
.name("done")
.data("{\"done\": true}"));
emitter.complete();
} catch (IOException e) {
log.error("发送完成信号失败: sessionId={}", sessionId, e);
}
}
@Override
public void onError(Throwable t) {
try {
emitter.send(SseEmitter.event()
.name("error")
.data("{\"error\": \"" + t.getMessage() + "\"}"));
emitter.completeWithError(t);
} catch (IOException e) {
log.error("发送错误信号失败: sessionId={}", sessionId, e);
}
}
});
} catch (Exception e) {
log.error("处理SSE流异常: sessionId={}", sessionId, e);
try {
emitter.send(SseEmitter.event()
.name("error")
.data("{\"error\": \"" + escapeJson(e.getMessage()) + "\"}"));
emitter.completeWithError(e);
} catch (IOException ioe) {
log.error("发送错误信号失败: sessionId={}", sessionId, ioe);
}
}
});
}
public void closeSession(String sessionId) {
SseEmitter emitter = activeEmitters.remove(sessionId);
if (emitter != null) {
emitter.complete();
}
}
public int getActiveConnectionCount() {
return activeEmitters.size();
}
private String escapeJson(String text) {
if (text == null) return "";
return text.replace("\\", "\\\\")
.replace("\"", "\\\"")
.replace("\n", "\\n")
.replace("\r", "\\r")
.replace("\t", "\\t");
}
}
这个实现展示了企业级SSE服务应有的样子:完整的生命周期管理、错误处理、资源清理、连接追踪,以及与LLM服务的集成。值得注意的是JSON转义的处理——在SSE的data字段中传输JSON数据时,必须对特殊字符进行转义,否则会导致前端解析失败。
────────────────────────────────────────────────────────────
前端EventSource API详解
EventSource基础用法
浏览器原生的EventSource API是使用SSE最简单的方式。它提供了一个基于事件的接口,让我们可以轻松地订阅服务器发送的消息。以下是EventSource的基本用法:
// 创建EventSource连接
const eventSource = new EventSource('/api/stream');
// 监听默认的message事件
eventSource.onmessage = (event) => {
console.log('收到消息:', event.data);
appendToDisplay(event.data);
};
// 监听自定义类型的消息
eventSource.addEventListener('message', (event) => {
console.log('message事件:', event.data);
});
eventSource.addEventListener('done', (event) => {
console.log('数据流结束');
hideTypingIndicator();
});
eventSource.addEventListener('error', (event) => {
console.error('SSE错误:', event);
if (event.target.readyState === EventSource.CLOSED) {
console.log('连接已关闭');
}
});
// 连接状态
console.log('连接状态:', eventSource.readyState);
// EventSource.CONNECTING = 0
// EventSource.OPEN = 1
// EventSource.CLOSED = 2
EventSource的自动重连机制
EventSource最方便的特性之一就是自动重连。当连接意外断开时(网络波动、服务器重启等),EventSource会自动尝试重新建立连接,而且会带上上一次成功接收到的最后一条消息的ID(Last-Event-ID),让服务器可以从断点继续发送。
这个机制是浏览器自动实现的,我们不需要编写任何重连逻辑。但有时候,我们可能需要在重连时做一些额外的处理,比如更新UI状态、记录日志等。可以通过监听error事件来实现这一点:
eventSource.onerror = (event) => {
if (event.target.readyState === EventSource.CONNECTING) {
console.log('正在尝试重新连接...');
updateConnectionStatus('reconnecting');
} else if (event.target.readyState === EventSource.CLOSED) {
console.log('连接已永久关闭');
updateConnectionStatus('disconnected');
// 可能需要手动提示用户刷新页面
}
};
EventSource的局限性
尽管EventSource API简单易用,但它有一些根本性的限制,这些限制在某些场景下会成为致命问题:
无法发送自定义请求头是EventSource最大的局限。由于EventSource本质上是通过<script>标签的动态创建来发起请求的(这是浏览器的内部实现),你无法在请求中添加Authorization头或其他自定义头部。这意味着,如果你需要在SSE请求中进行身份验证,只能通过URL参数传递令牌,或者依赖session cookie。这种做法在安全性上有一定的妥协。
无法指定HTTP方法。EventSource总是使用GET方法,无法发送POST请求。这在需要向服务器提交数据的场景下是完全不可用的。
不支持二进制数据。EventSource只能处理文本数据,无法接收二进制流。如果你需要传输二进制数据(如图片、文件等),必须先将其Base64编码为文本,这会大幅增加数据传输量。
IE浏览器不支持。这是历史遗留问题,虽然现代浏览器都已经支持EventSource,但如果你需要兼容老版本IE(现在已经非常罕见),EventSource是不可用的。
这些局限性促使我们在很多场景下选择Fetch API + ReadableStream的方案。
────────────────────────────────────────────────────────────
Fetch API + ReadableStream实现细粒度控制
为什么选择Fetch API
Fetch API是XMLHttpRequest的现代替代品,它提供了更强大、更灵活的网络请求能力。结合ReadableStream,Fetch API可以让我们完全控制HTTP响应的处理过程,包括流式数据的读取、分块解析、错误处理等。
相比EventSource,Fetch API + ReadableStream的核心优势包括:
完全的请求控制。我们可以指定任意的HTTP方法(GET、POST等)、请求头、请求体,满足各种复杂的业务需求。
细粒度的数据处理。ReadableStream提供了分块读取的能力,让我们可以一块一块地处理接收到的数据,而不是等待完整响应。
更好的错误处理。Fetch API的错误处理机制更加完善,我们可以区分网络错误、HTTP错误(如4xx、5xx)等不同类型的错误。
流式响应支持。通过设置response.body为ReadableStream,我们可以实时处理服务器推送的数据。
Fetch + ReadableStream基础实现
以下是一个使用Fetch API + ReadableStream实现SSE的完整例子:
class SSEReader {
constructor(url, options = {}) {
this.url = url;
this.options = options;
this.abortController = null;
this.reader = null;
this.decoder = new TextDecoder();
this.buffer = '';
}
async connect() {
this.abortController = new AbortController();
const response = await fetch(this.url, {
method: this.options.method || 'GET',
headers: this.options.headers || {},
signal: this.abortController.signal,
});
if (!response.ok) {
throw new Error(`HTTP error! status: ${response.status}`);
}
if (!response.body) {
throw new Error('ReadableStream is not supported');
}
this.reader = response.body.getReader();
return this.processStream();
}
async processStream() {
try {
while (true) {
const { done, value } = await this.reader.read();
if (done) {
// 处理缓冲区中剩余的数据
if (this.buffer.trim()) {
this.processSSEData(this.buffer);
}
this.onComplete();
break;
}
// 将接收到的数据块追加到缓冲区
this.buffer += this.decoder.decode(value, { stream: true });
// 处理缓冲区中的完整SSE消息
this.processBuffer();
}
} catch (error) {
this.onError(error);
}
}
processBuffer() {
// 按换行符分割
const lines = this.buffer.split('\n');
// 保留最后不完整的行在缓冲区中
this.buffer = lines.pop();
for (const line of lines) {
this.processSSEData(line);
}
}
processSSEData(line) {
line = line.trim();
if (!line) return;
// 解析SSE格式: field:value
const colonIndex = line.indexOf(':');
if (colonIndex === -1) return;
const field = line.substring(0, colonIndex).trim();
const value = line.substring(colonIndex + 1).trim();
switch (field) {
case 'event':
this.currentEventType = value;
break;
case 'id':
this.lastEventId = value;
break;
case 'data':
this.handleData(value);
break;
case 'retry':
// 服务器可以指定重连间隔
console.log(`服务器指定重连间隔: ${value}ms`);
break;
}
}
handleData(value) {
const eventType = this.currentEventType || 'message';
this.currentEventType = null;
switch (eventType) {
case 'message':
this.onMessage(value);
break;
case 'done':
this.onDone();
break;
case 'error':
this.onErrorEvent(value);
break;
default:
this.onCustomEvent(eventType, value);
}
}
onMessage(data) {
// 回调: 收到普通消息
if (this.options.onMessage) {
this.options.onMessage(data);
}
}
onDone() {
// 回调: 流结束
if (this.options.onDone) {
this.options.onDone();
}
}
onError(error) {
// 回调: 错误
if (this.options.onError) {
this.options.onError(error);
}
}
onComplete() {
// 回调: 完成
if (this.options.onComplete) {
this.options.onComplete();
}
}
close() {
if (this.abortController) {
this.abortController.abort();
}
if (this.reader) {
this.reader.cancel();
}
}
}
使用示例
const sseReader = new SSEReader('/api/stream', {
method: 'POST',
headers: {
'Content-Type': 'application/json',
},
body: JSON.stringify({ message: '你好,请介绍一下自己' }),
onMessage: (data) => {
try {
const parsed = JSON.parse(data);
appendToDisplay(parsed.content);
} catch (e) {
console.error('解析消息失败:', e);
appendToDisplay(data);
}
},
onDone: () => {
hideTypingIndicator();
console.log('数据流已完成');
},
onError: (error) => {
showError('连接错误: ' + error.message);
console.error('SSE错误:', error);
},
onComplete: () => {
console.log('连接已关闭');
}
});
// 在组件卸载时关闭连接
onUnmounted(() => {
sseReader.close();
});
────────────────────────────────────────────────────────────
打字机效果的前端实现
打字机效果的核心原理
打字机效果的实现原理其实非常直观:服务器发送的文本被分割成多个小块,前端每收到一个数据块,就将它追加到当前显示文本的末尾,同时更新页面渲染。这个过程不断重复,直到所有数据发送完毕。
在视觉效果上,由于文本是一块一块地添加的,我们看到的就像是一个看不见的人在逐字逐句地打字一样。如果配合光标动画和适当的滚动逻辑,整个体验就和一个真实的打字员在为你工作别无二致。
Vue3中的实现
在Vue3中实现打字机效果,我们需要考虑响应式更新、性能优化和用户体验等多个维度。以下是一个完整的Vue3组件实现:
<template>
<div class="chat-container">
<div class="message-list" ref="messageListRef">
<div
v-for="(message, index) in messages"
:key="index"
:class="['message', message.role]"
>
<div class="message-content">
<span v-html="formatMessage(message.content)"></span>
<span
v-if="message.role === 'assistant' && message.streaming"
class="typing-cursor"
></span>
</div>
</div>
</div>
<div class="input-area">
<textarea
v-model="inputText"
@keydown.enter.exact.prevent="sendMessage"
placeholder="输入你的问题..."
rows="3"
></textarea>
<button @click="sendMessage" :disabled="isStreaming">
{{ isStreaming ? '生成中...' : '发送' }}
</button>
</div>
</div>
</template>
<script setup>
import { ref, reactive, nextTick, watch } from 'vue';
const messages = reactive([]);
const inputText = ref('');
const isStreaming = ref(false);
const messageListRef = ref(null);
// 发送消息
const sendMessage = async () => {
if (isStreaming.value || !inputText.value.trim()) return;
const userMessage = inputText.value.trim();
inputText.value = '';
isStreaming.value = true;
// 添加用户消息
messages.push({
role: 'user',
content: userMessage
});
// 添加AI消息占位
const aiMessageIndex = messages.length;
messages.push({
role: 'assistant',
content: '',
streaming: true
});
// 创建SSE连接
const sseReader = new SSEReader('/api/stream', {
method: 'POST',
headers: { 'Content-Type': 'application/json' },
body: JSON.stringify({ message: userMessage }),
onMessage: (data) => {
try {
const parsed = JSON.parse(data);
messages[aiMessageIndex].content += parsed.content;
scrollToBottom();
} catch (e) {
messages[aiMessageIndex].content += data;
scrollToBottom();
}
},
onDone: () => {
messages[aiMessageIndex].streaming = false;
isStreaming.value = false;
scrollToBottom();
},
onError: (error) => {
messages[aiMessageIndex].content += `\n[错误: ${error.message}]`;
messages[aiMessageIndex].streaming = false;
isStreaming.value = false;
}
});
};
// 自动滚动到底部
const scrollToBottom = async () => {
await nextTick();
if (messageListRef.value) {
messageListRef.value.scrollTop = messageListRef.value.scrollHeight;
}
};
// 格式化消息(支持简单的Markdown)
const formatMessage = (content) => {
if (!content) return '';
let formatted = content
// 转义HTML
.replace(/&/g, '&')
.replace(/</g, '<')
.replace(/>/g, '>')
// 代码块
.replace(/```(\w*)\n([\s\S]*?)```/g, '<pre><code class="$1">$2</code></pre>')
// 行内代码
.replace(/`([^`]+)`/g, '<code>$1</code>')
// 粗体
.replace(/\*\*([^*]+)\*\*/g, '<strong>$1</strong>')
// 斜体
.replace(/\*([^*]+)\*/g, '<em>$1</em>')
// 换行
.replace(/\n/g, '<br>');
return formatted;
};
// 清理
onUnmounted(() => {
// 清理逻辑
});
</script>
<style scoped>
.chat-container {
display: flex;
flex-direction: column;
height: 100vh;
max-width: 800px;
margin: 0 auto;
background: #1a1a2e;
}
.message-list {
flex: 1;
overflow-y: auto;
padding: 20px;
}
.message {
margin-bottom: 16px;
max-width: 80%;
}
.message.user {
margin-left: auto;
text-align: right;
}
.message.user .message-content {
background: #3b82f6;
color: white;
padding: 12px 16px;
border-radius: 16px 16px 4px 16px;
}
.message.assistant .message-content {
background: #2d3748;
color: #e2e8f0;
padding: 12px 16px;
border-radius: 16px 16px 16px 4px;
}
.typing-cursor {
display: inline-block;
width: 2px;
height: 1em;
background: #10b981;
margin-left: 2px;
animation: blink 1s infinite;
vertical-align: text-bottom;
}
@keyframes blink {
0%, 100% { opacity: 1; }
50% { opacity: 0; }
}
.input-area {
display: flex;
padding: 16px;
background: #2d3748;
gap: 12px;
}
.input-area textarea {
flex: 1;
padding: 12px;
border: 1px solid #4a5568;
border-radius: 8px;
background: #1a202c;
color: #e2e8f0;
font-size: 14px;
resize: none;
}
.input-area button {
padding: 12px 24px;
background: #10b981;
color: white;
border: none;
border-radius: 8px;
cursor: pointer;
font-weight: bold;
}
.input-area button:disabled {
background: #4a5568;
cursor: not-allowed;
}
</style>
性能优化技巧
在实现打字机效果时,性能是一个必须认真考虑的问题。如果不加控制,每收到一个数据块就立即更新DOM,在高频数据流(如AI流式输出)的情况下,可能会导致严重的性能问题,用户会感受到明显的卡顿。
使用requestAnimationFrame节流是最简单有效的优化手段。我们不直接更新DOM,而是将要更新的内容放入一个变量,然后通过requestAnimationFrame来批量更新:
let pendingUpdate = false;
let displayText = '';
const updateDisplay = () => {
element.textContent = displayText;
pendingUpdate = false;
};
const onDataReceived = (chunk) => {
displayText += chunk;
if (!pendingUpdate) {
pendingUpdate = true;
requestAnimationFrame(updateDisplay);
}
};
文本片段合并是另一个重要的优化策略。AI模型生成的token可能非常小(有时甚至只有一个字符),如果每个token都触发一次DOM更新,效率会非常低下。我们可以设置一个缓冲时间,将多个小片段合并后一次性更新:
let textBuffer = '';
let flushTimeout = null;
const FLUSH_INTERVAL = 30; // 毫秒
const onDataReceived = (chunk) => {
textBuffer += chunk;
if (!flushTimeout) {
flushTimeout = setTimeout(() => {
displayText += textBuffer;
element.textContent = displayText;
textBuffer = '';
flushTimeout = null;
}, FLUSH_INTERVAL);
}
};
虚拟滚动对于超长对话是必须的。当消息列表非常长时,渲染所有的DOM元素会成为性能瓶颈。虚拟滚动的原理是只渲染当前可见区域的元素,当用户滚动时动态更新渲染的内容。Vue3生态中有许多成熟的虚拟滚动库,如vue-virtual-scroller。
────────────────────────────────────────────────────────────
SSE流式中的错误处理与重连机制
连接错误的类型分析
在SSE通信中,错误可能发生在多个层面,我们需要对它们进行细致的区分和处理:
网络层错误是最常见的错误类型。当网络连接中断时(WiFi断开、网线拔掉、网络切换等),EventSource会触发error事件,然后自动进入重连流程。这类错误通常是暂时性的,网络恢复后连接会自动建立。
HTTP层错误发生在请求到达服务器但处理出现问题的场景。比如返回404(端点不存在)、401(未认证)、500(服务器内部错误)等。这类错误不会触发EventSource的自动重连(因为HTTP响应已经收到了),需要我们手动处理。
超时错误是一个容易被忽视的问题。如果服务器在很长时间内没有发送任何数据,HTTP客户端可能会认为连接已死,从而主动断开。我们需要在服务器端配置合理的超时设置,并在客户端实现超时检测机制。
服务器主动关闭是服务器在某些情况下主动断开连接的行为。比如用户会话过期、服务器需要重启、负载均衡将请求切换到其他服务器等。这类情况下,服务器通常会先发送一条特殊的消息或使用特定的HTTP状态码来通知客户端。
前端错误处理实现
class SSEReaderWithErrorHandling {
constructor(url, options = {}) {
this.url = url;
this.options = {
maxRetries: 5,
retryDelay: 1000,
connectionTimeout: 30000,
...options
};
this.retryCount = 0;
this.retryTimeout = null;
this.connectionTimeoutId = null;
}
connect() {
this.resetTimeouts();
return new Promise((resolve, reject) => {
this.abortController = new AbortController();
// 设置连接超时
this.connectionTimeoutId = setTimeout(() => {
this.abortController.abort();
reject(new Error('连接超时'));
}, this.options.connectionTimeout);
fetch(this.url, {
method: this.options.method || 'GET',
headers: this.options.headers || {},
signal: this.abortController.signal,
})
.then(response => {
clearTimeout(this.connectionTimeoutId);
if (!response.ok) {
throw new Error(`HTTP ${response.status}: ${response.statusText}`);
}
this.retryCount = 0; // 重置重试计数
this.setupStreamProcessing(response);
resolve();
})
.catch(error => {
clearTimeout(this.connectionTimeoutId);
if (error.name === 'AbortError') {
reject(new Error('请求被中止'));
} else {
this.handleError(error);
reject(error);
}
});
});
}
handleError(error) {
console.error('SSE错误:', error);
if (this.retryCount < this.options.maxRetries) {
const delay = this.options.retryDelay * Math.pow(2, this.retryCount);
console.log(`${delay}ms后进行第${this.retryCount + 1}次重试...`);
this.retryTimeout = setTimeout(() => {
this.retryCount++;
this.connect().catch(() => {});
}, delay);
} else {
console.error('已达到最大重试次数');
if (this.options.onMaxRetriesExceeded) {
this.options.onMaxRetriesExceeded(error);
}
}
}
resetTimeouts() {
if (this.retryTimeout) {
clearTimeout(this.retryTimeout);
this.retryTimeout = null;
}
if (this.connectionTimeoutId) {
clearTimeout(this.connectionTimeoutId);
this.connectionTimeoutId = null;
}
}
close() {
this.resetTimeouts();
if (this.abortController) {
this.abortController.abort();
}
}
}
后端错误处理策略
后端Spring Boot应用的错误处理同样重要。我们需要考虑几个关键场景:
LLM服务不可用时的降级处理。当AI模型服务暂时不可用时,我们可以实现一个优雅降级策略:返回一条友好的错误消息,提示用户稍后再试,同时记录详细的错误日志便于后续排查。
@GetMapping(value = "/stream", produces = MediaType.TEXT_EVENT_STREAM_VALUE)
public SseEmitter stream(@RequestParam String message) {
SseEmitter emitter = new SseEmitter(Long.MAX_VALUE);
sseExecutor.execute(() -> {
try {
llmService.streamGenerate(message, new StreamCallback() {
@Override
public void onChunk(String chunk) {
emitter.send(SseEmitter.event()
.name("message")
.data("{\"content\": \"" + escapeJson(chunk) + "\"}"));
}
@Override
public void onComplete() {
emitter.send(SseEmitter.event()
.name("done")
.data("{\"done\": true}"));
emitter.complete();
}
@Override
public void onError(Throwable t) {
log.error("LLM调用失败", t);
try {
emitter.send(SseEmitter.event()
.name("error")
.data("{\"error\": \"服务暂时不可用,请稍后重试\"}"));
} catch (IOException e) {
log.error("发送错误消息失败", e);
}
emitter.completeWithError(t);
}
});
} catch (Exception e) {
log.error("创建流失败", e);
try {
emitter.send(SseEmitter.event()
.name("error")
.data("{\"error\": \"请求处理失败: " + escapeJson(e.getMessage()) + "\"}"));
} catch (IOException ioe) {
log.error("发送错误消息失败", ioe);
}
emitter.completeWithError(e);
}
});
// 设置超时回调
emitter.onTimeout(() -> {
log.warn("SSE连接超时: {}", message);
});
emitter.onCompletion(() -> {
log.info("SSE连接完成");
});
return emitter;
}
熔断器模式也是生产环境中常用的保护机制。当错误率超过阈值时,熔断器会"跳闸",快速拒绝新的请求,避免持续的失败尝试拖垮整个系统。Spring Cloud Netflix的Resilience4j是一个成熟的解决方案:
@CircuitBreaker(name = "llmService", fallbackMethod = "fallback")
@GetMapping(value = "/stream", produces = MediaType.TEXT_EVENT_STREAM_VALUE)
public SseEmitter stream(@RequestParam String message) {
// 正常逻辑
}
private SseEmitter fallback(String message, Throwable t) {
SseEmitter emitter = new SseEmitter();
sseExecutor.execute(() -> {
try {
emitter.send(SseEmitter.event()
.name("error")
.data("{\"error\": \"服务繁忙,请稍后重试\"}"));
emitter.complete();
} catch (IOException e) {
log.error("发送降级消息失败", e);
}
});
return emitter;
}
────────────────────────────────────────────────────────────
Nginx配置对SSE的影响
proxy_buffering问题
在将Spring Boot应用部署到生产环境时,Nginx几乎是必然要用到的反向代理服务器。然而,Nginx的默认配置可能会给SSE带来意想不到的问题,其中最关键的就是proxy_buffering。
proxy_buffering是Nginx的一个优化特性,默认为开启状态。当启用时,Nginx会缓冲代理服务器的响应,然后再发送给客户端。这个设计本意是减少对后端服务器的连接压力,提高整体吞吐量。但对于SSE这种需要实时推送的场景,proxy_buffering会导致严重的延迟问题——服务器发送的数据会被Nginx"截留",只有当缓冲区满了或者响应完成后,客户端才能收到数据。
解决方案:关闭proxy_buffering
针对SSE相关的location配置,我们必须关闭proxy_buffering:
location /api/stream {
proxy_pass http://backend;
proxy_http_version 1.1;
proxy_set_header Host $host;
proxy_set_header X-Real-IP $remote_addr;
proxy_set_header X-Forwarded-For $proxy_add_x_forwarded_for;
# 关键配置:关闭代理缓冲
proxy_buffering off;
# 关闭缓存
proxy_cache off;
# 设置chunked传输编码
chunked_transfer_encoding on;
# 超时设置
proxy_read_timeout 86400s;
proxy_send_timeout 86400s;
# 关闭升级(如果使用HTTP/1.0)
proxy_request_buffering off;
}
完整的生产环境Nginx配置
upstream sse_backend {
least_conn;
server 192.168.1.101:8080 weight=5;
server 192.168.1.102:8080 weight=5;
keepalive 32;
}
server {
listen 80;
server_name your-domain.com;
# SSE端点配置
location /api/stream {
proxy_pass http://sse_backend;
proxy_http_version 1.1;
# 基础代理头
proxy_set_header Host $host;
proxy_set_header X-Real-IP $remote_addr;
proxy_set_header X-Forwarded-For $proxy_add_x_forwarded_for;
proxy_set_header X-Forwarded-Proto $scheme;
proxy_set_header Connection '';
# SSE关键配置
proxy_buffering off;
proxy_cache off;
chunked_transfer_encoding on;
proxy_request_buffering off;
# 连接和传输超时(长连接需要较长超时)
proxy_connect_timeout 60s;
proxy_send_timeout 86400s; # 24小时,支持长时间流
proxy_read_timeout 86400s; # 24小时
# 错误处理
proxy_intercept_errors off;
proxy_next_upstream error timeout invalid_header http_500 http_502 http_503;
}
# 其他API端点(正常缓冲)
location /api/ {
proxy_pass http://sse_backend;
proxy_http_version 1.1;
proxy_set_header Host $host;
proxy_set_header X-Real-IP $remote_addr;
proxy_set_header X-Forwarded-For $proxy_add_x_forwarded_for;
proxy_set_header X-Forwarded-Proto $scheme;
# 普通API可以使用缓冲优化
proxy_buffering on;
proxy_buffer_size 4k;
proxy_buffers 8 4k;
proxy_busy_buffers_size 8k;
proxy_connect_timeout 30s;
proxy_send_timeout 60s;
proxy_read_timeout 60s;
}
# 静态资源
location /static/ {
expires 30d;
add_header Cache-Control "public, immutable";
}
}
HTTP/1.0与HTTP/1.1的差异
在配置Nginx时,还需要注意HTTP版本的影响。SSE需要HTTP/1.1的chunked传输编码支持。如果不小心配置成了HTTP/1.0,SSE可能无法正常工作。
proxy_http_version 1.1;这行配置确保了使用HTTP/1.1协议。同时,proxy_set_header Connection '';(注意是空字符串)用于清除Connection头,避免出现"Connection: keep-alive"导致的问题。这是Nginx代理SSE时的一个常见陷阱。
Gzip压缩与SSE
另一个需要注意的配置是Gzip压缩。Gzip会在传输层对数据进行压缩,对于普通API响应可以显著节省带宽。但对于SSE流,Gzip压缩可能会造成问题——因为压缩算法需要等待足够多的数据才能产生输出块,这会导致数据不能立即发送。
# 在SSE location中禁用Gzip
location /api/stream {
# ... 其他配置 ...
# 如果全局开启了Gzip,在这个location中关闭
gzip off;
}
────────────────────────────────────────────────────────────
完整实战案例:Spring Boot + Vue3实现打字机对话
项目概述
现在,让我们通过一个完整的实战项目来整合所有学到的知识。这个项目包含两个主要部分:基于Spring Boot的后端SSE流式响应服务,以及基于Vue3的前端对话界面。项目将实现一个类似ChatGPT的AI对话效果,支持流式输出、打字机效果、自动滚动等功能。
后端实现
项目结构
backend/
├── src/main/java/com/example/ssedemo/
│ ├── SseDemoApplication.java
│ ├── config/
│ │ ├── WebConfig.java
│ │ └── AsyncConfig.java
│ ├── controller/
│ │ └── ChatController.java
│ ├── service/
│ │ ├── ChatService.java
│ │ └── LLMService.java
│ ├── model/
│ │ └── ChatRequest.java
│ └── util/
│ └── JsonUtil.java
├── pom.xml
└── application.yml
Maven依赖
<?xml version="1.0" encoding="UTF-8"?>
<project xmlns="http://maven.springframework.org/schema/beans"
xmlns:xsi="http://www.w3.org/2001/XMLSchema-instance"
xsi:schemaLocation="http://maven.springframework.org/schema/beans
http://maven.springframework.org/schema/beans/spring-beans.xsd">
<modelVersion>4.0.0</modelVersion>
<parent>
<groupId>org.springframework.boot</groupId>
<artifactId>spring-boot-starter-parent</artifactId>
<version>3.2.0</version>
</parent>
<groupId>com.example</groupId>
<artifactId>sse-demo</artifactId>
<version>1.0.0</version>
<properties>
<java.version>17</java.version>
</properties>
<dependencies>
<dependency>
<groupId>org.springframework.boot</groupId>
<artifactId>spring-boot-starter-web</artifactId>
</dependency>
<dependency>
<groupId>org.projectlombok</groupId>
<artifactId>lombok</artifactId>
<optional>true</optional>
</dependency>
<dependency>
<groupId>com.fasterxml.jackson.core</groupId>
<artifactId>jackson-databind</artifactId>
</dependency>
</dependencies>
<build>
<plugins>
<plugin>
<groupId>org.springframework.boot</groupId>
<artifactId>spring-boot-maven-plugin</artifactId>
</plugin>
</plugins>
</build>
</project>
异步配置
@Configuration
@EnableAsync
public class AsyncConfig {
@Bean(name = "sseExecutor")
public Executor sseExecutor() {
ThreadPoolTaskExecutor executor = new ThreadPoolTaskExecutor();
executor.setCorePoolSize(10);
executor.setMaxPoolSize(50);
executor.setQueueCapacity(100);
executor.setThreadNamePrefix("sse-");
executor.setRejectedExecutionHandler(new ThreadPoolExecutor.CallerRunsPolicy());
executor.setWaitForTasksToCompleteOnShutdown(true);
executor.setAwaitTerminationSeconds(60);
executor.initialize();
return executor;
}
}
ChatController
@RestController
@RequestMapping("/api")
@CrossOrigin(origins = "*")
public class ChatController {
private static final Logger log = LoggerFactory.getLogger(ChatController.class);
@Autowired
private ChatService chatService;
@GetMapping(value = "/stream", produces = MediaType.TEXT_EVENT_STREAM_VALUE)
public SseEmitter stream(@RequestParam String message,
@RequestParam(required = false, defaultValue = "user-123") String sessionId) {
log.info("收到SSE请求: sessionId={}, message={}", sessionId, message);
SseEmitter emitter = chatService.createStream(sessionId, message);
emitter.onCompletion(() -> log.info("SSE连接完成: sessionId={}", sessionId));
emitter.onTimeout(() -> log.warn("SSE连接超时: sessionId={}", sessionId));
emitter.onError(e -> log.error("SSE连接错误: sessionId={}", sessionId, e));
return emitter;
}
@PostMapping(value = "/chat", produces = MediaType.TEXT_EVENT_STREAM_VALUE)
public SseEmitter chat(@RequestBody ChatRequest request) {
log.info("收到聊天请求: sessionId={}, message={}", request.getSessionId(), request.getMessage());
SseEmitter emitter = chatService.createStream(request.getSessionId(), request.getMessage());
emitter.onCompletion(() -> log.info("聊天会话完成: sessionId={}", request.getSessionId()));
emitter.onTimeout(() -> log.warn("聊天会话超时: sessionId={}", request.getSessionId()));
emitter.onError(e -> log.error("聊天会话错误: sessionId={}", request.getSessionId(), e));
return emitter;
}
}
ChatService
@Service
public class ChatService {
private final Map<String, SseEmitter> emitters = new ConcurrentHashMap<>();
private final Executor sseExecutor;
@Autowired
private LLMService llmService;
public ChatService(@Qualifier("sseExecutor") Executor sseExecutor) {
this.sseExecutor = sseExecutor;
}
public SseEmitter createStream(String sessionId, String message) {
SseEmitter emitter = new SseEmitter(Long.MAX_VALUE);
// 保存emitter
SseEmitter existing = emitters.put(sessionId, emitter);
if (existing != null) {
existing.complete();
}
// 设置回调
emitter.onCompletion(() -> emitters.remove(sessionId));
emitter.onTimeout(() -> emitters.remove(sessionId));
emitter.onError(e -> {
emitters.remove(sessionId);
log.error("SSE错误: sessionId={}", sessionId, e);
});
// 启动处理
processMessage(sessionId, message, emitter);
return emitter;
}
private void processMessage(String sessionId, String message, SseEmitter emitter) {
sseExecutor.execute(() -> {
try {
// 模拟LLM流式输出(实际项目中调用真实的LLM服务)
simulateLLMStream(emitter, message);
} catch (Exception e) {
log.error("处理消息失败: sessionId={}", sessionId, e);
try {
emitter.send(SseEmitter.event()
.name("error")
.data("{\"error\": \"" + escapeJson(e.getMessage()) + "\"}"));
} catch (IOException ioe) {
log.error("发送错误消息失败", ioe);
}
emitter.completeWithError(e);
}
});
}
// 模拟LLM流式输出(实际项目中替换为真实LLM调用)
private void simulateLLMStream(SseEmitter emitter, String userMessage) throws IOException {
String response = generateResponse(userMessage);
int eventId = 0;
for (char c : response.toCharArray()) {
// 模拟token生成延迟
try {
Thread.sleep(30 + (long)(Math.random() * 50));
} catch (InterruptedException e) {
Thread.currentThread().interrupt();
break;
}
final int currentId = ++eventId;
final String chunk = String.valueOf(c);
try {
emitter.send(SseEmitter.event()
.name("message")
.id(String.valueOf(currentId))
.data("{\"content\": \"" + escapeJson(chunk) + "\"}"));
} catch (IOException e) {
log.warn("发送SSE数据失败,客户端可能已断开: sessionId", sessionId);
return;
}
}
// 发送完成信号
emitter.send(SseEmitter.event()
.name("done")
.data("{\"done\": true}"));
emitter.complete();
}
private String generateResponse(String userMessage) {
// 这里使用模拟的回复,实际项目中调用真实的LLM服务
if (userMessage.contains("你好") || userMessage.contains("hello")) {
return "你好!很高兴见到你。我是洛水AI助手,一个基于大语言模型的智能对话系统。我可以帮助你回答问题、提供建议、进行创意写作等。有什么我可以帮助你的吗?";
} else if (userMessage.contains("你是谁") || userMessage.contains("介绍")) {
return "我是一个先进的人工智能助手,由洛水团队开发。我基于最新的大语言模型技术构建,具备强大的自然语言理解和生成能力。我可以帮助你完成各种任务,包括:\n\n1. 回答问题 - 无论是常识问题还是专业知识,我都可以尽力为你解答。\n\n2. 写作辅助 - 我可以帮你撰写文章、邮件、报告,或者帮你润色和修改文本。\n\n3. 代码开发 - 我熟悉多种编程语言,可以帮你写代码、调试bug、解释代码逻辑。\n\n4. 学习辅导 - 我可以帮助你学习新知识,解释复杂的概念。\n\n5. 创意头脑风暴 - 如果你需要新点子,我可以帮你进行创意发散。\n\n请告诉我你需要什么样的帮助吧!";
} else if (userMessage.contains("谢谢")) {
return "不客气!很高兴能帮到你。如果你还有其他问题,随时可以问我。保持好奇,继续探索!";
} else {
return "感谢你的提问!你的问题是:" + userMessage + "\n\n让我思考一下...\n\n关于这个话题,我认为这是一个非常有意义的话题,涉及到多个层面的知识和技术。让我详细解释一下:\n\n首先,我们需要理解这个问题的背景和核心要点。在这个快速发展的时代,各种新技术和新概念层出不穷,我们需要保持学习的态度,不断更新自己的知识体系。\n\n其次,实践是非常重要的。理论知识和实际应用之间往往存在差距,只有通过不断的实践,我们才能真正掌握一项技能或理解一个概念。\n\n最后,我希望这些信息对你有所帮助。如果你还有其他问题,欢迎继续提问!";
}
}
private String escapeJson(String text) {
if (text == null) return "";
return text.replace("\\", "\\\\")
.replace("\"", "\\\"")
.replace("\n", "\\n")
.replace("\r", "\\r")
.replace("\t", "\\t");
}
}
ChatRequest
@Data
public class ChatRequest {
private String sessionId;
private String message;
}
前端实现
项目结构
frontend/
├── public/
│ └── index.html
├── src/
│ ├── main.js
│ ├── App.vue
│ ├── components/
│ │ └── ChatInterface.vue
│ ├── services/
│ │ └── sseService.js
│ └── styles/
│ └── global.css
├── package.json
└── vite.config.js
Vue3 + Vite项目创建
npm create vite@latest frontend -- --template vue
cd frontend
npm install
npm run dev
sseService.js
// SSE服务封装
class SSEService {
constructor() {
this.currentReader = null;
this.abortController = null;
}
async chat(message, callbacks = {}) {
this.close();
this.abortController = new AbortController();
const { signal } = this.abortController;
try {
const response = await fetch('/api/stream', {
method: 'GET',
headers: {
'Accept': 'text/event-stream',
},
signal,
params: { message }
});
if (!response.ok) {
throw new Error(`HTTP ${response.status}: ${response.statusText}`);
}
await this.processStream(response, callbacks);
} catch (error) {
if (error.name === 'AbortError') {
console.log('SSE请求被中止');
} else {
console.error('SSE错误:', error);
if (callbacks.onError) {
callbacks.onError(error);
}
}
}
}
async processStream(response, callbacks) {
const reader = response.body.getReader();
this.currentReader = reader;
const decoder = new TextDecoder();
let buffer = '';
let currentEventType = 'message';
try {
while (true) {
const { done, value } = await reader.read();
if (done) {
break;
}
buffer += decoder.decode(value, { stream: true });
const lines = buffer.split('\n');
buffer = lines.pop();
for (const line of lines) {
const trimmed = line.trim();
if (!trimmed) continue;
const colonIndex = trimmed.indexOf(':');
if (colonIndex === -1) continue;
const field = trimmed.substring(0, colonIndex).trim();
const value = trimmed.substring(colonIndex + 1).trim();
switch (field) {
case 'event':
currentEventType = value;
break;
case 'data':
this.handleData(value, currentEventType, callbacks);
currentEventType = 'message';
break;
}
}
}
} finally {
this.currentReader = null;
if (callbacks.onComplete) {
callbacks.onComplete();
}
}
}
handleData(data, eventType, callbacks) {
switch (eventType) {
case 'message':
try {
const parsed = JSON.parse(data);
if (callbacks.onMessage) {
callbacks.onMessage(parsed.content || parsed);
}
} catch {
if (callbacks.onMessage) {
callbacks.onMessage(data);
}
}
break;
case 'done':
if (callbacks.onDone) {
callbacks.onDone();
}
break;
case 'error':
try {
const parsed = JSON.parse(data);
if (callbacks.onError) {
callbacks.onError(new Error(parsed.error));
}
} catch {
if (callbacks.onError) {
callbacks.onError(new Error(data));
}
}
break;
}
}
close() {
if (this.abortController) {
this.abortController.abort();
this.abortController = null;
}
if (this.currentReader) {
this.currentReader.cancel();
this.currentReader = null;
}
}
}
export const sseService = new SSEService();
ChatInterface.vue
<template>
<div class="chat-container">
<div class="chat-header">
<h1>洛水AI助手</h1>
<span class="status" :class="{ connected: isConnected }">
{{ isConnected ? '连接中' : '空闲' }}
</span>
</div>
<div class="message-list" ref="messageListRef">
<div
v-for="(message, index) in messages"
:key="index"
class="message"
:class="[message.role, { streaming: message.streaming }]"
>
<div class="avatar">
{{ message.role === 'user' ? 'U' : 'AI' }}
</div>
<div class="content-wrapper">
<div class="message-content" v-html="formatContent(message.content)"></div>
<span v-if="message.streaming" class="cursor"></span>
</div>
</div>
</div>
<div class="input-container">
<textarea
v-model="inputMessage"
@keydown.enter.exact.prevent="sendMessage"
placeholder="输入你的问题,按Enter发送..."
rows="3"
></textarea>
<button @click="sendMessage" :disabled="isStreaming">
{{ isStreaming ? '生成中...' : '发送' }}
</button>
</div>
</div>
</template>
<script setup>
import { ref, reactive, nextTick, onUnmounted } from 'vue';
import { sseService } from '../services/sseService';
const messages = reactive([]);
const inputMessage = ref('');
const isStreaming = ref(false);
const isConnected = ref(false);
const messageListRef = ref(null);
const sendMessage = () => {
if (isStreaming.value || !inputMessage.value.trim()) return;
const userMessage = inputMessage.value.trim();
inputMessage.value = '';
isStreaming.value = true;
// 添加用户消息
messages.push({
role: 'user',
content: userMessage
});
// 添加AI消息占位
const aiMessageIndex = messages.length;
messages.push({
role: 'assistant',
content: '',
streaming: true
});
scrollToBottom();
// 调用SSE服务
sseService.chat(userMessage, {
onMessage: (chunk) => {
messages[aiMessageIndex].content += chunk;
scrollToBottom();
},
onDone: () => {
messages[aiMessageIndex].streaming = false;
isStreaming.value = false;
isConnected.value = false;
scrollToBottom();
},
onError: (error) => {
messages[aiMessageIndex].content += `\n[错误: ${error.message}]`;
messages[aiMessageIndex].streaming = false;
isStreaming.value = false;
isConnected.value = false;
scrollToBottom();
}
});
isConnected.value = true;
};
const scrollToBottom = async () => {
await nextTick();
if (messageListRef.value) {
messageListRef.value.scrollTop = messageListRef.value.scrollHeight;
}
};
const formatContent = (content) => {
if (!content) return '';
let formatted = content
.replace(/&/g, '&')
.replace(/</g, '<')
.replace(/>/g, '>')
.replace(/\n/g, '<br>')
.replace(/```(\w*)\n([\s\S]*?)```/g, '<pre><code class="$1">$2</code></pre>')
.replace(/`([^`]+)`/g, '<code>$1</code>')
.replace(/\*\*([^*]+)\*\*/g, '<strong>$1</strong>')
.replace(/\*([^*]+)\*/g, '<em>$1</em>');
return formatted;
};
onUnmounted(() => {
sseService.close();
});
</script>
<style scoped>
.chat-container {
display: flex;
flex-direction: column;
height: 100vh;
max-width: 900px;
margin: 0 auto;
background: #0f0f1a;
color: #e2e8f0;
}
.chat-header {
display: flex;
justify-content: space-between;
align-items: center;
padding: 20px 24px;
background: #1a1a2e;
border-bottom: 1px solid #2d2d44;
}
.chat-header h1 {
margin: 0;
font-size: 20px;
color: #10b981;
}
.status {
font-size: 12px;
padding: 4px 12px;
border-radius: 12px;
background: #374151;
color: #9ca3af;
}
.status.connected {
background: #064e3b;
color: #10b981;
}
.message-list {
flex: 1;
overflow-y: auto;
padding: 24px;
}
.message {
display: flex;
gap: 16px;
margin-bottom: 24px;
max-width: 85%;
}
.message.user {
flex-direction: row-reverse;
margin-left: auto;
}
.message.assistant {
flex-direction: row;
}
.avatar {
width: 40px;
height: 40px;
border-radius: 50%;
display: flex;
align-items: center;
justify-content: center;
font-weight: bold;
flex-shrink: 0;
}
.message.user .avatar {
background: #3b82f6;
color: white;
}
.message.assistant .avatar {
background: #10b981;
color: white;
}
.content-wrapper {
position: relative;
padding: 12px 16px;
border-radius: 16px;
line-height: 1.6;
}
.message.user .content-wrapper {
background: #3b82f6;
color: white;
border-bottom-right-radius: 4px;
}
.message.assistant .content-wrapper {
background: #1e293b;
color: #e2e8f0;
border-bottom-left-radius: 4px;
}
.cursor {
display: inline-block;
width: 2px;
height: 1.2em;
background: #10b981;
margin-left: 2px;
animation: blink 0.8s infinite;
vertical-align: text-bottom;
}
@keyframes blink {
0%, 100% { opacity: 1; }
50% { opacity: 0; }
}
.input-container {
display: flex;
gap: 12px;
padding: 20px 24px;
background: #1a1a2e;
border-top: 1px solid #2d2d44;
}
.input-container textarea {
flex: 1;
padding: 12px 16px;
border: 1px solid #374151;
border-radius: 12px;
background: #0f0f1a;
color: #e2e8f0;
font-size: 14px;
font-family: inherit;
resize: none;
transition: border-color 0.2s;
}
.input-container textarea:focus {
outline: none;
border-color: #10b981;
}
.input-container textarea::placeholder {
color: #6b7280;
}
.input-container button {
padding: 12px 24px;
background: #10b981;
color: white;
border: none;
border-radius: 12px;
font-weight: bold;
cursor: pointer;
transition: background 0.2s;
}
.input-container button:hover:not(:disabled) {
background: #059669;
}
.input-container button:disabled {
background: #374151;
cursor: not-allowed;
}
</style>
────────────────────────────────────────────────────────────
SSE在AI对话中的最佳实践
连接管理与资源优化
在AI对话应用中,SSE连接的时长可能非常长——一次对话可能持续数分钟甚至更长时间。在这段时间内,后端服务器需要维护连接状态、线程资源、可能的缓存等。如果管理不当,很容易出现资源泄漏或耗尽的问题。
限制单个用户的并发连接数是首要原则。一个用户不应该同时发起多个SSE连接。可以在后端使用用户的sessionId作为key,维护一个Map,当同一个sessionId再次发起连接时,先关闭旧的连接:
private final Map<String, SseEmitter> sessionEmitters = new ConcurrentHashMap<>();
public SseEmitter createStream(String sessionId, String message) {
// 先关闭旧连接
SseEmitter oldEmitter = sessionEmitters.get(sessionId);
if (oldEmitter != null) {
oldEmitter.complete();
sessionEmitters.remove(sessionId);
}
SseEmitter newEmitter = new SseEmitter(Long.MAX_VALUE);
sessionEmitters.put(sessionId, newEmitter);
// ... 处理逻辑 ...
newEmitter.onCompletion(() -> sessionEmitters.remove(sessionId));
newEmitter.onTimeout(() -> sessionEmitters.remove(sessionId));
newEmitter.onError(e -> sessionEmitters.remove(sessionId));
return newEmitter;
}
定期心跳机制可以防止空闲连接被中间设备(如负载均衡器、防火墙)关闭。虽然HTTP长连接本身是持久的,但许多网络设备有空闲超时机制,一段时间没有数据传输的连接可能会被悄悄断开。定期发送ping消息可以保持连接的活跃:
// 定期发送ping
ScheduledExecutorService heartbeatScheduler = Executors.newScheduledThreadPool(1);
heartbeatScheduler.scheduleAtFixedRate(() -> {
try {
emitter.send(SseEmitter.event()
.name("ping")
.data(""));
} catch (IOException e) {
// 连接可能已关闭
heartbeatScheduler.shutdown();
}
}, 30, 30, TimeUnit.SECONDS);
数据格式设计
SSE的数据格式设计直接影响前端处理的复杂度和用户体验。一个好的数据格式应该语义清晰、易于解析、扩展性强:
// 普通文本消息
{"content": "这是回复的文本内容", "type": "text"}
// 带Markdown格式的文本
{"content": "**粗体** 和 *斜体*", "type": "markdown"}
// 代码块
{"content": "console.log('Hello')", "type": "code", "language": "javascript"}
// 思考过程(可选显示)
{"content": "让我想想这个问题...", "type": "thinking"}
// 流式结束信号
{"done": true}
// 错误信号
{"error": "服务暂时不可用"}
前端流式渲染优化
在前端实现AI对话时,除了基本的打字机效果,还有几个可以显著提升体验的优化点:
流式Markdown渲染。如果AI返回的是Markdown格式的文本,逐字渲染Markdown会让文本看起来非常奇怪。更好的做法是先对Markdown进行语法分析,只在完整的代码块或列表结束后再渲染,而不是逐字渲染:
class MarkdownRenderer {
constructor() {
this.buffer = '';
this.pendingTags = [];
}
addChunk(char) {
this.buffer += char;
// 检测是否是完整的语法单元
if (this.isCompleteUnit()) {
return this.flush();
}
return '';
}
isCompleteUnit() {
// 简化的检测逻辑
// 实际上需要更复杂的Markdown解析
return this.buffer.length > 50 ||
(this.buffer.endsWith('\n\n')) ||
(this.buffer.endsWith('```'));
}
flush() {
const result = this.renderMarkdown(this.buffer);
this.buffer = '';
return result;
}
}
减少重渲染。Vue和React的响应式系统在每次状态更新时都会进行Virtual DOM diff。在高频更新的场景下(如逐字渲染),这可能造成性能问题。可以使用节流(throttle)来减少更新频率:
const throttledUpdate = _.throttle((content) => {
messages[aiMessageIndex].content = content;
}, 50);
安全性考虑
输入验证。虽然SSE是服务器向客户端推送数据,但用户输入仍然是需要验证的。恶意用户可能通过特殊的输入触发服务器端的异常:
@PostMapping("/chat")
public SseEmitter chat(@RequestBody @Valid ChatRequest request) {
// 验证消息长度
if (request.getMessage().length() > 2000) {
throw new IllegalArgumentException("消息长度不能超过2000字符");
}
// 过滤特殊字符
String sanitizedMessage = sanitizers.html().strip(request.getMessage());
// ... 处理逻辑
}
速率限制。防止用户恶意频繁发起请求,耗尽服务器资源:
@Service
public class RateLimitService {
private final Map<String, AtomicInteger> requestCounts = new ConcurrentHashMap<>();
private final ScheduledExecutorService cleanup = Executors.newSingleThreadScheduledExecutor();
public RateLimitService() {
// 每分钟清理一次
cleanup.scheduleAtFixedRate(() -> requestCounts.clear(), 1, 1, TimeUnit.MINUTES);
}
public boolean isAllowed(String sessionId) {
AtomicInteger count = requestCounts.computeIfAbsent(sessionId, k -> new AtomicInteger());
return count.incrementAndGet() <= 60; // 每分钟最多60次请求
}
}
────────────────────────────────────────────────────────────
总结
SSE(Server-Sent Events)作为HTML5引入的服务器推送技术,在AI对话、实时通知、监控系统等场景中展现出了独特的优势。它以HTTP协议为基础,实现简单、兼容性良好、天然支持自动重连,特别适合服务器向客户端单向推送数据的场景。
本文从技术选型出发,深入分析了SSE与WebSocket、长短轮询的适用场景差异,帮助读者在项目初期做出正确的技术决策。随后,我们详细讲解了SSE的技术原理、数据格式,以及与HTTP协议的关系,为读者打下坚实的理论基础。
在后端实现部分,我们通过Spring Boot的SseEmitter API,展示了从简单到企业级的多种实现方案,包括异步线程池配置、错误处理、熔断器集成等生产环境必备要素。前端部分则同时介绍了EventSource API和Fetch + ReadableStream两种方案,让读者可以根据实际需求灵活选择。
打字机效果是AI对话应用的核心用户体验。我们不仅实现了基础的逐字显示,还深入探讨了性能优化、虚拟滚动、Markdown渲染等进阶话题。错误处理与重连机制、Nginx配置细节等生产部署必须考虑的问题,也在文中得到了详尽的阐述。
最后,通过一个完整的Spring Boot + Vue3实战项目,我们将所有知识点串联起来,展示了从设计到实现的完整流程。希望本文能够帮助读者全面掌握SSE流式响应开发的核心技能,在实际项目中游刃有余。
AI交互体验正在快速演进,SSE作为一种成熟稳定的技术方案,将继续在实时通信领域发挥重要作用。掌握这项技术,你将能够构建出更加流畅、自然的AI对话应用,为用户带来前所未有的交互体验。
────────────────────────────────────────────────────────────
附:配套技术图解

图1:SSE技术架构图

图2:SSE流式响应完整流程图

图3:前端EventSource打字机效果实现图

图4:SSE与WebSocket/长轮询对比分析图
附:配套技术图解
SSE技术架构图
图1:SSE技术架构图(展示Server-Sent Events的工作原理)
SSE流式响应完整流程图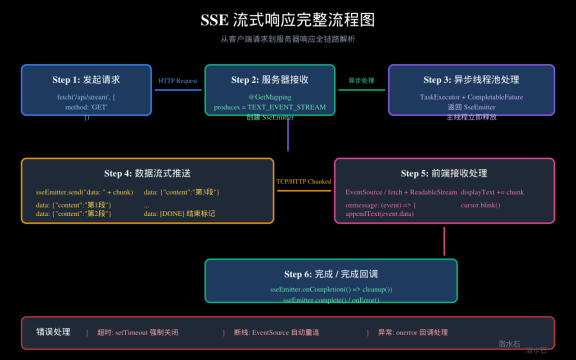
图2:SSE流式响应完整流程图(从请求到响应的全链路解析)
前端EventSource打字机效果实现
图3:前端EventSource API与Fetch + ReadableStream实现对比
SSE与WebSocket/长轮询对比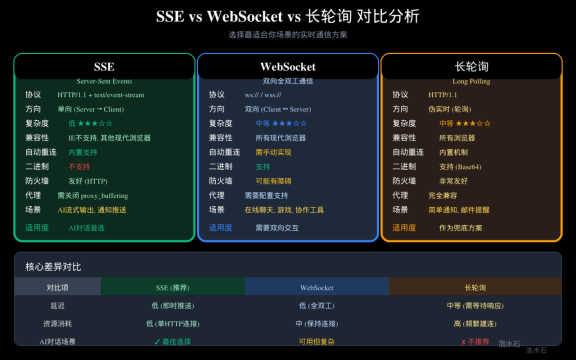
图4:三种实时通信技术全面对比分析

openEuler 是由开放原子开源基金会孵化的全场景开源操作系统项目,面向数字基础设施四大核心场景(服务器、云计算、边缘计算、嵌入式),全面支持 ARM、x86、RISC-V、loongArch、PowerPC、SW-64 等多样性计算架构
更多推荐
 5
5 0
0- 0


 已为社区贡献4条内容

所有评论(0)