Nginx 从入门到精通:部署、配置、虚拟主机与 HTTPS 证书实战指南
Nginx 从入门到精通:部署、配置、虚拟主机与 HTTPS 证书实战指南
Nginx 服务器
摘要:本文全面介绍了 Nginx 高性能 Web 服务器的部署、配置与管理。内容涵盖:1) Nginx 基础安装与启动;2) 配置文件层级结构与核心模块详解;3) 基于域名和端口的虚拟主机配置;4) SSL/TLS 证书的生成与 HTTPS 站点配置;5) 使用 Let’s Encrypt 申请免费 HTTPS 证书的完整流程。文章通过大量实际配置示例和命令行操作,帮助读者快速掌握 Nginx 的核心功能与最佳实践。
Nginx 是一款高性能的HTTP和反向代理服务器。在高连接并发的情况下,能够支持高达5万个并发连接数的响应,而内存、CPU等系统资源消耗却非常低,运行非常稳定。
Nginx 部署
# 安装 nginx
[root@controller ~ 11:14:22]# yum -y install nginx


# 启动 nginx
[root@controller ~ 11:26:39]# systemctl enable nginx --now

# 准备主页
[root@controller ~ 11:26:41]# mv /usr/share/nginx/html/index.html{,.ori}
[root@controller ~ 11:26:51]#  echo Hello World From Nginx > /usr/share/nginx

[root@controller ~ 11:27:13]# curl http://www.han.cloud

# windows客户端修改 C:\Windows\System32\drivers\etc\hosts
# Linux或Unix修改 /etc/hosts
# 添加如下记录
10.1.8.10 www.han.cloud
Nginx 配置
配置结构
Nginx 配置采用层级化、模块化的组织方式,整体是 “全局块 → 核心模块块 → 业务模块块” 的嵌套结构。
1. 全局配置块
作用于 Nginx 整个进程的基础配置,不嵌套在任何块内,是配置文件的 “根级别”。
# 全局配置示例
user nginx;                               # 运行Nginx的用户/用户组
worker_processes auto;                    # 工作进程数(核心参数,建议设为CPU核心数)
error_log /var/log/nginx/error.log;       # 错误日志路径
pid /run/nginx.pid;                       # 主进程PID文件路径
include /usr/share/nginx/modules/*.conf;  # 加载外部模块配置(全局级引入)
2. 核心模块 块
Nginx 的核心功能模块 events 块,用于处理网络连接相关配置。
events {
    worker_connections 1024;  # 每个工作进程的最大并发连接数
    use epoll;                # 事件驱动模型(epoll是Linux下高性能选择)
    multi_accept on;          # 允许一个进程一次性接受多个新连接
}
3. 业务模块 块
处理具体业务的核心配置块,最核心的是 http 块(HTTP/HTTPS 服务),可以包含多个 server 块(虚拟主机)。
# http块:所有HTTP/HTTPS服务的公共配置,可嵌套多个server块
http {
    # HTTP全局公共配置
    include       /etc/nginx/mime.types;    # 加载MIME类型映射
    default_type  application/octet-stream; # 默认响应类型
    log_format  main  '$remote_addr - $remote_user [$time_local] "$request"'; # 日志格式
    access_log  /var/log/nginx/access.log  main; # 访问日志
    sendfile     on;    # 高效文件传输开关
    keepalive_timeout  65;  # 长连接超时时间

    # server块:虚拟主机配置(一个http块可包含多个server)
    server {
        listen       80;  # 监听端口(80=HTTP,443=HTTPS)
        server_name  localhost;  # 域名/IP(可配置多个,用空格分隔)
        root         /usr/share/nginx/html;  # 网站根目录
        index index.html;

        # location块:URL路径匹配规则(一个server块可包含多个location)
        location / {
            index  index.html index.htm;  # 默认首页
            try_files $uri $uri/ /index.html;  # 路径匹配规则
        }

        # 错误页面配置
        error_page  404              /404.html;
        error_page  500 502 503 504  /50x.html;
    }

    # 第二个虚拟主机(示例)
    server {
        listen       8080;
        server_name  test.example.com;
        # ... 其他配置
    }
}
4. 特殊配置:HTTPS 专属块
如果配置 HTTPS,会在 server 块内增加 SSL 相关配置:
server {
    listen       443 ssl;  # 监听HTTPS端口并启用SSL
    server_name  example.com;

    # SSL证书配置
    ssl_certificate      /etc/nginx/cert/server.crt;  # 公钥文件
    ssl_certificate_key  /etc/nginx/cert/server.key;  # 私钥文件
    ssl_session_cache    shared:SSL:1m;
    ssl_session_timeout  5m;
    ssl_ciphers  HIGH:!aNULL:!MD5;
    ssl_prefer_server_ciphers  on;

    # ... 其他配置(如root、location等)
}
配置加载机制
- include 指令:Nginx 支持通过
include引入外部配置文件,实现模块化管理。 - 把不同虚拟主机配置拆到/etc/nginx/conf.d/*.conf- 把不同代理配置拆到/etc/nginx/default.d/*.conf - 配置优先级: - 同层级:后定义的配置覆盖先定义的; - 不同层级:子级(如 location)覆盖父级(如 server/http); - location 匹配:精准匹配(
=)> 正则匹配(~/~*)> 普通前缀匹配。
nginx.conf 配置详解
# 更多配置详情参考官方文档:
#   * 英文官方文档: http://nginx.org/en/docs/
#   * 俄文官方文档: http://nginx.org/ru/docs/

# 指定Nginx工作进程的运行用户为nginx
user nginx;

# 工作进程数,设置为auto时会自动根据CPU核心数调整
worker_processes auto;

# 错误日志文件路径及存储位置
error_log /var/log/nginx/error.log;

# Nginx主进程PID文件路径,用于标识进程ID
pid /run/nginx.pid;

# 加载动态模块,详细说明可查看/usr/share/doc/nginx/README.dynamic文件
include /usr/share/nginx/modules/*.conf;

# 事件模块配置块,用于设置网络连接相关参数
events {
    # 每个工作进程的最大并发连接数,默认1024
    worker_connections 1024;
}

# HTTP核心模块配置块,包含HTTP服务的主要配置
http {
    # 定义访问日志的格式,命名为main
    # 日志字段说明:客户端IP - 远程用户 [访问时间] "请求信息" 状态码 发送字节数 "来源页面" "用户代理" "代理IP"
    log_format  main  '$remote_addr - $remote_user [$time_local] "$request" '
                      '$status $body_bytes_sent "$http_referer" '
                      '"$http_user_agent" "$http_x_forwarded_for"';

    # 启用访问日志,使用main格式,日志文件存储路径
    access_log  /var/log/nginx/access.log  main;

    # 启用高效文件传输模式,减少磁盘I/O和CPU消耗
    sendfile            on;

    # 启用TCP_NOPUSH选项,在发送响应时累积数据后一次性发送,提高网络效率(需配合sendfile使用)
    tcp_nopush          on;

    # 启用TCP_NODELAY选项,禁用Nagle算法,减少数据传输延迟(适用于实时性要求高的场景)
    tcp_nodelay         on;

    # HTTP长连接超时时间,超过65秒无活动则关闭连接
    keepalive_timeout   65;

    # 文件类型哈希表的最大容量,增大可提高文件类型查找效率
    types_hash_max_size 4096;

    # 引入MIME类型配置文件,定义不同文件后缀对应的响应类型
    include             /etc/nginx/mime.types;

    # 默认MIME类型,当无法识别文件类型时使用(二进制流格式)
    default_type        application/octet-stream;

    # 加载/etc/nginx/conf.d目录下的所有.conf后缀配置文件(模块化配置)
    # 更多说明参考http://nginx.org/en/docs/ngx_core_module.html#include
    include /etc/nginx/conf.d/*.conf;

    # 虚拟主机配置块(默认HTTP服务)
    server {
        # 监听IPv4的80端口(HTTP默认端口)
        listen       80;

        # 监听IPv6的80端口
        listen       [::]:80;

        # 虚拟主机域名,_表示匹配所有未明确指定的域名
        server_name  _;

        # 网站根目录,存放静态资源的路径
        root         /usr/share/nginx/html;

        # 加载默认虚拟主机的额外配置文件(来自/etc/nginx/default.d/*.conf)
        include /etc/nginx/default.d/*.conf;

        # 配置404错误页面,当请求资源不存在时返回/404.html
        error_page 404 /404.html;
        # 精确匹配/404.html的访问路径(无额外配置,直接返回文件)
        location = /404.html {
        }

        # 配置500/502/503/504服务器错误页面,返回/50x.html
        error_page 500 502 503 504 /50x.html;
        # 精确匹配/50x.html的访问路径(无额外配置,直接返回文件)
        location = /50x.html {
        }
    }

# TLS/SSL加密服务配置(默认注释,启用需取消注释并配置证书)
#
#    server {
#        # 监听IPv4的443端口(HTTPS默认端口),启用SSL和HTTP/2协议
#        listen       443 ssl http2;
#        # 监听IPv6的443端口,启用SSL和HTTP/2协议
#        listen       [::]:443 ssl http2;
#        # 虚拟主机域名(需替换为实际域名)
#        server_name  _;
#        # 网站根目录(与HTTP服务一致)
#        root         /usr/share/nginx/html;
#
#        # SSL证书文件路径(公钥)
#        ssl_certificate "/etc/pki/nginx/server.crt";
#        # SSL证书密钥文件路径(私钥,需保密)
#        ssl_certificate_key "/etc/pki/nginx/private/server.key";
#        # SSL会话缓存配置:共享缓存,名称SSL,大小1MB
#        ssl_session_cache shared:SSL:1m;
#        # SSL会话超时时间,10分钟内再次连接无需重新握手
#        ssl_session_timeout  10m;
#        # SSL加密套件,优先选择高强度加密算法,排除aNULL和MD5
#        ssl_ciphers HIGH:!aNULL:!MD5;
#        # 优先使用服务器端指定的加密套件
#        ssl_prefer_server_ciphers on;
#
#        # 加载默认虚拟主机的额外配置文件
#        include /etc/nginx/default.d/*.conf;
#
#        # 404错误页面配置(原配置笔误,应为/404.html,此处保留原注释结构)
#        error_page 404 /404.html;
#            location = /40x.html {
#        }
#
#        # 服务器错误页面配置
#        error_page 500 502 503 504 /50x.html;
#            location = /50x.html {
#        }
#    }
}
虚拟主机
同一个 web 服务器提供多个站点。
虚拟主机支持多种方式:
- 主机名
- 端口号
- IP地址(基本不用)
根据名称
# 参考主配置文件/etc/nginx/nginx.conf中server块配置
[root@controller ~ 13:29:16]# cp /etc/nginx/nginx.conf /etc/nginx/conf.d/vhost-name.conf

[root@controller ~ 13:43:48]# vim /etc/nginx/conf.d/vhost-name.conf
server {
    server_name  web1.laoma.cloud;
    root         /usr/share/nginx/web1;
}
server {
    server_name  web2.laoma.cloud;
    root         /usr/share/nginx/web2;
}
[root@controller ~ 13:46:16]# mkdir /usr/share/nginx/web{1,2}

[root@controller ~ 13:46:35]# echo web1.han.cloud > /usr/share/nginx/index.html

[root@controller ~ 13:47:10]# echo web2.han.cloud > /usr/share/nginx/web2/index.html

[root@controller ~ 13:47:48]# systemctl restart nginx
#要加一下windows本地配置
客户端测试
# 配置名称解析,假设web服务器ip地址为10.1.8.10
[root@controller ~ 13:48:14]# curl http://web1.han.cloud/

10.1.8.10 web2.han.cloud

[root@controller ~ 13:49:36]# curl http://web1.han.cloud/
web1.han.cloud
[root@controller ~ 13:49:36]# curl http://web2.han.cloud/

web2.han.cloud
提示:清理环境,避免影响后续实验。很重要!!!!!
# mkdir /etc/nginx/conf.d/vhosts
# mv /etc/nginx/conf.d/vhost-name.conf /etc/nginx/conf.d/vhosts
根据 port
[root@www ~]# vim /etc/nginx/conf.d/vhost-port.conf
server {
    listen       8081;
    server_name  www.laoma.cloud;
    root         /usr/share/nginx/8081;
}
server {
    listen       8082;
    server_name  www.laoma.cloud;
    root         /usr/share/nginx/8082;
}
[root@controller ~ 14:12:40]# mkdir /usr/share/nginx/808{1,2}
[root@controller ~ 14:13:00]# echo 8081 > /usr/share/nginx/8081/index.html
[root@controller ~ 14:13:32]# echo 8082 > /usr/share/nginx/8082/index.html
[root@controller ~ 14:13:38]# systemctl restart nginx
客户端测试
# 配置名称解析,假设web服务器ip地址为10.1.8.10
10.1.8.10 www.han.cloud

# curl http://www.laoma.cloud:8081
8081
# curl http://www.laoma.cloud:8082
8082
提示:清理环境,避免影响后续实验。
配置 SSL/TLS
生成证书
#--1--生成私钥
[root@controller conf.d 14:53:30]# mkdir certs && cd certs
[root@controller certs 14:53:54]# openssl genrsa -out www.key 2048
Generating RSA private key, 2048 bit long modulus
..........................+++
............................................................................+++
e is 65537 (0x10001)

#--2--生成请求文件csr
[root@controller certs 14:56:42]# openssl req -new -key www.key -out www.csr -subj "/C=CN/ST=JS/L=NJ/O=LM/OU=DEVOPS/CN=www.laoma.cloud/emailAddress=webadmin@laoma.cloud"


# CN的值必须是网站域名

#--3--使用自己的私钥对请求文件签名,以生成证书
[root@controller certs 14:56:57]# openssl x509 -req -days 3650 -in www.csr -signkey www.key -out www.crt
Signature ok
subject=/C=CN/ST=JS/L=NJ/O=LM/OU=DEVOPS/CN=www.laoma.cloud/emailAddress=webadmin@laoma.cloud
Getting Private key
配置站点
[root@www certs]# mkdir /etc/nginx/conf.d/vhost-name.conf
[root@www certs]# mv www* /etc/nginx/conf.d/vhost-name.conf

# 参照默认配置修改
server {
    listen       443 ssl http2;
    listen       [::]:443 ssl http2;
    server_name  www.laoma.cloud;
    root         /usr/share/nginx/html;
    # 证书
    ssl_certificate "/etc/ssl/certs/www.laoma.cloud/www.crt";
    # 私钥
    ssl_certificate_key "/etc/ssl/certs/www.laoma.cloud/www.key";
}

[root@controller conf.d 15:09:18]# systemctl restart nginx
配置HTTP重定向到https
[root@controller conf.d 15:58:09]# vim /usr/share/nginx/html/auth-basic/index.html
server {
    listen       443 ssl http2;
    listen       [::]:443 ssl http2;
    server_name  www.laoma.cloud;
    root         /usr/share/nginx/html;
    # 证书
    ssl_certificate "/etc/ssl/certs/www.han.cloud/www.crt";
    # 私钥
    ssl_certificate_key "/etc/ssl/certs/www.han.cloud/www.key";
}

# 配置HTTP重定向到https
server {
    listen       80;
    listen       [::]:80;
    server_name  www.han.cloud;
    root         /usr/share/nginx/html;
    # 添加重定向
    return       301 https://$host$request_uri;
}
[root@controller conf.d 15:58:54]# systemctl restart nginx


# 测试
# curl http://www.han.cloud/
<html>
<head><title>301 Moved Permanently</title></head>
<body>
<center><h1>301 Moved Permanently</h1></center>
<hr><center>nginx/1.20.1</center>
</body>
</html>

# 使用-k指明目标站点不是一个安全站点
# curl -k https://www.han.cloud/

# 使用-L指明跟随重定向
# curl -Lk http://www.han.cloud/
申请免费的https证书
Let’s Encrypt 官方推荐使用 ACME 客户端获取证书,其中 Certbot 是最常用的工具,适配 Linux、Windows 等主流系统。
CentOS 7 系统
- 安装 Certbot
[root@controller conf.d 17:11:22]# yum install certbot -y
提示:certbot 依赖 epel仓库。
- 发起证书申请
执行以下命令启动手动 DNS 验证模式,将www.hmlei.cloud替换为你的域名:
[root@controller conf.d 17:13:15]# certbot certonly --manual --preferred-challenges dns -d www.hmlei.cn
若需申请泛域名证书(如*.laoma.cloud),可将域名参数改为-d *.laoma.cloud -d laoma.cloud。
[root@controller conf.d 17:14:47]# certbot certonly --manual --preferred-challenges dns -d hmlei.cloud -d *.hmlei.cn
提示:这里我采用第二种方式。
- 完成 DNS 验证
[root@controller conf.d 18:25:15]# certbot certonly --manual --preferred-challenges dns -d www.hmlei.cn --agree-tos --register-unsafely-without-email
Saving debug log to /var/log/letsencrypt/letsencrypt.log
Plugins selected: Authenticator manual, Installer None
Starting new HTTPS connection (1): acme-v02.api.letsencrypt.org
Requesting a certificate for www.hmlei.cn
Performing the following challenges:
dns-01 challenge for www.hmlei.cn

- - - - - - - - - - - - - - - - - - - - - - - - - - - - - - - - - - - - - - - -
Please deploy a DNS TXT record under the name
_acme-challenge.www.hmlei.cn with the following value:

A9MWJ6k_uojFVjanVywt6ilbwooI0Yy54OOw82G0IEM

Before continuing, verify the record is deployed.
- - - - - - - - - - - - - - - - - - - - - - - - - - - - - - - - - - - - - - - -
Press Enter to Continue
Waiting for verification...
Cleaning up challenges
Subscribe to the EFF mailing list (email: 3079507184@qq.com).
Starting new HTTPS connection (1): supporters.eff.org

IMPORTANT NOTES:
 - Congratulations! Your certificate and chain have been saved at:
   /etc/letsencrypt/live/www.hmlei.cn/fullchain.pem
   Your key file has been saved at:
   /etc/letsencrypt/live/www.hmlei.cn/privkey.pem
   Your certificate will expire on 2026-09-02. To obtain a new or
   tweaked version of this certificate in the future, simply run
   certbot again. To non-interactively renew *all* of your
   certificates, run "certbot renew"
 - If you like Certbot, please consider supporting our work by:

   Donating to ISRG / Let's Encrypt:   https://letsencrypt.org/donate
   Donating to EFF:                    https://eff.org/donate-le


# 这里不要按回车,等 TXT 记录配置完成后再按回车
# 这里不要按回车,等 TXT 记录配置完成后再按回车
# 这里不要按回车,等 TXT 记录配置完成后再按回车
登录域名服务商(如阿里云、腾讯云)的 DNS 控制台,添加对应的 TXT 记录。以下截图是阿里云控制台。
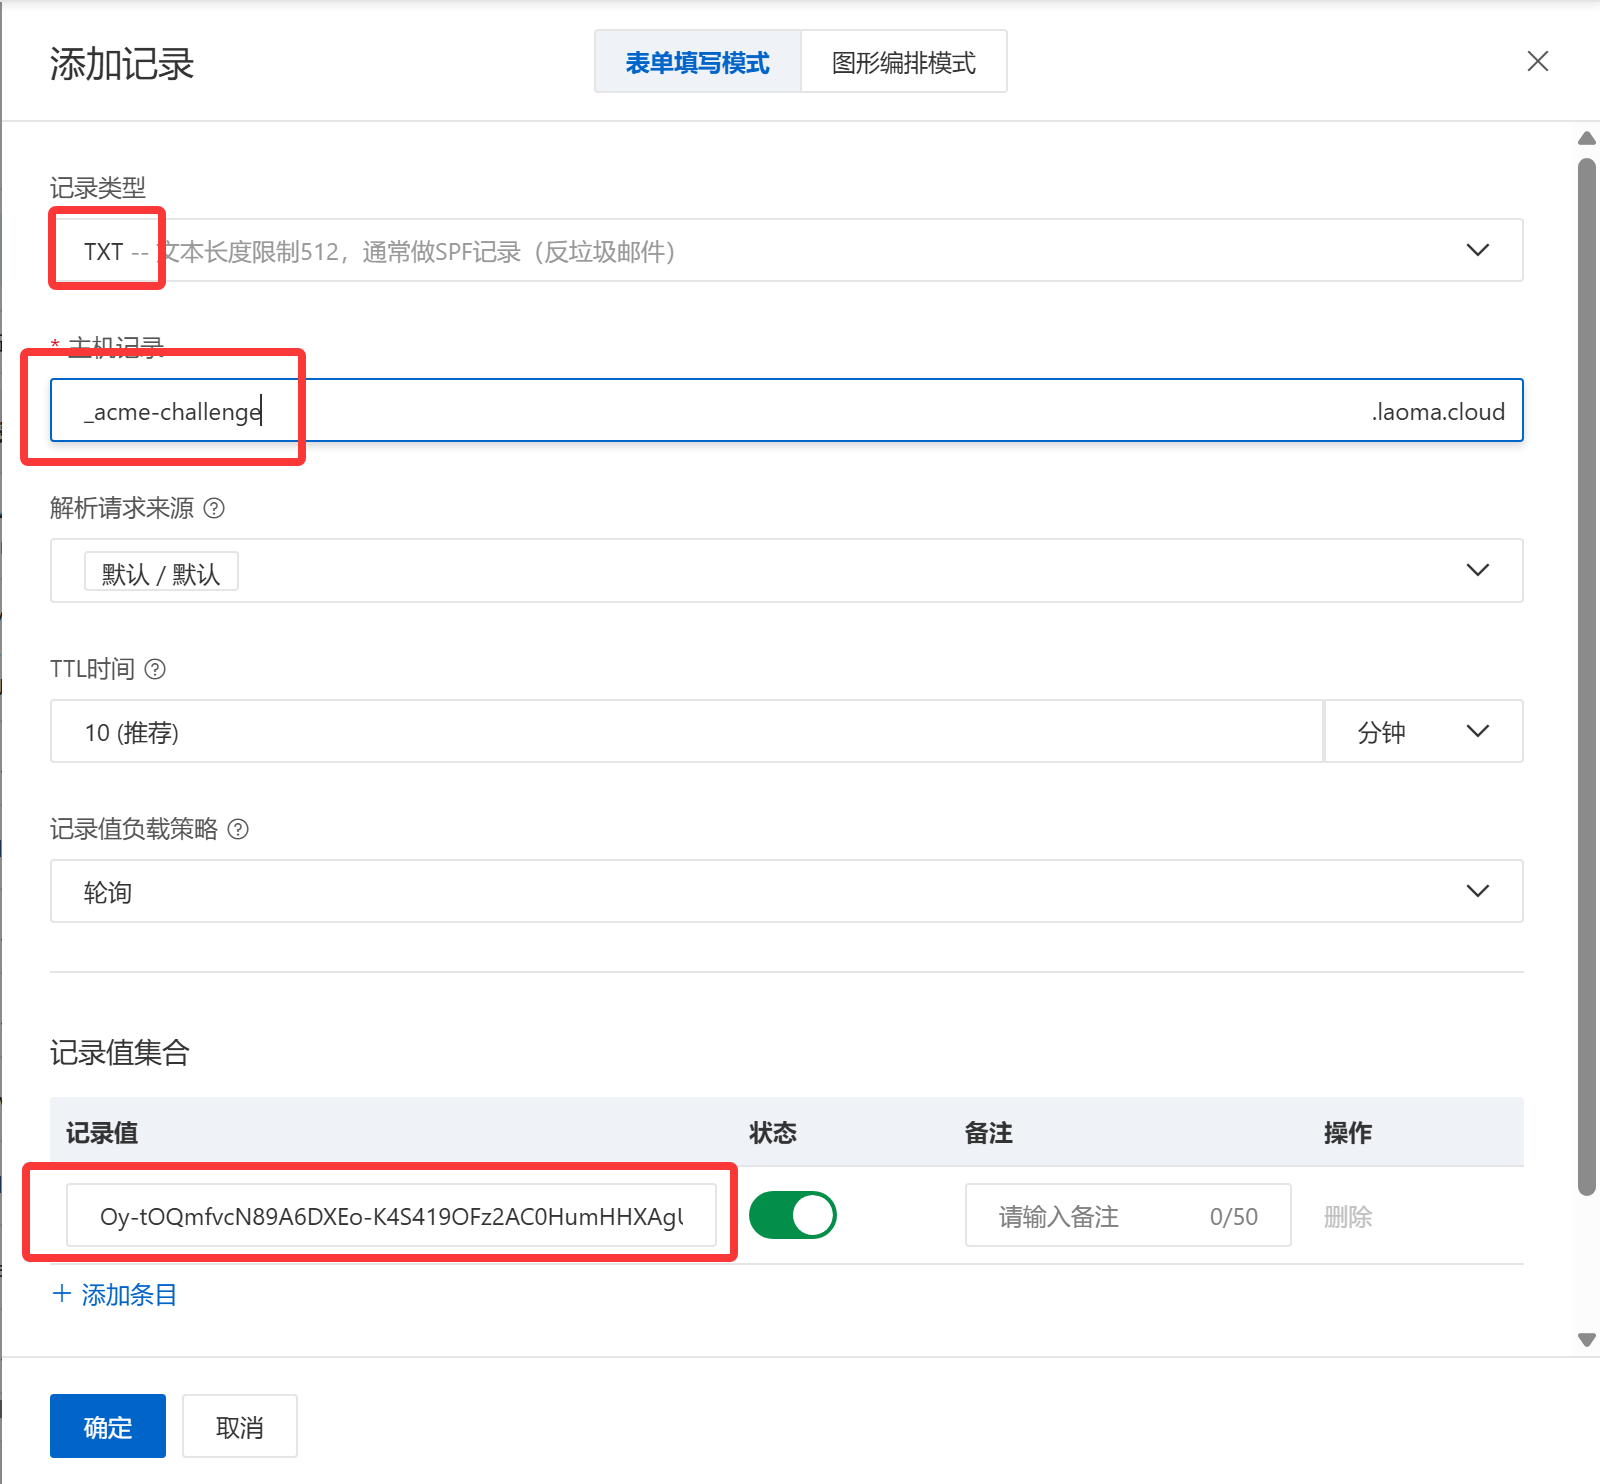
添加后需要等待一段时间,然后通过以下命令验证记录是否生效,直到能查到该记录,再按回车继续。
[root@linux ~]# nslookup -type=TXT _acme-challenge.laoma.cloud
Server:     223.5.5.5
Address:    223.5.5.5#53

Non-authoritative answer:
_acme-challenge.laoma.cloud text = "Oy-tOQmfvcN89A6DXEo-K4S419OFz2AC0HumHHXAgUU"

Authoritative answers can be found from:
- 根据提示,再次添加一个TXT记录。
Please deploy a DNS TXT record under the name
_acme-challenge.laoma.cloud with the following value:

F_wkFIItFwq0UUuIqSmFR2ZvonK8Hu5r-BdIm388-WE

Before continuing, verify the record is deployed.
(This must be set up in addition to the previous challenges; do not remove,
replace, or undo the previous challenge tasks yet. Note that you might be
asked to create multiple distinct TXT records with the same name. This is
permitted by DNS standards.)

- - - - - - - - - - - - - - - - - - - - - - - - - - - - - - - - - - - - - - - -
Press Enter to Continue
# 这里不要按回车,等 TXT 记录配置完成后再按回车
# 这里不要按回车,等 TXT 记录配置完成后再按回车
# 这里不要按回车,等 TXT 记录配置完成后再按回车
再次登录域名服务商(如阿里云、腾讯云)的 DNS 控制台,添加新的 TXT 记录。以下截图是阿里云控制台。
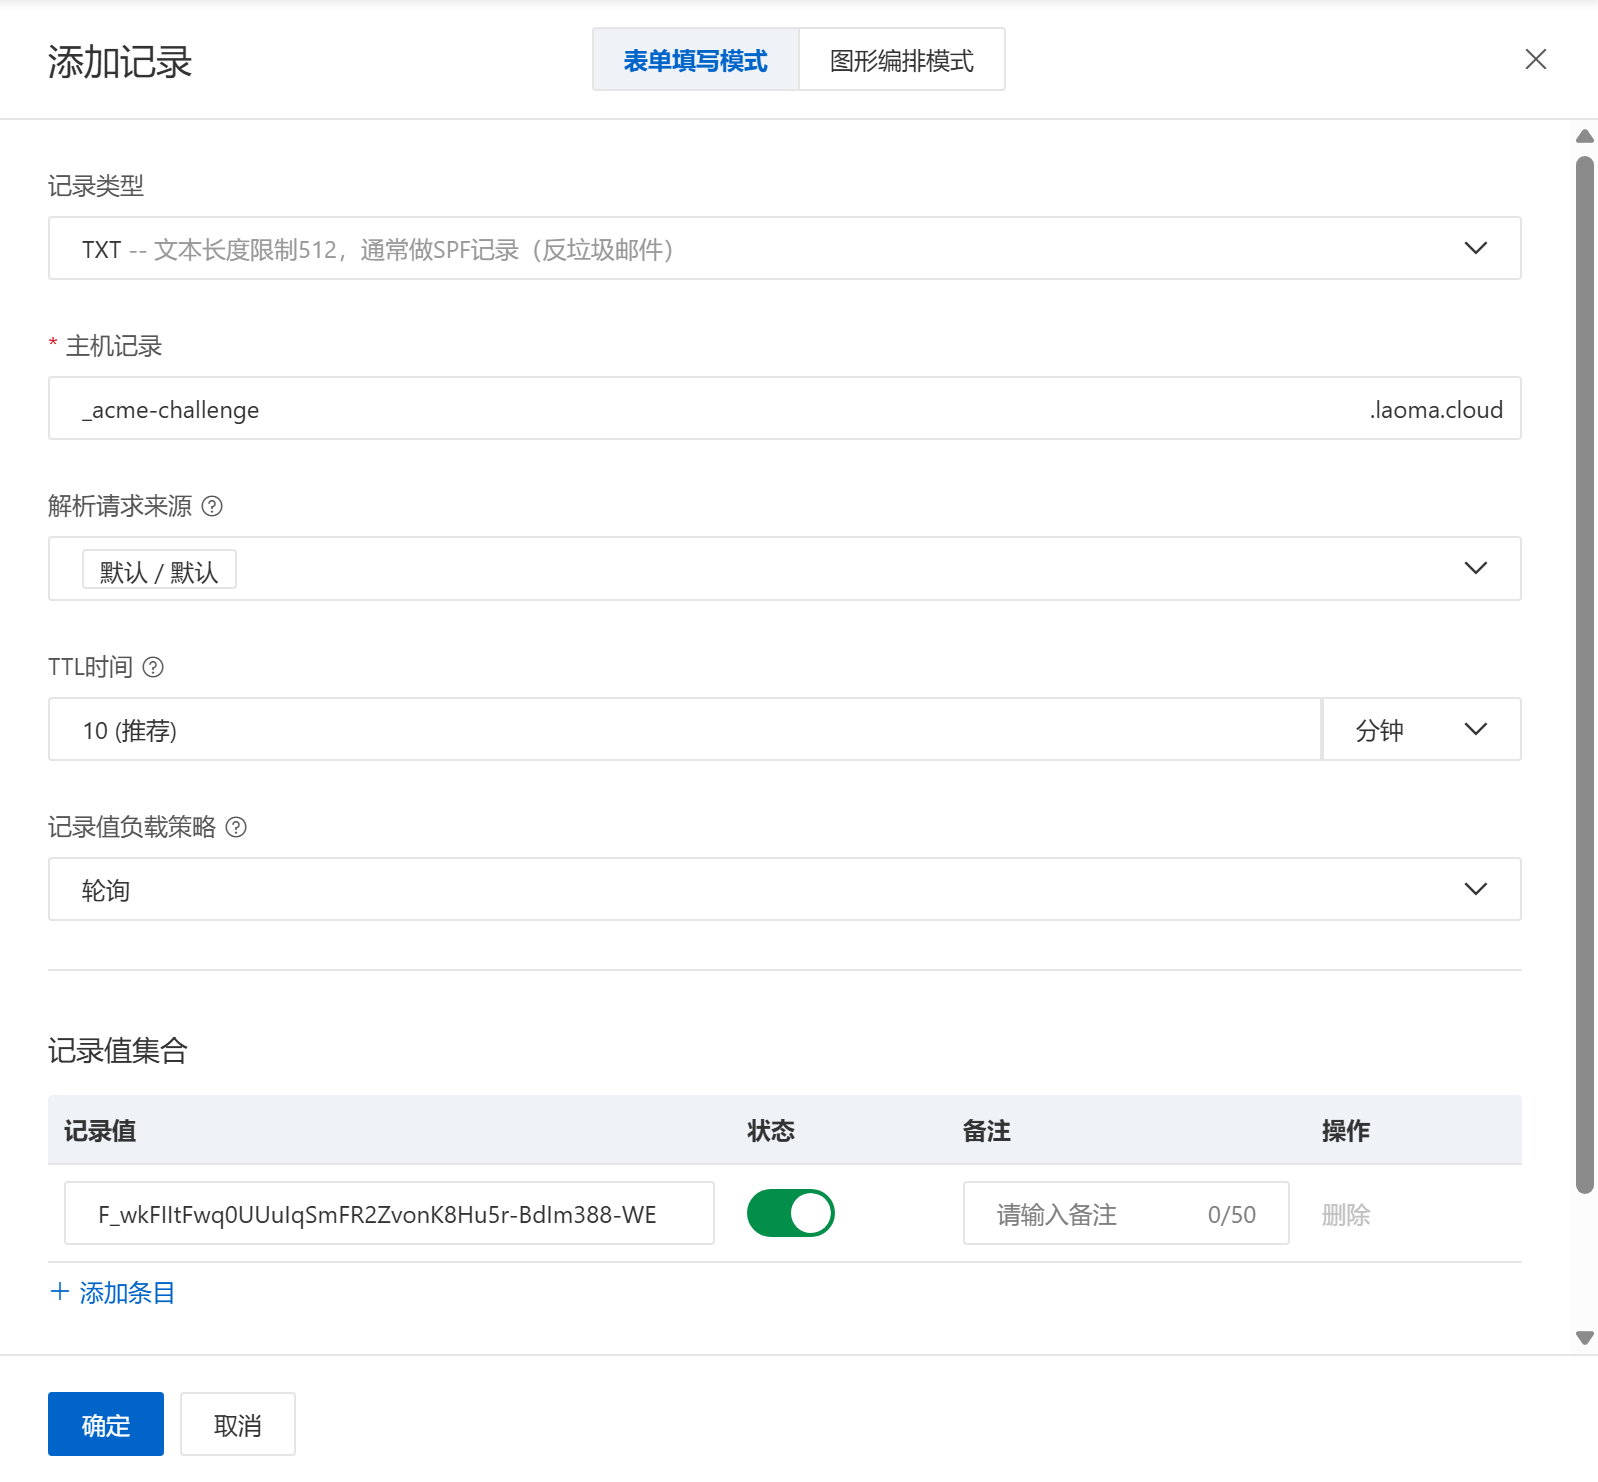
添加后需要等待一段时间,然后通过以下命令验证记录是否生效,直到能查到该记录,再按回车继续。
[root@controller ~ 18:28:32]# nslookup -type=TXT _acme-challenge.www.hmlei.cn 223.5.5.5
Server:		223.5.5.5
Address:	223.5.5.5#53

Non-authoritative answer:
_acme-challenge.www.hmlei.cn	text = "A9MWJ6k_uojFVjanVywt6ilbwooI0Yy54OOw82G0IEM"

Authoritative answers can be found from:
- 获取证书
Waiting for verification...
Resetting dropped connection: acme-v02.api.letsencrypt.org
Cleaning up challenges
Subscribe to the EFF mailing list (email: mage16196@163.com).
Starting new HTTPS connection (1): supporters.eff.org

IMPORTANT NOTES:
 - Congratulations! Your certificate and chain have been saved at:
   /etc/letsencrypt/live/www.hmlei.cn/fullchain.pem
   Your key file has been saved at:
   /etc/letsencrypt/live/www.hmlei.cn/privkey.pem
   Your certificate will expire on 2026-09-02. To obtain a new or
   tweaked version of this certificate in the future, simply run
   certbot again. To non-interactively renew *all* of your
   certificates, run "certbot renew"
 - If you like Certbot, please consider supporting our work by:

   Donating to ISRG / Let's Encrypt:   https://letsencrypt.org/donate
   Donating to EFF:                    https://eff.org/donate-le
验证通过后,证书会自动生成并存储在/etc/letsencrypt/live/你的域名/目录下,包含证书链文件fullchain.pem和私钥文件privkey.pem。
设置自动续期
Let’s Encrypt 证书有效期为 90 天,可通过定时任务实现自动续期。例如 Linux 系统中,添加 crontab 定时任务:
# 每天凌晨2点检查证书,到期自动续期
echo "0 2 * * * /usr/bin/certbot renew --quiet" | tee -a /etc/crontab
证书续期后,网站如何更新证书
推荐解决方案:
- 网站证书通过软连接指向生成的位置。(首选)
- 网站证书直接指向生成的位置。
- 配置监控脚本:证书发生变化后,复制到网站证书位置,并重启网站服务。

openEuler 是由开放原子开源基金会孵化的全场景开源操作系统项目,面向数字基础设施四大核心场景(服务器、云计算、边缘计算、嵌入式),全面支持 ARM、x86、RISC-V、loongArch、PowerPC、SW-64 等多样性计算架构
更多推荐

 2
2 0
0- 0


 已为社区贡献3条内容

所有评论(0)