Linux文件同步与软件包管理指南
从两台主机到一套仓库:Linux 文件同步与软件包管理指南
导读
文件在两台主机之间来回搬、软件在系统里反复装卸,是日常运维里最费手的两件事。承接前文网络管理与文件归档的内容,本文把「系统间传输文档」这条线走完,再从 rpm 的依赖报错自然过渡到 yum 仓库、源码编译与私有仓库。读完之后,你能用 scp / rsync 完成主机间文件搬运,用 rsync + sersync 搭出文件实时同步,用 rpm / yum 完成软件包的查询、验证、安装、降级、升级与事务回滚,并具备源码编译、自建仓库、同步仓库的完整能力。
内容导览
- 跨主机传输:scp 全量复制 → rsync 增量同步 → sersync 实时监控 → systemd 托管
- 软件包管理:rpm 包剖析 → rpm 命令 → yum 命令
一、跨主机传输:从全量复制到实时镜像
1.1 scp:基于 SSH 的安全复制
本节命令速查
命令 参数 说明 scp-r递归复制整个目录 scp[USER@]HOST:SRC DEST从远端拉取到本地 scpSRC [USER@]HOST:DEST从本地上传到远端 scp路径省略时 相对用户家目录(如 root@server:表示/root)
scp,全名 secure copy,也就是安全复制,基于 ssh 协议,也就是说 Linux 服务器要开启 sshd 服务。
# 【拉取】从远端复制单个文件到当前目录
[root@client ~]# scp root@server:/root/etc-20240726.tar .
etc-20240726.tar                    100%   30MB 188.5MB/s   00:00
[root@client ~]# ls etc*
etc-20240726.tar

# 【拉取】复制多个文件
[root@client ~]# scp root@server:/root/{etc-20240726.tar,etc.tar}  .
etc-20240726.tar                    100%   30MB 192.6MB/s   00:00
etc.tar                             100%   30MB 214.3MB/s   00:00

# 【拉取】复制目录,使用 -r 选项
[root@client ~]# scp root@server:/etc/selinux/  .
scp: /etc/selinux: not a regular file
[root@client ~]# scp -r root@server:/etc/selinux/  .
semanage.conf                       100% 2647     2.3MB/s   00:00
config                              100%  548   435.5KB/s   00:00
file_contexts                       100%  404KB 108.9MB/s   00:00
...

# 【上传】如果路径没有写,表示相对用户家目录。这里是上传到root用户家目录/root
[root@client ~]# scp etc.tar root@server:
etc.tar                             100%   30MB 185.9MB/s   00:00
[root@client ~]# scp etc.tar etc-20240726.tar root@server:
etc.tar                             100%   30MB 193.2MB/s   00:00
etc-20240726.tar                    100%   30MB 194.3MB/s   00:00
[root@client ~]# scp -r selinux/ root@server:
semanage.conf                       100% 2647     4.1MB/s   00:00
config                              100%  548   997.2KB/s   00:00
file_contexts                       100%  404KB 103.9MB/s   00:00
...
scp 命令缺点:不管目的位置是否有文件,总是再复制一次,可以理解为全量备份。缺少比对功能。
1.2 rsync:只同步变化的部分
本节命令速查
语法
rsync [OPTION]… SRC DEST
rsync [OPTION]… SRC [USER@]HOST:DEST
rsync [OPTION]… [USER@]HOST:SRC DEST
常用选项
参数 说明 -n空运行(dry run),显示结果但不做任何改变 -v显示执行过程详细输出 -aarchive mode,等价于 -r -l -p -t -g -o -D-r递归同步整个文件夹 -l同步软连接 -p保留权限 -t保留时间戳 -g保留所属组 -o保留所有者 -D同步设备文件 --delete同步删除 DEST 中已不存在于 SRC 的文件 -A同步时保留 ACLs 内容 -X同步时保留 selinux 内容( -a不同步 acl/selinux 内容)--password-file=FILE指定密码文件(配合 rsync 服务端) 其他命令
命令 说明 yum install -y rsync安装 rsync(客户端与服务端都需安装) mkdir准备测试目录 touch创建/更新测试文件时间戳 rm -f删除测试文件
Rsync(Remote Synchronize)是一款开源的、快速的、多功能的、远程数据同步备份工具,并且支持多种操作系统平台运行。
Rsync具有本地与远程两台主机之间的数据快速复制同步镜像、远程备份等功能,该功能类似scp,但是优于scp功能,还具有本地不同分区目录之间全量及增量复制数据。
Rsync同步数据镜像时,通过“quick check”算法,仅同步大小或最后修改时间发生变化的文件或目录,当然也可以根据权限,属主等属性变化的同步,所以可以实现快速同步。
前提:客户端和服务端都要提前安装好 rsync 软件包。
# 【安装】安装 rsync
[root@centos7 ~]# yum install -y rsync
语法:
rsync [OPTION]… SRC DEST
rsync [OPTION]… SRC [USER@]HOST:DEST
rsync [OPTION]… [USER@]HOST:SRC DEST
常用选项:
- -n 参数执行空运行,与真实执行显示结果一致,但是没有做任何改变。
- -v 显示执行过程中详细输出。
- -a 代表“archive mode”,同时启用参数:-r -l -p -t -g -o -D
- -r 递归同步整个文件夹
- -l 同步软连接
- -p 保留权限
- -t 保留时间戳
- -g 保留所属组
- -o 保留所有者
- -D 同步设备文件
说明:
- -A,同步时保留ACLs内容。
- -X 同步时保留selinux内容。-a,不同步acl selinux内容。
# 【准备】准备文件
[root@client ~]# mkdir Pictures
[root@client ~]# touch Pictures/snap{1..5}.jpg

# 【同步】首次同步
[root@client ~]# rsync -av Pictures root@server:
sending incremental file list
Pictures/
Pictures/snap1.jpg
Pictures/snap2.jpg
Pictures/snap3.jpg
Pictures/snap4.jpg
Pictures/snap5.jpg

sent 351 bytes  received 115 bytes  932.00 bytes/sec
total size is 0  speedup is 0.00

# 【同步】再次同步
[root@client ~]# rsync -av Pictures root@server:
sending incremental file list

sent 153 bytes  received 17 bytes  340.00 bytes/sec
total size is 0  speedup is 0.00

# 【同步】更新部分文件时间戳,再同步
[root@client ~]# touch Pictures/snap{1,2}*
[root@client ~]# rsync -av Pictures root@server:
sending incremental file list
Pictures/snap1.jpg
Pictures/snap2.jpg

sent 237 bytes  received 55 bytes  194.67 bytes/sec
total size is 0  speedup is 0.00

# 【同步】删除 SRC 中文件,默认不会同步删除DEST中文件
[root@client ~]# rm -f Pictures/snap5.jpg
[root@client ~]# rsync -av Pictures root@server:
sending incremental file list
Pictures/

sent 145 bytes  received 20 bytes  330.00 bytes/sec
total size is 0  speedup is 0.00

# 【同步】使用选项 --delete 同步删除 DEST 中文件
[root@client ~]# rsync -av Pictures root@server: --delete
sending incremental file list
deleting Pictures/snap5.jpg

sent 146 bytes  received 39 bytes  370.00 bytes/sec
total size is 0  speedup is 0.00
将目标文件拉取到本地,操作过程一致。
同步注意事项:
- 文件访问时间等属性、读写等权限、文件内容等有任何变动,都会被认为修改。
- 目标目录下如果文件比源目录还新,则不会同步。
- 源路径的最后是否有斜杠有不同的含义:
- 有斜杠,只是复制目录中的文件。
- 没有斜杠的话,不但要复制目录中的文件,还要复制目录本身。
1.3 实时同步方案:rsync 服务端部署与传输测试
本节命令速查
服务端(backup)
命令 参数 说明 yum install-y rsync安装 rsync 软件包 mkdir-m 777 /backup创建同步目录并直接设定权限为 777 vim/etc/rsyncd.conf编辑 rsync 服务端配置文件 echo'rsync:redhat' > /etc/rsyncd.secrets创建用户凭据文件 chmod400 /etc/rsyncd.secrets凭据文件仅属主可读 systemctlenable rsyncd --now设置开机自启并立即启动 rsyncd 客户端(webapp)
命令 参数 说明 echo/chmodredhat > rsyncd.secrets/400准备本地密码文件 rsync-av --password-file=./rsyncd.secrets SRC rsync@backup::backup指定密码文件同步到服务端模块 ls/backup/服务端验证同步结果 rsyncd.conf 关键配置项
配置项 值 说明 uid/gidroot/root运行 rsync 服务的用户和组 [backup]模块名 自定义模块名称 commentbackup for webapp描述信息 path/backup备份路径 read onlyno设置可写 auth usersrsync指定验证用户名 secrets file/etc/rsyncd.secrets指定用户密码文件
实时监控 webapp.wjq.cloud 主机中文件变化,并同步到 backup.wjq.cloud。
- Sersync:负责监控数据目录变化,并调用rsync进行同步,部署在webapp端。
- Rsync:提供备份服务,部署在backup端。
10.1.8.10 webapp.wjq.cloud webapp
10.1.8.11 backup.wjq.cloud backup
backup 端:安装软件包
[root@backup ~]# yum install -y rsync
backup 端:配置 rsync
本次使用验证用户同步。
# 准备同步目录,该目录任何用户都可以读写。
[root@backup ~]# mkdir -m 777 /backup

# 配置rsync,不验证用户,直接同步
[root@backup ~]# vim /etc/rsyncd.conf
# 设置uid和gid,指定运行rsync服务的用户和组
uid=root
gid=root

......
# 添加如下配置
[backup]
# 描述信息
comment = backup for webapp

# 备份路径
path = /backup

# 设置可写
read only = no

# 指定用户名
auth users = rsync

# 指定用户密码文件
secrets file = /etc/rsyncd.secrets
更多 rsyncd.conf 配置参考 rsyncd.conf(5)。
# 【服务端】创建用户凭据文件
[root@backup ~]# echo 'rsync:redhat' > /etc/rsyncd.secrets
[root@backup ~]# chmod 400 /etc/rsyncd.secrets

# 【服务端】启用并启动rsyncd服务
[root@backup ~]# systemctl enable rsyncd --now
webapp 端:客户端配置和测试
# 【客户端】准备密码文件
[root@webapp ~]# echo redhat > rsyncd.secrets
[root@webapp ~]# chmod 400 rsyncd.secrets

# 【客户端】传输测试
[root@webapp ~]# rsync -av --password-file=./rsyncd.secrets /etc/hostname rsync@backup::backup
sending incremental file list
hostname

sent 107 bytes  received 35 bytes  284.00 bytes/sec
total size is 17  speedup is 0.12
# 最后一个backup,是代表服务端的[backup]备份块。

# 【服务端】验证结果
[root@backup ~]# ls /backup/
hostname
1.4 webapp 端:sersync 安装与配置
本节命令速查
命令 参数 说明 wgethttp://.../sersync2.5.4_64bit_binary_stable_final.tar.gz下载 sersync 软件包 tar-xf sersync2.5.4_64bit_binary_stable_final.tar.gz解压软件包 lsGNU-Linux-x86/查看解压后的程序与配置文件 catGNU-Linux-x86/confxml.xml查看默认配置文件内容 vimconfxml.xml编辑自定义配置文件 confxml.xml 关键配置项
标签 / 属性 值 说明 <debug start>false是否开启 debug 模式 <fileSystem xfs>truexfs 文件系统需设为 true 才能同步 <filter start>true开启过滤器,按 exclude 正则过滤不同步的文件 <exclude expression>^cache/*排除缓存目录 <inotify>各事件delete/createFolder/closeWrite/moveFrom/moveTo视为文件改变的事件 <localpath watch>/app_data指定要监控(即同步)的本地目录 <remote ip name>10.1.8.11/backup同步到远程的 IP 与 rsync 模块名 <commonParams params>-azP手动执行 rsync 时要带的公共参数 <auth start users passwordfile>true/rsync//root/rsyncd.secrets认证开关、用户名、密码文件 <userDefinedPort start port>false/873非默认端口时指定 <ssh start>false是否使用 ssh 方式传输 <failLog path timeToExecute>/tmp/rsync_fail_log.sh/60失败重传日志与执行间隔 <crontab start schedule>false/600定期整体同步(单位 min)
Sersync 服务介绍
sersync 使用c++编写,类似于inotify,同样用于监控,但它克服了inotify的缺点。
inotify 最大的不足是会产生重复事件,或者同一个目录下多个文件的操作会产生多个事件,例如,当监控目录中有5个文件时,删除目录时会产生6个监控事件,从而导致重复调用rsync命令。比如:vim文件时,inotify会监控到临时文件的事件,但这些事件相对于rsync来说是不应该被监控的。
sersync 优点:
- sersync 同步效率更高,它会对linux系统文件系统产生的临时文件和重复的文件操作进行过滤,节省了运行时耗和网络资源。
- sersync配置很简单,其中提供了静态编译好的二进制文件和xml配置文件,直接使用即可。
- sersync使用多线程进行同步,尤其在同步较大文件时,能够保证多个服务器实时保持同步状态。
- sersync有出错处理机制,通过失败队列对出错的文件重新同步,如果仍旧失败,则按设定时长对同步失败的文件重新同步。
- sersync自带crontab功能,只需在xml配置文件中开启,按要求隔一段时间整体同步一次。
- sersync 可以二次开发。
sersync项目地址:https://code.google.com/archive/p/sersync/
sersync下载地址:https://code.google.com/archive/p/sersync/downloads
安装软件包
# 【安装】下载软件
[root@webapp ~]# wget http://192.168.49.200/class/course-materials/softwares/stage01/sersync2.5.4_64bit_binary_stable_final.tar.gz

# 【安装】解压文件
[root@webapp ~]# tar -xf sersync2.5.4_64bit_binary_stable_final.tar.gz
[root@webapp ~]# ls GNU-Linux-x86/
confxml.xml  sersync2
文件说明:
- sersync2,是二进制程序。
- confxml.xml,是sersync2程序的配置文件。
配置文件说明
[root@webapp ~]# cat GNU-Linux-x86/confxml.xml
<?xml version="1.0" encoding="ISO-8859-1"?>
<head version="2.5">
    <!-- hostip与port是针对插件的保留字段,对于同步功能没有任何作用,保留默认即可。  -->
    <host hostip="localhost" port="8008"></host>

    <!-- 是否开启debug模式 -->
    <debug start="false"/>

    <!-- 如果是xfs文件系统,则需要设置为true才能同步,rehat/REEL/CentOS/Fedora新版本默认都是xfs文件系统,可使用df -Th命令查看 -->
    <fileSystem xfs="true"/>

    <!-- 过滤器,设置为true则会对里面的exclude对应的正则匹配到的文件进行过滤,即不同步 -->
    <filter start="true">
        <!-- <exclude expression="(.*)\.svn"></exclude> -->
        <!-- <exclude expression="(.*)\.gz"></exclude> -->
        <!-- <exclude expression="^info/*"></exclude> -->
        <!-- <exclude expression="^static/*"></exclude> -->
        <exclude expression="^cache/*"></exclude>
    </filter>

    <!-- inotify是linux的内核功能,这里用于设置创建/删除/修改/移动文件时,是否视为文件改变(进而进行同步) -->
    <inotify>
        <!-- 删除一个文件是否视为文件改变(很明显我们要设置为true) -->
        <delete start="false"/>
        <!-- 创建一个文件夹是否视为文件改变(很明显我们要设置为true) -->
        <createFolder start="true"/>
        <!-- 创建一个文件是否触发文件改变事件(这里要设置false,因为创建一个文件除了有createFile事件还会有closeWrite事件,我们只要把closeWrite事件设置为true即可监控到创建          一个文件) -->
        <createFile start="false"/>
        <!-- 创建文件或修改文件后再关闭会触发该事件,比如vim打开一个文件,修改后用(:wq)保存,则会触发该事件,当然创建新文件一样会触发 -->
        <closeWrite start="true"/>
        <!-- 从别的地方移到被监控目录是否视为文件改变,毫无疑问要设置为true -->
        <moveFrom start="true"/>
        <!-- 被监控目录中的某个文件被移动到其他地方算不算文件改变?毫无疑问要设置为true -->
        <moveTo start="true"/>
        <!-- 文件属性改变了,是否视为文件改变?这个我们可以认为文件没有改,所以设置false -->
        <attrib start="false"/>
        <!-- 文件内容被修改了是否视为文件改变?感觉文件改变肯定要设置为true,但其实不用,因为这个改变有可能是vim(:w)保存,还没有关闭文件,所以保存的时候没必要同步,而关闭的时候会触发closeWrite,所以修改的文件也是通过closeWrite来同步的 -->
        <modify start="false"/>
    </inotify>

    <!-- servsync的模块 -->
    <sersync>
        <!-- 指定要监控(即同步)的本地目录 -->
        <localpath watch="/data">
            <!-- ip指定同步到远程的哪个服务器,name填写远程服务器中rsync配置文件中的自定义模块名称(即中括号括起来的那个名称) -->
            <remote ip="10.1.8.10" name="wjq"/>
            <!-- 如果你要同步到多台服务器,继续填写即可,每个服务器一个remote标签 -->
            <!--<remote ip="192.168.8.40" name="tongbu"/>-->
        </localpath>

        <!-- rsync模块配置 -->
        <rsync>
            <!-- 公共参数,即我们手动执行rsync的时候要带的选项就填在这里,servsync会自动组装 -->
            <commonParams params="-azP"/>
            <!-- 密码文件及指定用户名(用户名就是rsync服务器端配置文件中的"auth user =" 指定的用户名) -->
            <auth start="true" users="rsync" passwordfile="/etc/rsyncd.secrets"/>
            <!-- 如果你rsync服务器不是默认端口873,那么就要在这里指定具体的端口,当然是默认的你也可以指定一下 -->
            <userDefinedPort start="false" port="873"/>
            <!-- rsync超时时间 -->
            <timeout start="false" time="100"/><!-- timeout=100 -->
            <!-- 是否使用ssh方式传输 -->
            <ssh start="false"/>
        </rsync>
        <!-- 对于失败的传输,会进行重新传送,再次失败就会写入rsync_fail_log,然后每隔一段时间(timeToExecute进行设置,单位sec)执行该脚本再次重新传送,然后清空该脚本。可以          通过path来设置日志路径。 -->
        <failLog path="/tmp/rsync_fail_log.sh" timeToExecute="60"/><!--default every 60mins execute once-->

        <!-- 定期整体同步功能,schedule表示crontab执行间隔,单位是min -->
        <crontab start="false" schedule="600"><!--600mins-->
            <!-- 同步过滤器,要开启请把start设置为true,用于 整体同步时,排除一些文件或目录,比如缓存目录可以不需要同步 -->
            <crontabfilter start="false">
                <exclude expression="*.php"></exclude>
                <exclude expression="info/*"></exclude>
            </crontabfilter>
        </crontab>
        <!-- 同步完成后,执行一个插件,name表示执行哪些插件,而这个插件必须在后边用plugin标签定义 -->
        <plugin start="false" name="command"/>
    </sersync>

    <!-- 定义一个command插件(command插件类型的一种,另外的类型有socket,refreshCDN,http(目前由于兼容性问题,http插件暂时不能用)) -->
    <plugin name="command">
        <!-- command插件其实就是“.sh”结尾的shell脚本文件,prefix和subffix用于拼成一条执行shell命令的命令 -->
        <param prefix="/bin/sh" suffix="" ignoreError="true"/>  <!--prefix /data/wwwroot/mmm.sh suffix-->
        <!-- 该脚本做操作时要过滤的文件正则 -->
        <filter start="false">
            <include expression="(.*)\.php"/>
            <include expression="(.*)\.sh"/>
        </filter>
    </plugin>

    <!-- 定义一个socket插件,注意插件定义了但没有调用的话,是不会被执行的 -->
    <plugin name="socket">
        <localpath watch="/data">
            <deshost ip="192.168.138.20" port="8009"/>
        </localpath>
    </plugin>

    <!-- 定义一个refreshCDN插件,主要用于同步数据到cdn -->
    <plugin name="refreshCDN">
        <localpath watch="/data0/htdocs/cms.xoyo.com/site/">
            <cdninfo domainname="ccms.chinacache.com" port="80" username="xxxx" passwd="xxxx"/>
            <sendurl base="http://pic.xoyo.com/cms"/>
            <regexurl regex="false" match="cms.xoyo.com/site([/a-zA-Z0-9]*).xoyo.com/images"/>
        </localpath>
    </plugin>
</head>
配置文件示例
本例使用的示例文件。
[root@webapp ~]# vim confxml.xml
<?xml version="1.0" encoding="ISO-8859-1"?>
<head version="2.5">
    <host hostip="localhost" port="8008"></host>
    <debug start="false"/>
    <fileSystem xfs="true"/>
    <filter start="true">
        <exclude expression="^cache/*"></exclude>
    </filter>
    <inotify>
        <delete start="true"/>
        <createFolder start="true"/>
        <createFile start="false"/>
        <closeWrite start="true"/>
        <moveFrom start="true"/>
        <moveTo start="true"/>
        <attrib start="true"/>
        <modify start="true"/>
    </inotify>
    <sersync>
        <localpath watch="/app_data">
            <remote ip="10.1.8.11" name="backup"/>
        </localpath>
        <rsync>
            <commonParams params="-azP"/>
            <auth start="true" users="rsync" passwordfile="/root/rsyncd.secrets"/>
            <userDefinedPort start="false" port="873"/>
            <timeout start="false" time="100"/>
            <ssh start="false"/>
        </rsync>
        <failLog path="/tmp/rsync_fail_log.sh" timeToExecute="60"/>
        <crontab start="false" schedule="600"><!--600mins-->
            <crontabfilter start="false">
                <exclude expression="*.php"></exclude>
                <exclude expression="info/*"></exclude>
            </crontabfilter>
        </crontab>
        <plugin start="false" name="command"/>
    </sersync>
    <plugin name="command">
        <param prefix="/bin/sh" suffix="" ignoreError="true"/>
        <filter start="false">
            <include expression="(.*)\.php"/>
            <include expression="(.*)\.sh"/>
        </filter>
    </plugin>
</head>
1.5 sersync 运行、测试与 systemd 托管
本节命令速查
命令 参数 说明 mkdir/app_data准备同步目录 cpGNU-Linux-x86/sersync2 /usr/local/bin/复制程序到 $PATH中sersync2-h查看帮助(参数说明见下方输出) sersync2-o ./confxml.xml -d指定配置文件并以守护进程模式启动 sersync2-r监控前先用 rsync 推送一遍监控目录 sersync2-n指定开启守护线程的数量,默认 10 个 sersync2-m单独启用其他模块(如 -m refreshCDN/-m socket/-m http)watch-n 1 tree /backup服务端每秒刷新查看同步结果 echo/mkdir/rm -fr/app_data客户端制造文件变化以测试同步( rm -fr删除同步目录全部内容)cpconfxml.xml /etc/sersyncd.conf配置文件放入 /etc供服务引用vim/etc/systemd/system/sersyncd.service编写 systemd 单元文件 systemctldaemon-reload/enable sersyncd.service重载配置并设置开机自启 sersync2 参数说明
参数 说明 -d启用守护进程模式 -r在监控前,将监控目录与远程主机用 rsync 命令推送一遍 -n指定开启守护线程的数量,默认为 10 个 -o指定配置文件,默认使用 confxml.xml 文件 -m单独启用其他模块,如 -m refreshCDN/-m socket/-m http不加 -m默认执行同步程序
运行 Sersync
# 【准备】准备同步目录
[root@webapp ~]# mkdir /app_data

# 【安装】复制程序到$PATH中
[root@webapp ~]# cp GNU-Linux-x86/sersync2 /usr/local/bin/

[root@webapp ~]# sersync2 -h
set the system param
execute:echo 50000000 > /proc/sys/fs/inotify/max_user_watches
execute:echo 327679 > /proc/sys/fs/inotify/max_queued_events
parse the command param
_______________________________________________________
参数-d:启用守护进程模式
参数-r:在监控前,将监控目录与远程主机用rsync命令推送一遍
参数-n: 指定开启守护线程的数量,默认为10个
参数-o:指定配置文件,默认使用confxml.xml文件
参数-m:单独启用其他模块,使用 -m refreshCDN 开启刷新CDN模块
参数-m:单独启用其他模块,使用 -m socket 开启socket模块
参数-m:单独启用其他模块,使用 -m http 开启http模块
不加-m参数,则默认执行同步程序________________________________________________________________

# 【启动】运行 Sersync
[root@webapp ~]# sersync2 -o ./confxml.xml -d
set the system param
execute:echo 50000000 > /proc/sys/fs/inotify/max_user_watches
execute:echo 327679 > /proc/sys/fs/inotify/max_queued_events
parse the command param
option: -o 	config xml name:  confxml.xml
option: -d 	run as a daemon
daemon thread num: 10
parse xml config file
host ip : localhost	host port: 8008
now the filter work ,if you set the crontab,you have to set crontab filter
WARNING XFS FILE SYSTEM WORK
daemon start,sersync run behind the console
use rsync password-file :
user is	rsync
passwordfile is 	/root/rsyncd.secrets
config xml parse success
please set /etc/rsyncd.conf max connections=0 Manually
sersync working thread 12  = 1(primary thread) + 1(fail retry thread) + 10(daemon sub threads)
Max threads numbers is: 22 = 12(Thread pool nums) + 10(Sub threads)
please according your cpu ,use -n param to adjust the cpu rate
run the sersync:
watch path is: /app_data
测试
# 【服务端】监控目录 /backup
[root@backup ~]# watch -n 1 tree /backup

# 【客户端】创建文件和目录
[root@webapp ~]# echo hello world > /app_data/welcome.txt
[root@webapp ~]# mkdir /app_data/dbdata

# 【客户端】删除文件
[root@webapp ~]# rm -fr /app_data/*
配置 systemd 管理 Sersync
[root@webapp ~]# cp confxml.xml /etc/sersyncd.conf
[root@webapp ~]# vim /etc/systemd/system/sersyncd.service
[Unit]
Description=SerSync server daemon

[Service]
Type=forking
ExecStart=/usr/local/bin/sersync2 -o /etc/sersyncd.conf -d

[Install]
WantedBy=multi-user.target

[root@webapp ~]# systemctl daemon-reload
[root@webapp ~]# systemctl enable sersyncd.service
二、软件包管理:从单个 rpm 到自建 yum 仓库
2.1 认识 rpm 包:发行版谱系、命名格式与包内结构
本节命令速查
命令 参数 说明 df-Th查看文件系统类型(判断是否 xfs)
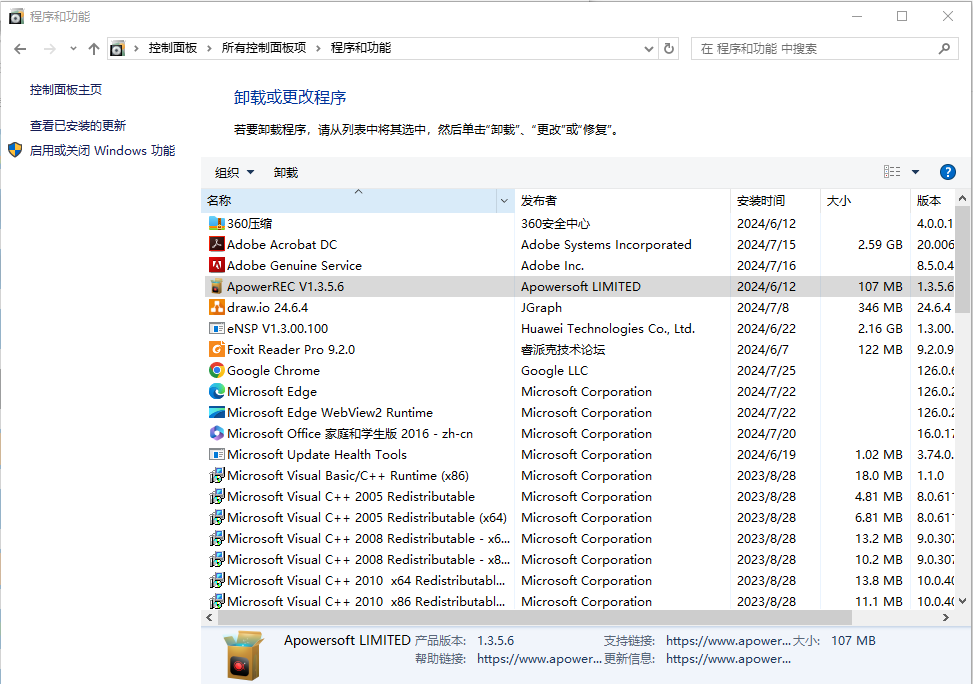
软件包管理并非 Linux 独有,先看 Windows 中的两种形态。
-
控制面板中程序和功能。通过安装,将信息注册到系统中。
-
用户下载的绿色软件:直接运行。例如U盘启动盘工具rufus。
软件包来源:应用商城,第三方官方网站(qq、微信)。
Linux 发行版本
-
以 RHEL 为代表的发行版本,使用rpm包管理系统:
- RHEL (Red Hat Enterprise Linux)
- Fedora(由原来的RedHat桌面版本发展而来,免费版本)
- CentOS(RHEL的社区克隆版本,免费)
- CentOS Stream(RHEL的社区克隆版本,免费)
- Rocky(RHEL的社区克隆版本,免费)
- OEL(Oralce Enterprise Linux)
-
以 Debian 为代表的发行版本,使用deb包管理系统:
-
Debian,社区Linux的典范,迄今为止最遵循GNU规范的Linux系统。
-
Ubuntu,Debian衍生版,是一个以桌面应用为主的Linux操作系统。
-
Kali Linux,Debian衍生版,旨在渗透测试和数字取证。
-
-
其他版本:ArchLinux Gentoo 等等…

RPM 包文件名格式
redhat 开发了 rpm 包管理,提供一个标准的软件版本管理方法,比从归档包解压文件到系统简单多了。CentOS 提供的所有软件都是rpm格式。
RPM软件包文件名格式:name-version-release.architecture.rpm
示例:lrzsz-0.12.20-36.el7.x86_64.rpm
- name,是描述其内容的一个或多个词语(lrzsz)。
- version,是原始软件的版本号(0.12.20)。
- release,是基于该版本的发行版号,由软件打包商设置,后者不一定是原始软件开发商(36.el7)。
- architecture,是编译的软件包运行的处理器架构。
- noarch,表示此软件包不限定架构。
- x86_64,表示此软件包限定x86 64位。
- aarch64,表示此软件包限定ARM 64位。
RPM 包组成
每个rpm包涵三个部分:
- 需要安装的文件。
- 包的元数据信息,包括包的名称、版本、架构等;软件包说明;软件包依赖关系;许可证;更变日志;其他信息。
- 脚本:软件包安装,更新,卸载需要执行的脚本。
通常,软件提供商使用GPG密钥对RPM软件包进行数字签名(Red Hat会对其发布的所有软件包进行数字签名)。 RPM系统通过确认包由相应的GPG密钥签名来验证包的完整性。 如果GPG签名不匹配,RPM系统拒绝安装包。
非对称加密
非对称加密:有一对公钥和私钥。
- 公钥:分享给别人,用来加密数据。
- 私钥:自己保留,用来解密公钥加密的数据。
Linux中rpm包会被私钥签名,客户端使用公钥验证签名,确保文件的完整性。
RPM 包安装和更新
- 如果同一个软件有多个版本,只需安装最高版本。
- 在大多数情况下,一个软件只能安装一个版本。 kernel是个例外。如果构建包的文件名没有冲突,则可以安装多个版本。 由于只能通过引导到该内核来测试新内核,因此特定设计了包,以便可以一次安装多个版本。如果内核无法启动,则旧内核仍然可用且可引导。
- 软件包升级只需要安装最新版本,不需要逐步升级。
- 升级RPM包将删除旧版本的软件包并安装新版本,通常会保留配置文件。
2.2 rpm 命令:查询、验证、安装与解包
2.2.1 查询(重点)
本节命令速查
基本语法
rpm {-q|--query} [select-options] [query-options]

   select-options
        [PACKAGE_NAME] [-a,--all] [-f,--file FILE]
        [-g,--group GROUP] {-p,--package PACKAGE_FILE}
        [--hdrid SHA1] [--pkgid MD5] [--tid TID]
        [--querybynumber HDRNUM] [--triggeredby PACKAGE_NAME]
        [--whatprovides CAPABILITY] [--whatrequires CAPABILITY]

   query-options
        [--changelog] [-c,--configfiles] [--conflicts]
        [-d,--docfiles] [--dump] [--filesbypkg] [-i,--info]
        [--last] [-l,--list] [--obsoletes] [--provides]
        [--qf,--queryformat QUERYFMT] [-R,--requires]
        [--scripts] [-s,--state] [--triggers,--triggerscripts]
命令与参数说明
命令 参数 说明 rpm-qa/-q -a查询系统中安装了哪些软件包 rpm-q PACKAGE_NAME查询某个软件包是否安装 rpm-q NAME -i/--info查看已安装软件包的元数据信息 rpm-q NAME -l/--list列出包内包含哪些文件 rpm-q NAME -c/--configfiles列出包内包含哪些配置文件 rpm-q NAME -d/--docfiles列出包内包含哪些文档文件 rpm-q -f FILE/--file查询某个文件属于哪个已安装软件包 rpm-q NAME --scripts查看包内包含的安装/卸载脚本 rpm-q NAME --changelog查看软件包变更日志 rpm-q -p FILE.rpm -c/-l/-d/-i查询 rpm 包文件(未安装)的对应内容 rpm-qg GROUP/--group查询软件包组中包含哪些软件包 yum install-y yum-utils安装 yum 扩展工具集 yumdownloaderhttpd下载软件包及其依赖 repoquery--location httpd查看软件包所在仓库精确位置 wgetURL通过仓库地址下载特定文件
基本语法:
rpm {-q|--query} [select-options] [query-options]

   select-options
        [PACKAGE_NAME] [-a,--all] [-f,--file FILE]
        [-g,--group GROUP] {-p,--package PACKAGE_FILE}
        [--hdrid SHA1] [--pkgid MD5] [--tid TID]
        [--querybynumber HDRNUM] [--triggeredby PACKAGE_NAME]
        [--whatprovides CAPABILITY] [--whatrequires CAPABILITY]

   query-options
        [--changelog] [-c,--configfiles] [--conflicts]
        [-d,--docfiles] [--dump] [--filesbypkg] [-i,--info]
        [--last] [-l,--list] [--obsoletes] [--provides]
        [--qf,--queryformat QUERYFMT] [-R,--requires]
        [--scripts] [-s,--state] [--triggers,--triggerscripts]
示例:
# 【查询】查询系统中安装了哪些软件包
[root@centos7 ~]# rpm -qa
libqmi-utils-1.18.0-2.el7.x86_64
libmpcdec-1.2.6-12.el7.x86_64
gtkmm30-3.22.2-1.el7.x86_64
nss-sysinit-3.67.0-4.el7_9.x86_64
......

# 【查询】查询系统中某个软件包是否安装
[root@centos7 ~]# rpm -q httpd
未安装软件包 httpd
[root@centos7 ~]# rpm -q kernel
kernel-3.10.0-1160.71.1.el7.x86_64

# 【查询】查询系统中某个已安装的软件包元数据信息
[root@centos7 ~]# rpm -q coreutils -i
Name        : coreutils
Version     : 8.22
Release     : 24.el7_9.2
Architecture: x86_64
Install Date: 2025年07月18日 星期五 10时29分40秒
Group       : System Environment/Base
Size        : 14594210
License     : GPLv3+
Signature   : RSA/SHA256, 2020年11月18日 星期三 22时16分51秒, Key ID 24c6a8a7f4a80eb5
Source RPM  : coreutils-8.22-24.el7_9.2.src.rpm
Build Date  : 2020年11月17日 星期二 06时24分59秒
Build Host  : x86-01.bsys.centos.org
Relocations : (not relocatable)
Packager    : CentOS BuildSystem <http://bugs.centos.org>
Vendor      : CentOS
URL         : http://www.gnu.org/software/coreutils/
Summary     : A set of basic GNU tools commonly used in shell scripts
Description :
These are the GNU core utilities.  This package is the combination of
the old GNU fileutils, sh-utils, and textutils packages.

# 【查询】查询系统中某个已安装的软件包包涵哪些文件
[root@centos7 ~]# rpm -q openssh-server -l
/etc/pam.d/sshd
/etc/ssh/sshd_config
/etc/sysconfig/sshd
/usr/lib/systemd/system/sshd-keygen.service
/usr/lib/systemd/system/sshd.service
/usr/lib/systemd/system/sshd.socket
/usr/lib/systemd/system/sshd@.service
/usr/lib64/fipscheck/sshd.hmac
/usr/libexec/openssh/sftp-server
/usr/sbin/sshd
/usr/sbin/sshd-keygen
/usr/share/man/man5/moduli.5.gz
/usr/share/man/man5/sshd_config.5.gz
/usr/share/man/man8/sftp-server.8.gz
/usr/share/man/man8/sshd.8.gz
/var/empty/sshd

# 【查询】查询系统中某个已安装的软件包包涵哪些配置文件
[root@centos7 ~]# rpm -q openssh-server -c
/etc/pam.d/sshd
/etc/ssh/sshd_config
/etc/sysconfig/sshd

# 【查询】查询系统中某个已安装的软件包包涵哪些文档文件
[root@centos7 ~]# rpm -q openssh-server -d
/usr/share/man/man5/moduli.5.gz
/usr/share/man/man5/sshd_config.5.gz
/usr/share/man/man8/sftp-server.8.gz
/usr/share/man/man8/sshd.8.gz

# 【查询】查询系统中某个某个文件属于哪个已安装的软件包
[root@centos7 ~]# rpm -q -f /etc/ssh/sshd_config
openssh-server-7.4p1-22.el7_9.x86_64

# 【查询】查询系统中某个已安装的软件包包涵的脚本
[root@centos7 ~]# rpm -q openssh-server --scripts
preinstall scriptlet (using /bin/sh):
......
postinstall scriptlet (using /bin/sh):
......
preuninstall scriptlet (using /bin/sh):
......
postuninstall scriptlet (using /bin/sh):
......

# 【查询】查询系统中某个已安装的软件包变更日志
[root@centos7 ~]# rpm -q openssh-server --changelog
* 四 9月 30 2021 Dmitry Belyavskiy <dbelyavs@redhat.com> - 7.4p1-22 + 0.10.3-2
- avoid segfault in Kerberos cache cleanup (#1999263)
- fix CVE-2021-41617 (#2008884)
......

# 【查询】下载 httpd 软件包,以及依赖的其他软件包
[root@centos7 ~]# yum install -y yum-utils
[root@centos7 ~]# yumdownloader httpd
[root@centos7 ~]# ls httpd-*
httpd-2.4.6-99.el7.centos.1.x86_64.rpm

# 【查询】查询系统中某个软件包(package)文件包涵哪些配置文件
[root@centos7 ~]# rpm -q -p httpd-2.4.6-99.el7.centos.1.x86_64.rpm -c
/etc/httpd/conf.d/autoindex.conf
/etc/httpd/conf.d/userdir.conf
/etc/httpd/conf.d/welcome.conf
......
# 同样-l -d -i也可以配合-p使用

# 【查询】查询系统中某个软件包组中包涵哪些软件包
[root@centos7 ~]# rpm -qg 'System Environment/Base'
grub2-common-2.02-0.87.0.1.el7.centos.9.noarch
centos-release-7-9.2009.1.el7.centos.x86_64
setup-2.8.71-11.el7.noarch
filesystem-3.2-25.el7.x86_64
......
扩展
# 【查询】查看软件包所在仓库精确位置
[root@centos7 ~]# repoquery --location httpd
http://mirrors.aliyun.com/centos/7/updates/x86_64/Packages/httpd-2.4.6-99.el7.centos.1.x86_64.rpm

# 【下载】此时可以通过 wget 下载特定文件
[root@centos7 ~]# wget \
http://mirrors.aliyun.com/centos/7/updates/x86_64/Packages/httpd-2.4.6-99.el7.centos.1.x86_64.rpm
2.2.2 验证
本节命令速查
基本语法
rpm {-V|--verify} [select-options] [verify-options]

   select-options
        [PACKAGE_NAME] [-a,--all] [-f,--file FILE]
        [-g,--group GROUP] {-p,--package PACKAGE_FILE}
        [--hdrid SHA1] [--pkgid MD5] [--tid TID]
        [--querybynumber HDRNUM] [--triggeredby PACKAGE_NAME]
        [--whatprovides CAPABILITY] [--whatrequires CAPABILITY]

   verify-options
        [--nodeps] [--nofiles] [--noscripts]
        [--nodigest] [--nosignature]
        [--nolinkto] [--nofiledigest] [--nosize] [--nouser]
        [--nogroup] [--nomtime] [--nomode] [--nordev]
        [--nocaps] [--noconfig] [--noghost]
命令与参数说明
命令 参数 说明 rpm-V NAME/--verify校验已安装软件包的文件是否被改动 sed-i 's/.../.../g' FILE修改文件内容以制造差异 mvFILE DEST移走文件以观察校验结果 verify-options --nodeps--nofiles--noscripts等关闭对应的校验项 输出字符含义:
S大小、M权限、5内容摘要、T时间戳等发生变化;遗漏表示文件缺失。
基本语法:
rpm {-V|--verify} [select-options] [verify-options]

   select-options
        [PACKAGE_NAME] [-a,--all] [-f,--file FILE]
        [-g,--group GROUP] {-p,--package PACKAGE_FILE}
        [--hdrid SHA1] [--pkgid MD5] [--tid TID]
        [--querybynumber HDRNUM] [--triggeredby PACKAGE_NAME]
        [--whatprovides CAPABILITY] [--whatrequires CAPABILITY]

   verify-options
        [--nodeps] [--nofiles] [--noscripts]
        [--nodigest] [--nosignature]
        [--nolinkto] [--nofiledigest] [--nosize] [--nouser]
        [--nogroup] [--nomtime] [--nomode] [--nordev]
        [--nocaps] [--noconfig] [--noghost]
示例:
# 【验证】查看openssh-server软件安装是否有问题
[root@centos7 ~]# rpm -V openssh-server

# 【验证】修改(change)
[root@centos7 ~]# sed -i 's/PermitRootLogin yes/PermitRootLogin no/g' /etc/ssh/sshd_config
[root@centos7 ~]# rpm -V openssh-server
S.5....T.  c /etc/ssh/sshd_config
[root@centos7 ~]# sed -i 's/PermitRootLogin no/PermitRootLogin yes/g' /etc/ssh/sshd_config

# 【验证】移走 /etc/ssh/sshd_config 文件,再次查看
[root@centos7 ~]# mv /etc/ssh/sshd_config .
[root@centos7 ~]# rpm -V openssh-server
遗漏   c /etc/ssh/sshd_config

# 【验证】恢复该文件到原来位置
[root@centos7 ~]# mv sshd_config /etc/ssh/sshd_config
2.2.3 安装和卸载
本节命令速查
基本语法
rpm {-i|--install} [install-options] PACKAGE_FILE ...

   install-options
        [--allfiles] [--badreloc] [--excludepath OLDPATH]
        [--excludedocs] [--force] [-h,--hash]
        [--ignoresize] [--ignorearch] [--ignoreos]
        [--includedocs] [--justdb] [--nocollections]
        [--nodeps] [--nodigest] [--nosignature] [--noplugins]
        [--noorder] [--noscripts] [--notriggers]
        [--oldpackage] [--percent] [--prefix NEWPATH]
        [--relocate OLDPATH=NEWPATH]
        [--replacefiles] [--replacepkgs]
        [--test]
命令与参数说明
命令 参数 说明 repoquery--location lrzsz查看软件包下载地址 wgetURL下载 rpm 包 rpm-i FILE.rpm/--install安装软件包 rpm-e NAME/--erase卸载软件包 rpm-ivh FILE.rpm友好方式安装: -i安装 +-v详细 +-h进度条rpm-evh NAME友好方式卸载 rpm-q NAME查询确认安装/卸载结果
基本语法:
rpm {-i|--install} [install-options] PACKAGE_FILE ...

   install-options
        [--allfiles] [--badreloc] [--excludepath OLDPATH]
        [--excludedocs] [--force] [-h,--hash]
        [--ignoresize] [--ignorearch] [--ignoreos]
        [--includedocs] [--justdb] [--nocollections]
        [--nodeps] [--nodigest] [--nosignature] [--noplugins]
        [--noorder] [--noscripts] [--notriggers]
        [--oldpackage] [--percent] [--prefix NEWPATH]
        [--relocate OLDPATH=NEWPATH]
        [--replacefiles] [--replacepkgs]
        [--test]
示例:
# 【下载】下载软件包
[root@centos7 ~]# repoquery --location lrzsz
http://mirrors.aliyun.com/centos/7/os/x86_64/Packages/lrzsz-0.12.20-36.el7.x86_64.rpm
[root@centos7 ~]# wget http://mirrors.aliyun.com/centos/7/os/x86_64/Packages/lrzsz-0.12.20-36.el7.x86_64.rpm
lrzsz-0.12.20-36.el7.x86_64.rpm

# 【安装】安装
[root@centos7 ~]# rpm -i lrzsz-0.12.20-36.el7.x86_64.rpm
[root@centos7 ~]# rpm -q lrzsz
lrzsz-0.12.20-36.el7.x86_64

# 【卸载】卸载
[root@centos7 ~]# rpm -e lrzsz
[root@centos7 ~]# rpm -q lrzsz
未安装软件包 lrzsz

# 【安装】友好方式安装
[root@centos7 ~]# rpm -ivh lrzsz-0.12.20-36.el7.x86_64.rpm
Verifying...                          ################################ [100%]
准备中...                          ################################ [100%]
正在升级/安装...
   1:lrzsz-0.12.20-36.el7             ################################ [100%]

# 【卸载】友好方式卸载
[root@centos7 ~]# rpm -evh lrzsz
准备中...                          ################################ [100%]
正在清理/删除...
   1:lrzsz-0.12.20-36.el7             ################################ [100%]

# 【依赖问题】安装 httpd,报错如下,下一节讲解如何解决
# 安装准备:确保系统中没有提供httpd需要的依赖包
[root@centos7 ~]# rpm -e apr apr-util httpd-tools mailcap
[root@centos7 ~]# rpm -ivh httpd-2.4.6-99.el7.centos.1.x86_64.rpm
错误:依赖检测失败:
	/etc/mime.types 被 httpd-2.4.6-99.el7.centos.1.x86_64 需要
	httpd-tools = 2.4.6-99.el7.centos.1 被 httpd-2.4.6-99.el7.centos.1.x86_64 需要
	libapr-1.so.0()(64bit) 被 httpd-2.4.6-99.el7.centos.1.x86_64 需要
	libaprutil-1.so.0()(64bit) 被 httpd-2.4.6-99.el7.centos.1.x86_64 需要
2.2.4 重新安装
本节命令速查
基本语法
rpm {--reinstall} [install-options] PACKAGE_FILE ...
命令 参数 说明 rpm--reinstall -vh lrzsz*重新安装软件包
rpm {--reinstall} [install-options] PACKAGE_FILE ...
示例:
# 【重装】重新安装
[root@centos7 ~]# rpm --reinstall -vh lrzsz*
Verifying...                          ################################ [100%]
准备中...                              ################################ [100%]
正在升级/安装...
   1:lrzsz-0.12.20-36.el7             ################################ [100%]
2.2.5 提取 RPM 包中文件
本节命令速查
命令 参数 说明 rpm2cpioFILE.rpm > FILE.cpio将 rpm 转换为 cpio 格式 cpio-t < FILE.cpio列出 cpio 归档中有哪些文件 cpio-id '*' < FILE.cpio提取所有文件, -d自动创建目录分层结构cpio-id ./etc/httpd/conf/httpd.conf < FILE.cpio提取特定文件 cpio-t < FILE.cpio | grep 'httpd\.conf'通过管道筛选特定文件 rpm2cpio+ 管道rpm2cpio FILE.rpm | cpio -id '*'一步提取所有文件
Windows 提取:使用压缩工具(例如360压缩)打开rpm包,浏览和提取。
Linux 提取:
-
方法一:分步骤提取
# 【解包】将文件转换为cpio格式 [root@centos7 ~]# rpm2cpio httpd-2.4.6-99.el7.centos.1.x86_64.rpm > httpd-2.4.6-99.el7.centos.1.x86_64.cpio # 【查询】查询 cpio 格式(一种打包格式)文件中有哪些文件 [root@centos7 ~]# cpio -t < httpd-2.4.6-99.el7.centos.1.x86_64.cpio ./etc/httpd ./etc/httpd/conf ./etc/httpd/conf.d ./etc/httpd/conf.d/README ./etc/httpd/conf.d/autoindex.conf ...... # 【查询】配置管道查询特定文件 [root@centos7 ~]# cpio -t < httpd-2.4.6-99.el7.centos.1.x86_64.cpio |grep 'httpd\.conf' ./etc/httpd/conf/httpd.conf ./usr/lib/tmpfiles.d/httpd.conf 19331 blocks # 【解包】提取所有文件,-d选项指明提取过程中创建对应的目录分层结构 [root@centos7 ~]# cpio -id '*' < httpd-2.4.6-99.el7.centos.1.x86_64.cpio # 【解包】提取特定文件 [root@centos7 ~]# cpio -id ./etc/httpd/conf/httpd.conf < httpd-2.4.6-99.el7.centos.1.x86_64.cpio -
方法二:一步提取所有文件
# 【解包】一步提取所有文件
[root@centos7 ~]# rpm2cpio httpd-2.4.6-99.el7.centos.1.x86_64.rpm | cpio -id '*'
2.3 yum 命令:从查询到事务回滚
本节命令速查
命令 参数 说明 yumhelp查看 yum 命令帮助信息 yuminfo httpd查看仓库中某个软件包信息 yumlist 'http*'查询软件包清单 yumlist httpd --showduplicates查看软件包所有可用版本 yumsearch 'web server'按关键字搜索软件包(简介) yumsearch all 'web server'按关键字搜索软件包(描述 + 简介) yumprovides sar/provides '*bin/sar'查看哪个包可以提供相应文件 yuminstall vsftpd安装软件包 yuminstall vsftpd --downloadonly --downloaddir=/root/只下载不安装,依赖一并下载 yumlocalinstall ./FILE.rpm安装本地文件系统中的软件包 yumdowngrade -y vsftpd-3.0.2-28.el7软件包降级(依赖需一并降级) yumupdate vsftpd-3.0.2-29.el7_9升级到指定版本 yumupdate升级系统中所有软件为最新版本 yumremove -y vsftpd卸载软件包 yumhistory list/history查询 yum 事务历史记录 yumhistory info 2查看特定 yum 事务详情 yumhistory undo 4反向操作第 4 个事务(回滚) yumhistory redo 4重做操作第 4 个事务 yumgrouplist/grouplist -v查看仓库中软件包组清单( -v显示组 ID)yumgroup list -v等价写法( unset LANG可切换为英文输出)yumgroupinfo 'Server with GUI'查看软件包组信息 yumgroupinstall 'Server with GUI'安装软件包组 yumgroupremove 'Server with GUI'卸载软件包组 unsetLANG清除语言变量,将 yum 输出切换为英文
yum 介绍
- rpm 命令是一个管理软件包的工具,不适用于软件包存储库或自动解决来自多个源的依赖项。
- Yum(Yellowdog Updater Modified)旨在成为管理基于RPM的软件安装和更新的更好系统。yum命令允许安装,更新,删除和获取有关软件包及其依赖项的信息。
help:查看yum命令帮助信息
# 【帮助】查看yum命令帮助信息
[root@centos7 ~]# yum help
info:查看仓库中某个软件包信息
# 【查询】查看仓库中httpd包信息
[root@centos7 ~]# yum info httpd
已加载插件:fastestmirror, langpacks
Loading mirror speeds from cached hostfile
 * base: mirrors.aliyun.com
 * extras: mirrors.aliyun.com
 * updates: mirrors.aliyun.com
已安装的软件包
名称    :httpd
架构    :x86_64
版本    :2.4.6
发布    :99.el7.centos.1
大小    :9.4 M
源    :installed
来自源:updates
简介    : Apache HTTP Server
网址    :http://httpd.apache.org/
协议    : ASL 2.0
描述    : The Apache HTTP Server is a powerful, efficient, and extensible
         : web server.
list:查询软件包清单
# 【查询】查看仓库中http开头的包有哪些
[root@centos7 ~]# yum list 'http*'
已加载插件:fastestmirror, langpacks
Loading mirror speeds from cached hostfile
 * base: mirrors.aliyun.com
 * extras: mirrors.aliyun.com
 * updates: mirrors.aliyun.com
已安装的软件包
httpd.x86_64                           2.4.6-99.el7.centos.1           @updates
httpd-tools.x86_64                     2.4.6-99.el7.centos.1           @updates
可安装的软件包
http-parser.i686                       2.7.1-9.el7                     base
http-parser.x86_64                     2.7.1-9.el7                     base
http-parser-devel.i686                 2.7.1-9.el7                     base
......

# 【查询】查看仓库中httpd包有哪些版本
[root@centos7 ~]# yum list httpd --showduplicates
已加载插件:fastestmirror, langpacks
Loading mirror speeds from cached hostfile
 * base: mirrors.aliyun.com
 * extras: mirrors.aliyun.com
 * updates: mirrors.aliyun.com
已安装的软件包
httpd.x86_64               2.4.6-99.el7.centos.1                       @updates
可安装的软件包
httpd.x86_64               2.4.6-95.el7.centos                         base
httpd.x86_64               2.4.6-97.el7.centos                         updates
httpd.x86_64               2.4.6-97.el7.centos.1                       updates
httpd.x86_64               2.4.6-97.el7.centos.2                       updates
httpd.x86_64               2.4.6-97.el7.centos.4                       updates
httpd.x86_64               2.4.6-97.el7.centos.5                       updates
httpd.x86_64               2.4.6-98.el7.centos.6                       updates
httpd.x86_64               2.4.6-98.el7.centos.7                       updates
httpd.x86_64               2.4.6-99.el7.centos.1                       updates
search:根据关键字搜索软件包
# 【查询】查看简介包含关键字的软件包
[root@centos7 ~]# yum search 'web server'

# 【查询】查看描述和简介包含关键字的软件包
[root@centos7 ~]# yum search all 'web server'
provides:查看仓库中哪个包可以提供相应文件
# 【查询】查看仓库中哪个包可以提供文件sar程序
[root@centos7 ~]# yum provides sar
已加载插件:fastestmirror, langpacks
Loading mirror speeds from cached hostfile
 * base: mirrors.aliyun.com
 * extras: mirrors.aliyun.com
 * updates: mirrors.aliyun.com
sysstat-10.1.5-19.el7.x86_64 : Collection of performance monitoring tools for Linux
源    :base
匹配来源:
文件名    :/usr/bin/sar

sysstat-10.1.5-20.el7_9.x86_64 : Collection of performance monitoring tools for Linux
源    :updates
匹配来源:
文件名    :/usr/bin/sar

# 【查询】备用查询命令
[root@centos7 ~]# yum provides '*bin/sar'

# 【安装】安装sar工具对应的软件包
[root@centos7 ~]# yum install -y sysstat
install:安装软件包
# 【安装】安装软件包
[root@centos7 ~]# yum install vsftpd

# 【下载】只下载不安装,将依赖软件包一并下载
# 前提是系统中没安装对应软件包,才会下载
[root@centos7 ~]# yum install vsftpd --downloadonly --downloaddir=/root/
[root@centos7 ~]# ls vsftpd-*
vsftpd-3.0.2-29.el7_9.x86_64.rpm
localinstall:安装本地文件系统中软件包
# 【安装】安装本地文件系统中vsftpd包
[root@centos7 ~]# yum localinstall ./vsftpd-3.0.2-29.el7_9.x86_64.rpm
downgrade:软件包降级
# 【降级】降级 vsftpd 版本为 3.0.2-28.el7
[root@centos7 ~]# yum downgrade -y vsftpd-3.0.2-28.el7
# 降级的时候,要一并降级依赖软件包
依赖降级示例:
# 【降级】环境准备:安装最新版httpd
[root@centos7 ~]# yum install -y httpd

# 【降级】降级到特定版本:降级失败,因为已安装的 httpd-tools 无法满足当前httpd版本
[root@centos7 ~]# yum downgrade -y httpd-2.4.6-97.el7.centos
已加载插件:fastestmirror, langpacks
Loading mirror speeds from cached hostfile
 * base: mirrors.aliyun.com
 * extras: mirrors.aliyun.com
 * updates: mirrors.aliyun.com
正在解决依赖关系
--> 正在检查事务
---> 软件包 httpd.x86_64.0.2.4.6-97.el7.centos 将被 降级
--> 正在处理依赖关系 httpd-tools = 2.4.6-97.el7.centos,它被软件包 httpd-2.4.6-97.el7.centos.x86_64 需要
---> 软件包 httpd.x86_64.0.2.4.6-99.el7.centos.1 将被 删除
--> 解决依赖关系完成
错误:软件包:httpd-2.4.6-97.el7.centos.x86_64 (updates)
          需要:httpd-tools = 2.4.6-97.el7.centos
          已安装: httpd-tools-2.4.6-99.el7.centos.1.x86_64 (@updates)
              httpd-tools = 2.4.6-99.el7.centos.1
          可用: httpd-tools-2.4.6-95.el7.centos.x86_64 (base)
              httpd-tools = 2.4.6-95.el7.centos
          ......
          可用: httpd-tools-2.4.6-98.el7.centos.7.x86_64 (updates)
              httpd-tools = 2.4.6-98.el7.centos.7
 您可以尝试添加 --skip-broken 选项来解决该问题
 您可以尝试执行:rpm -Va --nofiles --nodigest

 # 【降级】解决方法:httpd-tools与httpd一起降级到相同版本
[root@centos7 ~]# yum downgrade -y httpd-tools-2.4.6-97.el7.centos httpd-2.4.6-97.el7.centos
update:软件包升级
# 【升级】升级 vsftpd 版本为 3.0.2-29.el7_9
[root@centos7 ~]# yum update vsftpd-3.0.2-29.el7_9

# 【升级】升级系统中所有软件为最新版本
[root@centos7 ~]# yum update
remove:软件包卸载
# 【卸载】卸载软件包
[root@centos7 ~]# yum remove -y vsftpd
history list:查询yum事务历史记录
[root@centos7 ~]# yum history list
Loaded plugins: fastestmirror
ID     | Login user               | Date and time    | Action(s)      | Altered
-------------------------------------------------------------------------------
     2 | root <root>              | 2025-12-26 13:47 | I, U           |   37
     1 | System <unset>           | 2025-12-26 11:50 | Install        |  310
history list

[root@centos7 ~]# yum install -y vsftpd
[root@centos7 ~]# yum downgrade -y vsftpd

# list 可以省略
[root@centos7 ~]# yum history
Loaded plugins: fastestmirror
ID     | Login user               | Date and time    | Action(s)      | Altered
-------------------------------------------------------------------------------
     4 | root <root>              | 2026-01-04 09:37 | Downgrade      |    1
     3 | root <root>              | 2026-01-04 09:36 | Install        |    1
     2 | root <root>              | 2025-12-26 13:47 | I, U           |   37
     1 | System <unset>           | 2025-12-26 11:50 | Install        |  310
history list
history info:特定yum事务详情
[root@centos7 ~]# yum history info 2
Loaded plugins: fastestmirror
Transaction ID : 2
Begin time     : Fri Dec 26 13:47:43 2025
Begin rpmdb    : 310:e90f758c7a3328cccdf3787ccd8eb1c9db26dde0
End time       :            13:47:49 2025 (6 seconds)
End rpmdb      : 346:0938012bcb4642f9accea53c54ff5d2ef7be9e15
User           : root <root>
Return-Code    : Success
`Command Line`   : install -y bash-completion vim open-vm-tools lrzsz unzip rsync sshpass
Transaction performed with:
    Installed     rpm-4.11.3-48.el7_9.x86_64                      @anaconda
    Installed     yum-3.4.3-168.el7.centos.noarch                 @anaconda
    Installed     yum-plugin-fastestmirror-1.1.31-54.el7_8.noarch @anaconda
Packages Altered:
    Install     bash-completion-1:2.1-8.el7.noarch         @base
    Dep-Install gpm-libs-1.20.7-6.el7.x86_64               @base
......
history undo:反向操作第4个事务
[root@centos7 ~]# yum history undo 4
history redo:重做操作第4个事务
[root@centos7 ~]# yum history redo 4
软件包组管理
# 【查询】查看仓库中软件包组清单
[root@centos7 ~]# yum grouplist
......
可用的环境分组:
   最小安装
   基础设施服务器
   ......
   带 GUI 的服务器
   GNOME 桌面
   KDE Plasma Workspaces
   开发及生成工作站
可用组:
   Cinnamon
   Fedora Packager
   Haskell
   ......
   通用桌面
完成

[root@centos7 ~]# yum grouplist -v
......
可用的环境分组:
   最小安装 (minimal)
   基础设施服务器 (infrastructure-server-environment)
   ......
   带 GUI 的服务器 (graphical-server-environment)
   GNOME 桌面 (gnome-desktop-environment)
   KDE Plasma Workspaces (kde-desktop-environment)
   开发及生成工作站 (developer-workstation-environment)
可用组:
   Cinnamon (cinnamon-desktop)
   Fedora Packager (fedora-packager)
   Haskell (haskell)
   ......
   通用桌面 (general-desktop)
完成

[root@centos7 ~]# unset LANG
[root@centos7 ~]# yum group list -v
......
Available Environment Groups:
   Minimal Install (minimal)
   Compute Node (compute-node-environment)
   ......
   Server with GUI (graphical-server-environment)
   GNOME Desktop (gnome-desktop-environment)
   KDE Plasma Workspaces (kde-desktop-environment)
   Development and Creative Workstation (developer-workstation-environment)
Available Groups:
   Cinnamon (cinnamon-desktop)
   Compatibility Libraries (compat-libraries)
   Console Internet Tools (console-internet)
   ......
   Xfce (xfce-desktop)
Done

# 【查询】查看仓库中软件包组信息
[root@centos7 ~]# yum groupinfo <tab><tab>
[root@centos7 ~]# yum groupinfo 'Server with GUI'

# 【安装】安装仓库中软件包组
[root@centos7 ~]# yum groupinstall 'Server with GUI'

# 【卸载】卸载仓库中软件包组
[root@centos7 ~]# yum groupremove 'Server with GUI'

openEuler 是由开放原子开源基金会孵化的全场景开源操作系统项目,面向数字基础设施四大核心场景(服务器、云计算、边缘计算、嵌入式),全面支持 ARM、x86、RISC-V、loongArch、PowerPC、SW-64 等多样性计算架构
更多推荐

 0
0 0
0- 0


 已为社区贡献1条内容

所有评论(0)