科普文:软件架构之Linux系列【linux内核:Linux Kernel Module(LKM) Init、Delete Code Principle、Kprobe Hooking Princip】
1. Linux模块(LKM)简介
模块是一种向linux内核添加"设备驱动程序"、"文件系统"、"其他组件"的有效方法,而无须重新编译内核或重启系统,这消除了许多限制,同时带来了很多的优点
1. 通过使用模块,内核程序员能够预先编译大量驱动程序,而不会致使内核映像的尺寸发生膨胀。在自动检测硬件或用户提示后,安装例程会选择适当的模块并将其添加到内核中
2. 内核开发者可以将试验性的代码打包到模块中,模块可疑卸载,修改代码或重新打包后再重新加载,这使得可以快速测试新特性,无需每次都重启系统
3. 模块(LKM)可疑无缝地插入到内核中,同时模块也可以导出一些函数,可以由其他核心模块(以及持久编译到内核中的代码)使用。在模块代码需要卸载时,模块和内核剩余部分之间的关联会自动终止

0x1: 模块的依赖关系和引用
如果模块B使用了模块A提供的函数,那么模块A和模块B之间就存在关系,可以从两个方面来看这种关系
1. 模块B依赖模块A
除非模块A已经驻留在内核内存,否则模块B无法装载

2. 模块B引用模块A
除非模块B已经移除,否则模块A无法从内核移除,在内核中,这种关系称之为"模块B使用模块A"
"struct module_use"和"struct module->module_which_use_me"这两个结果共同组合和保证了内核模块中的依赖关系。
如果模块B使用了模块A提供的函数,那么模块A和模块B之间就存在关系,可以从两个方面来看这种关系
1. 模块B依赖模块A
除非模块A已经驻留在内核内存,否则模块B无法装载

2. 模块B引用模块A
除非模块B已经移除,否则模块A无法从内核移除,在内核中,这种关系称之为"模块B使用模块A"
对每个使用了模块A中函数的模块B,都会创建一个module_use结构体实例,该实例将被添加到模块A(被依赖的模块)的module实例中的modules_which_use_me链表中,modules_which_use_me指向模块B的module实例
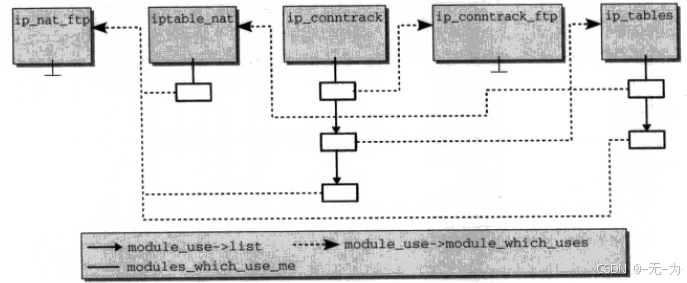
我们在编写并加载LKM模块的时候,一定要注意模块间的依赖关系,有时候还需要分步骤单独进行指定模块的加载,才能保证模块间的依赖关系的正确连接
2. 使用Linux模块
0x1: 模块的添加
从用户的角度来看,模块可以通过以下两个"指令”进行添加
1. modprobe
它考虑了各个模块之间可能出现的依赖性(在一个模块依赖于一个或多个合作者模块的功能时),modprobe在识别出目标模块所依赖的模块之后,在内核也会使用insmod(即modprobe只是对insmod的一个包装)

2. insmod
insmod只加载一个单一的模块到内核中,且该模块只信赖内核中已经存在的代码(不管是通过模块动态加载的、还是持久编译到内核中的)
从内核系统的角度来看,模块的加载可以通过以下方法完成
1. init_module()
init_module()是一个系统调用,用户空间的工具只需要提供二进制数据,所有其他工作(重定位、解决引用问题)由内核自身完成

2. request_module()
request_module()不是系统调用,它用于从内核端加载模块,它不仅用于加载模块,还用于实现热插拔功能
0x2: 模块的移除
从用户的角度来看,模块可以通过以下"指令”进行删除
1. rmmod
从内核系统的角度来看,模块的卸载可以通过以下方法完成
1. delete_module()
delete_module()是一个系统调用,它用于从内核移除一个模块,前提是该模块代码不再使用,且其他模块也不再使用该模块导出的函数(即不能有依赖关系)
3. LKM模块加载原理
LKM模块的加载的大部分逻辑都在init_module()中,ring3的insmod、modprobe仅仅负责传递一个二进制数据,本文只关注init_module这个系统调用的代码逻辑,关于整个insmod模块加载过程的原理分析,请参阅
https://download.csdn.net/download/Rookie_CEO/90025144
0x1: 代码流程
init_module()系统调用是用户空间和内核之间用于装载新模块的接口,它的大致流程如下

0x2: 内核代码分析
\linux-2.6.32.63\kernel\module.c
SYSCALL_DEFINE3(init_module, void __user *, umod, unsigned long, len, const char __user *, uargs)
    1. *umod
    指向用户地址空间中的区域,表示模块的名字
    2. len
    该区域的长度
    3. *uargs
    指向字符串的指针,指定了模块的参数
\linux-2.6.32.63\kernel\module.c
/* This is where the real work happens *//*static noinline struct module *sys_init_module_log(void __user *umod, unsigned long len, const char __user *uargs) 1. umod指向当前加载LKM的ELF镜像的内存地址,ELF镜像的结构见http://www.cnblogs.com/LittleHann/p/3871092.html2. lenELF镜像长度3. uargs执行insmod时附带的参数(一般情况下为null)#define Elf_Ehdr       Elf32_Ehdr#define Elf_Shdr       Elf32_Shdr*/
SYSCALL_DEFINE3(init_module, void __user *, umod, unsigned long, len, const char __user *, uargs)
{
    struct module *mod;
    int ret = 0;

    /*
    Must have permission
    确保有插入和删除模块不受限制的权利,并且模块没有被禁止插入或删除
    */
    if (!capable(CAP_SYS_MODULE) || modules_disabled)
    {
        return -EPERM;
    }


    /* Only one module load at a time, please */
    if (mutex_lock_interruptible(&module_mutex) != 0)
        return -EINTR;

    /*
    Do all the hard work
    分配,加载模块,并创建相关的sysfs文件
    */  //传入的代表当前加载LKM的ELF镜像,返回的是加载后的模块的struct module结构指针
    mod = load_module(umod, len, uargs);
    if (IS_ERR(mod))
    {
        mutex_unlock(&module_mutex);
        return PTR_ERR(mod);
    }

    /* Drop lock so they can recurse */
    mutex_unlock(&module_mutex);

    /*
    通知内核通知链module_notify_list上的监听者,模块状态变为MODULE_STATE_COMING
    关于module的状态信息,请参阅http://www.cnblogs.com/LittleHann/p/3865490.html,搜索: struct module
         enum module_state
        {
            MODULE_STATE_LIVE,    //模块当前正常使用中(存活状态)
            MODULE_STATE_COMING,    //模块当前正在被加载
            MODULE_STATE_GOING,    //模块当前正在被卸载
        };
    */
    blocking_notifier_call_chain(&module_notify_list, MODULE_STATE_COMING, mod);

    //调用本模块的所有构造器
    do_mod_ctors(mod);
    /*
    Start the module
    调用模块的init方法
    */
    if (mod->init != NULL)
        ret = do_one_initcall(mod->init);
    if (ret < 0)
    {
        /* Init routine failed: abort.  Try to protect us from
                   buggy refcounters. */
        mod->state = MODULE_STATE_GOING;
        synchronize_sched();
        module_put(mod);
        blocking_notifier_call_chain(&module_notify_list, MODULE_STATE_GOING, mod);
        mutex_lock(&module_mutex);
        free_module(mod);
        mutex_unlock(&module_mutex);
        wake_up(&module_wq);
        return ret;
    }
    if (ret > 0)
    {
        printk(KERN_WARNING
"%s: '%s'->init suspiciously returned %d, it should follow 0/-E convention\n"
"%s: loading module anyway...\n",
               __func__, mod->name, ret,
               __func__);
        dump_stack();
    }

    /*
    Now it's a first class citizen!  Wake up anyone waiting for it.
    */
    mod->state = MODULE_STATE_LIVE;
    //唤醒module_wq 队列上等待本模块初始化的所有任务
    wake_up(&module_wq);
    //通知内核通知链module_notify_list上的监听者,模块状态变为MODULE_STATE_LIVE
    blocking_notifier_call_chain(&module_notify_list, MODULE_STATE_LIVE, mod);

    /*
    We need to finish all async code before the module init sequence is done
    等待所有的异步函数调用完成
    */
    async_synchronize_full();

    //获得module_mutex锁,module_mutex作用之一就是保护全局的模块链表
    mutex_lock(&module_mutex);
    /* Drop initial reference. */
    module_put(mod);
    trim_init_extable(mod);
#ifdef CONFIG_KALLSYMS
    mod->num_symtab = mod->core_num_syms;
    mod->symtab = mod->core_symtab;
    mod->strtab = mod->core_strtab;
#endif
    /*
    释放与模块初始化相关的节区所占的内存
    这点和windows下的驱动加载是类似的,仅仅用于驱动加载的那部分"派遣初始化函数"被分配到"可换页内存"区域中,当驱动加载完毕后就立即释放
    */
    module_free(mod, mod->module_init);
    mod->module_init = NULL;
    mod->init_size = 0;
    mod->init_text_size = 0;
    mutex_unlock(&module_mutex);

    return 0;
}
init_module的关键代码逻辑都在load_module()中,我们继续内核代码的分析
/*
Allocate and load the module: note that size of section 0 is always zero, and we rely on this for optional sections.
*/
static noinline struct module *load_module(void __user *umod, unsigned long len, const char __user *uargs)
{
    /*
    ELF文件头地址。
    */
    Elf_Ehdr *hdr;
    /*
       段首部表地址,关于Linux ELF文件格式,请参阅另一篇文章
       http://www.cnblogs.com/LittleHann/p/3871092.html
    */
    Elf_Shdr *sechdrs;
    char *secstrings, *args, *modmagic, *strtab = NULL;
    char *staging;
    unsigned int i;
    unsigned int symindex = 0;
    unsigned int strindex = 0;
    unsigned int modindex, versindex, infoindex, pcpuindex;
    struct module *mod;
    long err = 0;
    void *percpu = NULL, *ptr = NULL; /* Stops spurious gcc warning */
    unsigned long symoffs, stroffs, *strmap;

    mm_segment_t old_fs;

    DEBUGP("load_module: umod=%p, len=%lu, uargs=%p\n", umod, len, uargs);
    if (len < sizeof(*hdr))
    {
        return ERR_PTR(-ENOEXEC);
    }

    /* Suck in entire file: we'll want most of it. */
    /* vmalloc barfs on "unusual" numbers.  Check here */
    /*
    64 * 1024 * 1024应该是模块文件的最大大小。
    */
    if (len > 64 * 1024 * 1024 || (hdr = vmalloc(len)) == NULL)
        return ERR_PTR(-ENOMEM);

    /*
    对模块进行有效性检查,为模块分配内核空间,并复制内核到该空间,并设置info->hdr和info->len
    */
    if (copy_from_user(hdr, umod, len) != 0)
    {
        err = -EFAULT;
        goto free_hdr;
    }

    /* Sanity checks against insmoding binaries or wrong arch, weird elf version */
    /*
    1. 检查文件标识是否是ELFMAG,检查模块目标文件是否是可重定向文件
    2. 检查目标文件的体系结构类型,检查ELF首部中段首部表中表项的大小
    3. 如果其中一项检查失败,则返回ENOEXEC
    */
    if (memcmp(hdr->e_ident, ELFMAG, SELFMAG) != 0 || hdr->e_type != ET_REL || !elf_check_arch(hdr) || hdr->e_shentsize != sizeof(*sechdrs))
    {
        err = -ENOEXEC;
        goto free_hdr;
    }

    /*
    hdr->e_shnum * sizeof(Elf_Shdr)计算的是ELF文件中段首部表的大小,加上偏移的值如果大于len,则说明模块目标文件被截断了,跳转到truncated标签处处理
    */
    if (len < hdr->e_shoff + hdr->e_shnum * sizeof(Elf_Shdr))
        goto truncated;

    /* Convenience variables */
    /*
    计算段首部表的地址.
    */
    sechdrs = (void *)hdr + hdr->e_shoff;
    /*
    计算段名称字符串表的地址,其中hdr->e_shstrndx是段名称字符串表在段首部表中
    的索引,sh_offset是当前段相对于文件头的偏移。
    */
    secstrings = (void *)hdr + sechdrs[hdr->e_shstrndx].sh_offset;
    /*
    将第一个段在执行时的虚拟地址设为0,不使用段首部表中的第一个表项
    */
    sechdrs[0].sh_addr = 0;

    /*
    开始遍历段首部表, hdr->e_shnum是段首部表表项的数量
    */
    for (i = 1; i < hdr->e_shnum; i++)
    {
        /*
        如果索引为i的段需要在文件中占据空间,但是文件长度小于段的偏移加上段大小(也就是说文件长度不够),则跳转到truncated标签处处理
        */
        if (sechdrs[i].sh_type != SHT_NOBITS && len < sechdrs[i].sh_offset + sechdrs[i].sh_size)
            goto truncated;

        /* Mark all sections sh_addr with their address in the temporary image. */
        /*
        将段在执行时的虚拟地址设为他们在临时内存映像中的地址.
        */
        sechdrs[i].sh_addr = (size_t)hdr + sechdrs[i].sh_offset;

        /* Internal symbols and strings. */
        /*
        如果索引为i的段是符号表,则做相应的处理.目前目标文件只能有一个符号表,这个限制以后可能会有变化,所以下面的语句只会执行一次
         */
        if (sechdrs[i].sh_type == SHT_SYMTAB)
        {
            /*
            用来保存符号表在段首部表中的索引
            */
            symindex = i;
            /*
            strindex存储的是与当前段段相关的字符串表段的索引
            */
            strindex = sechdrs[i].sh_link;
            /*
            strtab存储的是与当前段相关的字符串表段的地址
            */
            strtab = (char *)hdr + sechdrs[strindex].sh_offset;
        }
#ifndef CONFIG_MODULE_UNLOAD
        /* Don't load .exit sections */
        /*
        如果当前段是".exit"段(前缀是".exit"),则在段的标志中移除SHF_ALLOC标志,意思是当前段在执行过程中不需要占用内存。
        */
        if (strstarts(secstrings+sechdrs[i].sh_name, ".exit"))
            sechdrs[i].sh_flags &= ~(unsigned long)SHF_ALLOC;
#endif
    }
    /*
    查找".gnu.linkonce.this_module"段在段首部表中的索引,和LKM的模块名有关的信息在这个段中
    */
    modindex = find_sec(hdr, sechdrs, secstrings, ".gnu.linkonce.this_module");
    if (!modindex)
    {
        printk(KERN_WARNING "No module found in object\n");
        err = -ENOEXEC;
        goto free_hdr;
    }
    /* This is temporary: point mod into copy of data. */
    /*
    将模块的地址暂时设为临时映像中段给出的地址。
    */
    mod = (void *)sechdrs[modindex].sh_addr;
    /*
    如果没有找到符号表段,则跳转到free_hdr处处理
    */
    if (symindex == 0)
    {
        printk(KERN_WARNING "%s: module has no symbols (stripped?)\n", mod->name);
        err = -ENOEXEC;
        goto free_hdr;
    }

    /*
    查找__versions段在段首部表中的索引
    */
    versindex = find_sec(hdr, sechdrs, secstrings, "__versions");
    /*
    查找.modinfo段在段首部表中的索引
    */
    infoindex = find_sec(hdr, sechdrs, secstrings, ".modinfo");
    /*
    查找".data.percpu"段在段首部表中的索引
    */
    pcpuindex = find_pcpusec(hdr, sechdrs, secstrings);

    /* Don't keep modinfo and version sections. */
    /*
    "__versions"和".modinfo"段在执行时不需要,因此移除SHF_ALLOC标志。
    */
    sechdrs[infoindex].sh_flags &= ~(unsigned long)SHF_ALLOC;
    sechdrs[versindex].sh_flags &= ~(unsigned long)SHF_ALLOC;

    /* Check module struct version now, before we try to use module. */
    /*
    检查模块的版本信息    linux下的lkm rootkit普遍存在的一个问题就是编译的rootkit不能跨系统运行,需要在肉鸡上进行编译后插入内核,原因在于linux对于加载的lkm采取了模块检查机制http://bbs.chinaunix.net/thread-1943318-1-1.html
    */
    if (!check_modstruct_version(sechdrs, versindex, mod))
    {
        err = -ENOEXEC;
        goto free_hdr;
    }

    /*
    在.modinfo段查找vermagic变量对应的值。
    */
    modmagic = get_modinfo(sechdrs, infoindex, "vermagic");
    /* This is allowed: modprobe --force will invalidate it. */
    if (!modmagic)
    {
        /*
        如果没有找到vermagic变量,则尝试强制加载模块。
        但是try_to_force_load()函数的实现依赖于CONFIG_MODULE_FORCE_LOAD宏是否定义。而该宏默认是没有定义的,所以这里会返回失败,看来内核并不推荐强制加载模块
         */
        err = try_to_force_load(mod, "bad vermagic");
        if (err)
            goto free_hdr;
    } else if (!same_magic(modmagic, vermagic, versindex)) {
        printk(KERN_ERR "%s: version magic '%s' should be '%s'\n",
               mod->name, modmagic, vermagic);
        err = -ENOEXEC;
        goto free_hdr;
    }

    /*
    在.modinfo段查找staging变量对应的值
    */
    staging = get_modinfo(sechdrs, infoindex, "staging");
    if (staging)
    {
        /*
        从2.6.28版本起,内核代码的drivers下增加了一个staging目录,这个目录也是用来存放驱动程序
        只是这里的驱动程序和上层目录不同,加载的时候内核日志会打印如下的语句:
        MODULE_NAME: module is from the staging directory, the quality is unknown, you have been warned.
        Greg KH于2008年6月10号在Linux内核邮件列表里发出一封信,宣布建立了另外一棵kernel tree,这就是Linux staging tree
        Greg解释到,staging tree建立之目的是用来放置一些未充分测试或者因为一些其他原因未能进入内核的新增驱动程序和新增文件系统。
        */
        add_taint_module(mod, TAINT_CRAP);
        printk(KERN_WARNING "%s: module is from the staging directory, the quality is unknown, you have been warned.\n", mod->name);
    }

    /* Now copy in args */
    /*
    将插入模块时指定的参数从用于空间拷贝到args中,即
    Usage: insmod filename [args]
    */
    args = strndup_user(uargs, ~0UL >> 1);
    if (IS_ERR(args)) {
        err = PTR_ERR(args);
        goto free_hdr;
    }

    /*
    为与符号表相关的字符串表段在内存中分配用于映射的空间。
    sechdrs[strindex].sh_size是与符号表相关的字符串表段的大小。
    这里分配的是一个位图,用于符号表中的符号名称的映射
    */
    strmap = kzalloc(BITS_TO_LONGS(sechdrs[strindex].sh_size)
             * sizeof(long), GFP_KERNEL);
    if (!strmap) {
        err = -ENOMEM;
        goto free_mod;
    }

    /*
    查找当前要加载的模块是否已经存在,如果存在,则
    跳转到free_mod标签处。
    */
    if (find_module(mod->name)) {
        err = -EEXIST;
        goto free_mod;
    }

    mod->state = MODULE_STATE_COMING;

    /* Allow arches to frob section contents and sizes.  */
    /*
    err总是为0
    */
    err = module_frob_arch_sections(hdr, sechdrs, secstrings, mod);
    if (err < 0)
        goto free_mod;

    /*
    如果存在.data.percpu段,则为该段在内存中分配空间。
    分配成功后,移除SHF_ALLOC标志,并且初始化module实例的percpu成员
    */
    if (pcpuindex) {
        /* We have a special allocation for this section. */
        percpu = percpu_modalloc(sechdrs[pcpuindex].sh_size,
                     sechdrs[pcpuindex].sh_addralign,
                     mod->name);
        if (!percpu) {
            err = -ENOMEM;
            goto free_mod;
        }
        sechdrs[pcpuindex].sh_flags &= ~(unsigned long)SHF_ALLOC;
        mod->percpu = percpu;
    }

    /* Determine total sizes, and put offsets in sh_entsize.  For now
       this is done generically; there doesn't appear to be any
       special cases for the architectures. */
    /*
    对core section和init section中的大小及代码段的信息进行统计
    */
    layout_sections(mod, hdr, sechdrs, secstrings);
    /*
    处理符号表中的符号,返回值是core section尾部的符号表的偏移
    */
    symoffs = layout_symtab(mod, sechdrs, symindex, strindex, hdr,
                secstrings, &stroffs, strmap);

    /* Do the allocs. */
    /*
    为core section分配内存,初始化后存储在module实例的module_core成员中
     */
    ptr = module_alloc_update_bounds(mod->core_size);
    /*
     * The pointer to this block is stored in the module structure
     * which is inside the block. Just mark it as not being a
     * leak.
     */
    kmemleak_not_leak(ptr);
    if (!ptr) {
        err = -ENOMEM;
        goto free_percpu;
    }
    memset(ptr, 0, mod->core_size);
    mod->module_core = ptr;
    /*
    为init section分配内存,初始化后存储在module实例的module_init成员中。
     */
    ptr = module_alloc_update_bounds(mod->init_size);
    /*
     * The pointer to this block is stored in the module structure
     * which is inside the block. This block doesn't need to be
     * scanned as it contains data and code that will be freed
     * after the module is initialized.
     */
    kmemleak_ignore(ptr);
    if (!ptr && mod->init_size) {
        err = -ENOMEM;
        goto free_core;
    }
    memset(ptr, 0, mod->init_size);
    mod->module_init = ptr;

    /* Transfer each section which specifies SHF_ALLOC */
    DEBUGP("final section addresses:\n");
    /*
    遍历段首部表,拷贝需要占用内存的段到init section 或core section,并且调整各个段的运行时地址
    */
    for (i = 0; i < hdr->e_shnum; i++)
    {
        void *dest;
        /*
        如果当前段执行时不占用内存,则不处理
        */
        if (!(sechdrs[i].sh_flags & SHF_ALLOC))
            continue;
        /*
        如果段首部的sh_entsize的最高位设置的话,表示该段属于init section,则从module_init开始的内存中获取当前段应该存储的地址
        否则从module_core开始的内存中获取当前段应该存储的地址
        */
        if (sechdrs[i].sh_entsize & INIT_OFFSET_MASK)
            dest = mod->module_init
                + (sechdrs[i].sh_entsize & ~INIT_OFFSET_MASK);
        else
            dest = mod->module_core + sechdrs[i].sh_entsize;
        /*
        将当前段的内容从ELF文件头拷贝到指定的段(init section或core section)中
        */
        if (sechdrs[i].sh_type != SHT_NOBITS)
            memcpy(dest, (void *)sechdrs[i].sh_addr,
                   sechdrs[i].sh_size);
        /* Update sh_addr to point to copy in image. */
        /*
        更改段的运行时地址,sh_addr原先存储的地址是相对于ELF文件头的地址
        */
        sechdrs[i].sh_addr = (unsigned long)dest;
        DEBUGP("\t0x%lx %s\n", sechdrs[i].sh_addr, secstrings + sechdrs[i].sh_name);
    }
    /* Module has been moved. */
    mod = (void *)sechdrs[modindex].sh_addr;
    kmemleak_load_module(mod, hdr, sechdrs, secstrings);

#if defined(CONFIG_MODULE_UNLOAD) && defined(CONFIG_SMP)
    /*
    初始化多处理下用于引用计数的refptr成员
    */
    mod->refptr = percpu_modalloc(sizeof(local_t), __alignof__(local_t),
                      mod->name);
    if (!mod->refptr) {
        err = -ENOMEM;
        goto free_init;
    }
#endif
    /* Now we've moved module, initialize linked lists, etc. */
    /*
    初始化卸载模块时的处理
    */
    module_unload_init(mod);

    /* add kobject, so we can reference it. */
    /*
    在sysfs中创建模块对应的对象,可以在通过/sys/module/module_name查看
    */
    err = mod_sysfs_init(mod);
    if (err)
        goto free_unload;

    /* Set up license info based on the info section */
    /*
    从.modinfo段获取license对应的值,检查是否兼容,如果不是GPL兼容的,则需要设置污染标志
    */
    set_license(mod, get_modinfo(sechdrs, infoindex, "license"));

    /*
     * ndiswrapper is under GPL by itself, but loads proprietary modules.
     * Don't use add_taint_module(), as it would prevent ndiswrapper from
     * using GPL-only symbols it needs.
     */
    if (strcmp(mod->name, "ndiswrapper") == 0)
        add_taint(TAINT_PROPRIETARY_MODULE);

    /* driverloader was caught wrongly pretending to be under GPL */
    if (strcmp(mod->name, "driverloader") == 0)
        add_taint_module(mod, TAINT_PROPRIETARY_MODULE);

    /* Set up MODINFO_ATTR fields */
    /*
    根据.modinfo段设置模块信息。
    */
    setup_modinfo(mod, sechdrs, infoindex);

    /* Fix up syms, so that st_value is a pointer to location. */
    /*
    解决当前模块对其他模块的符号引用问题,并找到符号对应的值的地址
     */
    err = simplify_symbols(sechdrs, symindex, strtab, versindex, pcpuindex,
                   mod);
    if (err < 0)
        goto cleanup;

    /* Now we've got everything in the final locations, we can
     * find optional sections. */
    /*
    获取__param段的运行时地址,及其存储的对象的个数
    */
    mod->kp = section_objs(hdr, sechdrs, secstrings, "__param", sizeof(*mod->kp), &mod->num_kp);

    /*
    获取__ksymtab段的运行时地址,及其存储的对象的个数
    */
    mod->syms = section_objs(hdr, sechdrs, secstrings, "__ksymtab", sizeof(*mod->syms), &mod->num_syms);

    /*
    获取__kcrctab段的运行时地址
    */
    mod->crcs = section_addr(hdr, sechdrs, secstrings, "__kcrctab");

    /*
    获取__ksymtab_gpl段的运行时地址,及其存储的对象的个数
    */
    mod->gpl_syms = section_objs(hdr, sechdrs, secstrings, "__ksymtab_gpl", sizeof(*mod->gpl_syms), &mod->num_gpl_syms);

    /*
    获取__kcrctab_gpl段的运行时地址
    */
    mod->gpl_crcs = section_addr(hdr, sechdrs, secstrings, "__kcrctab_gpl");

    /*
    获取__ksymtab_gpl_future段的运行时地址,及其存储的对象的个数
    */
    mod->gpl_future_syms = section_objs(hdr, sechdrs, secstrings, "__ksymtab_gpl_future", sizeof(*mod->gpl_future_syms), &mod->num_gpl_future_syms);

    /*
    获取__kcrctab_gpl_future段的运行时地址。
    */
    mod->gpl_future_crcs = section_addr(hdr, sechdrs, secstrings, "__kcrctab_gpl_future");

#ifdef CONFIG_UNUSED_SYMBOLS
    /*
    获取__ksymtab_unused段的运行时地址,及其存储的对象的个数。
     */
    mod->unused_syms = section_objs(hdr, sechdrs, secstrings, "__ksymtab_unused", sizeof(*mod->unused_syms), &mod->num_unused_syms);

    /*
    获取__kcrctab_unused段的运行时地址。
    */
    mod->unused_crcs = section_addr(hdr, sechdrs, secstrings, "__kcrctab_unused");

    /*
    获取__ksymtab_unused_gpl段的运行时地址,及其存储的对象的个数。
    */
    mod->unused_gpl_syms = section_objs(hdr, sechdrs, secstrings, "__ksymtab_unused_gpl", sizeof(*mod->unused_gpl_syms), &mod->num_unused_gpl_syms);

    /*
    获取__kcrctab_unused_gpl段的运行时地址。
    */
    mod->unused_gpl_crcs = section_addr(hdr, sechdrs, secstrings, "__kcrctab_unused_gpl");
#endif
#ifdef CONFIG_CONSTRUCTORS
    /*
    获取.ctors段的运行时地址,及其存储的对象的个数。
    */
    mod->ctors = section_objs(hdr, sechdrs, secstrings, ".ctors", sizeof(*mod->ctors), &mod->num_ctors);
#endif

#ifdef CONFIG_TRACEPOINTS
    /*
    获取__tracepoints段的运行时地址,及其存储的对象的个数。
    */
    mod->tracepoints = section_objs(hdr, sechdrs, secstrings, "__tracepoints", sizeof(*mod->tracepoints), &mod->num_tracepoints);
#endif
#ifdef CONFIG_EVENT_TRACING
    /*
    获取_ftrace_events段的运行时地址,及其存储的对象的个数。
    */
    mod->trace_events = section_objs(hdr, sechdrs, secstrings, "_ftrace_events", sizeof(*mod->trace_events), &mod->num_trace_events);
#endif
#ifdef CONFIG_FTRACE_MCOUNT_RECORD
    /* sechdrs[0].sh_size is always zero */
    /*
    获取__mcount_loc段的运行时地址,及其存储的对象的个数。
    */
    mod->ftrace_callsites = section_objs(hdr, sechdrs, secstrings, "__mcount_loc", sizeof(*mod->ftrace_callsites), &mod->num_ftrace_callsites);
#endif
#ifdef CONFIG_MODVERSIONS
    if ((mod->num_syms && !mod->crcs)
        || (mod->num_gpl_syms && !mod->gpl_crcs)
        || (mod->num_gpl_future_syms && !mod->gpl_future_crcs)
#ifdef CONFIG_UNUSED_SYMBOLS
        || (mod->num_unused_syms && !mod->unused_crcs)
        || (mod->num_unused_gpl_syms && !mod->unused_gpl_crcs)
#endif
        ) {
        err = try_to_force_load(mod,
                    "no versions for exported symbols");
        if (err)
            goto cleanup;
    }
#endif

    /* Now do relocations. */
    for (i = 1; i < hdr->e_shnum; i++) {
        const char *strtab = (char *)sechdrs[strindex].sh_addr;
        unsigned int info = sechdrs[i].sh_info;

        /* Not a valid relocation section? */
        /*
        如果当前段附加的段的索引大于段的数目,则info不是一个有效的索引,不做处理。
        */
        if (info >= hdr->e_shnum)
            continue;

        /* Don't bother with non-allocated sections */
        /*
        如果段在执行过程中不占内存,则不需要进行处理。
        */
        if (!(sechdrs[info].sh_flags & SHF_ALLOC))
            continue;

        /*
        如果当前段包含重定向表项,但是没有补齐内容则调用apply_relocate来处理。(只关心64位系统)。
        */
        if (sechdrs[i].sh_type == SHT_REL)
            err = apply_relocate(sechdrs, strtab, symindex, i,mod);

        /*
        如果当前段包含重定向表项,但是可能有补齐内容则调用apply_relocate_add来处理。
        */
        else if (sechdrs[i].sh_type == SHT_RELA)
            err = apply_relocate_add(sechdrs, strtab, symindex, i,
                         mod);
        if (err < 0)
            goto cleanup;
    }

        /* Find duplicate symbols */
    /*
    检查模块导出的符号在内核导出的或其他模块导出的符号是否有重复的。
    */
    err = verify_export_symbols(mod);
    if (err < 0)
        goto cleanup;

      /* Set up and sort exception table */
      /*
    获取__ex_table段的运行时地址,及其存储的对象的个数。
    */
    mod->extable = section_objs(hdr, sechdrs, secstrings, "__ex_table",
                    sizeof(*mod->extable), &mod->num_exentries);
    sort_extable(mod->extable, mod->extable + mod->num_exentries);

    /* Finally, copy percpu area over. */
    percpu_modcopy(mod->percpu, (void *)sechdrs[pcpuindex].sh_addr,
               sechdrs[pcpuindex].sh_size);

    /*
    初始化模块中字符串表、符号表相关的成员,
       初始化core section中的字符串表和符号表。
     */
    add_kallsyms(mod, sechdrs, hdr->e_shnum, symindex, strindex, symoffs, stroffs, secstrings, strmap);
    /*
    释放用于字符串表名称映射的位图
    */
    kfree(strmap);
    strmap = NULL;

    if (!mod->taints)
    {
        /*
        处理用于debug的段,不关注这个。
        */
        struct _ddebug *debug;
        unsigned int num_debug;

        debug = section_objs(hdr, sechdrs, secstrings, "__verbose", sizeof(*debug), &num_debug);
        if (debug)
            dynamic_debug_setup(debug, num_debug);
    }

    err = module_finalize(hdr, sechdrs, mod);
    if (err < 0)
        goto cleanup;

    /* flush the icache in correct context */
    /*
    get_fs是用来获取当前进程的地址限制,当当前的限制是KERNEL_DS时,内核不会检查参数中的地址类型
    */
    old_fs = get_fs();
    set_fs(KERNEL_DS);

    /*
     * Flush the instruction cache, since we've played with text.
     * Do it before processing of module parameters, so the module
     * can provide parameter accessor functions of its own.
     */
    /*
    flush_icache_range函数中没有任何操作,不用考虑。
    */
    if (mod->module_init)
        flush_icache_range((unsigned long)mod->module_init, (unsigned long)mod->module_init + mod->init_size);
    flush_icache_range((unsigned long)mod->module_core, (unsigned long)mod->module_core + mod->core_size);

    set_fs(old_fs);

    mod->args = args;
    if (section_addr(hdr, sechdrs, secstrings, "__obsparm"))
        printk(KERN_WARNING "%s: Ignoring obsolete parameters\n",
               mod->name);

    /* Now sew it into the lists so we can get lockdep and oops
     * info during argument parsing.  Noone should access us, since
     * strong_try_module_get() will fail.
     * lockdep/oops can run asynchronous, so use the RCU list insertion
     * function to insert in a way safe to concurrent readers.
     * The mutex protects against concurrent writers.
     */
    list_add_rcu(&mod->list, &modules);

    /*
    解析插入模块时指定的参数。
    */
    err = parse_args(mod->name, mod->args, mod->kp, mod->num_kp, NULL);
    if (err < 0)
        goto unlink;
    /*
    在sysfs中创建模块相应的项
    */
    err = mod_sysfs_setup(mod, mod->kp, mod->num_kp);
    if (err < 0)
        goto unlink;
    /*
    添加段属性
    */
    add_sect_attrs(mod, hdr->e_shnum, secstrings, sechdrs);
    /*
    添加注解属性
    */
    add_notes_attrs(mod, hdr->e_shnum, secstrings, sechdrs);

    /* Get rid of temporary copy */
    vfree(hdr);

    trace_module_load(mod);

    /* Done! */
    return mod;

 unlink:
    /* Unlink carefully: kallsyms could be walking list. */
    list_del_rcu(&mod->list);
    synchronize_sched();
    module_arch_cleanup(mod);
 cleanup:
    free_modinfo(mod);
    kobject_del(&mod->mkobj.kobj);
    kobject_put(&mod->mkobj.kobj);
 free_unload:
    module_unload_free(mod);
#if defined(CONFIG_MODULE_UNLOAD) && defined(CONFIG_SMP)
    percpu_modfree(mod->refptr);
 free_init:
#endif
    module_free(mod, mod->module_init);
 free_core:
    module_free(mod, mod->module_core);
    /* mod will be freed with core. Don't access it beyond this line! */
 free_percpu:
    if (percpu)
        percpu_modfree(percpu);
 free_mod:
    kfree(args);
    kfree(strmap);
 free_hdr:
    vfree(hdr);
    return ERR_PTR(err);

 truncated:
    printk(KERN_ERR "Module len %lu truncated\n", len);
    err = -ENOEXEC;
    goto free_hdr;
}
Relevant Link:
http://bbs.chinaunix.net/thread-2194837-1-1.html
http://blog.csdn.net/wuhui_gdnt/article/details/5316616
http://blog.csdn.net/muge0913/article/details/7518568
http://blog.csdn.net/ganggexiongqi/article/details/6823960
4. LKM模块卸载原理
我们输入指令rmmod,最终在系统内核中需要调用sys_delete_module进行实现
SYSCALL_DEFINE2(delete_module, const char __user *, name_user, unsigned int, flags)
    1. name_user
    待卸载的模块名称
    2. flags
\linux-2.6.32.63\kernel\module.c
SYSCALL_DEFINE2(delete_module, const char __user *, name_user, unsigned int, flags)
{
    struct module *mod;
    char name[MODULE_NAME_LEN];
    int ret, forced = 0;

    //确保有插入和删除模块不受限制的权利,并且模块没有被禁止插入或删除
    if (!capable(CAP_SYS_MODULE) || modules_disabled)
        return -EPERM;

    //获得从用户空间传递到内核空间的模块名字
    if (strncpy_from_user(name, name_user, MODULE_NAME_LEN-1) < 0)
        return -EFAULT;
    name[MODULE_NAME_LEN-1] = '\0';

    /* Create stop_machine threads since free_module relies on
     * a non-failing stop_machine call. */
    ret = stop_machine_create();
    if (ret)
        return ret;

    //获得module_mutex锁
    if (mutex_lock_interruptible(&module_mutex) != 0) {
        ret = -EINTR;
        goto out_stop;
    }

    //得到要卸载的模块的指针
    mod = find_module(name);
    if (!mod) {
        ret = -ENOENT;
        goto out;
    }

    /*
    检查,确认没有其他模块依赖要卸载的模块
    关于linux下模块间的依赖性以及相关数据结构,请参阅另一篇文章
    http://www.cnblogs.com/LittleHann/p/3865490.html,搜索: struct module_use
    */
    if (!list_empty(&mod->modules_which_use_me)) {
        /* Other modules depend on us: get rid of them first. */
        ret = -EWOULDBLOCK;
        goto out;
    }

    /*
    Doing init or already dying?
    检查模块的状态是否是 MODULE_STATE_LIVE
    */
    if (mod->state != MODULE_STATE_LIVE) {
        /* FIXME: if (force), slam module count and wake up
                   waiter --RR */
        DEBUGP("%s already dying\n", mod->name);
        ret = -EBUSY;
        goto out;
    }

    /* If it has an init func, it must have an exit func to unload */
    if (mod->init && !mod->exit) {
        forced = try_force_unload(flags);
        if (!forced) {
            /* This module can't be removed */
            ret = -EBUSY;
            goto out;
        }
    }

    /*
    Set this up before setting mod->state
    设置等待本模块退出 的进程为current
    */
    mod->waiter = current;

    /* Stop the machine so refcounts can't move and disable module. */
    ret = try_stop_module(mod, flags, &forced);
    if (ret != 0)
        goto out;

    /*
    Never wait if forced.
    等待模块的引用计数变为0
    */
    if (!forced && module_refcount(mod) != 0)
    {
        wait_for_zero_refcount(mod);
    }

    //释放module_mutex锁
    mutex_unlock(&module_mutex);
    /*
    Final destruction now noone is using it.
    调用模块本身的exit函数
    */
    if (mod->exit != NULL)
    {
        mod->exit();
    }
    //告诉通知链module_notify_list上的监听者,模块状态 变为 MODULE_STATE_GOING
    blocking_notifier_call_chain(&module_notify_list, MODULE_STATE_GOING, mod);
    //等待所有的异步函数调用完成
    async_synchronize_full();
    mutex_lock(&module_mutex);
    /* Store the name of the last unloaded module for diagnostic purposes */
    strlcpy(last_unloaded_module, mod->name, sizeof(last_unloaded_module));
    free_module(mod);

 out:
    mutex_unlock(&module_mutex);
out_stop:
    stop_machine_destroy();
    return ret;
}
5. Monitor init_module syscall By Kprobe
关于kprobe的原理和编程方法,请参阅另一篇文章
http://www.cnblogs.com/LittleHann/p/3854977.html
(搜索: 0x4: 利用Linux内核机制kprobe机制(kprobes, jprobe和kretprobe)进行系统调用Hook)
这里需要说明的是,kprobe是linux提供的一个系统调用注册回调机制,它有3种技术(或者叫三种方法): kprobes(有s)、jprobe、kretprobe,它们对原始系统调用的代码逻辑改变情况如下
1. kprobes: A kprobe can be inserted on virtually any instruction in the kernel
kprobes_pre->系统调用->kprobes_post

2. jprobe: A jprobe is inserted at the entry to a kernel function, and provides convenient access to the function's arguments
jprobe->系统调用

3. kretprobe: A return probe fires when a specified function returns
系统调用->kretprobe
在实验中发现使用jprobe对init_module系统调用进行注册回调监控,系统在加载LKM模块的时候会出现hung住现象,很像是产生了死锁,有兴趣的朋友可以编译并运行下面的LKM代码
init_module_log.c
#include <linux/module.h>
#include <linux/kprobes.h>
#include <linux/slab.h>
#include <linux/tty.h>


static int sys_init_module_log(void __user *umod,  unsigned long len, const char __user * uargs)
{
    printk("load_module: umod=%s, len=%lu, uargs=%s\n", umod, len, uargs);

out:
    jprobe_return();
    return 0;
}

static int signal_that_will_cause_exit(int trap_number)
{
        switch(trap_number)
        {
            case SIGABRT:
            case SIGSEGV:
            case SIGQUIT:
            //TODO Other signals that we need to handle?
                return 1;
                break;
            default:
                return 0;
                break;
        }
}

static int handler_fault(struct kprobe *p, struct pt_regs *regs, int trap_number)
{
    if(signal_that_will_cause_exit(trap_number))
    {
        printk(KERN_ERR KBUILD_MODNAME ": fault handler: Detected fault %d from inside probes.", trap_number);
    }

    return 0;
}


static struct jprobe init_module_jprobe =
{
    .entry = (kprobe_opcode_t *) sys_init_module_log,
    .kp =
    {
        .symbol_name = "sys_init_module",
        .fault_handler = handler_fault,
    },
};

static int __init plant_probes(void)
{
    int err;

    err = register_jprobe(&init_module_jprobe);
    if(err < 0)
    {
        printk(KERN_ERR KBUILD_MODNAME ":\t[-] Failed to plant init_module_jprobe pre handler\n");
        return -1;
    }

    printk(KERN_INFO KBUILD_MODNAME ":\t[+] Planted init_module_jprobe pre handler\n");
    printk(KERN_INFO KBUILD_MODNAME ":\t[+] Deployed\n");

    return 0;
}

static void __exit unplant_probes(void)
{
    unregister_jprobe(&init_module_jprobe);
    printk(KERN_INFO KBUILD_MODNAME ":\t[+] Unplanted init_module_jprobe pre handler probe\n");
}

MODULE_LICENSE("GPL");
MODULE_AUTHOR("Alibaba");
MODULE_DESCRIPTION("init_module_jprobe monitor module");

//初始化内核模块
module_init(plant_probes);
module_exit(unplant_probes);
Makefile
#
# Variables needed to build the kernel module
#
name      = init_module_log

obj-m += $(name).o

all: build

.PHONY: build install clean

build:
    make -C /lib/modules/$(shell uname -r)/build M=$(PWD) modules CONFIG_DEBUG_SECTION_MISMATCH=y

install: build
    -mkdir -p /lib/modules/`uname -r`/kernel/arch/x86/kernel/
    cp $(name).ko /lib/modules/`uname -r`/kernel/arch/x86/kernel/
    depmod /lib/modules/`uname -r`/kernel/arch/x86/kernel/$(name).ko

clean:
    [ -d /lib/modules/$(shell uname -r)/build ] && \
    make -C /lib/modules/$(shell uname -r)/build M=$(PWD) clean
编译并加载后,此后无论系统加载任何驱动,整个内核都会hung住,我们接下来分析一下kprobe这个机制的代码层的具体原理,找到内核锁死的原因
0x1: How Does a Kprobes Work
对于kprobe功能的实现主要利用了内核中的两个功能特性: 异常(尤其是int 3)、单步执行(EFLAGS中的TF标志)

1. 安装一个kprobes探测点时,kprobe首先备份被探测的指令,然后使用断点指令(即在i386和x86_64的int3指令)来取代被探测指令的头一个或几个字节
When a kprobe is registered, Kprobes makes a copy of the probedinstruction and replaces the first byte(s) of the probed instructionwith a breakpoint instruction (e.g., int3 on i386
and x86_64).

2. 当CPU执行到探测点时,触发指定的断点指令,将因运行断点指令而执行trap操作,那将导致保存CPU的寄存器
When a CPU hits the breakpoint instruction, a trap occurs, the CPU's registers are saved

3. CPU将调用相应的trap处理函数。trap处理函数将调用相应的"notifier_call_chain"(内核中一种异步工作机制)中注册的所有notifier函数,并传递相应的参数(kprobe struct、CPU寄存器参数registers),kprobe正是通
过"register_xxx"向trap对应的"notifier_call_chain"注册关联到探测点的处理函数("pre_handler")来实现探测处理的(这也可以看出kprobe是充分利用了linux系统原生提供的回调机制进行监控,这种技术具有更好的稳定性)
control passes to Kprobes via the notifier_call_chain mechanism.  Kprobes executes the "pre_handler" associated with the kprobe, passing the handler the addresses of the kprobe
struct and the saved registers.

4. 接着,kprobe单步执行被探测指令的备份(即被监控的原始系统调用),通过设置EFLAGS中的TF标志位,并且把异常返回的地址修改为保存的原指令码
Next, Kprobes single-steps its copy of the probed instruction.(It would be simpler to single-step the actual instruction in place, but then Kprobes would have to temporarily remove
the breakpoint instruction.  This would open a small time window when another CPU could sail right past the probepoint.)

5. 由于开启了单步调试模式,执行完指令后会继续触发异常,这次的是do_debug异常处理流程(即do_debug()-->post_kprobe_handler())
After the instruction is single-stepped, Kprobes executes the "post_handler," if any, that is associated with the kprobe.

6. 等所有这些运行完毕后,紧跟在被探测指令后的指令流将被正常执行
Execution then continues with the instruction following the probepoint.

接下来从内核源代码的角度来分析一下kprobes的机制原理

这张图比较直观地展示了kprobes的内核机制,想要了解细节的朋友可以深入linux内核源代码文件去学习(图片较大,可以另存为后本地查看)
0x2: How Does a Jprobe Work
Jprobe、Kretprobe都复用了Kprobe的代码逻辑,但是又在kprobe的基础上进行了一些功能的封装,jprobe更关注的是对参数的"镜像访问"(因为是拷贝过来的参数,并不是原始的内核栈参数)

jprobe是Kprobes中实现的另一种调试方式,该调试方式主要为了满足调试内核函数传递的参数的情况。jprobe是基于kprobe实现的,是kprobe调试的一种扩展形式。jprobe的基本原理是利用了一个探测代理函数来接收传入参数,做相应处理后再把控制权交回被调试函数

仔细分析整个jprobes的流程其实不难发现,jprobe是基于kprobe调试方式实现的,jprobe利用了三次CPU异常,产生的前两次CPU异常都是int3异常,第 三次产生了Debug异常。jprobe主要通过代理函数的方式来实现传入参数的调试,并利用修改异常返回地址的方式来控制执行的流程
0x3: How Does a Kretprobe Work
kretprobe探测方式是基于kprobe实现的又一种内核探测方式,该探测方式主要用于在函数返回时进行探测,获得内核函数的返回值,还可以用于计算函数执行时间等方面

猜测原因:
jprobe、kprobe、kretrobe都是通过注册die_notify通知链表来获取系统的int3中断事件的,而init_module这个系统调用在初始化的时候会阻塞等待这个die_notify链表上的事件全部完成才能继续进行,这样就形成了一个互锁的
现象
    1) Init_module阻塞等待所有等待在"notifier_call_chain"链表上的函数调用(包括jprobe、kretprobe、kprobe)
    2) 而jprobe必须要单步执行完原始系统调用(init_module)之后,代码逻辑才能继续往下走,而这个时候,jprobe是不会释放在"notifier_call_chain"链表上的阻塞等待的
最终的结果是两者形成互锁
Relevant Link:
http://blog.csdn.net/liyongming1982/article/details/17102995
http://blog.chinaunix.net/uid-23769728-id-3198044.html
http://blog.itpub.net/15480802/viewspace-1162094/
http://wenku.baidu.com/view/98d7864acf84b9d528ea7ad5.html
http://www.verydemo.com/demo_c167_i3469.html
http://www-users.cs.umn.edu/~boutcher/kprobes/
http://bbs.chinaunix.net/thread-2156769-1-1.html
http://www.oenhan.com/jprobe-hw-breakpoint
http://lwn.net/Articles/132196/
http://blog.chinaunix.net/uid-387104-id-1744082.html
https://www.kernel.org/doc/Documentation/kprobes.txt
http://web.mit.edu/usmanm/MacData/afs/sipb/contrib/linux/samples/kprobes/kretprobe_example.c
Copyright (c) 2014 LittleHann All rights reserved

openEuler 是由开放原子开源基金会孵化的全场景开源操作系统项目,面向数字基础设施四大核心场景(服务器、云计算、边缘计算、嵌入式),全面支持 ARM、x86、RISC-V、loongArch、PowerPC、SW-64 等多样性计算架构
更多推荐


 10
 0
- 0


 已为社区贡献14条内容

所有评论(0)